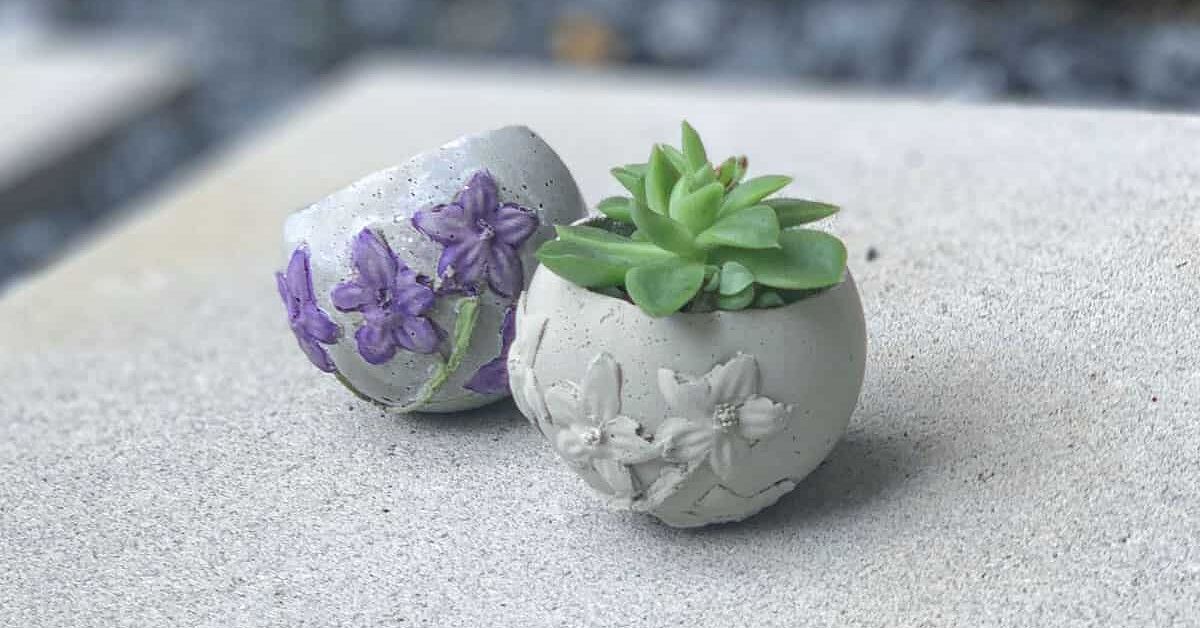
A round cement planter has a certain “tiny modern sculpture” energy. It looks clean, architectural, and expensiveyet it can be made on a worktable with a little silicone, a sphere-shaped object, and the calm confidence of someone who has watched exactly three DIY videos and now owns safety goggles. The real magic is the mold. Once you create a good silicone sphere mold for a cement planter, you can cast multiple planters with consistent curves, smooth edges, and that boutique-home-decor look without paying boutique-home-decor prices.
This guide walks you through how to create a silicone sphere mold, prepare it for cement casting, pour your planter, demold it cleanly, and finish it beautifully. You will also learn what materials work best, how to avoid common mistakes, how to add drainage, and how to make your finished cement planter look intentional rather than “I had a disagreement with a bucket.”
The process is beginner-friendly, but it does require patience. Silicone needs time to cure, cement needs time to harden, and your future planter needs time to become the elegant little orb it was born to be. Let’s make something gorgeous.
Why Use a Silicone Sphere Mold for a Cement Planter?
Silicone is one of the best mold materials for small cement and concrete crafts because it is flexible, reusable, and excellent at capturing detail. A rigid mold can trap your cement piece like a stubborn jar lid. Silicone, on the other hand, bends away from the casting, making demolding much easierespecially with rounded shapes such as spheres, bowls, and curved planter forms.
A sphere mold is especially useful because it produces a soft, modern shape that works with many decorating styles. It can look minimalist in a white cement finish, earthy in a gray concrete tone, playful with pigment, or high-end with a sealed matte surface. Use it for succulents, air plants, small herbs, or decorative moss arrangements. One mold can produce a whole family of planters, which is excellent news if you enjoy making gifts or suddenly decide every windowsill needs a cement ball with greenery in it.
Materials and Tools You Will Need
Before you begin, gather your supplies. Mold-making goes much more smoothly when everything is ready before the silicone is mixed. Two-part silicone does not care that you forgot the stir stick. It will start curing anyway, because craft supplies enjoy drama.
Materials
- A smooth sphere to use as the original model, such as a glass globe, plastic ornament, foam ball sealed with acrylic spray, or small decorative ball
- Two-part silicone mold-making rubber
- A mold box or container slightly larger than your sphere
- Hot glue or strong tape for securing the model
- Mold release, if recommended by your silicone product
- Cement mix, concrete mix, or fine casting cement
- Water
- A smaller inner form to create the planter cavity
- A straw, dowel, or silicone plug for the drainage hole
- Sandpaper or sanding sponge
- Concrete sealer, optional but recommended
- Potting mix and a small plant
Tools
- Disposable mixing cups
- Stir sticks
- Digital scale, if your silicone is measured by weight
- Utility knife or craft blade
- Gloves
- Safety glasses
- Dust mask or respirator suitable for fine cement dust
- Plastic sheeting, cardboard, or newspaper to protect your workspace
Safety First: Cement Is Not Just Gray Flour
Cement and concrete craft projects are fun, but dry cement dust and wet cement should be handled carefully. Wear gloves, eye protection, and a dust mask or respirator when measuring and mixing dry cement. Work in a well-ventilated area, and avoid breathing dust. Wet cement is highly alkaline and can irritate or burn skin, so do not mix it barehanded, no matter how much your inner pottery goblin wants to feel the texture.
Keep water nearby for cleanup, but do not rinse large amounts of cement slurry down household drains. Let leftover cement harden in a disposable container, then dispose of it according to your local rules. Also, protect your table. Silicone and cement are both excellent at creating “permanent memories” on surfaces you thought were safe.
Step 1: Choose the Right Sphere Shape
Your mold will copy the original object, so choose your sphere carefully. A glass globe, plastic ornament, or smooth ball works well. The smoother the model, the smoother your planter will be. If your object has seams, scratches, or texture, those details may transfer into the silicone mold and then into the cement casting.
For a planter, a sphere between 2.5 and 5 inches wide is a practical beginner size. Smaller spheres are cute but may not leave much room for soil. Larger spheres make a stronger design statement but require more silicone and cement. If this is your first silicone mold, begin with a modest size. Your wallet will thank you, because silicone is wonderful but not shy about its price tag.
Step 2: Build a Simple Mold Box
A mold box holds the silicone around your sphere while it cures. You can use a plastic container, acrylic box, cardboard coated with packing tape, a cut plastic bottle, or a custom foam-board box. The mold box should leave at least half an inch of space around the sphere on all sides. Too little silicone makes a weak mold; too much wastes material.
Attach the sphere to the base of the mold box using hot glue, strong double-sided tape, or clay. Make sure it cannot float once silicone is poured. Floating is adorable in a bathtub, not in mold-making. If the sphere rises or shifts, your mold thickness becomes uneven and the final casting may be awkward.
If you plan to make a one-piece cut mold, position the sphere so it can later be removed by cutting a clean slit in the cured silicone. If your original sphere is fragile or valuable, do not use it. Mold-making can be gentle, but there is always a chance of scratches, residue, or an extraction battle.
Step 3: Seal Porous Objects
If your sphere is made of foam, wood, plaster, unglazed ceramic, or another porous material, seal it before pouring silicone. Porous objects can trap silicone, release bubbles, or bond too strongly to the mold. A few light coats of acrylic spray sealer can create a smoother, safer surface. Let the sealer dry completely before moving forward.
For glass, plastic, or polished metal, sealing may not be necessary. However, check the instructions for your specific silicone product. Some materials can interfere with silicone curing, especially certain clays, sulfur-containing materials, or uncured coatings. When in doubt, test a small amount first.
Step 4: Apply Mold Release If Needed
Many silicone mold-making rubbers do not stick aggressively to smooth nonporous surfaces, but mold release can still make demolding easier. Use a release agent compatible with your silicone and your model material. Apply a thin, even layer. More is not always better; too much release can blur fine surface details or leave a residue.
If you are making a two-part mold, release agent becomes especially important between silicone layers. Silicone bonds beautifully to itself unless told not to, so forgetting release between halves can turn your clever two-part mold into one rubbery block of regret.
Step 5: Measure and Mix the Silicone
Two-part silicone usually includes Part A and Part B. Some products mix by equal volume, while others require precise ratios by weight. Follow the manufacturer’s instructions exactly. Guessing with silicone ratios is like guessing in baking: sometimes you get a cake, sometimes you get a science lesson.
Mix slowly and thoroughly, scraping the sides and bottom of the cup. Fast whipping introduces air bubbles. For a sphere mold, bubbles against the model surface can create bumps or pits in your finished cement planter. Stir until the silicone color and texture look uniform. If your silicone has a short working time, move efficiently but do not panic-stir like you are rowing away from a crocodile.
Step 6: Pour the Silicone Carefully
Pour the silicone in a thin stream into one corner of the mold box and let it rise around the sphere naturally. This technique helps reduce trapped air. Avoid pouring directly onto the top of the sphere if you can, because that can trap bubbles against the surface.
Once poured, gently tap the mold box on the table to encourage bubbles to rise. You can also use a toothpick to tease bubbles away from visible edges. Let the silicone cure undisturbed according to the product instructions. Cure times vary, so check the label. Do not demold early. Silicone that looks cured on the surface may still be soft inside, and a torn mold is a heartbreaking little pancake.
Step 7: Remove the Sphere and Cut the Mold
After the silicone has fully cured, remove the mold box. If the sphere does not pop out easily, use a sharp craft knife to create a careful slit down one side of the mold. Cut in a wavy or zigzag line rather than a perfectly straight line. This helps the mold register back together accurately when you cast cement later.
Open the silicone gently and remove the original sphere. Inspect the inside surface. It should be smooth and clean. Trim any ragged silicone edges, but avoid cutting too much. The goal is a flexible mold that opens enough for release but closes neatly enough to hold wet cement without leaking.
Step 8: Create the Planter Cavity
A cement planter needs a hollow center for soil and roots. The easiest method is to use a smaller inner form during casting. This could be a small plastic cup, a rounded cap, a silicone plug, a foam ball wrapped in plastic, or another smooth object shaped like the cavity you want.
For a sphere planter, the cavity should sit slightly above center so the finished piece has a stable bottom and enough depth for planting. If the cavity goes too low, the planter may be thin and fragile. If it sits too high, it may look like a cement bowl pretending to be a planter. Aim for balanced walls, usually at least a quarter inch thick for small planters and thicker for larger ones.
Step 9: Add a Drainage Hole
Drainage matters. Most plants dislike sitting in soggy soil, and a planter without drainage can quickly become a tiny swamp with ambitions. To create a drainage hole, insert a straw, dowel, silicone rod, or oiled plug from the cavity area down to the base of the planter. Make sure it stays in place while the cement is poured.
If you prefer a cachepot style, you can skip the drainage hole and use the cement sphere as a decorative outer container. In that case, keep the plant in a nursery pot with its own drainage holes and remove it for watering. This method protects both the plant and the cement finish.
Step 10: Mix the Cement
For small silicone molds, fine cement or a smooth concrete mix works best. Large gravel aggregate can make the surface rough and may not flow well into small rounded molds. Add water gradually and mix until the cement reaches a thick batter consistency. It should be pourable but not watery.
Too much water weakens the finished planter and may create more surface bubbles. Too little water makes the mix hard to pack into the mold. A good mix should slide slowly off your stir stick, like pancake batter with a serious personality.
You can customize the cement by adding concrete pigment, white cement, fine sand, or small decorative aggregate, but keep the mold size in mind. For a polished sphere planter, simple is often better. A clean gray or soft white finish lets the shape shine.
Step 11: Cast the Cement Planter
Close the silicone mold and secure it with rubber bands, painter’s tape, or a mold jacket if needed. Place it upright in a cup, bowl, or support container so it does not wobble while you pour. Pour a small amount of cement first and rotate or tap the mold to coat the inner surface. This helps reduce air pockets on the visible exterior.
Continue filling the mold, then insert your inner cavity form. Press it down slowly until the planter depth looks right. Cement will rise around it, so work over a protected surface. Add the drainage plug if you have not already positioned it. Tap the mold gently to release bubbles, then check that the inner form remains centered.
If the inner form floats upward, weigh it down with small stones, coins, or tape stretched across the top of the mold. Do not use so much weight that it sinks too far. The mission is “centered planter cavity,” not “cement donut.”
Step 12: Let the Cement Cure
Leave the casting undisturbed until it is firm enough to demold. Many small cement crafts can be demolded after about 24 hours, but timing depends on the product, water ratio, mold size, temperature, and humidity. When the cement feels hard and no longer fragile, gently open the silicone and remove the planter.
Even after demolding, cement continues to cure and gain strength. Keep the planter slightly damp or loosely covered with plastic for a longer cure if your cement product recommends it. This helps reduce rapid moisture loss and can improve durability. Avoid planting immediately if the cement still feels very fresh or damp.
Step 13: Sand and Finish the Planter
Once the planter is dry enough to handle comfortably, sand rough edges with fine-grit sandpaper or a sanding sponge. Focus on the rim, base, drainage hole, and any seam line from the mold. A small seam is normal, especially with cut molds. You can embrace it as handmade character or sand it smoother for a cleaner finish.
For a more refined look, wipe away dust and apply a concrete sealer. A sealer can reduce water absorption, limit staining, and give the surface a finished appearance. Choose matte sealer for a natural modern look or satin sealer for a subtle glow. Avoid glossy finishes unless you want the planter to say, “I host rooftop cocktail parties.”
Design Ideas for a Stunning Cement Sphere Planter
Minimalist White Cement
Use white cement or a white casting mix for a clean, gallery-style planter. Pair it with a jade plant, echeveria, or small cactus. The contrast between the soft plant texture and the smooth spherical cement is simple but striking.
Color-Pigmented Cement
Add concrete pigment to create charcoal, terracotta, sage, blush, or deep green planters. Start with a small amount of pigment and increase gradually. Too much pigment may affect the mix, so follow product guidance.
Terrazzo-Inspired Finish
Add tiny chips of colored stone, crushed glass made for crafts, or decorative aggregate to the cement surface. After curing, sand lightly to reveal the speckled pattern. This takes more effort, but the result can look like something from a design shop with suspiciously expensive candles.
Half-Dipped Paint Effect
After sealing the cement, paint the lower half with outdoor acrylic paint. Use painter’s tape to create a clean line. Black, gold, cream, or muted green can make the sphere feel custom and modern.
Common Mistakes and How to Avoid Them
Using the Wrong Cement Texture
Chunky concrete mixes can be difficult in small molds. Use a fine cement mix for smoother results. If your mix contains large stones, sift them out or choose another product.
Adding Too Much Water
Watery cement may seem easier to pour, but it can weaken the planter and increase surface imperfections. Add water slowly until the mix is workable.
Demolding Too Early
If the cement has not hardened enough, edges can crumble or the sphere can crack. Patience is cheaper than remaking the whole thing.
Forgetting Drainage
A planter needs a way to release excess water unless it is being used as a decorative cachepot. Plan the drainage hole before casting, not after your succulent starts sending emotional distress signals.
Not Supporting the Mold
Silicone is flexible, which is helpful for demolding but risky during pouring. Support the mold in a cup, sand bed, or custom holder to keep the sphere round and stable.
How to Care for Your Finished Cement Planter
Let your planter cure fully before planting. Rinse it, allow it to dry, and seal it if desired. Use a well-draining potting mix, especially for succulents and cacti. If the planter has a drainage hole, place a small tray beneath it. If it does not, use a nursery pot inside the sphere and remove the plant when watering.
Cement planters can develop a natural patina over time. This is part of their charm. If you prefer a cleaner look, wipe the surface occasionally with a damp cloth. Avoid harsh acidic cleaners, which may affect the cement finish.
Experience Notes: Lessons From Making Silicone Sphere Molds for Cement Planters
The first thing you learn when making a silicone sphere mold is that the mold is the project. The cement planter feels like the grand finale, but the mold determines whether that finale gets applause or awkward silence. A smooth, well-supported, properly cut silicone mold can produce beautiful castings again and again. A rushed mold, however, will repeat the same mistake every time like a tiny rubber photocopier of regret.
One helpful experience is to practice with a smaller sphere before making a larger one. Small molds use less silicone and teach you how your chosen product behaves. You will learn how quickly it thickens, how many bubbles it traps, and how flexible it feels after curing. This small test can save money and frustration. It also gives you a useful mini planter, so even the practice round can become a windowsill win.
Another lesson is to think about the planter opening before you pour the silicone. A sphere is naturally closed, but a planter needs an opening. If the opening is too narrow, planting becomes difficult. If it is too wide, the sphere loses some of its sculptural charm. A good balance is an opening wide enough for soil and roots but small enough to preserve the rounded silhouette. Before casting cement, place your inner form inside the mold and visually check the proportions. This two-minute preview prevents the classic “why does this look like a cereal bowl?” moment.
Supporting the silicone mold during casting is also more important than beginners expect. Silicone bends under the weight of wet cement. If the mold bulges, your sphere may cure into a charming but not exactly spherical potato. Nest the mold in a cup, bowl, sand, rice, or a custom cardboard cradle. The support should hold the mold evenly without squeezing it out of shape.
Surface bubbles are another common adventure. Tapping the mold helps, but the best trick is to brush or swirl a thin first layer of cement around the inside surface before filling the rest. This “detail coat” reaches the visible surface and reduces pitting. If a few bubbles remain, do not panic. Small imperfections can look handmade and natural. If you want a cleaner finish, fill tiny pits later with a thin cement slurry, let it dry, and sand lightly.
Drainage planning deserves special attention. A beautiful cement sphere planter can still fail as a plant home if water collects at the bottom. A simple straw or small dowel can create a clean drainage channel during casting. Coat it lightly with release or twist it out before the cement becomes rock hard. If the drainage hole is rough, clean it with a small file after curing. Your plant will not write a thank-you note, but it will look healthier, which is basically the plant version of applause.
Finally, do not underestimate finishing. Sanding the rim, smoothing the base, and applying a sealer can take the planter from “homemade” to “handcrafted.” Those words are cousins, but one gets better compliments. A matte sealer is usually the safest choice for a modern cement look. Add a small succulent, top-dress with pebbles, and suddenly your silicone sphere mold has produced a planter that looks like it belongs beside a designer lamp and a very confident coffee table book.
Conclusion
Creating a stunning silicone sphere mold for a cement planter is a satisfying project because it combines creativity, practicality, and just enough mess to feel like a real DIY victory. With the right sphere model, a carefully built mold box, properly mixed silicone, and a thoughtful casting setup, you can make smooth, reusable molds that produce beautiful cement planters again and again.
The key is patience. Let the silicone cure fully. Let the cement harden properly. Sand the edges. Add drainage. Seal the surface if you want a polished finish. Each small step adds up to a planter that looks intentional, durable, and stylish. And once you have one great mold, you can experiment with pigments, finishes, textures, and plant combinations until your home slowly becomes a tasteful cement-planter showroom. Honestly, there are worse problems to have.