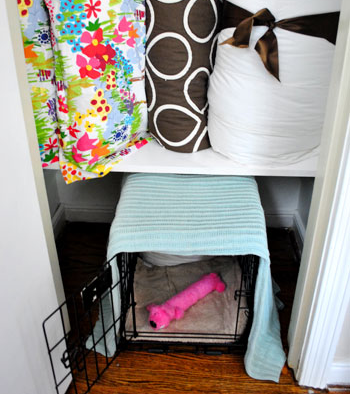
Building an extra closet shelf to integrate a dog crate is one of those home projects that sounds suspiciously simple until you are standing in the closet with a tape measure, a nervous dog, and a shelf board that suddenly appears to be judging your life choices. The good news? This project is completely doable for many DIY-minded homeowners, and it can transform an awkward crate setup into a tidy, functional, pet-friendly storage zone.
The idea is straightforward: create a strong shelf above, around, or partially framing a dog crate so the crate fits neatly into a closet without wasting vertical space. Instead of letting the crate sit like a metal suitcase in the middle of the room, you give it a dedicated home. Your dog gets a cozy den, your closet gets smarter storage, and your hallway no longer looks like a pet supply aisle exploded with enthusiasm.
Done well, a closet dog crate integration can look intentional, polished, and surprisingly stylish. Done poorly, it can block airflow, sag under weight, or make your dog feel like they have been assigned to the broom closet. This guide walks through planning, measuring, materials, safety, installation, design details, and real-world experience so you can build a shelf that works for both your storage needs and your four-legged roommate.
Why Integrate a Dog Crate Into a Closet?
Dog crates are useful, but they are not exactly subtle. Even the nicest wire crate can dominate a bedroom, mudroom, laundry area, or entryway. Integrating a dog crate into a closet allows you to reclaim floor space while keeping the crate accessible and comfortable.
This project is especially helpful in small homes, apartments, condos, and houses with limited storage. If your closet has unused vertical space above the crate, an extra shelf creates room for leashes, grooming supplies, blankets, seasonal items, toys, or bins. It also gives the crate a defined footprint, which makes the overall room feel less cluttered.
There is also a comfort factor. Many dogs like den-like spaces, and a properly placed crate can become a safe retreat. The key phrase is properly placed. A crate should never be sealed inside a stuffy closet, hidden behind a closed door for long periods, or surrounded by items that can fall, poke, rattle, overheat, or tempt chewing. This project is about smart integration, not turning your dog into a secret agent stationed behind the winter coats.
Start With the Dog, Not the Shelf
Before buying wood or brackets, measure your dog and evaluate the crate. A correct crate size should allow your dog to stand up, turn around, and lie down comfortably. If the crate is too small, it is uncomfortable. If it is excessively large for a puppy during house training, it may not provide the den-like structure that makes crate training effective.
Also consider your dog’s temperament. A calm adult dog that already enjoys the crate is a great candidate for a closet integration. A dog with separation anxiety, escape behavior, destructive chewing, or crate panic may need training support before you make the crate more built-in. If your dog claws, bites bars, bends crate doors, or salivates heavily when confined, the shelf project can wait. Your walls will understand.
Basic Comfort Rules
Keep the crate in a space with airflow, visibility, and easy access. A closet door should remain open or be removed if the crate is used regularly. Avoid placing the crate near heat registers, radiators, direct sun, damp exterior walls, or drafty doorways. Add a washable crate mat or blanket if your dog does not chew bedding. Leave enough space around the crate for the door to swing open fully and for you to clean beneath and behind it.
Choose the Right Closet
Not every closet deserves a dog crate. Some closets are narrow, hot, poorly ventilated, or packed with items that could fall. The best closet for this project is one with a wide opening, good airflow, sturdy wall framing, and enough depth for the crate without crushing the room’s traffic flow.
A reach-in closet in a mudroom, laundry room, guest room, office, or entry area often works well. A bedroom closet can work too, especially if the dog sleeps nearby at night. However, avoid closets where the crate would be trapped behind sliding doors or buried under hanging clothes. Dogs deserve dignity. Also, nobody wants a sleeve dangling into the crate like a chew toy with a mortgage.
Closet Measurements to Take
Measure the closet width, depth, height, baseboard thickness, door opening width, and the crate’s full dimensions. Include the crate door when open. Also measure the height of any existing shelf or rod. You may remove or adjust a closet rod if the new layout focuses on pet storage instead of hanging clothing.
For the shelf itself, decide whether it will sit directly above the crate, span the full closet width, or form part of a built-in cubby. The simplest version is a sturdy shelf installed several inches above the crate. More advanced versions include side panels, a face frame, lower trim, storage bins, or a removable crate platform.
Plan for Clearance, Ventilation, and Cleaning
The shelf should not press against the top of the crate. Leave a practical gap above the crate for airflow, hand access, and easy crate removal. For many setups, 2 to 4 inches above the crate is the minimum working clearance, but more is better if you can spare it. If you store soft bins above the crate, make sure nothing droops over the ventilation openings.
Leave side clearance too. Wire crates ventilate through the sides, and plastic crates often rely on side and rear vents. Crowding the crate against walls, bins, laundry baskets, or hanging coats can reduce airflow. A crate tucked into a closet should still feel open enough that your dog can see out and breathe comfortably.
Cleaning matters as much as looks. Dogs shed. Blankets migrate. Treat crumbs appear as if summoned by tiny snack ghosts. Build the shelf so the crate can slide out without dismantling the whole closet. If the crate sits on the floor, use a washable mat underneath or protect the flooring with a durable, non-slip surface.
Materials and Tools You Will Need
The materials depend on your closet size and design, but a basic extra closet shelf usually requires plywood or solid wood, wall cleats, screws, anchors if needed, brackets, sandpaper, primer, paint or stain, and finishing trim if you want a cleaner look.
Recommended Materials
- 3/4-inch plywood, solid pine, or quality shelving board for the shelf
- 1×2 or 1×3 lumber for wall cleats
- Wood screws long enough to reach wall studs securely
- Heavy-duty shelf brackets if the span is wide or the load is heavy
- Wood glue for optional front-edge reinforcement
- Primer and low-odor interior paint or a pet-safe finish once cured
- Edge banding, trim, or a 1×2 front lip to reduce sag and improve appearance
- Stud finder, level, drill, saw, measuring tape, pencil, and safety glasses
For most closet shelf projects, wood cleats attached to studs on the back and side walls provide strong support. If studs are not where you need them, use appropriate wall anchors, but do not rely on lightweight drywall anchors for a shelf that may hold heavy bins. The shelf above a dog crate should be stable enough that nothing shifts or rattles when the dog moves below.
Step-by-Step: Building the Extra Closet Shelf
Step 1: Empty and Prep the Closet
Remove everything from the closet, including old shelves or rods that interfere with the new layout. Patch holes, sand rough spots, and clean the walls. If you plan to paint, do it before installing the shelf. Painting inside a closet after a shelf goes in is possible, but it requires the flexibility of a gymnast and the patience of a saint.
Step 2: Place the Crate and Mark the Shelf Height
Set the dog crate in the closet exactly where it will live. Open the crate door fully and confirm that it does not hit trim, walls, or the closet frame. Mark the top of the crate on the wall, then mark your shelf height above that point. Add enough clearance for airflow and easy removal.
If the crate has a top handle, latch, or folding mechanism, account for that too. You do not want to build a shelf so perfectly close that you need a butter knife and a motivational speech to remove the crate later.
Step 3: Locate the Studs
Use a stud finder to locate studs on the back wall and side walls. Mark stud locations slightly above or below your cleat line so they remain visible while you work. Stud attachment is one of the biggest differences between a shelf that lasts and a shelf that slowly becomes modern art.
Step 4: Cut and Install the Cleats
Cut the back cleat to fit the rear wall. Cut side cleats deep enough to support the shelf along both sides. Use a level to draw straight guide lines. Pre-drill pilot holes, then screw the cleats into studs. The top edge of each cleat should sit exactly where the underside of the shelf will rest.
If your closet walls are not perfectly square, do not panic. Most closets have at least one wall that seems to have been framed during a dramatic thunderstorm. Measure carefully, test-fit pieces, and scribe or trim as needed.
Step 5: Cut the Shelf Board
Measure the closet width at the front and back, because the two numbers may not match. Cut the shelf to fit the smallest measurement, leaving a tiny allowance so it can slide into place. For a deeper closet, consider a shelf depth that allows storage without blocking the crate’s airflow or making the back of the shelf impossible to reach.
Sand the edges smooth. If using plywood, finish the front edge with trim, iron-on edge banding, or a 1×2 board glued and nailed to the face. A front lip can make the shelf look more built-in and help resist sagging.
Step 6: Add Brackets or Center Support if Needed
For long spans, heavy storage, or shelves made of material more likely to sag, add a center bracket or vertical support. A vertical divider beside the crate can create a neat cubby and support the shelf at the same time. Just make sure it does not pinch the crate or reduce ventilation.
If the shelf will hold only blankets and lightweight bins, cleats may be enough. If it will hold tools, bulk pet food, books, or mystery boxes labeled “miscellaneous,” add more support. “Miscellaneous” is often heavier than it looks. It contains forgotten chargers, old hardware, and emotional baggage.
Step 7: Secure the Shelf
Place the shelf on the cleats and check for level. Once it fits correctly, secure it to the cleats with screws from above or angled fasteners where appropriate. The shelf should not wobble, bounce, or shift. If the dog bumps the crate, the shelf should remain quiet and solid.
Step 8: Finish the Surface
Prime and paint the shelf, or apply stain and a clear finish. Let finishes cure fully before placing the crate back in regular use. Choose low-odor products and ventilate the area well. Dogs have sensitive noses, and fresh paint fumes do not make a luxury spa experience for anyone.
Step 9: Reinstall the Crate and Organize Storage
Slide the crate into place. Open and close the door several times. Check airflow, visibility, and clearance. Then organize the shelf with labeled bins, baskets, or folded bedding. Store only dog-safe items directly above the crate. Avoid heavy objects, glass containers, cleaning chemicals, sharp tools, or anything your dog could pull through the bars.
Smart Storage Ideas Above the Crate
The shelf above the crate is prime real estate. Use it for lightweight, pet-related items that you reach for often. Good options include spare leashes, harnesses, poop bags, grooming wipes, towels, blankets, seasonal dog sweaters, puzzle toys, travel bowls, and extra crate mats.
Use bins with smooth sides so they do not snag on the wall or drop small items into the crate. If the shelf is high, choose clear bins or add labels. A closet shelf should make life easier, not turn every walk into a treasure hunt for the leash.
What Not to Store Above the Crate
Do not store cleaning products, medications, heavy paint cans, tools, holiday glassware, or open food bags above the crate. If something falls, leaks, or smells tempting, your dog is the one directly below it. Keep the area calm, safe, and boring in the best possible way.
Design Options That Look Built-In
If you want the project to look more custom, paint the shelf and cleats the same color as the closet interior. Add a simple face frame to hide the shelf edge. Install a small battery-powered motion light above the shelf, not inside the crate, to make the closet easier to use. Use matching bins for a boutique-style look.
You can also remove closet doors and replace them with a curtain, bifold opening, or nothing at all. For a dog crate, an open closet often works better than a closed one. If you want visual softness, hang curtains to the sides, but do not close them tightly when your dog is inside. Ventilation comes before aesthetics. Cute is nice. Oxygen is non-negotiable.
Common Mistakes to Avoid
Mistake 1: Building Too Tight Around the Crate
A tight fit may look sleek, but it can create heat, airflow, and cleaning problems. Leave room around the crate so the setup remains practical.
Mistake 2: Ignoring Studs
Shelves need real support. Whenever possible, attach cleats and brackets to studs. Drywall alone is not a storage system. It is a wall covering with confidence issues.
Mistake 3: Storing Heavy Items Over the Dog
Keep the overhead shelf light and secure. If you would not want an item falling near your foot, do not store it above your dog’s head.
Mistake 4: Closing the Closet Door
A dog crate inside a closet should not become an enclosed box inside another enclosed box. Keep the space open, ventilated, and comfortable.
Mistake 5: Forgetting the Dog’s Opinion
Introduce the new setup gradually. Let your dog explore the crate in its new location with the door open. Add treats, praise, and short positive sessions. If your dog seems worried, slow down. A built-in crate should feel like a bedroom, not a filing cabinet.
Safety Checklist Before You Call It Done
- The shelf is level, secure, and attached to studs or proper anchors.
- The crate can be removed for cleaning.
- The crate door opens fully and latches correctly.
- There is airflow on multiple sides of the crate.
- No heavy, toxic, sharp, or breakable items are stored above the dog.
- No cords, dangling fabric, or loose trim can be chewed through the crate.
- The closet remains open and comfortable while the crate is in use.
- Your dog can stand, turn around, and lie down comfortably inside the crate.
Budget and Time Expectations
A simple extra closet shelf can often be built as a weekend project. If you already own basic tools, the main expenses are wood, screws, brackets, paint, and storage bins. A basic shelf may cost relatively little, while a more finished built-in with trim, paint, lighting, and custom dividers will cost more.
The biggest time investment is usually planning and fitting. Closets are notorious for being uneven, and old walls may require extra patching or creative trimming. Take your time with measuring. A careful plan prevents the classic DIY moment where you cut the board twice and it is still too short.
When to Hire a Professional
Consider hiring a carpenter or handyman if your closet has electrical wiring, plumbing, damaged drywall, uneven framing, or if you want a fully custom built-in. Also get help if the shelf will support significant weight or if you are unsure how to anchor it safely. DIY confidence is wonderful, but gravity has never cared about enthusiasm.
Extra Experience: What This Project Teaches You in Real Life
After working through a project like building an extra closet shelf to integrate a dog crate, the first lesson is that measuring is not a single step. It is a lifestyle. You measure the crate, then the closet, then the crate again because suddenly the latch sticks out farther than you remembered. You measure the wall at the back and the front because the closet may be wider in one spot than another. You measure the dog too, because the whole point is to build around an actual living creature, not a decorative storage cube with paws.
The second lesson is that comfort beats perfection. A shelf that looks beautiful but makes the crate dark, stuffy, or difficult to access is not a good shelf. The best version of this project is not necessarily the fanciest one. It is the one where your dog walks in happily, the door opens smoothly, the bedding is easy to wash, and you can grab a leash without knocking three bins onto your head. Practical design has its own kind of elegance.
Another experience worth mentioning is the importance of test-fitting everything before final installation. Place the crate in the closet. Put a temporary board where the shelf will go. Open the crate door. Reach inside. Pretend you are changing the bedding. Pretend your dog dropped a treat in the far back corner and is now looking at you like this is a personal emergency. These small tests reveal problems that drawings do not show.
You may also discover that closet organization becomes easier once the crate has a designated zone. Instead of random pet supplies living in five different places, the shelf creates a command center. One bin can hold walking gear. Another can hold grooming items. A third can hold extra blankets. Suddenly, the dog has a better-organized lifestyle than most adults during tax season.
Noise is another real-world detail. If the shelf is loose or the bins rattle, some dogs may become uncomfortable. Add felt pads under bins, secure the shelf tightly, and avoid metal baskets directly above a wire crate if your dog is sound-sensitive. The goal is calm. A crate area should not sound like a tiny garage band every time your dog turns around.
Finally, expect to adjust after a week or two. You might move the bins, add a hook for the leash, raise a curtain tieback, or swap the crate mat for something easier to clean. A good DIY project evolves with daily use. Once you see how your dog enters, exits, rests, and reacts to the space, you can fine-tune the setup. That is the difference between a shelf that simply exists and a shelf that genuinely improves your home.
Conclusion
Building an extra closet shelf to integrate a dog crate is a smart way to combine pet comfort with better home organization. The project works best when you plan around your dog first, then design the shelf around safety, airflow, support, and easy cleaning. Use strong materials, anchor supports properly, keep storage lightweight above the crate, and avoid turning the closet into an enclosed space.
With careful measuring and a little patience, you can create a tidy crate nook that feels intentional rather than improvised. Your dog gets a cozy resting place, you get extra storage, and your closet gets promoted from clutter cave to functional pet-friendly design feature. Everybody wins, including the tape measure, which finally gets the respect it deserves.