Turning a PlayStation 4 into a portable gaming setup sounds like something a hardware wizard would attempt in a garage filled with solder fumes, caffeine, and questionable life choices. But the good news is that a simple portable PS4 build does not have to be a sci-fi engineering project. You do not need to shrink the console into a handheld shell, design a custom motherboard, or whisper sweet motivational quotes to a lithium battery pack at 2 a.m. A practical portable PS4 setup can be built with smart component choices, careful airflow, reliable power, and a compact display.
The idea is straightforward: take the PS4 you already own, pair it with a portable monitor, organize the power and cables, add protection for travel, and create a setup that can be moved from room to room, taken to a friend’s house, used in a dorm, or packed for a weekend gaming session. It is not a Nintendo Switch. It is not a PlayStation Portal. It is a real PS4 running games locally, just in a smaller, cleaner, more travel-friendly package.
This guide explains what makes a portable PS4 build work, which version of the console is easiest to use, what parts matter most, how to think about battery power, and what mistakes can turn a fun DIY project into a noisy plastic toaster. Let’s build something simple, useful, and slightly cooler than balancing a console on a folding chair next to a TV.
What Is a Portable PS4 Build?
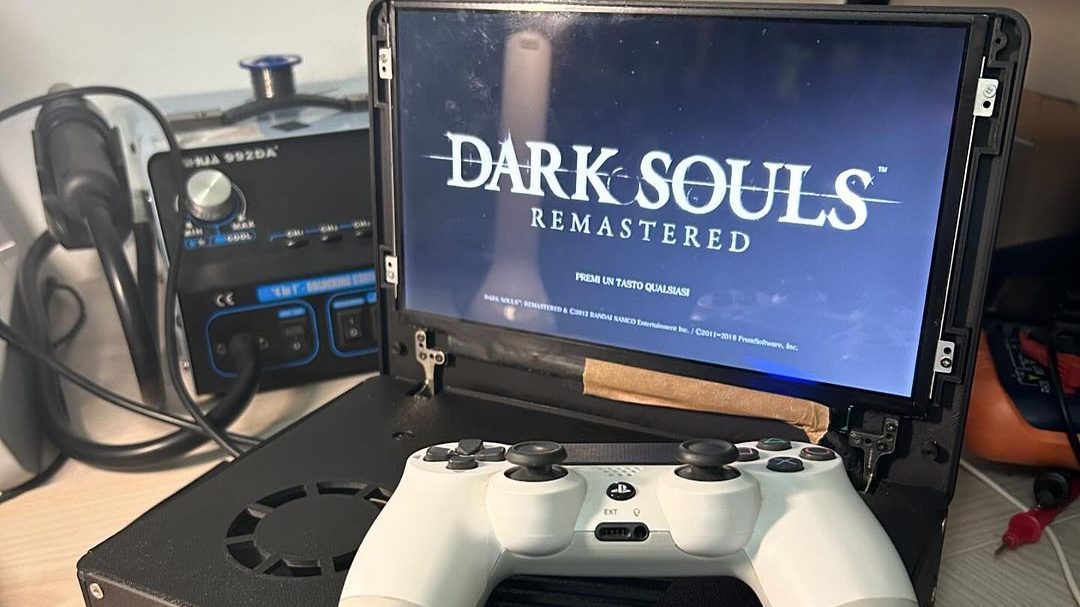
A portable PS4 build is a compact gaming station that combines a PS4 console, screen, power solution, controller, and cable management into one movable setup. Some creators go all-in and create true handheld PS4 systems by removing the motherboard, trimming the shell, adding custom cooling, and wiring battery packs. Those builds are impressive, but they are not beginner-friendly. They require advanced electronics knowledge, 3D printing, thermal management, and a strong tolerance for “oops, that connector was important.”
A simple portable PS4 build takes a more realistic approach. Instead of rebuilding the console from scratch, you keep the PS4 mostly intact and design a portable station around it. Think of it as a console travel kit: a slim monitor, a secure case, short HDMI cable, compact power options, and enough airflow to keep the system healthy.
This style of build is ideal for players who want flexibility without permanently modifying expensive hardware. It is also easier to repair, upgrade, and pack away. If something fails, you replace a cable or monitor instead of diagnosing a custom power board that looks like it was assembled during a thunderstorm.
Why the PS4 Slim Is the Best Choice
The PS4 family includes the original PS4, the PS4 Slim, and the PS4 Pro. For portability, the PS4 Slim is usually the sweet spot. It is lighter and smaller than the PS4 Pro while still offering excellent access to the PS4 game library. It also uses less power than the Pro, which matters when you are trying to run a console from a compact power station or battery setup.
The PS4 Slim has enough performance for mainstream PS4 gaming, supports HDMI output, includes built-in Wi-Fi and Bluetooth, and keeps the familiar DualShock 4 experience. The PS4 Pro delivers better performance in enhanced games and supports higher-end display features, but it is larger, heavier, and more power-hungry. If your goal is a clean portable PS4 setup, the Slim is the sensible hero. The Pro is the gym bro of the family: powerful, impressive, and not exactly light on snacks.
Core Parts for a Simple Portable PS4 Setup
You can build a practical portable PS4 with a short parts list. The exact brands are flexible, but the categories matter. Choose reliable parts over mystery gadgets with names that look like someone dropped a keyboard.
1. PS4 Slim Console
A used PS4 Slim is often the best starting point. Before building around it, clean the vents, check the HDMI port, test Wi-Fi, confirm that the controller pairs properly, and update the system software. If the console sounds like a jet engine preparing for takeoff, clean it before making it portable. Portability should not mean carrying around a tiny leaf blower.
2. Portable HDMI Monitor
A 13.3-inch to 15.6-inch portable monitor is a strong match for the PS4. Look for 1080p resolution, HDMI input, built-in speakers or headphone output, and a separate power input. Many portable monitors use USB-C for power and mini-HDMI or full-size HDMI for video. A 1080p display is usually enough because most PS4 games target 1080p, and it keeps the setup affordable.
3. Short HDMI Cable
A short HDMI cable reduces clutter and helps the build feel intentional. A right-angle HDMI adapter can also help if your case layout is tight. Avoid putting stress on the PS4’s HDMI port. That little port is the gateway to your entire visual universe, so treat it like a VIP entrance.
4. Power Source
The simplest version uses wall power. Plug the PS4 and portable monitor into a power strip or compact extension unit. For true off-grid play, use a portable power station with an AC outlet that can safely handle the console and display. Battery-only internal builds are possible, but they require serious electrical knowledge and safety planning.
5. Carrying Case or Custom Box
A padded camera case, equipment case, small hard-shell suitcase, or custom 3D-printed enclosure can work. The goal is to protect the console and monitor while leaving room for airflow. Do not seal the PS4 inside a foam cave. Consoles enjoy breathing, just like humans and dramatic houseplants.
Power Planning: The Part You Should Not Guess
Power is the most important part of a portable PS4 build. The PS4 Slim is more efficient than the PS4 Pro, but it still needs stable power. When using a portable power station, choose one with enough wattage for the PS4, the display, and a little overhead. A setup that draws 90 to 150 watts during gameplay needs a power source that can comfortably supply that load without running at its absolute limit.
Battery capacity is measured in watt-hours. A 150Wh battery, for example, might theoretically run a 100W setup for about 1.5 hours, but real-world losses from conversion, heat, and changing game load will reduce runtime. DIY examples have shown portable PS4 builds achieving roughly 90 minutes to several hours depending on battery size, display type, game load, and efficiency. Lightweight games may sip power; demanding open-world titles may chug it like an energy drink.
For most people, an external portable power station is safer and easier than building a custom lithium-ion battery pack. It includes protection circuitry, charging management, ports, and a case designed for transport. A homemade battery pack can work, but only if built by someone who understands cell balancing, fusing, charging limits, current draw, insulation, and thermal safety.
Cooling and Ventilation Matter More Than Looks
A portable PS4 build should never sacrifice cooling for style. Sony’s own safety guidance warns against blocking vents, placing the system in cramped spaces, or allowing dust to build up. That matters even more when the console is inside a case or portable station.
Leave space around the intake and exhaust areas. Use a case layout that allows hot air to escape instead of bouncing around inside like a trapped ghost with a fever. If you add fans, place them to support natural airflow rather than fighting it. Blowing air randomly into a box is not engineering; it is wishful thinking with fan blades.
Before finalizing the build, test the PS4 for at least 30 to 60 minutes with a demanding game. Listen for fan noise, feel for heat buildup around the case, and check whether the console remains stable. If the system becomes unusually loud, shuts down, or feels excessively hot, improve airflow before using it regularly.
Display Choices: Portable Monitor vs. Salvaged Laptop Screen
There are two common screen approaches. The easiest is buying a portable HDMI monitor. It is clean, reliable, and usually plug-and-play. The more DIY approach is using a salvaged laptop screen with an LVDS or eDP controller board. This can be cheaper if you already have the screen, but it adds complexity and extra wiring.
A portable monitor is the better option for most builders. It usually includes a case, power input, brightness controls, speakers, and standard video support. A salvaged laptop panel can look great, but matching the correct controller board requires knowing the panel model number. If you enjoy hunting tiny labels and decoding display specifications, go for it. If not, buy the monitor and spend your energy deciding whether to replay Bloodborne.
Case Layout: Keep It Simple and Serviceable
The best portable PS4 case layout is boring in the best way. The console should be secure, the monitor should open or mount safely, and cables should be short and easy to replace. Velcro straps, foam padding, rubber feet, cable clips, and removable panels can make the setup feel polished without permanent modification.
Do not glue everything into place unless you enjoy future regret. The PS4 may need cleaning, the monitor cable may fail, and the power adapter may need replacement. A serviceable layout saves headaches later. Think modular, not museum exhibit.
A clamshell case is popular because it mimics a giant gaming laptop. The screen mounts in the lid, while the console and power accessories sit in the base. Another option is a compact “briefcase build,” where the PS4, monitor, controller, and cables travel together but are set up on a table when used. The briefcase style is easier, lighter, and less risky.
Controller and Audio Setup
The DualShock 4 remains the easiest controller choice. It pairs natively with the console, charges through Micro-USB, and includes a headphone jack. For travel, pack a short charging cable and a pair of wired headphones. Built-in portable monitor speakers are often usable, but not always impressive. Some sound like a bee trapped in a cereal box.
If you want a cleaner setup, add a small controller pocket inside the case. Keep thumbstick covers or a protective shell on the controller if it will travel often. Analog sticks do not love being crushed under power bricks.
Storage and Game Planning
A portable build is more enjoyable when your games are already installed. Physical discs work, but they add bulk and can be scratched during travel. Digital games are more convenient, especially if your PS4 has a larger internal drive or external USB storage.
Before a trip, update your games, sync saves, and test offline access. Nothing ruins portable gaming faster than arriving somewhere and discovering your console wants a 47GB update. At that point, you are not gaming; you are watching a progress bar age in real time.
Portable PS4 vs. PS Remote Play
PS Remote Play lets you stream PS4 games to a phone, tablet, PC, or compatible device over a network. It is convenient and lightweight, but it depends on connection quality. A simple portable PS4 build runs games locally, meaning less reliance on internet speed and fewer streaming artifacts.
Remote Play is excellent for casual sessions, especially at home. A portable PS4 build is better when you want the actual console experience with local HDMI output. It also works well in places where network quality is unpredictable, such as hotels, dorms, cabins, or houses where the Wi-Fi router appears to be powered by ancient folklore.
Safety Tips Before You Build
Safety should be part of the design from the beginning. Keep the PS4’s vents clear. Do not modify the AC power cord. Avoid damaged batteries or swollen power banks. Use quality chargers and cables. If you use a portable power station, follow the manufacturer’s instructions. If you travel by air, remember that lithium batteries have strict watt-hour limits and airline rules.
For beginners, the safest portable PS4 is not internally battery-powered. It is a protected console, portable monitor, tidy wiring, and either wall power or a certified external power station. You still get portability without turning the project into an electrical certification exam.
Common Mistakes to Avoid
Blocking the Vents
This is the classic mistake. A console inside a tight case may look clean, but heat buildup can shorten hardware life. Leave space for intake and exhaust.
Using an Underrated Power Source
If your power station cannot handle the PS4’s load, the system may shut off during gameplay. Choose a power source with enough wattage and battery capacity.
Overcomplicating the First Build
Start simple. Make a reliable portable setup before attempting custom battery packs, 3D-printed shells, or internal rewiring.
Forgetting Cable Strain Relief
Portable builds move around. Secure cables so the HDMI and power ports do not take the full force of bumps and pulls.
Best Use Cases for a Simple Portable PS4 Build
A portable PS4 build is perfect for dorm rooms, small apartments, travel between houses, family visits, LAN-style gaming nights, and temporary setups where a full TV is not available. It is also useful for content creators who want a compact capture station or repair hobbyists who test consoles without dedicating a full desk to them.
It is not ideal for backpack gaming, airplane use, or handheld play while walking around. The PS4 was designed as a home console, and even a simple portable setup still needs a stable surface. This is “portable” in the same way a sewing machine is portable: technically yes, but please do not use it on a skateboard.
Experience Notes: What It Feels Like to Use a Portable PS4 Build
The first thing you notice after setting up a portable PS4 is how freeing it feels to remove the TV from the equation. Suddenly, the console is no longer chained to the living room like a medieval prisoner with HDMI privileges. You can bring it to a desk, kitchen table, spare bedroom, or friend’s house and be playing within minutes. The experience feels familiar, but the smaller screen makes it more focused. You sit closer, the sound is more personal, and even older games can feel fresh again.
There is also a surprising amount of satisfaction in making the setup neat. Short cables, a dedicated case, a snug controller pocket, and a monitor that folds into place make the whole thing feel like a custom machine. It may not be as elegant as a commercial handheld, but it has personality. Every zip tie and foam pad says, “I made this work, and I only mildly questioned my decisions.”
In real use, the biggest challenge is managing power. Wall-powered portable setups are easy. Battery-powered setups require planning. You quickly learn that not all games draw power the same way. A quiet indie game may run longer and keep the fan calm, while a graphically intense title can make the console work harder. This is where a power station with a wattage display becomes genuinely helpful. Watching the draw change during gameplay teaches you more than any spec sheet.
Heat is the second major lesson. A PS4 needs airflow, and portable cases can trap warmth if designed poorly. During testing, it helps to play a demanding game with the case open, then closed, then slightly adjusted. Small changes can matter. Raising the console on rubber feet, opening a vent path, or moving a power brick away from the exhaust can reduce heat buildup. The goal is not silence; the goal is stable, healthy operation.
The portable monitor experience is usually better than expected. A 15.6-inch 1080p screen feels sharp at desk distance, and many PS4 games look excellent on it. The downside is audio. Built-in speakers on thin portable monitors are rarely powerful. Headphones or a small external speaker make the setup feel much better, especially for story-heavy games or late-night sessions when you do not want to announce explosions to the entire house.
Another practical lesson is that digital games are much easier than discs. Carrying discs works, but it adds clutter. A portable build shines when the games are already installed and updated. Before taking the setup anywhere, it is worth launching each game once, checking save data, and making sure the controller is charged. The best portable gaming session is the one that starts immediately, not the one that begins with system updates and emotional damage.
Overall, a simple portable PS4 build feels like a clever middle ground. It is not a pocket console, and it is not trying to be. It is a compact PlayStation station that gives an older console new life. For players with a PS4 Slim sitting unused, this kind of build can turn forgotten hardware into a flexible gaming machine again. And honestly, rescuing a console from dust duty is a noble act. Somewhere, a DualShock 4 sheds a tiny Bluetooth tear.
Conclusion
A simple portable PS4 build is one of the most practical ways to make an older console feel exciting again. The key is to keep the project realistic: use a PS4 Slim if possible, pair it with a good portable HDMI monitor, protect the hardware in a serviceable case, plan power carefully, and never compromise airflow. Advanced handheld conversions are amazing, but most players do not need to rebuild the console to enjoy portable gaming.
The best portable PS4 setup is reliable, safe, easy to pack, and quick to use. It should feel like a travel-ready gaming station, not a science fair volcano with a login screen. With smart planning, you can create a setup that plays your favorite PS4 games almost anywhere there is a table, a chair, and enough time to say, “just one more mission” seven times.