Somewhere in a closet, garage, classroom cabinet, or “I’ll definitely use this someday” electronics box, an old VGA monitor is waiting for its comeback tour. It has seen spreadsheets. It has survived Windows XP wallpapers. It has probably displayed at least one painfully slow progress bar. But with a little imagination, an Arduino, a handful of basic parts, and the wonderfully stubborn spirit of DIY electronics, that retired display can become something much more playful: a VGA monitor drawing toy.
The idea sounds like a tiny magic trick. Instead of plugging the monitor into a desktop computer, you feed it simple video signals from a microcontroller. Add two knobs for movement, a button for color, and another button to clear the screen, and suddenly the old display behaves like a digital drawing board inspired by classic knob-controlled toys. It is part retro computing project, part art machine, and part proof that makers can turn almost anything into a weekend adventure.
This project became popular in maker circles because it blends nostalgia with real engineering. It is simple enough to understand, charming enough to make people smile, and limited enough to be interesting. No, it will not replace an iPad Pro. It will not help you paint a photorealistic tiger. But it will draw chunky pixel lines on a VGA screen, and honestly, that is a very specific kind of joy.
What Is the “VGA Monitor Becomes Drawing Toy” Project?
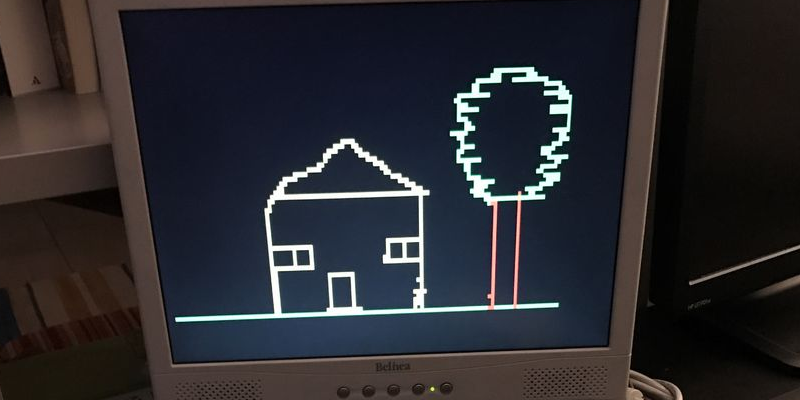
The project is a DIY electronics build that turns a VGA monitor into an Etch A Sketch-style drawing toy using an Arduino Uno and the VGAX library. The user controls a cursor with two potentiometers: one moves horizontally, and the other moves vertically. A button changes the drawing color, while another clears the screen. The display output is low-resolution, colorful, and delightfully blocky.
The original idea came from maker Rob Cai, who had already experimented with using an Arduino Uno and VGA monitor for simple games such as Pong. Once the hardware existed, the next leap was natural: if the system can move objects around the screen, why not leave a trail behind and let people draw?
That is the clever part. A drawing toy does not need fast 3D graphics, fancy shaders, or a graphics card that sounds like a leaf blower. It needs movement, memory, and feedback. The Arduino reads the knobs, updates the cursor position, draws pixels, and sends a VGA signal to the monitor. The result is a handmade digital sketchpad that feels both old-school and surprisingly fresh.
Why VGA Makes This Project So Interesting
VGA, short for Video Graphics Array, is an analog video standard that became common on computer monitors for decades. A VGA connector carries separate red, green, and blue color signals, plus horizontal and vertical synchronization signals. In plain English: the monitor needs color information and timing instructions so it knows where each line of the picture belongs.
Modern screens hide a lot of complexity behind HDMI and DisplayPort, but VGA is more approachable for experimenters because its signals can be generated with relatively simple circuits. That does not mean VGA is “easy” in the same way toast is easy. Timing still matters. The monitor expects signals to arrive at a steady rhythm, and if the rhythm is wrong, the picture may roll, flicker, or vanish like your motivation during cable management.
The beauty of this drawing toy is that it uses the VGAX library to handle much of that timing challenge. VGAX allows an Arduino Uno or Mega to generate a basic VGA signal with very little extra hardware. The tradeoff is resolution and color depth. Instead of crisp HD graphics, you get a small framebuffer, typically around 120 by 60 pixels on an Arduino Uno, with four colors. That limitation is not a flaw here; it is the personality of the project.
The Main Parts Behind the Magic
A typical VGA monitor drawing toy build uses parts that are common in beginner and intermediate Arduino projects. The core component is an Arduino Uno, which reads user input and generates the graphics. Two potentiometers act like the knobs on a classic mechanical drawing toy. Two push buttons handle actions such as clearing the display and changing color. A few resistors help form the simple video output circuit, and a VGA connector or repurposed VGA cable connects the circuit to the monitor.
Arduino Uno
The Arduino Uno is the brain of the operation. It reads analog values from the potentiometers and digital states from the buttons. The sketch then translates those inputs into cursor movement, drawing commands, and screen updates. The Uno is not a powerhouse, but it is accessible, affordable, and well-documented, which makes it perfect for educational electronics projects.
VGAX Library
The VGAX library is what makes the monitor output practical. Instead of writing every timing routine from scratch, the maker can use a library designed to generate a VGA signal from an AVR-based Arduino. Because the Arduino has limited memory and processing power, the graphics are intentionally simple. The four-color, low-resolution output gives the project its charming retro look.
Potentiometers
A potentiometer is basically a twistable analog input. When you turn the knob, the voltage on its middle pin changes, and the Arduino can read that value. In this project, one potentiometer controls the X position and the other controls the Y position. Turn one knob, and the cursor moves sideways. Turn the other, and it moves up or down. Turn both together, and diagonal lines appearassuming your hands agree to cooperate.
Buttons
The buttons add interaction beyond movement. One button can clear the screen, replacing the classic “shake to erase” motion with a simple press. Another button can cycle through available colors. Since the VGAX setup supports only a small color palette, choosing colors becomes part of the fun. It is like painting with crayons, except the crayons are pixels and the box only came with four.
How the Drawing Toy Works
The project works by constantly reading input, updating coordinates, and drawing to a tiny screen buffer. The Arduino reads the potentiometer values, maps them to screen coordinates, and decides where the cursor should be. When the cursor moves, the program leaves a trail of pixels in the selected color. Meanwhile, the VGAX library keeps generating the video signal so the monitor can display the image.
Because the monitor is not storing the drawing by itself, the Arduino must maintain the image in memory. This is why the resolution is low. The Uno has very limited SRAM, so every pixel matters. A 120-by-60 display may sound tiny compared with modern screens, but it is enough for lines, doodles, geometric shapes, initials, mazes, and the kind of abstract art that makes adults say, “Interesting,” while quietly rotating their head sideways.
The experience is intentionally physical. Unlike drawing with a mouse or touchscreen, knob drawing requires patience. Straight lines are easy. Smooth curves are harder. Circles become heroic achievements. This turns the device into both a toy and a coordination challenge.
Why Low Resolution Is Actually a Feature
Low resolution often sounds like a drawback, but in this project it becomes part of the appeal. The chunky pixels make every drawing look like it belongs on a vintage computer. Mistakes are visible, but they are also funny. A slightly crooked house looks charming. A lopsided robot looks like it has personality. A cat may become a suspicious rectangle with ears, but that is still technically art.
Limitations also make the project easier to understand. When students or beginners see a small set of pixels controlled by two knobs, they can connect cause and effect quickly. The knob changes a number. The number moves a cursor. The cursor changes pixels. The pixels form a drawing. That chain is simple, but it teaches input, output, mapping, timing, memory, and user interface design.
This is why the VGA monitor drawing toy is more than a novelty. It is a compact lesson in embedded systems. It shows how software and hardware work together, and it does so without requiring a polished commercial product or a mountain of expensive parts.
A Smart Way to Reuse Old Electronics
Another reason this project feels timely is that it gives old electronics a second life. Many VGA monitors still work perfectly, but they are often pushed aside because newer computers no longer include VGA ports. Instead of letting an old monitor collect dust, a maker can turn it into a playful display for experiments.
This does not mean every old monitor should be opened, modified, or treated like a science fair victim. In fact, the safest approach is to leave the monitor closed and use only the external VGA connection. This is especially important with old CRT monitors, which can contain dangerous high-voltage components even after being unplugged. For most hobbyists, an LCD monitor with VGA input is the friendlier choice.
Reusing a monitor through its normal port is a neat compromise. You get the satisfaction of upcycling without performing surgery on the display. The monitor remains a monitor; the Arduino simply becomes a tiny video source.
What You Can Draw With It
The short answer is: anything your patience can survive. Names, houses, trees, pixel flowers, smiley faces, game maps, maze paths, robots, and abstract patterns all work well. The best drawings are often simple, bold, and geometric. Since the resolution is low, detailed portraits are possible only if your artistic style is “mysterious block creature.”
That said, the constraints encourage creativity. You start thinking in lines, corners, and color blocks. You learn to plan your movement before turning the knobs. You discover that clearing the screen too quickly feels dramatic, like deleting a masterpiece because one eyebrow went rogue.
For classrooms, maker clubs, and family projects, this can become a fun challenge. Who can draw the best spaceship? Who can write their name without accidentally drifting into the corner? Who can make a recognizable dog in four colors? The monitor becomes a shared canvas, and the awkward controls make the results funnier, not worse.
Educational Value: Tiny Project, Big Lessons
The VGA monitor drawing toy is a strong educational project because it combines several concepts in one visible result. Students learn about analog input through potentiometers, digital input through buttons, video output through VGA, and memory constraints through the tiny framebuffer. They also learn that computers do not magically “make pictures.” Pictures are data, timing, voltage, and code working together.
It is also a great introduction to interface design. The controls are simple, but the choices matter. Should turning the knob move the cursor directly, or should it control speed? Should the clear button erase instantly, or should there be a confirmation? Should color selection cycle through the palette or use separate buttons? These small design questions are the same kind of thinking behind larger hardware and software products.
Even troubleshooting becomes educational. If the monitor shows no image, the builder must think about wiring, sync signals, resistor values, code, and compatibility. If the cursor moves strangely, the issue may be analog mapping or noisy input. Debugging is not just a headache; it is the part where the project teaches you something, usually right after it teaches you humility.
Ideas to Upgrade the Project
Once the basic drawing toy works, the project invites upgrades. A tilt sensor or accelerometer could make clearing the screen feel more like shaking a traditional drawing toy. A small speaker could add sound effects when drawing or changing colors. A custom enclosure could place both knobs and buttons in one neat box, ideally with a bright retro color scheme.
More advanced makers could experiment with different microcontrollers, higher resolutions, alternative VGA libraries, or extra drawing tools. For example, one mode could draw continuous lines, while another places dots or rectangles. A “stamp” mode could add little pixel icons. A save feature would be harder on a small Arduino Uno, but possible with additional storage or a different board.
The most important upgrade, however, is usability. A clean enclosure, labeled controls, stable wiring, and a safe external connection make the toy more enjoyable. A project that works on a breadboard is exciting. A project that survives being touched by actual human beings is legendary.
Safety Notes Before You Start
This kind of DIY electronics project should stay on the low-voltage side. Do not open a CRT monitor. Do not poke around inside any display. Use the VGA connector externally, keep wires insulated, and disconnect power before changing connections. If soldering is involved, work in a ventilated area and use proper supervision if needed.
For beginners, an LCD monitor with a VGA input is usually the best option. It is lighter, easier to handle, and less intimidating than old CRT hardware. The goal is to make a drawing toy, not to audition for a dramatic electrical safety video.
Hands-On Experience: What This Project Feels Like in Real Life
The first thing you notice when using a VGA monitor drawing toy is that it feels slower than modern digital art tools, and that is exactly why it is fun. A touchscreen lets you draw instantly. A mouse gives you direct control. This project makes you negotiate with two knobs like you are steering a tiny shopping cart through a pixel supermarket.
At first, the movement feels strange. You turn the horizontal knob and watch the cursor slide left or right. Then you turn the vertical knob and try to position the cursor exactly where you want it. The moment you try to draw a diagonal line, both hands have to cooperate. One hand turns smoothly, the other gets overexcited, and suddenly your neat roofline becomes a mountain range. It is frustrating for about five seconds, then hilarious.
The best experience comes when you stop expecting perfection. The toy rewards playful drawing rather than polished design. A house with uneven walls looks handmade. A flower with square petals looks like it grew in a video game. A smiley face drawn in four colors has more personality than it deserves. Every mistake becomes part of the picture because the tool itself has character.
There is also a satisfying moment when people realize the monitor is not connected to a normal computer. They see an old VGA display showing lines and colors, then look down at the tiny Arduino and the homemade controls. That “wait, that little board is doing all this?” reaction is one of the best parts of the project. It turns invisible computing concepts into something physical and obvious.
Building the toy also changes how you look at old hardware. A VGA monitor stops being outdated junk and becomes a canvas. A potentiometer stops being a random component and becomes a steering wheel for pixels. A few resistors become part of a video system. The project makes electronics feel less like a pile of mysterious parts and more like a box of creative ingredients.
In a classroom or maker space, the experience gets even better because everyone draws differently. Some people carefully plan shapes. Others immediately mash buttons and create digital spaghetti. Someone will try to write their name. Someone else will attempt a dragon and produce what appears to be a nervous toaster. Nobody cares, because the joy is in the process.
That is the real charm of turning a VGA monitor into a drawing toy. It is not about building the most advanced graphics machine. It is about rediscovering the fun of simple interaction. It gives old technology a new role, teaches useful electronics concepts, and reminds us that creativity does not require perfect tools. Sometimes it only needs two knobs, four colors, and a monitor that thought its career was over.
Conclusion
The “VGA Monitor Becomes Drawing Toy” project is a perfect example of maker creativity: simple parts, clever code, and a playful result. By using an Arduino Uno, potentiometers, buttons, resistors, and the VGAX library, an old VGA monitor can become a hands-on drawing machine with retro charm. Its low resolution and limited colors are not weaknesses; they are what make the project approachable, educational, and memorable.
For beginners, it offers a friendly introduction to analog input, video signals, and embedded graphics. For experienced makers, it is a reminder that great projects do not always need expensive parts or huge displays. Sometimes the best builds are the ones that make people grin and say, “I didn’t know you could do that.”
So before that old VGA monitor heads to the recycling pile, consider giving it one more job. It may not want to display spreadsheets anymore. It may be ready to become a drawing toy.