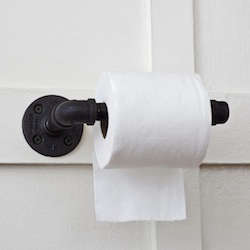
A plumbing pipe toilet paper holder is one of those wonderfully odd DIY projects that makes you wonder why ordinary bathroom hardware has to be so ordinary. A few threaded metal fittings, a wall flange, and an hour of tinkering can turn hardware-store plumbing parts into a sturdy piece of industrial bathroom decor.
The idea works especially well in farmhouse, loft, rustic, vintage, and industrial-style bathrooms. Black steel pipe provides a rugged matte look, galvanized fittings lean brighter and more utilitarian, and painted pipe lets you wander into brass, bronze, copper, or practically any color your bathroom can handle.
Better yet, this project does not require actual plumbing. No water lines need to be cut, no mysterious valve needs to be touched, and your bathroom will not suddenly become an indoor swimming pool. The pipe is simply being used as decorative hardware.
What Is a Plumbing Pipe Toilet Paper Holder?
A plumbing pipe toilet paper holder is a wall-mounted or freestanding toilet roll holder assembled from threaded pipe and fittings. Typical components include a floor flange, pipe nipples, elbows, tees, caps, and sometimes a wooden base or shelf.
Black pipe is particularly popular because its dark industrial finish looks right at home beside matte-black faucets, concrete countertops, subway tile, reclaimed wood, and exposed metal shelving. Major U.S. hardware retailers sell threaded black pipe fittings in numerous sizes and shapes, including elbows, nipples, tees, couplings, and flanges, making it easy to create a custom configuration.
Although people commonly call it “black iron pipe,” much of the material sold under that name is actually black steel. For this project, the distinction is less important than it would be in real plumbing because the holder carries toilet paper rather than pressurized gas or water.
Why Build One Instead of Buying a Regular Holder?
It Is Surprisingly Sturdy
Cheap bathroom holders occasionally develop a special talent for wobbling. Eventually, tightening the tiny set screw becomes part of your monthly home-maintenance routine.
A properly mounted pipe holder is different. Threaded fittings create a rigid structure, while a metal floor flange provides a broad mounting surface with several screw holes. When anchored into a wall stud or solid blocking, the assembly feels more like permanent hardware than a lightweight bathroom accessory.
It Adds Industrial Character
The visual appeal is probably the biggest reason people build an industrial toilet paper holder. Exposed elbows, threads, flanges, and pipe sections create a deliberately mechanical appearance.
It pairs particularly well with:
- Industrial farmhouse bathrooms
- Rustic wood vanities
- Matte-black fixtures
- Concrete or stone countertops
- Subway tile
- Pipe shelving
- Vintage Edison-style lighting
One pipe accessory looks interesting. Several coordinated pipe accessories can make the whole bathroom look intentional rather than as though somebody accidentally left plumbing supplies on the wall.
It Is Easy to Customize
Commercial toilet paper holders come in predetermined dimensions. A DIY pipe version can be adjusted simply by swapping pipe nipples.
Want more clearance for oversized rolls? Use a longer nipple. Want the holder to project less from the wall? Shorten the connector between the flange and elbow. Need a shelf above it? Mount the pipe assembly to a finished wood board and extend that board upward.
Best Pipe Size for a DIY Toilet Paper Holder
For most projects, 1/2-inch or 3/4-inch nominal pipe offers a good balance of appearance, weight, and compatibility with toilet paper roll cores.
Half-inch pipe produces a slightly lighter, cleaner look. Three-quarter-inch pipe feels more substantial and exaggerates the industrial style. Larger fittings can work, but they increase weight and may make the finished holder appear oversized in a small powder room.
Whichever size you select, keep the size consistent throughout the threaded assembly unless you intentionally use reducing fittings.
Simple Wall-Mounted Parts List
A straightforward black pipe toilet paper holder can be made with only a handful of parts:
- 1 black pipe floor flange
- 1 short threaded nipple, approximately 1 1/2 to 3 inches
- 1 90-degree threaded elbow
- 1 threaded nipple approximately 5 to 7 inches long
- 1 threaded cap or plug
- Appropriate mounting screws or wall anchors
A roughly 6-inch horizontal pipe usually provides comfortable room for a standard roll while leaving enough clearance to slide it on and off. Because toilet paper dimensions vary, especially with jumbo rolls, test your preferred roll before permanently mounting anything.
How to Build a Plumbing Pipe Toilet Paper Holder
Step 1: Dry-Fit Everything First
Assemble the fittings by hand before cleaning, painting, or drilling holes.
Thread the short nipple into the flange, install the elbow, and screw the longer nipple into the elbow. Add the cap if your design uses one.
The goal is not merely to tighten everything until your forearms file a complaint. Because threaded pipe connections tighten progressively, the elbow may stop slightly before or after the orientation you want. Experiment with the components until the arm sits level.
Unlike a working pressure pipe, this decorative project does not need a leak-tight connection. That means thread-sealing tape is normally unnecessary unless you are using it strategically to reduce movement or help establish orientation.
Step 2: Clean the Pipe
Black pipe and fittings can arrive with manufacturing oil, grime, residue, or protective coatings. That is wonderful for industrial storage and less wonderful for white toilet paper.
Wipe every component thoroughly with an appropriate degreaser. Pay particular attention to threaded areas and the horizontal section that will contact the cardboard roll.
Allow everything to dry completely.
Step 3: Choose Your Finish
You have several choices.
Raw black pipe: Keeps the authentic industrial appearance but may eventually show oxidation in a humid bathroom.
Clear-coated pipe: Preserves much of the raw appearance while adding protection.
Painted pipe: Allows the holder to coordinate with faucets, cabinet hardware, lighting, or mirrors.
If painting bare metal, proper preparation matters. Rust-preventive metal primers and protective enamels are specifically designed to improve corrosion resistance and coating durability. Follow the coating manufacturer’s preparation, ventilation, drying, and recoat instructions rather than improvising a chemistry experiment next to your toothbrush.
Step 4: Find the Best Location
Sit on the toilet and check the natural reach zone. This extremely sophisticated design procedure is also known as “seeing whether you can actually reach the toilet paper.”
In a typical residential bathroom, comfort matters more than copying a single universal mounting height. The holder should be slightly forward of the seated user rather than awkwardly behind the hip.
Accessibility requirements are more specific in spaces governed by the ADA Standards. U.S. Access Board guidance places compliant toilet paper dispenser centerlines 7 to 9 inches in front of the water closet, with additional requirements governing outlet height and grab-bar clearances. Residential DIY installations are not automatically subject to these provisions, but the measurements illustrate an important design principle: easy reach matters.
Step 5: Locate a Stud or Solid Backing
A metal pipe holder is heavier than many conventional toilet paper holders, and people occasionally pull on bathroom hardware harder than intended.
Mounting the flange directly into a wall stud or solid wood blocking is therefore ideal.
If the desired location falls between studs, use a wall anchor appropriate for your wall construction and the expected load. Bathroom-hardware manufacturers commonly distinguish between mounting into wood, drywall, tile, and masonry because each substrate requires different fastening methods.
If you are unsure what lies behind the drilling location, check for plumbing and electrical hazards before making holes. Bathrooms contain both surprisingly close together, which makes freestyle drilling an unnecessarily exciting hobby.
Step 6: Mark the Flange Holes
Hold the assembled holder against the wall and place a small level along the horizontal arm.
Once it looks correct, mark the flange screw holes with a pencil.
Do not trust your eyes alone. A holder that is three degrees crooked will somehow become the only thing you notice every time you enter the bathroom.
Step 7: Drill and Mount
Drill appropriate pilot holes or install suitable anchors for the wall material.
Position the flange and drive the screws gradually. Alternate between screw locations instead of fully tightening one screw immediately. This helps the flange seat evenly against the wall.
Check the level again before final tightening.
Step 8: Test With a Real Roll
Slide on a roll and confirm that it:
- Rotates without scraping the wall
- Does not slide off too easily
- Clears the toilet and nearby cabinetry
- Can accommodate thicker rolls
- Can be replaced without disassembling half the bathroom
If your decorative cap prevents roll changes, congratulations: you have built a beautiful toilet paper prison. Adjust the design before calling the project finished.
Wall-Mounted vs. Freestanding Pipe Holders
Wall-Mounted Design
A wall-mounted holder saves floor space and typically looks cleaner. A floor flange serves as the mounting point and creates the classic plumbing aesthetic.
This style is ideal for compact bathrooms but requires drilling.
Freestanding Design
A freestanding pipe holder is useful when you do not want holes in tile, a vanity, or rental-property walls.
These versions often use a heavy wood base with a vertical pipe assembly. A tee or elbow can create the dispensing arm, while the remaining vertical pipe can store extra rolls.
The challenge is stability. Metal pipe is top-heavy, so a lightweight base may tip when somebody pulls paper enthusiastically. A sufficiently wide, heavy base solves most of that problem.
Adding a Wooden Shelf
One popular variation combines the pipe toilet paper holder with a small wood shelf.
A board mounted above the roll creates a convenient place for a phone, wipes container, air freshener, or small decorative object. Reclaimed lumber emphasizes the farmhouse character, while smooth walnut or oak can make the same plumbing fittings look unexpectedly upscale.
Seal wood used in bathrooms because repeated humidity changes can stain or distort unfinished material.
Common Mistakes to Avoid
Using Dirty Pipe
Metal residue and machine oil can transfer onto hands, walls, and toilet paper. Clean every piece before installation.
Ignoring Corrosion Protection
Commercial bathroom hardware often uses corrosion-resistant materials or protective finishes for good reason. Bathrooms experience recurring humidity and condensation.
If raw steel begins developing surface rust, remove the oxidation and refinish the metal rather than allowing corrosion to spread.
Mounting Only to Weak Drywall
A gorgeous holder mounted poorly will eventually become a gorgeous holder lying on the floor beside two surprisingly large drywall holes.
Use a stud or blocking whenever possible. Otherwise, select anchors specifically suited to the wall material.
Forgetting Jumbo Toilet Paper Rolls
Some modern rolls are impressively ambitious. Leave enough distance between the horizontal pipe and wall for the thickest rolls you normally buy.
Making Roll Replacement Complicated
An open-ended arm offers the easiest replacement. If you add a cap for appearance, consider whether it can remain loose enough to remove easily without allowing the roll to escape during normal use.
Design Ideas for an Industrial Bathroom
Your DIY toilet paper holder can become the starting point for an entire coordinated bathroom.
Matching plumbing pipe can be used decoratively for towel bars, robe hooks, shelves, mirror supports, and storage racks. Keeping pipe diameter and finish consistent helps separate deliberate design from “hardware aisle clearance sale.”
Black pipe looks especially striking against white subway tile. Galvanized pipe works naturally with weathered wood and lighter farmhouse interiors. Black pipe mounted on walnut creates a warmer, contemporary-industrial feel.
You can also paint the holder brushed gold, aged bronze, charcoal, satin black, or metallic copper while retaining the visible pipe geometry.
Practical Experience With Plumbing Pipe Toilet Paper Holders
One lesson becomes obvious when building this project in the real world: assemble the entire holder before drilling anything.
Individual pipe pieces look deceptively small while sitting in a hardware-store bin. Once a flange, nipple, elbow, arm, and cap are threaded together, the finished assembly can project farther from the wall than expected. Temporarily holding it beside the toilet immediately tells you whether your original location makes sense.
Another useful experience is to buy several nipple lengths if you are undecided. Threaded nipples are inexpensive compared with the annoyance of finishing the installation and discovering that a jumbo roll rubs against the wall. Trying a 5-inch and 6-inch arm side by side takes minutes and can noticeably improve usability.
Cleaning also matters more than beginners expect. New black pipe may look clean until a white rag is wiped across it. Suddenly the rag resembles something recovered from underneath an old pickup truck. Degreasing before assembly prevents that residue from reaching the wall or fresh paint.
When painting the parts, assembling everything permanently first can create another problem: threaded joints hide small sections of pipe. If you later change the elbow angle, an unpainted ring may suddenly appear. A better approach is to dry-fit the components, mark approximately where the threads meet, disassemble them, finish the visible areas, allow everything to cure, and then complete the final assembly.
Mounting is where spending an extra few minutes pays the biggest dividend. A flange secured directly to solid wood feels dramatically more rigid than one depending on inadequate plastic drywall plugs. Toilet paper itself weighs almost nothing, but the holder gets bumped, pushed, grabbed, cleaned around, and occasionally used as an accidental handhold. Strong attachment matters far more than the load represented by the paper roll.
Placement should also be tested by the people who actually use the bathroom. A visually perfect location may require an uncomfortable twist from the toilet. Before drilling, tape the outline of the flange to the wall and have family members test the reach. Moving a piece of painter’s tape is much easier than moving four screw holes.
Another practical consideration is orientation. Because tapered pipe threads tighten gradually, the elbow does not always become perfectly level exactly when it feels tight. Decorative pipe projects sometimes require backing a fitting off slightly or adjusting neighboring threaded parts until everything aligns. Since the holder is not carrying pressurized fluid, the objective is mechanical stability and correct orientation rather than creating a pressure-tight plumbing connection.
After installation, maintenance is refreshingly uneventful. Wipe the pipe periodically with a soft damp cloth and dry it afterward. Watch exposed threads and scratched areas for early rust. A small finish touch-up is much easier than stripping and repainting the entire assembly later.
The biggest surprise, though, is how much visual impact such a tiny project can have. Bathrooms contain many smooth ceramic and polished surfaces. A chunky pipe flange and exposed elbow introduce texture and contrast without requiring a full remodel. For the cost of a few fittings and an afternoon of DIY work, an otherwise forgettable corner can become one of the bathroom’s most distinctive details.
Conclusion
A plumbing pipe toilet paper holder combines a simple function with a lot more personality than the typical store-bought bracket. A floor flange, threaded nipple, elbow, horizontal arm, and optional cap are enough to create a durable industrial-style fixture, while different pipe sizes, finishes, wood backers, and shelf designs provide nearly endless customization.
The most successful version is not necessarily the fanciest. Clean the metal carefully, protect steel from moisture, test roll clearance, choose a comfortable location, and secure the flange to appropriate wall structure. Get those basics right and the finished holder should look intentionally rugged rather than simply unfinished.
And perhaps that is the charm of the project: plumbing fittings normally spend their lives hidden behind walls. Here, they finally get a promotion to bathroom decor.
Research synthesis based on U.S. accessibility guidance, pipe-thread standards, major U.S. hardware retailers, bathroom-hardware manufacturers, metal-coating guidance, and established DIY/home-improvement references. Additional DIY and installation references: