Joining tongue-and-groove plywood looks simple: slide the tongue into the groove, tap the panels together, and congratulate yourself on mastering advanced carpentry before lunch. In practice, however, a strong, flat, squeak-resistant joint depends on careful layout, correct spacing, suitable adhesive, proper fastening, and a gentle touch with the hammer.
Tongue-and-groove plywood is commonly used for structural subfloors because its interlocking long edges support one another between floor joists. The joint reduces vertical movement at panel edges and can eliminate the need for continuous blocking beneath those edges when the assembly complies with the applicable design and building code. It does not eliminate the need for correct panel thickness, fastening, or support at panel ends. In other words, the tongue and groove help, but they are not tiny wooden superheroes.
How Tongue-and-Groove Plywood Joints Work
Each panel has a projecting tongue along one long edge and a matching groove along the opposite edge. When two sheets are joined, the tongue enters the groove and helps keep their top surfaces aligned. Loads near the joint are distributed across both panels rather than forcing one unsupported edge to flex independently.
This profile is especially useful in subfloor construction because the long panel edges usually fall between joists. Under widely used residential-code provisions, unsupported panel edges generally need tongue-and-groove joints, blocking, or another approved method of support. The short panel ends must still land on joists, trusses, blocking, or another structural support specified by the floor design.
Tongue-and-groove plywood is not finish flooring
Do not confuse structural tongue-and-groove plywood with tongue-and-groove hardwood planks, laminate flooring, or decorative wall boards. Structural panels are designed to form part of the building assembly. They are normally covered with finished flooring and fastened directly to framing.
Also distinguish plywood from OSB. Both materials are sold as tongue-and-groove subfloor panels, and many installation principles are similar, but their product instructions, edge profiles, moisture-resistant features, and warranties may differ. Always follow the instructions printed on the panel or supplied by its manufacturer.
Tools and Materials You Will Need
- Rated tongue-and-groove plywood suitable for the specified joist spacing
- Chalk line, tape measure, carpenter’s pencil, and framing square
- Circular saw with an appropriate wood-cutting blade
- Drill, screw gun, framing nailer, or other specified fastening tool
- Code-approved nails or structural subfloor screws
- Subfloor construction adhesive compatible with plywood and framing
- Caulking gun or manufacturer-approved adhesive applicator
- Scrap 2-by-4 or plywood tapping block
- Dead-blow mallet or small sledgehammer
- Panel spacers where the edge profile is not self-spacing
- Eye protection, hearing protection, gloves, and dust protection
Check the panel stamp before installation. The span rating, performance category, exposure classification, and product instructions must match the plans and intended use. A thicker-looking sheet is not automatically the correct sheet; structural panels are selected according to their rating and the spacing of the supports beneath them.
Preparation Before Joining the Panels
Inspect and correct the floor framing
A tongue-and-groove joint cannot rescue a floor framed with crowned, twisted, uneven, or incorrectly spaced joists. Check that the framing is straight, securely connected, and consistent with the construction plans. Remove dried mud, ice, sawdust, and other debris from the top edges of the joists so the panels can sit flat.
Use a straightedge or string line to identify high framing members. Correct significant irregularities before placing the plywood. Otherwise, the panels may rock, fasteners may miss their targets, and the finished floor may advertise every framing error like an unusually honest billboard.
Store panels correctly
Keep plywood off the ground and protect it from prolonged wetting. Allow panels to reach appropriate jobsite conditions when required by the manufacturer. Wood-based panels change dimensions as their moisture content changes, which is one reason edge and end spacing is important.
Do not install severely swollen, delaminated, broken, or permanently distorted panels. Minor surface moisture may be acceptable for certain exposure-rated products, but standing water, damaged edges, and visibly compromised plies deserve attention before the floor is covered.
Plan the panel layout
Install structural floor panels with their long dimension perpendicular to the joists unless the approved plans or product instructions state otherwise. This orientation generally provides the intended strength and stiffness. Arrange the sheets so every square-cut end is fully supported, and stagger end joints in adjacent rows instead of creating one continuous seam across the floor.
Measure the full floor before cutting. Avoid finishing with a useless two-inch strip beside the wall. Shifting the starting layout slightly can produce wider, easier-to-fasten pieces at both sides of the room.
How to Join Tongue-and-Groove Plywood Step by Step
1. Establish a perfectly straight first row
Measure from the rim board or another verified reference point and snap a chalk line across the joists. The line should mark the field-facing edge of the first row, commonly four feet from the starting perimeter for standard sheets. Confirm that the line is square to the joists and parallel to the intended edge of the floor.
The first row controls every row that follows. If it wanders, later panels will resist joining, end joints may drift away from the centers of the joists, and your afternoon may become a long seminar entitled “Why One-Eighth Inch Matters.” Professional installation guides consistently emphasize getting this first course straight.
2. Orient the first panel
Confirm which face is intended to be installed upward. Many products print fastening guides, grade information, or a “this side up” indication on the working face.
For common subfloor layouts, the first sheet is positioned with its tongue toward the exterior perimeter and its groove facing the open floor. The next row’s tongue can then slide into that exposed groove. This arrangement also helps protect the tongues of the remaining panels during installation, but the panel manufacturer’s instructions take priority because profiles vary.
3. Dry-fit before applying adhesive
Place the first few panels without glue to verify their orientation, end-bearing locations, cutouts, and joint alignment. Mark plumbing penetrations, vents, stair openings, and walls carefully. A dry-fit takes a few minutes; cutting a second opening because the first one was six inches west takes considerably longer.
Inspect the tongue and groove for crushed fibers, manufacturing debris, or dried mud. Clean minor obstructions with a brush or utility knife without altering the intended profile. A damaged tongue should not be “repaired” by attacking it with a hammer until it resembles mulch.
4. Apply subfloor adhesive to the framing
Use an adhesive specifically approved for bonding plywood subfloor panels to wood framing. Apply the recommended bead to the joists immediately before laying each sheet. Do not coat a large area far in advance because many adhesives begin to skin over, especially in warm or windy conditions.
Subfloor adhesive helps reduce movement between the framing and panels, fills minor irregularities, and lowers the risk of squeaks. It supplements mechanical fasteners; it does not replace them. Complete the required fastening while the adhesive is still within its working time.
5. Place and fasten the first panel
Lower the sheet squarely onto the adhesive rather than dragging it through the bead. Align its field-facing edge with the chalk line and ensure its ends bear correctly on the framing. Tack the panel with enough fasteners to hold the alignment, recheck the position, and then complete the fastening pattern required by the plans, code, and panel manufacturer.
Drive fastener heads flush with or slightly below the surface without crushing the plywood. Overdriven fasteners can damage the face plies and reduce holding performance. Missed fasteners beside a joist should be removed rather than left underneath the finished flooring as tiny metal monuments to poor aim.
6. Apply adhesive in the groove when specified
Some glued-floor systems call for a thin bead of compatible adhesive inside the groove before the adjoining tongue is inserted. APA guidance describes using a smaller bead in the groove than on the joists to avoid excessive squeeze-out. Other proprietary panels may have different requirements, so check the product instructions before gluing the edge joint.
More adhesive is not automatically better. Filling the entire groove can create hydraulic resistance, prevent the joint from seating, produce a hardened ridge, or interfere with the spacing designed into the profile.
7. Engage the next panel
Position the second panel so its tongue lines up evenly with the first panel’s groove. Start the joint at one end and work progressively toward the other. Keep both sheets in the same plane; lifting or twisting one panel can cause the thin edge of the tongue to catch and split.
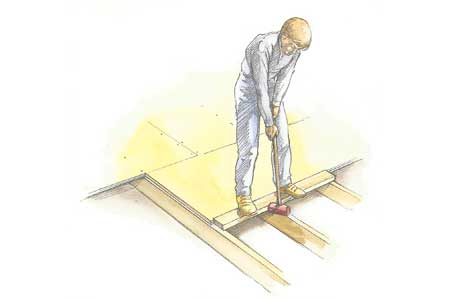
Use a scrap 2-by-4 or a purpose-made tapping block against the groove-side edge of the new sheet. Tap the block with a dead-blow mallet or small sledgehammer, moving along the joint rather than striking one location repeatedly. Never hit the tongue directly. Direct blows can mushroom, crush, or break it, making the next connection unnecessarily dramatic.
8. Preserve the required expansion space
Do not assume that a tight-looking joint is automatically correct. APA generally recommends approximately a 1/8-inch space at panel edge and end joints unless the product manufacturer specifies otherwise. Several proprietary tongue-and-groove profiles are self-spacing and may create a smaller visible gap when correctly seated.
Never force a self-spacing profile past its intended stopping point. LP, for example, warns installers not to overdrive certain panels because their profile creates its own edge spacing. Follow the exact instructions for the product in your hands, not a vague memory of the sheet installed on another project three summers ago.
9. Complete the fastening immediately
Once the joint is straight, seated, and correctly spaced, fasten the panel before the adhesive skins over. Work from one side toward the other to press the plywood evenly against the framing. Use the fastener type, length, edge distance, and spacing required by the approved assembly.
Fastener schedules vary according to panel rating, framing, adhesive use, local code, engineering requirements, and finish-floor specifications. A common pattern places fasteners closer together along supported panel edges than across intermediate framing, but the construction documentsnot guessworkmust determine the final schedule.
10. Stagger the next row
Begin the next course with a half sheet or another planned offset so its end joint does not align with the previous row’s end joint. Continue checking the chalk-line layout, joist centers, and edge alignment as work progresses.
Use offcuts efficiently, but do not install pieces too narrow to fasten safely or pieces whose damaged edges cannot provide proper support. Every panel end must have sufficient bearing on its framing member.
How to Handle Difficult Tongue-and-Groove Joints
The joint will not close
Stop hammering and inspect the problem. Common causes include a bent tongue, debris in the groove, a bowed panel, misaligned framing, dried adhesive, or a first row that is no longer straight. Pull the sheet back, correct the obstruction, and try again with the two panels held level.
When a panel has a modest bow, one installer can stand on or clamp the high area while another taps the joint together and places temporary fasteners. Do not use body weight near an unprotected floor opening or unsupported panel edge.
The tongue is damaged
Minor feathering can sometimes be trimmed carefully, provided the structural profile remains intact. A badly crushed or missing tongue cannot support the adjoining edge as intended. Replace the panel, cut the damaged area back to framing, or add approved blocking beneath the joint rather than hiding the defect and hoping the finished flooring develops a forgiving personality.
The groove edge is chipped
Small surface splinters may be removable, but a split groove lip can prevent alignment and weaken edge support. Do not fill a structural joint with ordinary wood putty and call it repaired. Provide proper framing support or replace the affected section.
The last sheet cannot slide into place
At walls and other confined areas, there may not be enough clearance to engage the joint normally. Depending on the approved installation method, the last panel may need to be cut accurately, lowered at an angle, or installed after carefully removing part of the lower groove lip. Any altered edge that no longer provides full tongue-and-groove support should be supported by blocking.
Common Mistakes to Avoid
- Starting without a chalk line: A crooked first course causes cumulative alignment problems.
- Installing panels parallel to joists: This may reduce the intended stiffness unless specifically approved.
- Leaving panel ends unsupported: Tongue-and-groove edges do not support square-cut ends.
- Forcing joints too tightly: Wood panels need the spacing required by their manufacturer.
- Hitting the tongue directly: The tongue can crush or mushroom, ruining the next joint.
- Applying adhesive too early: Skinned adhesive may not form the intended bond.
- Skipping mechanical fasteners: Subfloor adhesive is part of a system, not a substitute for nails or screws.
- Overdriving fasteners: Deeply buried heads can damage the panel face.
- Ignoring wet or swollen panels: Raised seams can telegraph through finished flooring.
- Using damaged profiles: Broken tongues and grooves cannot provide reliable edge support.
Checking the Finished Plywood Subfloor
Walk the installed area and listen for movement or squeaks. Check that panel faces are even, end joints are supported, fasteners are properly seated, and no hardened adhesive remains above the surface. Inspect the underside where accessible to locate missed joists or unsupported cuts.
Before installing finished flooring, allow wet panels to dry to acceptable conditions. Sand localized swollen edges only when permitted by the panel and flooring manufacturers. Correct loose panels, protruding fasteners, high seams, and damaged areas now. A carpet installer, tile setter, or hardwood contractor should not be expected to solve structural subfloor problems with optimism and extra underlayment.
Experience-Based Lessons From Real-World Installations
The most useful lesson from repeated subfloor installations is that speed comes from preparation, not from swinging a larger hammer. Crews that begin with straight framing, an accurate chalk line, staged panels, and a planned adhesive sequence often move faster than crews that rush into laying sheets. The second group may appear impressively energetic for twenty minutes, after which everyone is measuring the same crooked joint with increasingly creative vocabulary.
A tapping block is one of the simplest tools on the job, yet it prevents a remarkable number of damaged panels. A four-foot scrap of straight 2-by-4 spreads impact along the panel edge and lets the installer work from one end of the joint to the other. A short block concentrates force in a small area and is more likely to dent the plywood. The block should bear against a sturdy portion of the sheet, never against the exposed tongue.
Adhesive timing is another lesson that becomes obvious after one difficult sheet. Applying glue across half the floor may feel efficient, but the first interruptiona phone call, complicated plumbing cut, misplaced panel, or wandering tape measurecan leave several beads covered with dust or partially cured. Applying adhesive only for the sheet currently being installed keeps the bond fresh and reduces cleanup. APA and adhesive manufacturers similarly emphasize fastening panels within the product’s working time.
Experienced installers also check joist locations before every fastening run. Printed fastener guides are helpful, but framing can shift, double members can occur, and rim areas may require a different angle. A pencil line or snapped reference can prevent a neat row of nails from missing the joist by half an inch. Looking underneath the floor after the first few sheets is worth the inconvenience; discovering thirty missed fasteners after the ceiling is installed is less charming.
Another recurring observation is that a reluctant joint is usually communicating a real problem. When two clean, undamaged panels are level and correctly aligned, the tongue should enter the groove with firm but reasonable tapping. If the panel requires repeated heavy blows, stop. The framing may be out of line, the tongue may be folded, or the first course may have shifted. Brute force can close the visible gap while creating hidden damage inside the joint.
Weather changes the workflow as well. Wet framing, cold adhesive, direct summer sun, and wind can all affect handling and working time. Panels exposed to rain should be drained and allowed to dry as appropriate before finish flooring is installed. Manufacturers offer products with enhanced moisture resistance, but “moisture resistant” does not mean “happily converted into a temporary swimming pool.”
Finally, the best quality-control test is not merely whether the joint looks closed. A successful installation combines correct spacing, full support, proper adhesive contact, accurately driven fasteners, and a flat surface. The floor should feel quiet and solid underfoot. That result is less exciting than dramatic hammering, but decades from now, nobody will praise the noise made during construction. They will appreciate the noise the finished floor does not make.
Conclusion
Joining tongue-and-groove plywood successfully begins long before the tongue enters the groove. Select the correct rated panel, prepare and inspect the framing, establish a straight first course, orient the sheets properly, and keep every square-cut end supported. Apply compatible subfloor adhesive in manageable sections, engage each joint with a tapping block, preserve the manufacturer’s required spacing, and fasten the panels before the adhesive begins to cure.
Most installation problems come from forcing a damaged or misaligned joint, ignoring panel expansion, or trying to compensate for poor framing with additional nails. Slow down when a panel resists. A few minutes spent finding the cause can prevent raised seams, broken edges, loose sheets, and squeaks that seem to know exactly when the house is quiet.
Note: This article synthesizes established installation guidance from APAThe Engineered Wood Association, ICC Digital Codes, the USDA Forest Products Laboratory, Weyerhaeuser, LP Building Solutions, Huber Engineered Woods, Georgia-Pacific Building Products, Fine Homebuilding, ProTradeCraft, the National Wood Flooring Association, Lowe’s, Loctite, and related U.S. construction references. Product instructions, engineered plans, and locally adopted building codes should always control a specific installation.