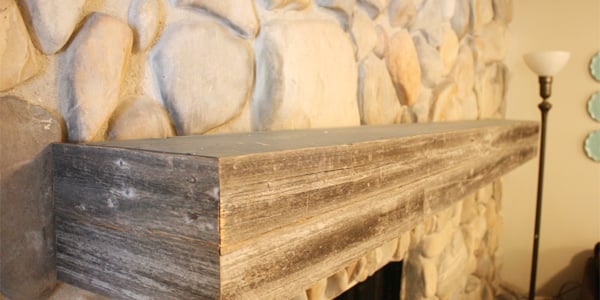
Installing a wood mantel on a stone wall is one of those home projects that looks simple from across the room and suddenly becomes very serious when you are holding a drill, staring at uneven stone, and wondering whether your fireplace is judging you. The good news? A wood mantel can absolutely be installed on stone when you plan carefully, use the right mounting method, and respect the fact that stone is not drywall wearing a fancy jacket.
A wood mantel adds warmth, balance, and a strong focal point to a stone fireplace. It can make a rugged wall feel finished, give a living room a cozy architectural anchor, and provide a handsome shelf for art, candles, framed photos, or the seasonal parade of pumpkins, stockings, and tiny ceramic houses. But because stone surfaces are uneven, heavy, and often located near heat, mantel installation requires more than “put screw here and hope.”
This guide walks through the practical steps, safety considerations, tools, examples, and real-world experience involved in installing a wood mantel on a stone wall. Whether you are working with natural fieldstone, stacked stone veneer, brick-like stone, or a manufactured stone surround, the goal is the same: a level, sturdy, attractive mantel that looks like it was born there.
Why Install a Wood Mantel on a Stone Wall?
Stone brings texture. Wood brings warmth. Put them together and your fireplace suddenly develops personality, like a cabin architect who also knows how to host Thanksgiving.
A wood mantel can soften the visual weight of a stone fireplace, especially if the stone wall feels dark, cold, or bulky. A floating wood beam mantel creates a rustic or modern farmhouse look, while a smooth stained mantel can feel transitional, craftsman, or contemporary. Painted mantels can also work beautifully when the room needs contrast rather than more natural tones.
Functionally, the mantel creates a visual break between the firebox and the wall above it. It can also help frame a mirror, artwork, or television area. However, a mantel is not just decoration. Because it projects from the wall and may hold objects, it must be properly anchored. A loose mantel is not “charming.” It is a shelf with commitment issues.
Before You Start: Know Your Stone Wall
Not every stone wall is the same. Before drilling anything, identify what you are attaching the mantel to. The installation method depends heavily on the wall structure.
Natural Stone
Natural stone is strong but irregular. Some stones are extremely hard, while others can split or chip if drilled carelessly. The surface may have high and low spots, which makes it harder for a mantel or cleat to sit flush.
Manufactured Stone Veneer
Manufactured stone veneer is often made from concrete mixtures shaped and colored to look like real stone. It is usually thinner and lighter than full-depth natural stone. The important detail is that veneer itself may not be strong enough to carry the full weight of a heavy mantel. In many cases, the fasteners must reach the masonry, framing, or structural backing behind the veneer.
Stacked Stone
Stacked stone is beautiful, but it can be tricky because the face is uneven and narrow ledges may interfere with a flat mounting bracket. You may need shims, careful grinding, or a custom back cut on the mantel to help it sit correctly.
Solid Masonry vs. Framed Wall
A true masonry fireplace may have stone, brick, block, or concrete behind the face. A framed wall with stone veneer may have wood studs and cement board behind the stone. These two conditions require different fasteners. Masonry screws, sleeve anchors, wedge anchors, threaded rods, or epoxy systems may be used for masonry. Lag screws may be appropriate when anchoring into solid wood framing behind the stone.
Fireplace Safety and Mantel Clearance
Before thinking about stain color, mantel depth, or how many tiny plants you can place on top, deal with safety clearances. Wood is combustible, and fireplaces produce heat. That combination deserves respect.
For a working fireplace, check your local building code, fireplace manufacturer instructions, and any listing label on the fireplace or insert. A common rule for masonry fireplaces is that combustible mantel material must not be too close to the fireplace opening, and deeper projections generally require greater clearance. Many homeowners use a basic planning guideline of placing the mantel at least 12 inches above the firebox opening, but the correct clearance depends on your fireplace type, mantel projection, and local code.
Gas inserts, wood-burning fireplaces, electric fireplaces, and decorative nonworking fireplaces can all have different requirements. A mantel installed safely above a nonworking decorative fireplace may not be safe above a wood-burning firebox. When in doubt, ask a licensed fireplace professional or local building department. That five-minute call is much cheaper than turning your beautiful mantel into a campfire with better trim.
Choosing the Right Wood Mantel
The best mantel is not simply the one that looks good online. It must fit the fireplace, the room, and the wall structure.
Size and Proportion
A common design approach is to let the mantel extend a few inches beyond the fireplace opening on both sides. For many fireplaces, a mantel shelf depth of about 6 to 8 inches feels balanced, but larger stone fireplaces may support deeper or thicker beams visually. Smaller rooms usually look better with slimmer mantels, while large vaulted rooms can handle a chunky reclaimed beam.
Weight
Weight matters. A hollow box mantel is easier to mount than a solid timber beam. Solid wood beams can be stunning, but they may require stronger anchors, deeper embedment, and more helpers. If the mantel makes two adults say, “Let’s count to three,” treat it as a structural mounting project, not a craft project.
Style and Finish
Oak, pine, cedar, walnut, maple, and reclaimed barnwood all create different moods. A rough-sawn beam feels rustic. A clean-lined white oak mantel looks modern. A painted mantel can brighten a dark stone fireplace. Choose a finish that complements the stone instead of fighting it. If your stone already has strong color variation, a simpler wood tone often works best.
Best Mounting Methods for a Wood Mantel on Stone
There are several reliable ways to install a wood mantel on a stone wall. The best choice depends on mantel weight, wall type, surface irregularity, and desired appearance.
1. Wood Cleat or Ledger Board
A cleat is one of the most common mantel installation methods. A board is fastened securely to the stone or structural backing, and the hollow mantel slides over it or rests on it. This method works especially well for hollow box mantels because the cleat supports the mantel from inside.
For stone, the cleat may be attached with masonry screws or anchors. If the wall is stone veneer over framing, you may need fasteners long enough to reach studs or solid backing. The cleat must be level, straight, and strong. The mantel is then secured to the cleat with screws from the top, bottom, or back, depending on the design.
2. French Cleat
A French cleat uses two matching angled pieces. One is mounted to the wall, and the other is attached to the mantel. The angles interlock, pulling the mantel down and back toward the wall. This method is popular because it creates a strong, clean installation and makes it easier to remove the mantel later if needed.
On uneven stone, the challenge is getting the wall cleat flat and level. You may need shims behind the cleat or carefully choose anchor points on flatter stone areas.
3. Steel Rod or Hidden Bracket System
Steel rods or hidden mantel brackets are often used for floating wood beams. The rods are anchored into masonry or framing, and the mantel is drilled to slide over them. This gives a clean “floating” look with no visible support.
This method is excellent for solid beams but requires accurate drilling. The rod holes in the mantel must line up with the rods in the wall. If they do not, you will learn new vocabulary very quickly.
4. Corbels or Decorative Brackets
Corbels can be decorative, structural, or both. If they are structural, they must be properly anchored into masonry or framing and sized to support the mantel’s depth and weight. Corbels are useful when the design calls for a traditional mantel or when extra visible support makes sense.
5. Adhesive-Only Installation
Construction adhesive or epoxy can help reduce movement and improve contact between surfaces, but adhesive alone is usually not the best choice for a heavy wood mantel over a working fireplace. Adhesives have cure times, temperature limitations, and surface-preparation requirements. For lightweight decorative pieces, adhesive may be part of the system, but for most mantels, mechanical fastening should do the real holding.
Tools and Materials You May Need
Gathering the right tools before starting prevents the classic DIY workout known as “walking back and forth to the garage 37 times.”
- Wood mantel or beam
- Mounting cleat, French cleat, steel rods, or mantel bracket
- Hammer drill or rotary hammer
- Masonry drill bits sized for your anchors
- Level, tape measure, pencil, and painter’s tape
- Masonry screws, sleeve anchors, wedge anchors, or lag screws as appropriate
- Construction adhesive rated for wood and masonry, if used
- Shop vacuum, compressed air, or blow-out bulb for dust removal
- Shims for uneven stone
- Socket wrench, impact driver, or drill driver
- Safety glasses, dust mask, hearing protection, and gloves
- Stud finder or inspection method if stone veneer covers a framed wall
Step-by-Step Guide: Installing a Wood Mantel on a Stone Wall
Step 1: Confirm Clearance and Layout
Measure from the top and sides of the firebox opening. Confirm that your planned mantel location meets the required clearance for your fireplace type. Then mark the centerline of the firebox and the centerline of the mantel. These two lines help keep the finished mantel visually balanced.
Use painter’s tape to outline the mantel on the stone wall. Step back and look at it from across the room. Check height, width, and depth visually. This is your chance to adjust before making holes. Holes in stone are not like pencil marks; they do not politely erase themselves.
Step 2: Choose Anchor Locations
Pick anchor points that land in solid material. If you are drilling into natural stone, avoid fragile edges, cracks, or thin pieces. If you are drilling through veneer, determine what is behind it. For brick or block, some installers prefer mortar joints for smaller attachments because they are easier to repair, but for heavy mantels, the anchor must be rated for the load and installed in a material that can support it.
Do not guess on heavy installations. If the wall construction is unclear, remove a small hidden area, inspect from above or below, or consult a contractor.
Step 3: Dry-Fit the Mantel and Mounting Hardware
Hold the mantel or cleat in place and check for gaps. Stone walls are rarely perfectly flat. A few small gaps may be normal, but large gaps can cause rocking, twisting, or poor support.
For a hollow mantel, test how it slides over the cleat. For steel rods, mark rod spacing carefully on both the wall and the mantel. For corbels, check that both supports touch the mantel evenly. Dry-fitting is the difference between a smooth installation and a dramatic reenactment of “Why Is This Crooked?”
Step 4: Drill the Stone or Masonry
Use a masonry bit matched to the fastener requirements. Start slowly to prevent the bit from wandering on uneven stone. Painter’s tape over the drill point can help reduce slipping. Keep the drill level and avoid forcing it. Let the bit do the work.
Drill to the proper depth for the anchor. Many masonry fasteners require the hole to be slightly deeper than the anchor embedment so dust and debris have room to clear. After drilling, remove dust with a vacuum, compressed air, or blow-out bulb. Dust left in the hole can prevent anchors from seating properly and weaken the connection.
Step 5: Install the Cleat, Rods, or Brackets
Fasten the mounting system to the wall according to the hardware requirements. Check level after the first fastener, after the second fastener, and again after tightening. Stone can push a bracket slightly out of alignment as fasteners seat.
If using shims, use noncompressible shims where possible and keep them hidden behind the mantel. If using construction adhesive as a supplement, apply it only after you are sure the parts fit and the mantel can be held in place while it cures.
Step 6: Attach the Mantel
Lift the mantel into place with help. Slide it over the cleat, onto the rods, or onto the bracket system. Do not rush this step. Heavy wood plus uneven stone is a team sport.
Once the mantel is seated, secure it according to the design. This may involve screws driven from the top into the cleat, set screws underneath, or hidden fasteners. Recheck level and alignment before final tightening.
Step 7: Finish the Details
Fill visible screw holes with matching wood filler or plugs. Touch up stain or paint. If small gaps remain between the mantel and stone, decide whether to leave them as natural shadow lines or use a carefully chosen dark caulk that blends with the stone. Avoid smearing caulk into rough stone unless you enjoy cleaning textured surfaces with the patience of a museum conservator.
Common Mistakes to Avoid
Ignoring Fireplace Clearance
This is the biggest mistake. A mantel that looks beautiful but sits too close to heat is not properly installed. Always check clearances before drilling.
Using Drywall Anchors in Stone
Drywall anchors are not masonry anchors. Stone and masonry require fasteners designed for hard base materials. Using the wrong anchor can lead to a loose mantel, cracked stone, or sudden shelf failure.
Skipping Dust Removal
Masonry dust inside a drilled hole can block the anchor from seating correctly. Clean every hole before inserting fasteners.
Assuming Veneer Can Carry the Load
Stone veneer may be decorative rather than structural. A heavy mantel should be supported by masonry, studs, blocking, or rated anchors, not by thin veneer alone.
Installing Alone
Even a medium-size mantel can be awkward. Having a helper improves safety and accuracy. It also gives you someone to blame when the pencil rolls behind the hearth.
Design Examples for Different Rooms
Rustic Living Room
A reclaimed oak beam mounted on rough fieldstone creates a lodge-like feel. Use hidden rods or a strong cleat, and keep the finish matte so the wood looks natural rather than overly polished.
Modern Farmhouse Fireplace
A hollow box mantel in white oak or stained pine works well over stacked stone. A French cleat can provide a clean floating appearance. Keep decor simple: one large mirror, a few candleholders, and perhaps greenery that does not look like it is trying too hard.
Traditional Stone Surround
A shaped wood mantel with corbels can make a stone fireplace feel more formal. In this case, painted wood may coordinate with crown molding, built-ins, or baseboards.
Small Room or Low Ceiling
Use a slimmer mantel and avoid an overly deep projection. A big chunky beam in a small room can look like the fireplace is wearing shoulder pads.
Maintenance After Installation
After installing a wood mantel on a stone wall, check it periodically. Look for movement, widening gaps, loose screws, or changes caused by seasonal wood movement. Wood expands and contracts with humidity, while stone does not move in the same way. Small changes are normal, but a mantel that shifts or sags should be inspected.
Dust the mantel regularly and avoid placing heavy objects near the front edge. If the fireplace is used often, monitor the wood finish for discoloration or drying from heat. Never hang combustible decorations too close to the firebox, and be especially careful during holidays when stockings, garlands, and ribbons tend to appear as if summoned by a festive wizard.
Real-World Experiences: What Installing a Wood Mantel on Stone Teaches You
The first experience most people have with this project is discovering that stone is not flat. It looks flat in photos. It looks flat from the sofa. But the moment you put a level or cleat against it, the wall reveals its topographical ambitions. One stone sticks out like a proud little mountain, another sinks back, and suddenly your mantel installation has become a geography lesson.
That is why the dry-fit stage matters so much. A common beginner mistake is assuming the mantel will pull tight to the wall once the screws are tightened. Sometimes it will. Sometimes tightening only twists the cleat, stresses the anchor, or makes the mantel lean forward like it is listening to gossip. Experienced installers take time to identify the high points in the stone and plan around them. A small shim behind a cleat can solve a problem that brute force would only make worse.
Another lesson is that drilling into stone requires patience. A hammer drill can make the work manageable, but stone varies wildly. One hole may drill cleanly in seconds, and the next may feel like drilling into a meteorite. Starting slowly helps keep the bit from skating across the surface. Once the bit has a shallow seat, you can increase pressure. It is also wise to pause occasionally and let the bit cool, especially in hard stone.
Dust control is another surprisingly important part of the experience. The hole may look clean from the outside, but fine masonry dust packs inside like flour in a measuring cup. If you drive an anchor into a dusty hole, it may stop short, bind, or fail to grip correctly. Cleaning the hole with a vacuum or blow-out bulb feels like a small step, but it has a big effect on how securely the fastener seats.
Many homeowners also learn that mantel weight changes the mood of the project. A lightweight hollow mantel feels friendly. A solid beam feels like furniture with a gym membership. With heavy mantels, extra hands are not optional. Two people can hold and align the mantel while a third checks level or starts fasteners. Trying to balance a heavy beam alone against stone is how projects become stories told at family gatherings.
There is also an aesthetic lesson: perfection is not always the goal. Stone has texture, shadow, and irregularity. A tiny reveal line behind a mantel may look natural, while overfilling every gap with caulk can make the installation look less authentic. The best results often come from fitting the mantel carefully, hiding structural adjustments, and allowing the stone to keep its character.
Finally, installing a wood mantel on a stone wall teaches respect for preparation. The visible part of the project may take only an hour or two, but the planning determines the outcome. Measuring clearance, choosing anchors, testing the fit, marking level lines, and confirming support are the quiet steps that make the finished mantel feel solid and intentional. In other words, the mantel gets the applause, but the layout does the heavy lifting.
Conclusion
Installing a wood mantel on a stone wall is a rewarding upgrade that can completely change the personality of a fireplace. The project combines design, carpentry, masonry, and safety in one highly visible place. When done well, the mantel looks effortless. Behind that effortless look, however, are careful measurements, proper clearances, rated fasteners, clean anchor holes, and a mounting method matched to the wall.
The smartest approach is to treat the stone wall with respect. Identify what kind of stone or veneer you have, understand what is behind it, choose a suitable cleat or bracket system, and never ignore fireplace clearance rules. A wood mantel can be rustic, refined, modern, or traditional, but above all, it should be secure.
Take your time, test-fit everything, and invite a helper before the heavy lifting begins. Your future self will thank you every time you look at the fireplace and see a level, sturdy, handsome mantel instead of a crooked shelf with a dramatic backstory.
Note: This article is written for web publishing and is based on real home-improvement, fireplace-safety, masonry-fastening, and manufacturer installation practices. Always verify local code, fireplace manufacturer requirements, and load-rated hardware before installation.