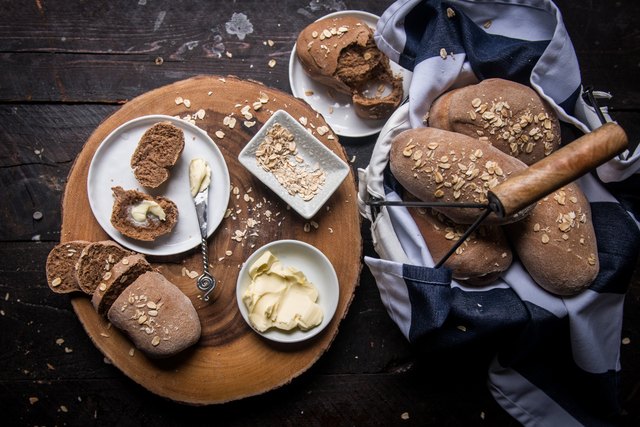
Some restaurant bread baskets are polite little appetizers. The Cheesecake Factory brown bread is different. It arrives at the table warm, sweet, soft, and covered with oats, then quietly becomes the main event while everyone pretends to study the enormous menu.
This homemade copycat recipe recreates the bread’s signature combination of honeyed sweetness, deep molasses flavor, tender whole-wheat crumb, and dark brown color. It is not an official restaurant formula, but it uses the same general flavor profile found in the brand’s retail bread: wheat flour, whole wheat, oats, yeast, sweeteners, molasses, and rye. Cocoa and espresso powder provide the extra roasted depth commonly used in successful home versions.
The process is approachable even if yeast usually makes you nervous. The most important rule is to watch the dough rather than worship the clock. Yeast has no respect for your dinner schedule, your favorite television show, or the fact that guests will arrive in 47 minutes.
What Makes Cheesecake Factory Brown Bread So Distinctive?
It Is Sweet, but It Is Not Dessert
Honey, molasses, and a modest amount of sugar give the bread its recognizable sweetness. However, salt, whole-wheat flour, cocoa, and coffee keep the flavor balanced. The finished loaf should taste rich and lightly sweet, not like chocolate cake wearing an oat costume.
The Dark Color Comes From Several Ingredients
Whole-wheat flour provides a naturally tan base, while molasses, cocoa powder, and espresso deepen the color. Commercial versions may also use caramel color, but a homemade loaf can achieve an attractive dark brown shade without it.
Use natural unsweetened cocoa powder rather than a sweetened cocoa drink mix. The goal is color and complexity, not a bread loaf that tastes like hot chocolate.
The Texture Is Soft and Slightly Chewy
A combination of bread flour and whole-wheat flour is the easiest way to produce a tender crumb with enough structure to hold its shape. Bread flour contributes gluten and chew, while whole wheat brings the hearty flavor associated with honey-wheat bread.
A small amount of rye flour is optional, but it moves the flavor closer to the packaged ingredient profile. Keep the quantity modest. Too much rye can make the dough denser and less fluffy.
Copycat Cheesecake Factory Brown Bread Recipe
Yield: 3 small baguette-style loaves, about 18 slices
Preparation time: 25 minutes
Rising time: 1 hour 45 minutes to 2 hours 30 minutes
Baking time: 22 to 28 minutes
Equipment
- Large mixing bowl or stand mixer
- Dough hook, wooden spoon, or sturdy silicone spatula
- Kitchen scale or measuring cups
- Baking sheet
- Parchment paper
- Clean kitchen towel or reusable bowl cover
- Instant-read thermometer, recommended
Ingredients
- 1 1/4 cups warm water, approximately 105°F to 110°F
- 2 1/4 teaspoons active dry yeast or instant yeast
- 1 teaspoon granulated sugar
- 2 cups bread flour, approximately 240 grams
- 1 1/4 cups whole-wheat flour, approximately 150 grams
- 1/4 cup rye flour, approximately 30 grams, optional
- 2 tablespoons unsweetened cocoa powder
- 1 teaspoon instant espresso powder
- 1 1/2 teaspoons fine salt
- 1/4 cup honey
- 3 tablespoons unsulphured molasses
- 2 tablespoons neutral oil or melted unsalted butter
- 1/3 cup old-fashioned rolled oats, for topping
- Fine cornmeal, for the baking sheet, optional
- Melted butter, for brushing after baking, optional
How to Make Cheesecake Factory Brown Bread Step by Step
1. Activate the Yeast
Pour the warm water into a large mixing bowl. Stir in the teaspoon of sugar and sprinkle the yeast over the surface. Let the mixture stand for 5 to 10 minutes.
Active dry yeast should become creamy or foamy. Instant yeast does not always create an impressive foam party, so do not panic if the surface looks calmer. When testing active dry yeast separately, visible foam after several minutes is a useful sign that the yeast is alive and ready to work.
Avoid very hot water. It can damage the yeast and leave you with a dark brown doorstop instead of bread.
2. Combine the Dry Ingredients
In a separate bowl, whisk together the bread flour, whole-wheat flour, optional rye flour, cocoa powder, espresso powder, and salt.
Whisk thoroughly so the cocoa and coffee are evenly distributed. A stubborn pocket of espresso powder can create one surprisingly energetic and bitter bite.
3. Mix the Dough
Add the honey, molasses, and oil to the yeast mixture. Stir until mostly combined. Add the dry ingredients gradually, mixing on low speed with a dough hook or stirring with a wooden spoon.
Once no dry flour remains, knead the dough for 8 to 10 minutes in a stand mixer or about 10 to 12 minutes by hand. The finished dough should feel soft, elastic, and slightly tacky. It may cling lightly to a fingertip, but it should not behave like cake batter.
If the dough is extremely wet, add bread flour 1 tablespoon at a time. Wait at least 30 seconds between additions. Whole-wheat flour absorbs moisture gradually, and adding half a cup of flour in a moment of panic is how soft restaurant-style bread becomes construction material.
4. Complete the First Rise
Lightly grease a clean bowl. Form the dough into a ball, place it in the bowl, and turn it once so the surface receives a thin coating of oil. Cover the bowl.
Let the dough rise in a draft-free area until approximately doubled in size, usually 60 to 90 minutes. A cool kitchen may require longer. Yeasted dough is ready when it has expanded substantially; temperature affects the speed, so volume is more reliable than a rigid time limit.
5. Divide and Shape the Loaves
Line a baking sheet with parchment paper. Sprinkle the parchment lightly with cornmeal if desired.
Gently press the air from the risen dough and divide it into three equal portions. A scale makes this easy, but visual estimation is perfectly acceptable. The bread police are not coming.
Pat each portion into a rough rectangle. Roll it tightly from one long side to the other, pinching the seam closed. Roll each piece gently under your palms until it forms an 8- to 10-inch log with slightly tapered ends.
Place the loaves seam-side down on the prepared baking sheet, leaving several inches between them.
6. Proof the Shaped Loaves
Cover the shaped dough loosely and let it rise for 35 to 55 minutes. The loaves should look noticeably puffy but should not necessarily double completely.
Use the fingertip test near the end of proofing. Press the dough gently with a lightly floured finger. If the indentation fills immediately, it needs more time. If it returns slowly and leaves a faint mark, it is ready. If the dough collapses or the indentation never moves, it may be overproofed.
During the final 20 minutes of proofing, preheat the oven to 350°F.
7. Add the Oat Topping
Brush the loaves very lightly with water. Sprinkle rolled oats over the tops and press them gently so they adhere.
Do not soak the dough. A mist or thin brushing is enough. Otherwise, the oats may slide off during baking like tiny breakfast-themed sleds.
8. Bake
Bake the loaves on the center rack for 22 to 28 minutes. Rotate the pan once if your oven browns unevenly.
The bread is done when the loaves are firm, the bottoms sound somewhat hollow when tapped, and the center measures approximately 190°F to 195°F. Soft yeast breads are generally fully baked around 190°F, while particularly dense whole-grain loaves may require a higher internal temperature.
Because this dough is already dark, visual browning is not a dependable test. A thermometer is more useful than staring through the oven window and attempting to communicate telepathically with the bread.
9. Cool and Serve
Transfer the loaves to a wire rack. Brush the crusts with melted butter for a softer finish, if desired.
Allow the bread to cool for at least 20 to 30 minutes before slicing. Fresh bread continues setting as it cools. Cutting it immediately can compress the crumb and make the center appear gummy even when it was baked correctly.
Serve slightly warm with salted butter. The contrast between the sweet bread and salty butter is a major part of the restaurant-style experience.
Why This Copycat Brown Bread Recipe Works
The Flour Blend Balances Flavor and Structure
Using only whole-wheat flour can produce a heavier loaf because the bran interferes with gluten development and absorbs more water. Bread flour strengthens the dough, helping it trap gas from the yeast while preserving a chewy, flexible crumb.
The optional rye flour adds grain complexity without taking over. If rye flour is unavailable, simply replace it with an equal amount of bread flour.
Honey and Molasses Perform Different Jobs
Honey provides a clean, floral sweetness and helps keep the crumb tender. Molasses contributes darker color, mild bitterness, minerals, and a toasted caramel flavor.
Use regular unsulphured molasses rather than blackstrap molasses. Blackstrap is much more bitter and can overwhelm the cocoa, honey, and wheat.
Cocoa and Espresso Add Depth, Not Dessert Flavor
Cocoa powder deepens the color and contributes subtle roasted notes. Espresso powder reinforces those notes without making the finished bread taste strongly like coffee.
People who are especially sensitive to coffee can reduce the espresso powder to 1/2 teaspoon or omit it. The loaf will be slightly lighter and less complex, but it will still be delicious.
Common Brown Bread Problems and How to Fix Them
The Bread Is Dense
Dense bread is commonly caused by inactive yeast, insufficient kneading, too much flour, or inadequate rising time. Check that the dough actually doubles during the first rise rather than stopping the process simply because 60 minutes have passed.
When measuring flour by volume, spoon it into the cup and level the top. Scooping directly from the flour bag compresses the flour and can add significantly more than intended.
The Dough Is Too Sticky
A little tackiness is desirable. Before adding more flour, continue kneading for another two minutes. Gluten development often transforms a messy dough into a smoother one.
If it still smears heavily across the bowl or work surface, add flour one tablespoon at a time. Humidity, flour brand, and measuring technique can all affect hydration.
The Bread Tastes Bitter
Too much cocoa, espresso powder, or blackstrap molasses can create bitterness. Use level measurements and regular unsulphured molasses. Do not substitute brewed coffee for all the water unless you deliberately want a stronger roasted flavor.
The Loaves Spread Sideways
Dough that is too wet, under-kneaded, or overproofed may lose its shape. Create surface tension during shaping by rolling the dough tightly and pinching the seam securely.
If your kitchen is warm, begin checking the second rise after 25 to 30 minutes. A loaf can move from perfectly proofed to exhausted surprisingly quickly.
The Crust Is Hard
Overbaking is the most likely cause. Check the internal temperature early, especially if you formed smaller loaves. Brushing the hot crust with melted butter and covering the loaves loosely with a clean towel while they cool can soften the exterior.
Recipe Variations
Brown Bread Dinner Rolls
Divide the dough into 12 equal pieces and shape them into smooth balls. Arrange them in a greased 9-by-13-inch pan, leaving a little space between each roll. Proof until puffy and bake at 350°F for approximately 18 to 22 minutes.
Sandwich Loaf
Shape the entire batch into one large loaf and place it in a greased 9-by-5-inch loaf pan. The pan will produce a taller bread suitable for sandwiches and toast. Bake for approximately 35 to 42 minutes, checking the center with a thermometer.
Mini Baguettes
Divide the dough into six portions rather than three. Bake the smaller loaves for approximately 16 to 21 minutes. These are ideal for individual bread baskets, although they may encourage every diner to guard a personal loaf like a dragon protecting treasure.
Without a Stand Mixer
Mix the dough with a wooden spoon until shaggy, then knead it on a lightly floured surface. Use the heel of your hand to push the dough away, fold it back, rotate it, and repeat.
The dough may initially feel sticky. A bench scraper makes hand kneading easier and prevents you from adding unnecessary flour.
Storage, Freezing, and Reheating
Store completely cooled bread in an airtight container or tightly sealed bag at room temperature for up to three days. Avoid refrigerating it unless necessary, because refrigeration can accelerate staling.
For longer storage, wrap each loaf tightly in plastic wrap and place it in a freezer bag. Freeze for up to two months. Thaw at room temperature while still wrapped so moisture remains inside the bread rather than condensing on the counter.
To recreate the warm restaurant-basket effect, wrap a loaf in foil and heat it in a 325°F oven for about 8 to 12 minutes. Individual slices can be warmed briefly in a microwave under a slightly damp paper towel.
What to Serve With Cheesecake Factory Brown Bread
Salted butter is the classic choice, but the bread is more versatile than its appetizer reputation suggests. Try it with:
- Honey butter or cinnamon butter
- Chicken salad or turkey sandwiches
- Tomato soup, chili, or beef stew
- Soft cream cheese and berry preserves
- Eggs and breakfast sausage
- French toast with maple syrup
- Mini sliders with roast beef or pulled pork
Leftover slices also make excellent croutons. Cube the bread, toss it with melted butter and a pinch of salt, then bake until crisp. The mild sweetness pairs especially well with salads containing apples, pears, pecans, or blue cheese.
Conclusion
Making Cheesecake Factory brown bread at home requires more patience than buying a loaf, but the reward is a kitchen filled with the smell of honey, molasses, cocoa, and warm wheat. The recipe succeeds when the dough stays soft, the yeast receives enough time to work, and the loaves are baked by temperature rather than color alone.
Once you understand the basic dough, it can become baguettes, dinner rolls, sandwich bread, sliders, toast, or the centerpiece of a bread basket that mysteriously empties before dinner is ready. Serve it warm with salted butter and prepare to hear the highest compliment available to a home baker: “Wait, you made this?”
The Real Kitchen Experience: What You Will Notice While Making It
The first surprise comes while mixing the dough. Honey, molasses, cocoa, and coffee do not initially look like the beginning of soft dinner bread. The bowl resembles an ambitious mud project. Then the flour absorbs the liquid, the dough becomes elastic, and the aroma starts making sense. It smells malty, earthy, and faintly chocolatey without smelling like brownies.
The kneading stage is where many first-time bakers become suspicious. This dough is tackier than basic white bread because it contains liquid sweeteners and whole-grain flour. The natural reaction is to keep throwing in flour until nothing sticks. Resist that urge. A dough that feels perfectly dry before rising often produces a loaf that feels perfectly dry after baking.
Instead, give the dough time to develop. After several minutes of kneading, it should begin pulling away from the bowl more cleanly. It may still cling slightly at the bottom, and that is fine. Touch it with a lightly oiled finger. If a thin film remains but no large piece tears away, the consistency is usually on target.
The first rise can feel uneventful. Dark dough does not always reveal bubbles as clearly as pale dough, so mark the starting height on the bowl with a piece of tape. This simple trick prevents the classic bread-making debate: “Has it doubled, or have I merely stared at it long enough to lose perspective?”
Shaping is the most satisfying part. Rolling the dough into smooth miniature baguettes instantly makes the project look more professional. If a loaf keeps shrinking after you stretch it, let it rest for five minutes. Resting relaxes the gluten, after which the dough becomes much more cooperative and less determined to return to its original postal code.
The second proof requires closer attention. Properly proofed loaves look soft and inflated, with rounded sides. Underproofed dough feels tight and springs back immediately when pressed. Overproofed dough feels fragile and may wrinkle or deflate. The ideal loaf responds slowly to a gentle touch.
During baking, the aroma becomes remarkably similar to a restaurant bread basket. The molasses smells warmer, the cocoa loses its raw edge, and the oats begin to toast. Because the dough begins brown, it is easy to wonder whether anything is happening. Trust the thermometer rather than waiting for a dramatic golden transformation that may never arrive.
The hardest part is cooling. The loaves look ready, the butter is ready, and everyone nearby suddenly develops an urgent interest in quality control. Slicing too early, however, releases steam and compresses the interior. Waiting even 20 minutes produces cleaner slices and a softer, more even crumb.
The second batch is usually easier than the first because you recognize what “slightly tacky” actually means in your kitchen. You also learn how quickly your oven bakes smaller loaves and how long proofing takes at your room temperature. Bread recipes provide measurements, but experience supplies the final adjustments.
One practical lesson is to make more than you think you need. Three small loaves sound generous until one is sampled during cooling, another reaches the dinner table, and the third is quietly claimed for tomorrow’s breakfast. Fortunately, the recipe freezes well, so doubling the batch is less unreasonable than it appears.
The finished bread should be soft enough to compress gently, sturdy enough to slice, and sweet enough to make plain butter taste exciting. It will not be chemically identical to a commercial or restaurant loaf, but it captures the experience that matters: dark honey-wheat bread arriving warm, disappearing quickly, and making everyone temporarily forget that cheesecake exists.