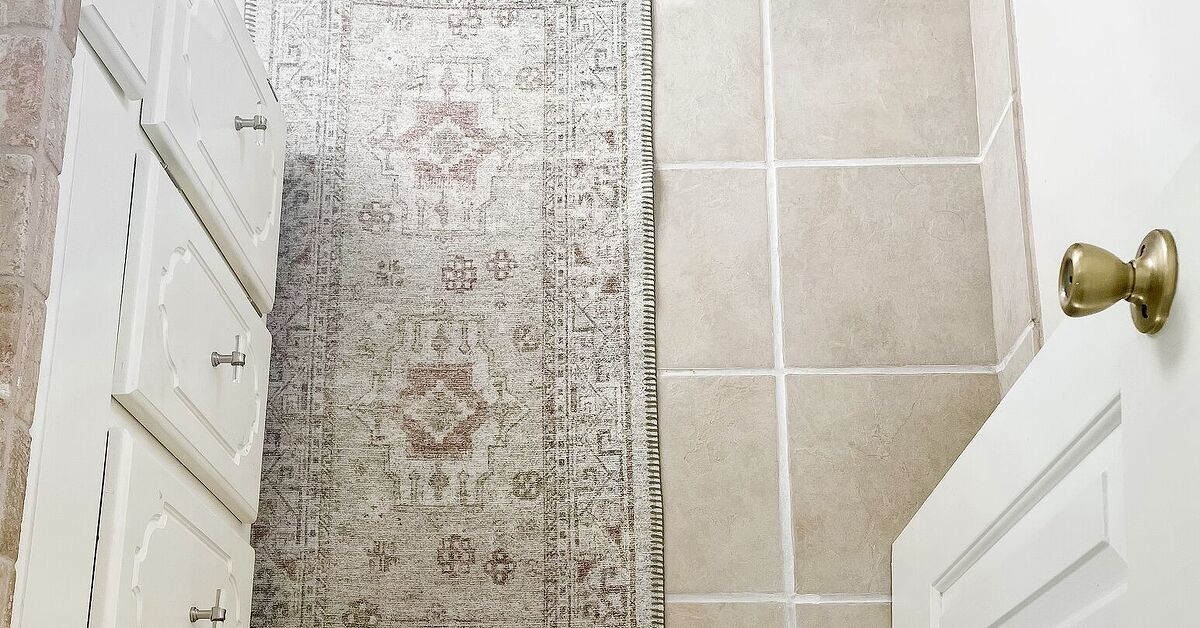
Your floor tile may not be ugly. It may simply have terrible outlines.
That sounds dramatic, but dirty, stained, or uneven grout can make perfectly respectable ceramic or porcelain tile look decades older than it really is. The tile is still sitting there, doing its job, while the grout lines have apparently decided to dress as a parking lot.
Fortunately, you may not need to rip out the floor, rent demolition equipment, or begin a home renovation that somehow ends with you choosing new kitchen cabinets at 11 p.m. A grout pen can offer a fast, relatively inexpensive way to refresh dingy floor tile by restoring or changing the visible color of existing grout lines.
The process is simple in theory: clean the grout, let it dry, draw over the joints, and allow the colorant to cure. In practice, preparation, product compatibility, and a steady application technique make the difference between a crisp tile makeover and a floor that looks as though a toddler discovered a paint marker.
Here is how to update dingy floor tile with a grout pen, choose a color, avoid common mistakes, and make your refreshed grout last.
What Is a Grout Pen?
A grout pen is a marker-style applicator containing a liquid grout colorant or coating. Depending on the product, the formula may be water-based and designed to cover discoloration, create a more uniform grout color, or add stain resistance as it colors.
Instead of removing the old grout, you apply the color directly to the exposed surface of existing grout joints. The applicator tip helps control where the color goes, making a grout pen especially convenient for small rooms, narrow joints, and detailed touch-ups.
Think of it as cosmetic dentistry for your floor. The underlying grout still needs to be sound, but the visible surface gets a much cleaner smile.
What a grout pen can do
A grout pen may help:
- Cover stubborn grout discoloration
- Create more consistent-looking grout lines
- Restore white, gray, beige, or other grout colors
- Change the apparent contrast between grout and tile
- Refresh a bathroom, kitchen, mudroom, or entry floor
- Delay a larger cosmetic tile renovation
What a grout pen cannot fix
A grout pen is not grout repair material. Do not use colorant as camouflage for joints that are badly cracked, crumbling, deeply missing, or separating from the tile edges. Loose tile, recurring moisture problems, and extensive mold also deserve investigation before you reach for a marker.
If you can scrape chunks of grout away with very little effort, the problem is structural rather than purely cosmetic. Repair or replace damaged grout first. A pretty coat of color over failing material is basically putting lipstick on a pothole.
Why Dingy Grout Makes Floor Tile Look So Old
Grout lines act as part of the visual grid of a tile installation. When the grout color is uniform, your eye tends to notice the tile pattern. When the joints are blotchy, dark in traffic areas, or covered with uneven stains, your eye notices every line.
Traditional cement-based grout can be porous. Dirt, oily residue, cleaning-product buildup, and everyday traffic may contribute to discoloration over time. Kitchens add cooking residue. Entryways collect outdoor soil. Bathrooms provide moisture and personal-care products. In other words, grout lives a hard life despite being only a few millimeters wide.
Regular cleaning can dramatically improve many floors. However, old stains or permanent color variation may remain after the actual grime is gone. That is where a grout color pen becomes useful: it creates a more consistent visible finish rather than asking you to scrub the same stubborn gray spot for the forty-third time.
Before Using a Grout Pen, Inspect the Floor
Do not begin coloring the moment your package arrives. Spend a few minutes inspecting the tile installation.
Look for cracked or missing grout
Walk slowly across the floor and examine the joints under good lighting. Mark areas with deep cracks, loose sections, or missing grout. Small repairs should be completed with an appropriate grout repair method before cosmetic recoloring.
Check for loose tile
A moving tile can continue stressing nearby grout. Coloring those joints will not solve the movement. If tiles rock, sound hollow in a suspicious way, or repeatedly develop cracks around the edges, investigate the installation problem.
Identify the tile material
Ceramic and porcelain floors are common candidates for grout-refresh projects, but natural stone requires additional care. Marble, limestone, travertine, and other stone surfaces can be sensitive to acidic or abrasive cleaners.
Read the grout pen label and the tile manufacturer’s care recommendations. Test your cleaning process and grout colorant in a hidden location. Behind a toilet, beneath an appliance edge, or in the back of a closet is better than discovering a compatibility problem in the center of your foyer.
Tools and Supplies You Will Need
Most grout pen makeovers require a surprisingly short shopping list:
- A grout pen or grout color marker suitable for your grout
- Vacuum, broom, or dry microfiber mop
- Tile-appropriate grout cleaner
- Soft- or medium-bristle grout brush
- Clean water
- Microfiber cloths or lint-free rags
- Disposable gloves
- Knee pads or a folded towel
- Small repair materials if damaged grout must be fixed
Keep several damp cloths within reach during the coloring stage. A grout pen project is much more relaxing when an accidental mark on tile can be wiped immediately instead of becoming a tiny archaeological artifact.
How to Update Dingy Floor Tile With a Grout Pen
Step 1: Vacuum or sweep the tile thoroughly
Begin with a dry floor. Vacuum along the grout lines to remove dust, crumbs, pet hair, and loose debris. Pay special attention to corners and edges.
This step is easy to underestimate. If loose soil remains on the floor, your cleaning solution can turn it into muddy residue and move it directly into the porous grout you are trying to refresh.
Step 2: Deep-clean the grout
Choose a cleaner compatible with your tile and grout. For routine soil, a mild or pH-neutral tile-and-grout cleaner is often a sensible starting point. Apply the cleaner according to its label and give it the specified dwell time before gently scrubbing the joints.
Use a grout brush or a small nylon-bristle brush. Work in manageable sections and rinse well so cleaner, loosened dirt, and residue are removed.
Natural stone deserves special caution. Avoid casually reaching for vinegar or another acidic DIY cleaner unless the surface manufacturer specifically approves it. Acid can damage acid-sensitive stone and may be inappropriate for deteriorating grout or certain sealers.
Also, never improvise your own chemistry experiment by mixing household cleaning chemicals. More bubbles do not automatically mean more cleaning power. Sometimes they mean you should leave the room and call someone.
Step 3: Rinse away all cleaning residue
A visibly clean floor is not necessarily residue-free. Wipe the tile and grout with clean water, changing your rinse water when it becomes dirty.
Leftover soap, grease, cleaner, or sealer can interfere with the way some grout colorants bond to the surface. This is one reason a grout pen used over poorly prepared joints may produce patchy results.
Step 4: Let the grout dry completely
Patience now saves frustration later. Allow the grout to dry as required by the grout pen manufacturer. Environmental conditions matter; humid bathrooms and poorly ventilated spaces may stay damp longer than open, air-conditioned rooms.
Do not judge grout dryness solely by touching the tile. Glazed tile may feel dry while porous cement grout still contains moisture.
Use fans or normal room ventilation when appropriate, but follow all product directions. The goal is clean, dry grout that gives the colorant the best chance to form a uniform finish.
Step 5: Test the grout pen in a hidden area
Never trust a grout color based only on the cap, package photograph, or your phone screen. Apply it to a small inconspicuous section and allow it to dry.
Grout color influences the way tile appears. Bright white lines can make individual tiles look sharply defined. A medium gray may soften stains and create a more practical appearance on a busy floor. A grout shade close to the tile color tends to create a calmer, more continuous visual field.
Examine your test section in daylight and artificial light before committing to the entire room.
Step 6: Prepare the grout pen
Follow the product instructions exactly. Many marker-style grout colorants require shaking and priming the nib by pressing it against a protected surface until color reaches the tip.
Do not repeatedly mash the applicator into the grout. Excessive pressure can damage a pen tip and release more colorant than you can control.
Your goal is a smooth, consistent flow. You are drawing a grout line, not trying to perform CPR on the marker.
Step 7: Color the grout in small sections
Start in the farthest corner of the room and work toward the exit. Otherwise, you may eventually find yourself standing on freshly colored grout with no escape route except an undignified hop across the tile.
Guide the grout pen directly along the joint using light, even pressure. Work on a small group of lines at a time. Some people find it easier to complete parallel joints in one direction and then return for the intersecting lines.
Do not rush. A steady application is usually faster overall because it reduces cleanup and touch-ups.
Step 8: Wipe colorant off the tile promptly
Keep a clean, slightly damp cloth nearby. If the grout pen touches the tile, wipe away the unwanted color while the product is still easy to remove, following manufacturer directions.
This matters especially on textured tile. Colorant can collect in tiny surface depressions that are considerably less fun to clean after curing.
For irregular or porous tile, test the application process carefully before doing a large area. Some surfaces may require extra protection or a different grout-coloring product.
Step 9: Inspect the first coat
Once the initial application has dried enough for inspection, look at the grout from standing height rather than six inches away.
Why? Because nobody normally examines a bathroom floor with their nose next to the baseboard. Minor variations that look dramatic while kneeling may be invisible under normal use.
Touch up thin areas or apply another coat only when permitted by the grout pen instructions. More product is not always better. Heavy, uneven application can produce visible ridges or inconsistent texture.
Step 10: Allow the grout color to cure
Drying and curing requirements vary among grout pens and grout colorants. Some products permit light foot traffic relatively quickly, while water exposure or full curing may require more time.
Follow the exact label for your product. Keep pets, children, wet mops, and impatient household members away from the treated area until it is ready.
Blocking the doorway with an upside-down laundry basket can be surprisingly effective. Is it elegant? No. Does it prevent a cat from autographing the floor? Sometimes.
How to Choose the Best Grout Pen Color
Match the original grout for an invisible refresh
If you simply want the floor to look cleaner, choose a color close to the original grout. This approach works well when the tile design is still attractive and the only problem is discoloration.
Choose darker grout for a more forgiving floor
Medium gray, warm gray, beige, or taupe can be practical in high-traffic spaces. Darker grout will not eliminate the need for cleaning, but everyday discoloration may be less visually obvious than it is on brilliant white joints.
Use contrast to emphasize the tile pattern
A contrasting grout color visually outlines each tile. Dark lines around white subway-style tile, for example, can create a graphic look. On a floor, strong contrast also makes grout alignment and application consistency more noticeable.
Blend grout and tile for a quieter appearance
Choosing grout close to the tile color reduces visual contrast. This can make a small room feel less busy and may draw more attention to the overall floor surface than the grid of joints.
Common Grout Pen Mistakes to Avoid
Coloring dirty grout
This is the classic shortcut that creates disappointing results. A grout pen should not be asked to bond through grease, cleaner film, floor polish, and five years of mysterious kitchen residue.
Clean first. Rinse thoroughly. Dry completely.
Using a grout pen as crack filler
Color does not rebuild missing grout. Repair deteriorated joints before recoloring.
Skipping the test patch
A color called “warm ivory” may look beige under your lighting, yellow beside your tile, or suspiciously like cappuccino foam. Test it.
Working across the entire room at once
Small sections give you better control and make it easier to wipe excess colorant from tile before it becomes difficult to remove.
Ignoring the product instructions
Not every grout pen has the same formula, surface compatibility, coverage, or cure time. Some products primarily color the grout, while other grout-colorant systems also provide sealing or stain protection.
Use the directions for the product in your hand rather than instructions from a random marker demonstrated in a 17-second social media video.
How Long Does a Grout Pen Makeover Last?
The life of a grout pen finish depends on the product, preparation, grout condition, traffic, moisture exposure, and cleaning routine.
A low-traffic guest bathroom may hold its refreshed appearance differently from a kitchen floor crossed by shoes, dogs, groceries, spills, and one person who somehow drops coffee every Tuesday.
Correct surface preparation is essential. So is maintenance after the project. Avoid cleaners or scrubbing methods that the grout colorant manufacturer warns against. Abrasive treatment may wear some surface coatings prematurely.
When touch-ups are eventually required, clean and prepare the affected grout according to the product instructions before applying more color.
How to Keep Refreshed Grout Looking Cleaner
Vacuum or sweep tile floors regularly so grit is not repeatedly ground into the joints. Clean spills promptly, especially oily or deeply colored liquids.
Use a tile-safe cleaner recommended for your flooring material and grout treatment. A soft or medium nylon brush can help remove buildup without resorting immediately to aggressive abrasives.
In moisture-prone areas, improve ventilation and address persistent water problems. Remember that sealing or coloring grout does not make routine cleaning unnecessary. Even stain-resistant surfaces can collect material on top.
Always check whether your specific grout pen already functions as a grout colorant and sealer before applying a separate sealer over it. Product systems differ, and an unnecessary topcoat may be incompatible.
When a Grout Pen Is Better Than Regrouting
A grout pen is worth considering when the existing joints are intact but permanently discolored or visually inconsistent. It is especially appealing for a modest-sized floor where detailed manual work is realistic.
Regrouting is a more involved process. It generally requires removing enough deteriorated or unwanted grout to create suitable depth for replacement material, then installing and curing new grout. That approach is appropriate when existing grout has actually failed.
For cosmetic problems, however, removing sound grout may be unnecessary. A grout pen allows you to update the visible color without disturbing the entire tile installation.
The important word is cosmetic. If the grout is breaking apart, diagnose and repair it. If it is simply clean-but-ugly, a color refresh may be the satisfying shortcut you were hoping to find.
Real-World Experiences and Lessons From Refreshing Dingy Floor Tile
The most surprising part of a grout pen project is often how different the room looks before the entire floor is finished. Complete a three-foot section, step back, and the untreated grout suddenly appears much darker than it did 20 minutes earlier.
That visual contrast can create a dangerous burst of DIY enthusiasm. You begin the project thinking, “I will do a small bathroom.” By lunchtime, you are staring at the kitchen floor and calculating linear feet of grout like an accountant who has recently discovered home improvement television.
Experience 1: The cleaning stage usually takes longer than expected
On an older floor, one quick mopping is rarely enough preparation. The tile may look clean from standing height while the grout still contains residue. High-traffic paths often require more brushing than grout near walls or beneath cabinets.
A practical lesson is to clean the entire floor first, then inspect it after drying. Areas that remain much darker may need another cleaning pass. This does not mean you must restore every grout joint to its factory color before using a pen. It means the loose soil, grease, and cleaner residue should be removed so the colorant is not simply coating contamination.
The temptation to skip this stage is enormous because the grout pen is sitting nearby looking ridiculously easy to use. Resist it. Preparation is the difference between recoloring grout and coloring dirt.
Experience 2: A medium grout color can be less stressful than pure white
Bright white grout creates dramatic before-and-after photographs. It also highlights every inconsistent edge, missed spot, and future speck of soil.
For a busy floor, a soft gray or warm neutral may create a cleaner-looking result without demanding a laboratory-level maintenance routine. On beige tile, for example, a warm gray-beige joint can visually soften the grid while disguising minor day-to-day discoloration.
The best color is not always the brightest. It is the color that works with the tile, lighting, traffic, and amount of cleaning you realistically plan to do. Be honest. There is no grout police department.
Experience 3: Knee protection is not optional for a large floor
Technically, you can refresh grout without knee pads. Technically, you can also carry groceries one can at a time.
After 30 minutes on a hard tile floor, a folded towel or proper knee pads begin to feel like advanced technology. Break the room into sections and change your working position regularly. Detailed grout work requires enough concentration without adding sore knees and an angry lower back.
Some homeowners also find that sitting on a low rolling shop seat works in open areas, although you must make sure the wheels do not cross freshly treated grout.
Experience 4: The first few lines may not be your best lines
Every grout pen has a small learning curve. At first, you may press too hard, move too slowly, or accidentally push the nib against a raised tile edge.
This is another reason to start in an inconspicuous location. After several joints, you develop a rhythm: draw, inspect, wipe the tile edge, move forward. Your hand learns how quickly the colorant flows.
Do not begin at the most visible doorway in the house. Give yourself a practice zone. Professional-looking DIY often involves carefully hiding the part where you learned how to do the DIY.
Experience 5: Wiping mistakes immediately saves enormous effort
A damp microfiber cloth within arm’s reach is probably the most useful accessory in the entire project. Minor overdraw onto glazed tile is often far less intimidating when addressed promptly according to product directions.
The problem begins when you color 30 feet of grout before checking the tile surface. On textured tile, those tiny marks can sit in surface details you did not even know existed.
A good routine is to apply color to a handful of joints, pause, and inspect from different angles. Light reflecting across the floor often reveals small smears that are invisible when viewed straight down.
Experience 6: Stop before fatigue ruins your work
Grout coloring is repetitive. That is relaxing for the first hour and slightly hypnotic after that. Eventually, your neat lines may become wider, faster, and increasingly optimistic.
For larger floors, dividing the work into logical zones can improve consistency. Finish one section, clean your tools, and return according to the product’s application requirements.
The floor does not award bonus points for being completed in one heroic marathon.
Experience 7: The final result looks better after you stop staring at individual joints
During application, you notice everything. One line appears slightly lighter. Another has a tiny thin spot. You may begin questioning every life decision that brought you to the bathroom floor with a grout marker.
After the color has dried and the room is back in use, the visual effect becomes much more important than microscopic perfection. Uniform grout makes the tile surface feel cleaner, sharper, and more intentional.
Replace the bath mat, return the furniture, or put the trash can back in its corner. Then walk out of the room and reenter normally. That is how guests and family members will see the floor.
In many successful grout pen makeovers, the greatest compliment is not, “Your grout colorant application is technically excellent.” It is, “Did you get new tile?”
Conclusion: A Small Grout Pen Can Create a Big Tile Update
Learning how to update dingy floor tile with a grout pen can save an otherwise sound tile floor from looking prematurely outdated. The job does not require demolition, but it does reward careful preparation.
Inspect the grout first. Repair damaged joints. Use a cleaner that is appropriate for the tile and grout. Rinse away residue, allow the surface to dry, test your color, and work in small sections. Keep a cloth nearby for mistakes and respect the manufacturer’s curing instructions.
A grout pen will not rescue a failing tile installation, but for structurally sound grout that is stained, blotchy, or simply the wrong color, it can deliver a remarkably visible refresh. Sometimes the tile was never the problem. It was just suffering from very bad lines.
Note: Grout pens and grout colorants vary in formula, compatibility, sealing properties, coverage, drying time, and cure requirements. Always follow the instructions for the specific product and tile surface being treated. Repair crumbling or cracked grout and investigate recurring moisture issues before applying a cosmetic color treatment.