Quick answer: To load a packing tape dispenser, place the tape roll onto the dispenser wheel with the sticky side facing down, pull several inches of tape forward, thread it between the metal gate and roller, guide it over the cutting blade area, adjust the tension knob, and test it on a box. Congratulations: you have now defeated one of the most confusing office tools ever invented.
Why Packing Tape Dispensers Confuse Almost Everyone
A packing tape dispenser looks simple. It has a handle, a wheel, a roller, a sharp blade, and one job: help you seal boxes without wrestling a roll of tape like it owes you money. Yet the first time many people try to load one, the tape sticks to the wrong place, rolls backward, refuses to cut, or turns into a transparent ribbon of frustration.
The good news is that loading a packing tape dispenser is easy once you understand the direction of the tape. The secret is not strength. It is not luck. It is not staring at the dispenser until it feels guilty. The secret is making sure the adhesive side faces down as the tape unwinds toward the roller and blade.
This tutorial walks you through the process step by step, explains the parts of a standard tape gun, covers common mistakes, and shares practical experience from real packing situations. Whether you are preparing moving boxes, shipping products, organizing storage bins, or mailing a birthday gift that somehow needs three layers of bubble wrap, this guide will help you load and use a packing tape dispenser with confidence.
What Is a Packing Tape Dispenser?
A packing tape dispenser, often called a tape gun, is a handheld tool designed to apply packaging tape quickly and evenly. Instead of peeling tape by hand, losing the end, biting the tape like a raccoon with ambition, or hunting for scissors every thirty seconds, a dispenser holds the roll, controls tension, presses the tape onto the box, and cuts it with a built-in serrated blade.
Main Parts of a Tape Dispenser
Most handheld packing tape dispensers include the same basic parts:
- Tape wheel: The large round holder where the tape roll sits.
- Handle: The grip you hold while sealing boxes.
- Tape roller: The front roller that presses tape smoothly onto the carton.
- Metal loading gate: A small metal guide near the roller that helps route the tape correctly.
- Tension knob: A control that makes the tape unwind more loosely or more tightly.
- Cutting blade: The serrated edge used to cut the tape after application.
- Wiper or pressure plate: A flat piece that helps smooth tape onto the box.
Once you recognize these parts, the dispenser stops looking like a tiny medieval machine and starts making sense.
Before You Start: Choose the Right Tape
Most standard handheld packing tape dispensers are made for rolls about 2 inches wide with a 3-inch core. That is the common size used for moving boxes, shipping cartons, and general packaging. Some dispensers fit narrower rolls, wider rolls, paper tape, filament tape, or specialty tape, so check your dispenser if the roll feels too loose, too tight, or completely uninterested in cooperating.
Common Packing Tape Types
Clear packing tape is the everyday choice for moving and shipping. Heavy-duty packing tape is better for heavier boxes or long-distance shipping. Paper packing tape may be used for recyclable packaging or branding. Filament tape has reinforcing fibers and is useful for bundling or strengthening packages.
For the average home move or small business shipment, a good-quality clear or heavy-duty shipping tape is usually enough. Very thin tape can split, curl, or break under pressure. Ultra-cheap tape may save a few coins upfront, then cost you time, patience, and possibly a suspiciously opened box later.
How to Load a Packing Tape Dispenser Step by Step
Step 1: Place the Dispenser on a Flat Surface
Set the tape dispenser on a table, desk, packing station, or flat section of floor. Loading it in midair is possible, but it adds unnecessary drama. A flat surface keeps the dispenser steady and helps you avoid the cutting blade.
Hold the handle so the large tape wheel is facing upward or sideways, depending on your model. The blade should point away from your fingers. The blade is useful, but it is not your friend. Treat it with the same respect you would give a cactus in a narrow hallway.
Step 2: Find the Sticky Side of the Tape
Pull a small piece of tape from the roll and touch one side lightly. One side is smooth; the other is sticky. When loaded correctly, the sticky side should face down as the tape comes off the roll and moves toward the roller.
A simple way to remember it: the sticky side should be ready to meet the box, not the dispenser. If the sticky side faces the roller incorrectly, the tape may cling to the tool, bunch up, or refuse to glide.
Step 3: Push the Tape Roll Onto the Tape Wheel
Place the roll onto the large wheel or spindle. Push it firmly until it sits flat and secure. Do not force it so hard that you crack the plastic core or bend the dispenser. The roll should spin, but it should not wobble like a shopping cart with one bad wheel.
Check the direction before moving on. When you pull the tape forward, it should unwind from the bottom of the roll or around the roll in a way that leaves the adhesive side facing down toward the box. If the tape is upside down, remove the roll, flip it, and try again.
Step 4: Pull Out Several Inches of Tape
Pull about 5 to 6 inches of tape away from the roll. This gives you enough length to thread it through the dispenser without needing tweezers, wizardry, or a second cup of coffee.
Keep the tape smooth as you pull. If the end folds onto itself, cut off the messy part and start with a clean edge. A wrinkled tape lead can cause crooked feeding and uneven application.
Step 5: Thread the Tape Between the Roller and Metal Gate
Guide the tape forward toward the front roller. On many dispensers, the tape passes between the tape roller and a metal loading gate. Some gates can be gently pulled or held open while you feed the tape through. Keep your fingers away from the blade while doing this.
The tape should slide under or around the roller depending on the dispenser design, then come forward toward the cutting blade. The smooth side usually faces the roller, while the sticky side faces down and away from the roller.
Step 6: Pull the Tape Past the Blade Area
Pull the tape forward until the end reaches just beyond the cutting blade. Do not press it hard into the blade yet. You simply want the tape positioned and ready for use.
If the tape sticks to the roller, it is probably loaded backward. If the tape does not move smoothly, the tension may be too tight or the tape may be trapped under the wrong part of the gate.
Step 7: Adjust the Tension Knob
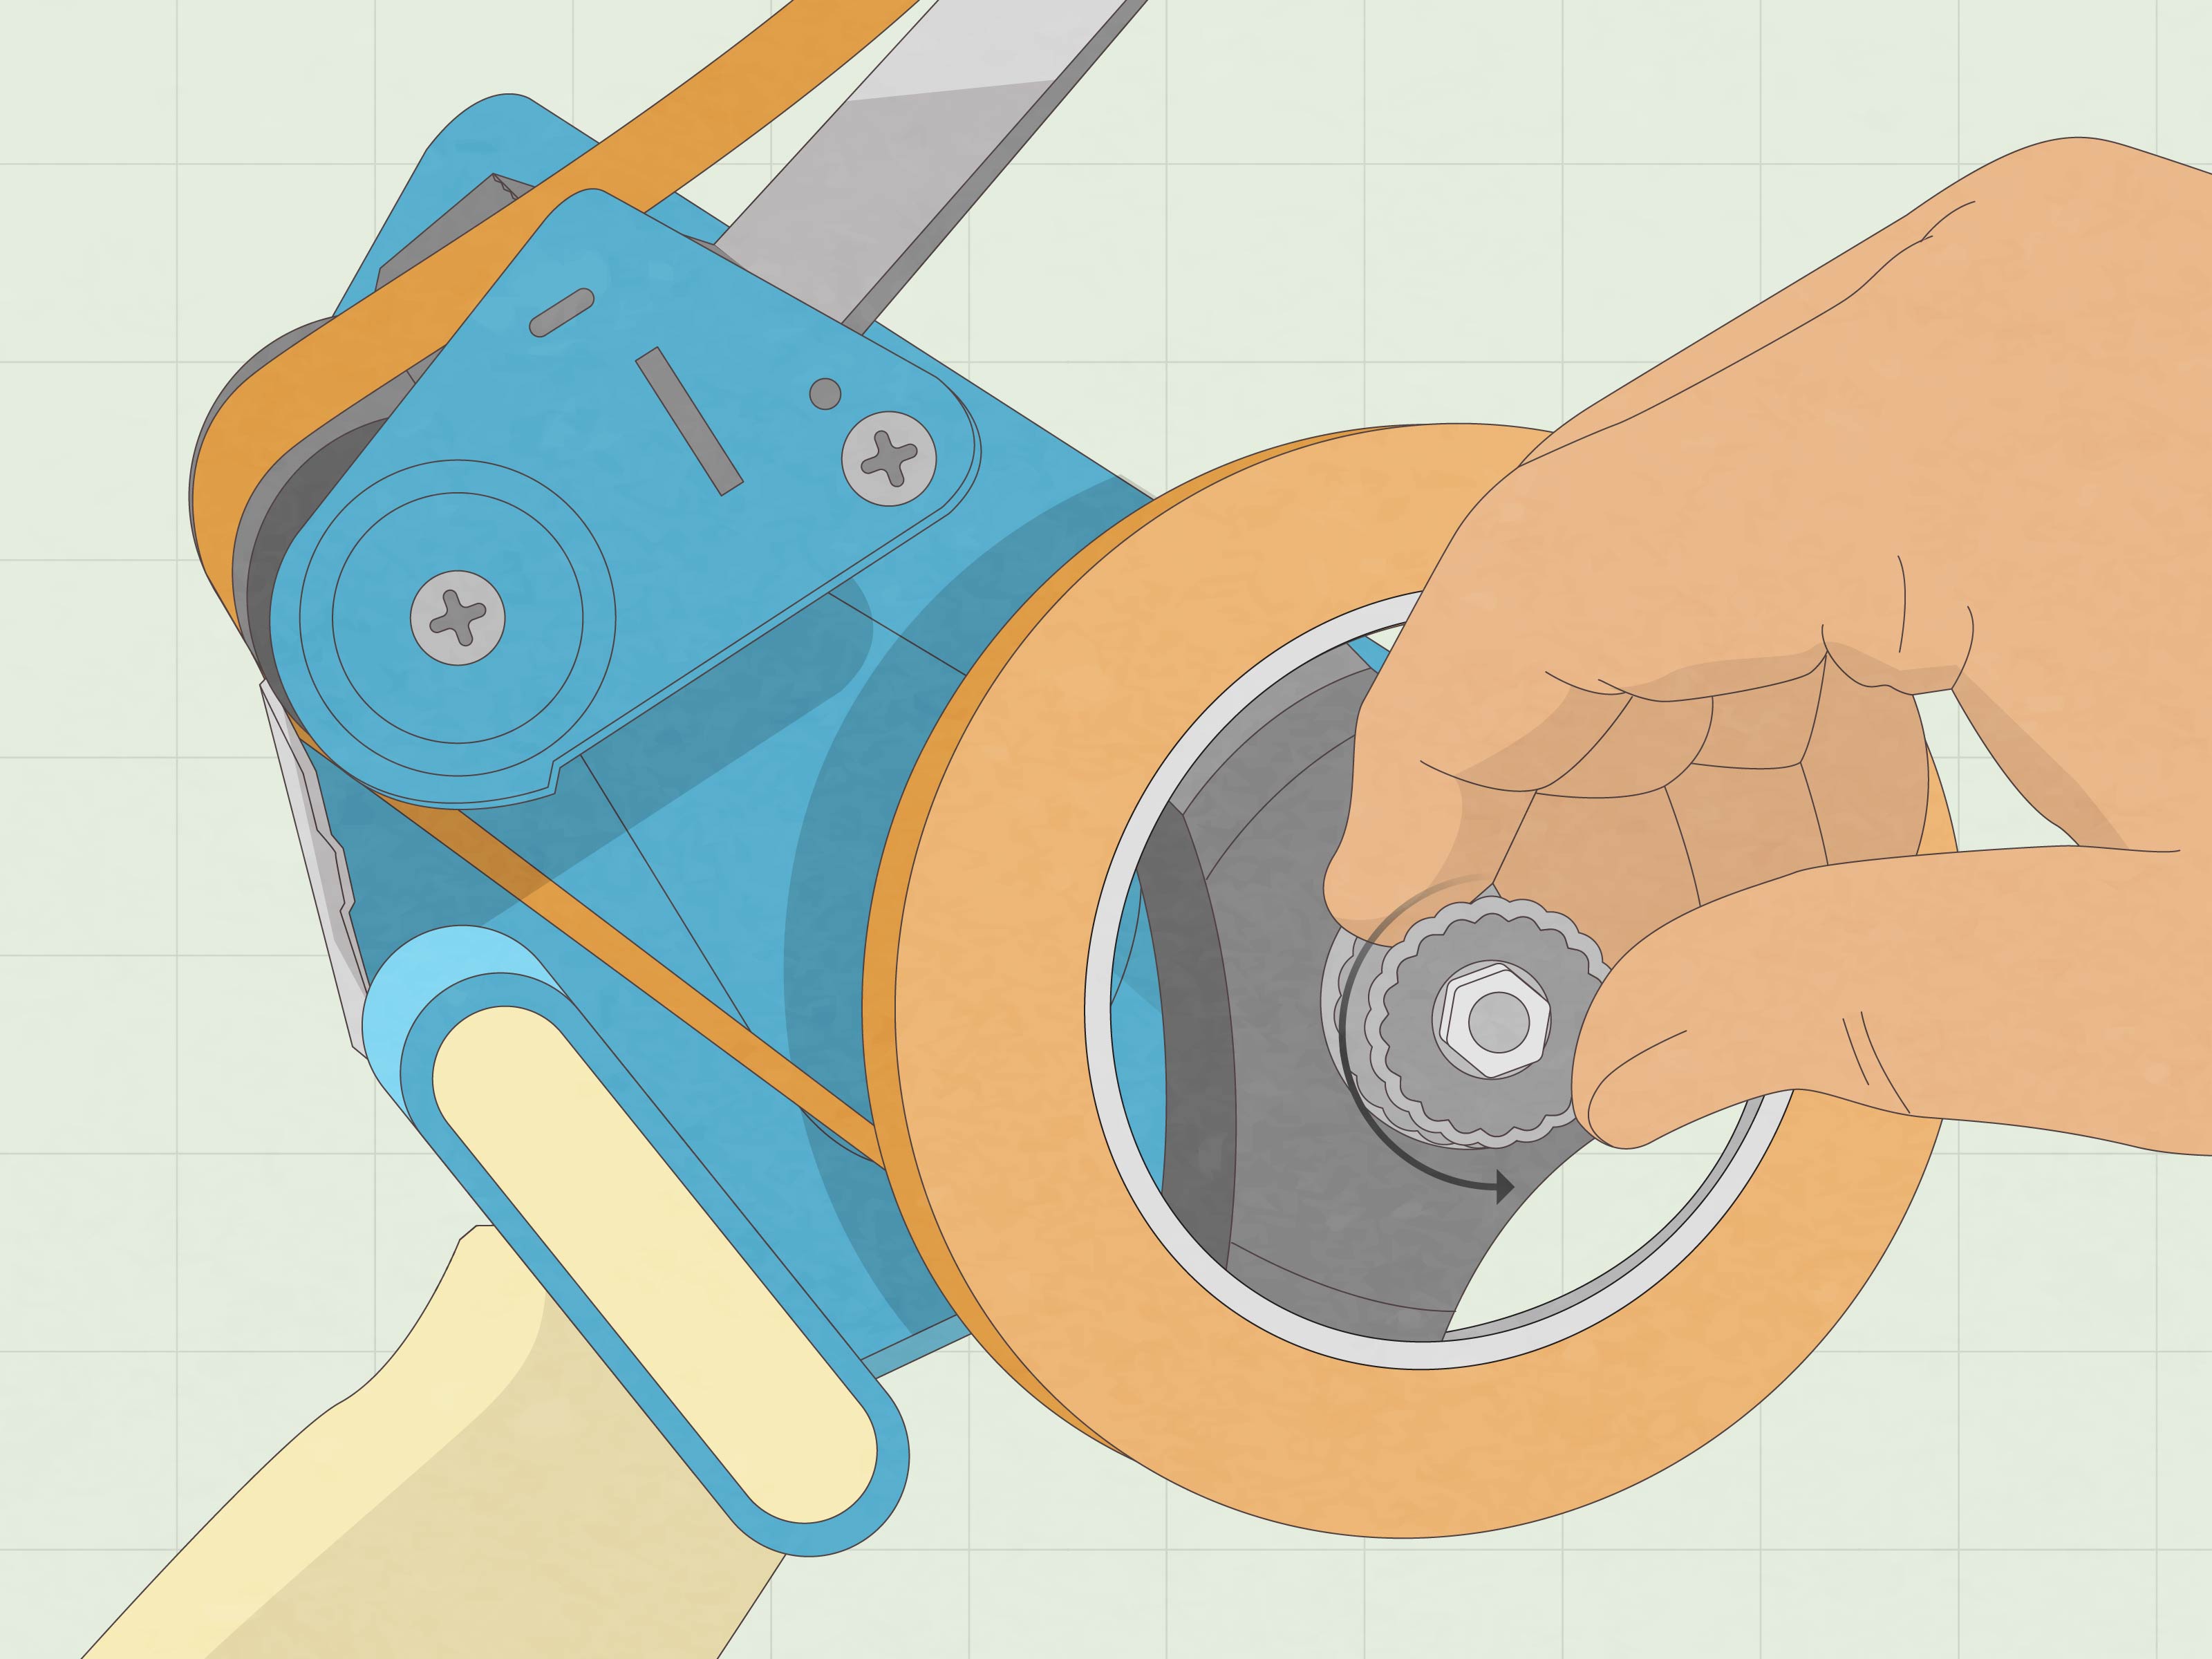
Most packing tape dispensers have a tension knob in the center of the tape wheel. Turn it slightly to control how easily the roll spins. If the tape unwinds too fast and creates loops, tighten the knob. If the tape drags, squeals, or refuses to move, loosen it.
The goal is smooth resistance. You want the tape to pull steadily, not race ahead like it has weekend plans. For heavy-duty tape, you may need slightly more tension. For thinner tape, lighter tension often works better.
Step 8: Test the Dispenser on a Box
Before sealing an important package, test the dispenser on a scrap box or spare piece of cardboard. Press the tape end onto the box, roll forward along the seam, then tilt the dispenser forward and twist slightly to cut.
If the tape applies smoothly and cuts cleanly, you are ready. If it wrinkles, splits, or sticks to the tool, reload it and check the tape direction.
How to Use a Packing Tape Dispenser After Loading
Start a Few Inches Down the Side of the Box
For a strong seal, start the tape several inches down one side of the box, not exactly at the top seam. Press the tape end firmly onto the cardboard, then guide the dispenser up and across the center seam.
This creates an anchor point. If you start only on the top flap, the tape may peel away more easily, especially on heavy boxes or boxes exposed to dust, cold, or movement.
Keep the Roller in Contact With the Box
As you move the dispenser, keep the roller touching the cardboard. The roller applies pressure, which helps the adhesive bond to the surface. Floating the dispenser above the box may look stylish, but it usually creates bubbles, wrinkles, and weak spots.
Cut With a Forward Tilt and Twist
When you reach the opposite side, continue a few inches down the side panel. Then tilt the dispenser forward and twist or pull back against the serrated blade. The blade should cut the tape cleanly.
If the tape stretches but does not cut, the blade may be dull, the tape angle may be wrong, or you may need a quicker motion. Do not use your fingers to tear the tape near the blade.
Common Mistakes When Loading a Packing Tape Dispenser
Mistake 1: Loading the Tape Backward
This is the classic mistake. If the tape is backward, the adhesive side may face the roller or metal gate, causing sticky chaos. Remove the roll, flip it, and reload with the sticky side facing down as the tape moves forward.
Mistake 2: Forgetting the Metal Gate
The metal loading gate helps guide the tape. If you skip it, the tape may flop around, feed unevenly, or miss the roller. Thread the tape between the gate and roller so it stays aligned.
Mistake 3: Setting the Tension Too Tight
If the tension knob is too tight, the tape will be hard to pull. You may feel like you are dragging a stubborn suitcase through wet grass. Loosen the knob slightly until the tape moves smoothly.
Mistake 4: Setting the Tension Too Loose
If the tension is too loose, the roll may spin too quickly. This creates extra tape, loops, and waste. Tighten the knob a little until the roll stops free-spinning.
Mistake 5: Using the Wrong Tape Size
A roll that is too wide, too narrow, or made for another dispenser style may not feed correctly. Most common tape guns use 2-inch-wide tape with a 3-inch core, but not all models are identical.
Mistake 6: Ignoring a Dull Blade
If the dispenser has been used for years, the blade may be dull or clogged with adhesive. Clean it carefully or replace it if the model allows. A dull blade turns every cut into a tiny tug-of-war.
Troubleshooting: Why Your Tape Dispenser Is Not Working
The Tape Keeps Sticking to the Roller
The tape is probably loaded backward. Remove the roll and reload it so the sticky side faces down toward the box, not inward toward the roller.
The Tape Will Not Pull Forward
Check the tension knob. It may be too tight. Also make sure the tape is not pinched under the loading gate or wrapped around the wrong part of the roller.
The Tape Unwinds Too Fast
Tighten the tension knob slightly. The roll should spin only when you pull, not keep spinning after you stop.
The Tape Wrinkles on the Box
Keep steady pressure on the roller and move in a straight line. Wrinkles often happen when the dispenser is angled sideways or lifted away from the surface.
The Tape Does Not Stick Well
Cardboard dust, moisture, cold temperatures, or low-quality tape can weaken adhesion. Wipe dusty boxes if needed, store tape at room temperature, and use heavy-duty tape for heavier packages.
Safety Tips for Loading and Using a Tape Gun
A packing tape dispenser is not dangerous when used carefully, but the cutting blade is sharp. Keep your fingers away from the blade while threading the tape. Place the dispenser on a stable surface when loading. Do not toss it into a drawer blade-first. Keep it away from small children, pets, and anyone who thinks “I wonder how sharp this is” is a good research question.
When cutting tape, use the dispenser’s motion instead of touching the blade. If tape gets jammed near the cutter, set the dispenser down and clear it slowly. If adhesive builds up, clean the blade area carefully according to the tool’s instructions.
Best Practices for Sealing Boxes Like a Pro
Use the H-Tape Method for Moving Boxes
For stronger box sealing, use the H-tape method. Tape the center seam first, then tape the two edge seams so the tape forms an “H” across the box flaps. This is especially helpful for moving boxes, books, kitchen items, tools, and anything heavier than a pillow.
Do Not Overpack Weak Boxes
Tape helps, but it is not magic. If a box is crushed, damp, torn, or overloaded, even excellent tape may fail. Use sturdy boxes and keep weight reasonable.
Press the Tape Down After Applying
After sealing, run your hand or the dispenser’s wiper gently over the tape. Pressure improves contact between the adhesive and cardboard. This small step makes packages look cleaner and hold better.
Store Tape Properly
Keep packing tape in a clean, dry place away from extreme heat or cold. Tape stored in a hot garage or freezing storage room may become brittle, gooey, or less sticky.
Simple Example: Loading a Tape Dispenser for Moving Day
Imagine you are packing a bedroom for a move. You have ten flat boxes, one roll of heavy-duty clear tape, and a dispenser that looks suspiciously like it was designed to test your character.
First, place the dispenser on a table. Push the tape roll onto the wheel so the adhesive side faces down when pulled forward. Pull out about 6 inches of tape. Thread it between the metal gate and the front roller. Pull the end toward the blade. Adjust the tension knob so the tape pulls smoothly. Press the tape onto a test box, roll it across the seam, tilt forward, and cut.
Now you can seal the bottom of each box before filling it. Start tape several inches down the side, run it across the bottom seam, and continue several inches down the opposite side. For heavy boxes, add strips along the side seams. The dispenser saves time, keeps the tape neat, and reduces the chance that you will lose the tape end every three minutes.
Extra Experience: What I Learned From Loading Packing Tape Dispensers
Here is the honest truth: the first time someone loads a packing tape dispenser, there is a very good chance they will do it backward. This is not a personal failure. It is practically a tradition. The dispenser gives very few visual clues, the tape is transparent, and the sticky side loves pretending to be obvious only after it has attached itself to the roller.
One useful habit is to pause before placing the tape roll on the wheel and ask, “Where will the sticky side go when I pull this forward?” That one question solves most loading problems. If the adhesive will face the box, you are on the right track. If it will face the roller, the gate, or your fingers, flip the roll.
Another experience-based tip is to pull more tape than you think you need during loading. A tiny tape end is difficult to thread. A longer lead gives you control, especially if your dispenser has a tight metal gate. Pulling 5 or 6 inches may feel wasteful, but it usually saves tape because you avoid jams, folds, and reloading attempts.
Tension also matters more than beginners expect. When the knob is too loose, the tape roll spins wildly and creates slack. Then the tape lands crooked, wrinkles, or sticks to itself. When the knob is too tight, you pull harder, the box shifts, and the dispenser feels broken even though it is only over-tightened. The best tension feels like a smooth, controlled pull. Not floppy. Not stubborn. Somewhere in the calm middle.
During a big packing project, it helps to create a small packing station. Keep boxes on one side, tape in the dispenser, labels nearby, and a marker within reach. Load the tape before you start filling boxes. It sounds simple, but it prevents the classic moving-day scene where one person is holding box flaps shut with both elbows while another person is trying to figure out why the tape gun has become a puzzle from an escape room.
For small business shipping, consistency matters. A properly loaded dispenser makes each box look cleaner and more professional. Crooked tape may still hold, but neat tape gives customers the impression that the package was handled carefully. That matters when you are shipping handmade products, online orders, documents, gifts, or anything that represents your brand.
One final lesson: test the dispenser every time you change tape rolls. Even if you have loaded hundreds of rolls before, a quick test strip can catch problems before you seal an important package. Tape direction, tension, blade sharpness, and cardboard quality all affect the result. A five-second test can save you from peeling off a wrinkled strip that somehow welded itself to the wrong flap.
Loading a packing tape dispenser becomes easy with repetition. After a few tries, your hands remember the process: roll on, sticky side down, tape through the gate, over the roller, tension adjusted, test cut. At that point, you may even become the person everyone asks for help on moving day. Use this power wisely. Also, hide the good tape.
Conclusion
Learning how to load a packing tape dispenser is one of those small skills that pays off immediately. Once the tape roll is facing the correct direction and threaded through the roller and gate, sealing boxes becomes faster, cleaner, and far less annoying. The most important rule is simple: keep the sticky side facing down toward the box as the tape unwinds.
From there, pull out enough tape to thread it easily, guide it through the dispenser, adjust the tension knob, and test before you start packing seriously. If something goes wrong, check the direction first, then the tension, then the blade. Most problems are quick fixes.
A tape dispenser may never be glamorous, but when it is loaded correctly, it is one of the most useful tools in any packing, moving, shipping, or storage project. It saves time, reduces waste, and helps every box look like it was packed by someone who has their life togethereven if the junk drawer says otherwise.