Note: This guide covers a standard canopy-mounted remote receiver for a compatible ceiling fan. Your fan’s wiring diagram and remote-kit instructions always win if they differ from a general guide. Electricity is not the place for creative interpretation, improvisational jazz, or “this wire looks close enough.”
A ceiling fan remote is one of those upgrades that feels wildly luxurious for something you can usually install in an afternoon. Suddenly, you can adjust the fan speed, dim the lights, and turn everything off without climbing out from under a blanket like a Victorian ghost hunting for a pull chain.
Installing a ceiling fan remote usually means adding a small receiver inside the fan canopy. The receiver sits between your home’s electrical supply and the fan, translating clicks from the handheld remote into commands for the motor and light kit. For many standard AC ceiling fans, this is a practical DIY project. The secret is not speed. The secret is working carefully, confirming compatibility, and treating every wire as important because, frankly, it is.
Before You Buy a Ceiling Fan Remote Kit
Confirm That Your Fan Is Compatible
Not every ceiling fan accepts a universal remote receiver. Many traditional AC-motor fans with pull chains can use a universal remote kit, but newer DC-motor fans, smart fans, and fans with built-in electronic controls may require the manufacturer’s specific remote or receiver. Some wall controls and universal speed controls are also not compatible with fans that already have integrated remote electronics.
Before buying anything, find the fan’s model number. It is often printed on a label near the motor housing, inside the canopy, or in the original owner’s manual. Search for the manufacturer’s approved remote accessories first. A matching kit is usually easier to install, easier to pair, and less likely to turn your peaceful ceiling fan into an expensive decorative sculpture.
Check the Receiver’s Electrical Ratings
Look at the remote kit’s fan-motor and light-kit ratings. The receiver must be rated for your fan’s motor type and the total wattage of its light fixture. This matters especially if your fan uses multiple bulbs, older incandescent bulbs, or a light kit that draws more power than the receiver allows.
Also confirm whether your fan has a separate light wire. In many conventional fans, the blue wire serves the light kit, the black wire serves the fan motor, the white wire is neutral, and the green or bare copper wire is ground. But wire colors can vary by model, age, and manufacturer, so use the labels on the receiver and the fan’s wiring diagram instead of relying on color alone.
Tools and Supplies You Will Need
- Compatible ceiling fan remote-control kit with receiver
- Phillips-head screwdriver
- Flat-head screwdriver if your canopy or remote cradle requires one
- Non-contact voltage tester or multimeter
- Wire connectors supplied with the remote kit
- Electrical tape if recommended by the manufacturer
- Step ladder tall enough to work comfortably
- Fresh batteries for the remote
- Phone camera for taking a photo of the original wiring before changes
A good ladder matters more than people expect. You will be working overhead with small screws, wire connectors, and a canopy that seems genetically programmed to hide hardware at the exact moment you need it. Set up your ladder on a stable, level surface, and do not balance on furniture. Your dining chair is not a certified electrical-access platform, no matter how confident it looks.
Understand What the Remote Receiver Does
A ceiling fan remote receiver acts like a tiny traffic controller. Power from the house enters the receiver first. The receiver then sends controlled power to the fan motor and light kit.
Most receivers have two groups of wires:
- Input wires: These connect to the house wiring. Labels may say “AC IN,” “Line,” “L,” “Neutral,” or “N.”
- Output wires: These connect to the fan motor and light kit. Labels may say “To Fan,” “Motor,” “Light,” or similar wording.
Do not connect wires based only on what seems logical. A receiver might use black and white wires for incoming power, while the outgoing fan wires can vary widely by brand. Some modern fans use several motor-control wires that do not resemble traditional fan wiring at all. Follow the receiver labels and your specific wiring diagram.
How to Install a Ceiling Fan Remote Receiver
Step 1: Set the Fan and Light Controls Correctly
Before shutting off power, set the fan’s pull-chain speed to high. If the fan has a pull-chain light control, turn the light to on. The receiver needs those original controls left in their “ready to receive commands” position. Otherwise, you may finish the installation perfectly and then wonder why the remote only controls a very expensive ceiling ornament.
If your fan has a wall-mounted dimmer or variable-speed control, stop and check compatibility. Most remote receiver kits need full, constant power from a standard on/off wall switch. A dimmer feeding a receiver can cause flickering, buzzing, poor performance, or damage to the receiver electronics.
Step 2: Shut Off Power at the Circuit Breaker
Turn off the wall switch, then turn off the fan’s circuit breaker at the electrical panel. Do not rely on the wall switch alone. Someone could flip it back on, or the switch may not disconnect every conductor in the box.
Use a non-contact voltage tester to verify that the fan wiring is not energized before touching anything. If you are unsure how to test safely, if the wiring colors do not make sense, or if the outlet box seems damaged, stop and hire a licensed electrician. Electrical shock and fire hazards are not the kind of DIY plot twist anyone wants.
Step 3: Lower the Fan Canopy
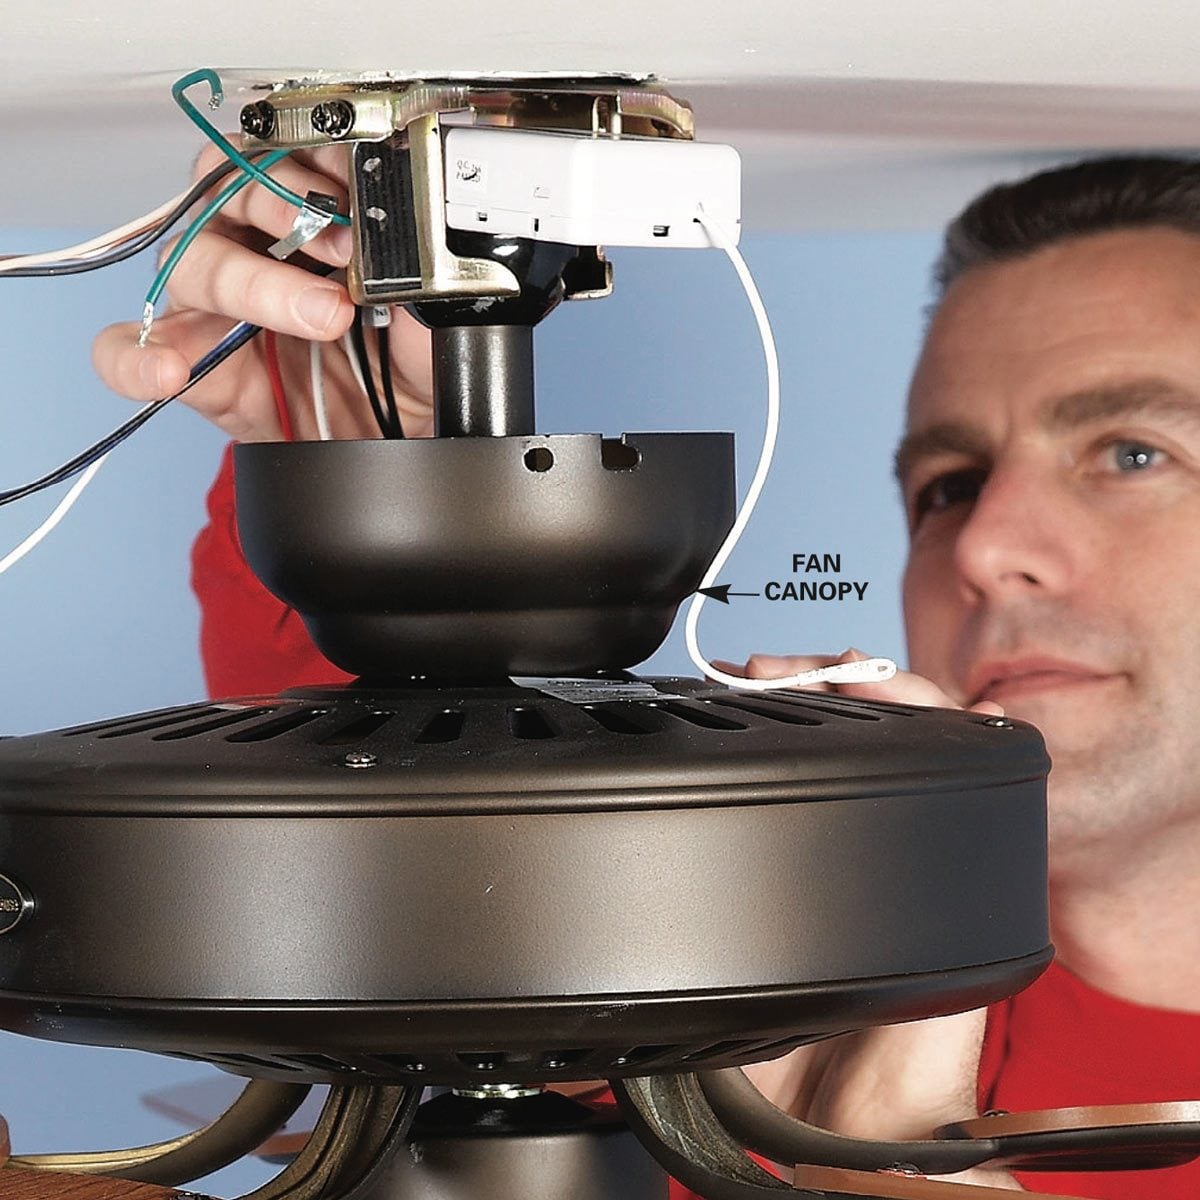
Remove the screws holding the fan canopy to the mounting bracket. Support the canopy while loosening screws so it does not drop or scratch the fan housing. Slide the canopy down the downrod to expose the wiring and the mounting bracket.
Take a clear photo of the existing wiring before disconnecting anything. This five-second habit can save you thirty minutes of squinting at wires later while trying to remember whether the blue wire was attached to the black wire, the red wire, or your last remaining shred of confidence.
Step 4: Locate the Remote Receiver Space
The receiver usually slides into the upper part of the fan canopy, above the downrod and below the ceiling mounting bracket. On many models, the receiver sits with its flat side facing the ceiling. The exact location depends on the fan and bracket design.
Before making wire connections, gently test-fit the receiver. If it barely fits, do not force it. You may need to organize the house wiring more neatly inside the outlet box, position the receiver differently within the approved canopy space, or confirm that the remote kit is actually designed for your fan.
Step 5: Match the Remote and Receiver Code or Pairing Method
Older universal remote kits often use tiny DIP switches inside the battery compartment and on the receiver. Set both to the exact same pattern before installation. If two nearby fans use the same code, one remote may operate both fans, which is fun exactly once and irritating forever after.
Newer remotes may use a pairing button, a “set” button, Bluetooth pairing, or a timed reset sequence after power is restored. Keep the manual nearby. Many systems require you to press and hold a pairing button within a specific time window after turning the breaker back on.
Step 6: Connect the House Wires to the Receiver Input
Follow the receiver diagram carefully. In a common setup:
- The house hot wire connects to the receiver’s input hot wire, often black and labeled “AC IN L” or “Line.”
- The house neutral wire connects to the receiver’s input neutral wire, often white and labeled “AC IN N” or “Neutral.”
- The ground wires remain connected together as directed by the fan and receiver instructions.
Twist the appropriate wires together, install the supplied wire connector, and tug gently on each wire to confirm it is secure. No bare copper should remain exposed below the connector. Do not use electrical tape as a substitute for an approved wire connector.
Step 7: Connect the Receiver Output to the Fan
Next, connect the receiver’s output wires to the fan’s motor and light wires. Common labels include “To Motor,” “To Fan,” and “For Light.” Some fans use a black wire for the motor and a blue wire for the light. Others use multiple labeled wires for motor communication or speed control.
Use the labels, not guesswork. A modern fan may have red, gray, yellow, blue, and white wires between the receiver and motor. Those wires are not interchangeable simply because they are colorful. They are functional parts of the fan’s control system.
Step 8: Tuck the Wiring and Install the Receiver
Carefully tuck the house wiring into the outlet box first, then slide the receiver into its designated space in the canopy. Avoid pinching wires against sharp metal edges or forcing the canopy closed. The receiver should sit securely without crushing wire connectors.
Make sure the fan’s mounting bracket, downrod, and safety hardware remain properly installed. The receiver is an electronic control device, not structural support. A fan must always be secured by a properly rated ceiling fan outlet box and mounting system. Consumer safety recalls have shown why secure brackets and protected wiring are not optional details.
Step 9: Reinstall the Canopy and Restore Power
Raise the canopy into place, reinstall the screws, and make sure it sits flush against the ceiling. Restore power at the circuit breaker, then turn on the wall switch.
Install fresh batteries in the remote and test the following:
- Fan on and off
- Each fan-speed setting
- Light on and off
- Light dimming, if supported
- Reverse function, if your remote includes one
- Pairing or reset function, if required
Some fans make a beep, flash the light, or briefly move the blades when pairing is successful. Others remain theatrically silent. Either way, test every function before putting the ladder away.
Ceiling Fan Remote Installation Tips for Common Setups
Single Wall Switch
A single on/off wall switch is the easiest setup for most remote receivers. Leave the wall switch on so the receiver has constant power, then use the remote for normal fan and light control.
Two Wall Switches
Some older fans have separate wall switches for the fan and light. A remote receiver may still work, but the wiring approach depends on whether you want to preserve separate wall control. Read the remote kit instructions closely. In many cases, the remote receiver is designed for one constant hot supply, not two independently switched hot wires.
Multiple Fans in Nearby Rooms
If you install remote kits on multiple fans, assign different DIP-switch combinations or pair each remote individually. This avoids the awkward moment when turning on the bedroom fan also wakes up the guest-room light like a low-budget haunted-house effect.
Ceiling Fan Remote Troubleshooting
The Fan Does Not Respond at All
Start with the obvious checks: confirm the wall switch is on, the breaker is on, and the remote batteries are fresh and correctly installed. Then verify that the receiver is properly connected to incoming power and that all wire connectors are secure. Dead batteries and loose battery contacts are common causes of remote problems.
The Light Works but the Fan Does Not
Make sure the fan pull chain is set to high speed. Then inspect the receiver-to-motor connections. A loose motor wire, incorrect output connection, or incompatible receiver can prevent the fan from running even when the light still works.
The Fan Works but the Light Does Not
Confirm that the light pull chain is set to on. Check the receiver’s light-output connection, the bulb or LED module, and whether the remote kit supports dimming with your specific light source. Not every LED bulb behaves well with every remote dimmer.
The Remote Controls the Wrong Fan
For DIP-switch models, turn off power and set a different matching switch pattern on both the remote and receiver. For smart or Bluetooth systems, unpair and re-pair each fan according to the manufacturer’s instructions.
The Remote Works Only When You Stand Very Close
Replace the battery first. Then make sure the receiver is not buried behind excessive metal, pinched inside the canopy, or installed in a way that blocks its antenna or wireless signal. Remote range varies by model, and the manufacturer’s stated range is usually a better guide than wishful thinking from across three rooms.
When You Should Call an Electrician
DIY installation is not the right choice when you find damaged insulation, scorched wires, aluminum wiring, no visible ground connection, a loose ceiling box, confusing multi-switch wiring, or a fan that is not securely mounted. Call an electrician if you are uncomfortable identifying the supply wires or if the remote kit instructions do not match what you see in the ceiling.
It is also smart to call a professional when converting a fan from a wall-controlled setup to a remote-controlled setup in an older home. Paying for one correct service visit is cheaper than paying for a replacement receiver, a repaired ceiling, and an embarrassing explanation to your insurance company.
Real-World DIY Lessons: What Installing a Ceiling Fan Remote Teaches You
The most useful lesson from ceiling fan remote installation is that the project is usually easier than it first appears, but only after you slow down enough to understand the fan you actually have. Many people begin with the assumption that every ceiling fan is wired the same way. That assumption lasts right up until the canopy comes down and reveals a collection of wires that looks like a tiny electrical spaghetti festival.
Experienced DIYers tend to make the job easier by taking photos before touching anything. A quick picture of the existing wiring gives you a visual map if you need to retrace your steps. It also helps when the manual uses a diagram that looks nothing like your ceiling box. Photos are especially useful in older homes, where prior repairs may have created unusual wire combinations or where colors do not follow modern conventions.
Another common lesson is that the receiver space is often tighter than expected. The receiver may fit perfectly in a product photo, then refuse to cooperate when real-world wire connectors, ceiling-box wiring, and a downrod enter the chat. The solution is usually not forcing it. Instead, organize the wiring carefully, tuck the house wires into the outlet box first, and position the receiver according to the fan manufacturer’s instructions. Forcing a canopy shut can pinch wires, strain connectors, and make future troubleshooting much harder.
DIYers also learn quickly that pull chains do not disappear from the equation just because a remote arrives. On a standard fan, the fan pull chain should generally be set to high and the light pull chain should be set to on before the remote receiver takes over. If either pull chain is set incorrectly, the remote may appear broken even though the wiring is perfect. This is one of the most common and most easily avoided mistakes.
Pairing is another area where patience pays off. Older remotes may use DIP switches, while newer models can require a reset button, a timed hold sequence, or a Bluetooth pairing process. The key is to read the exact instructions before restoring power. Trying random button combinations after the fact can lead to confusion, especially when more than one fan is nearby.
Perhaps the best practical experience is learning where DIY confidence should stop. Replacing a compatible receiver in a stable, correctly wired ceiling fan is one thing. Discovering brittle insulation, a wobbly mounting box, unidentified wires, or a nonstandard control system is another. Knowing when to pause and call an electrician is not a failure of DIY skill. It is the most professional move available.
Once the remote works, the payoff is immediate. You can adjust airflow from bed, turn off a light without crossing a dark room, and retire the pull chain from active duty. It is a modest upgrade, but it makes everyday life feel noticeably smoother. And unlike many smart-home projects, this one does not require a password, a firmware update, or a troubleshooting forum written entirely in acronyms.
Conclusion
Installing a ceiling fan remote is a manageable DIY upgrade when you use a compatible receiver, shut off power at the breaker, follow the wiring labels exactly, and pair the remote correctly. Work slowly, keep the fan’s original pull-chain controls set properly, and do not force the receiver or canopy into place. Done carefully, a remote-controlled fan adds comfort, convenience, and one less reason to get out of bed on a hot night.