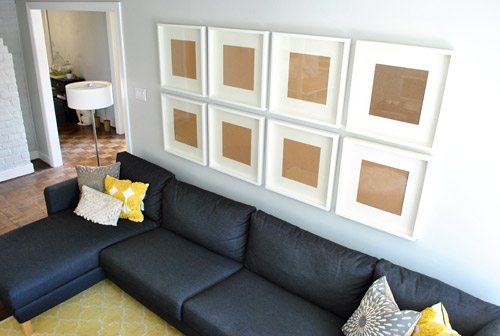
There are two kinds of people in this world: people who measure twice before hanging art, and people who end up with a wall that looks like it lost a fight with a woodpecker. If you want to hang a grid of picture frames, you definitely want to be in the first group.
A grid of picture frames is one of the cleanest, smartest, and most foolproof ways to make a wall look polished. It brings order to family photos, vacation prints, black-and-white portraits, botanical art, kids’ drawings, or even that random collection of travel photos you keep promising to “do something with.” Unlike an eclectic gallery wall, a grid has structure. It looks intentional. It says, “Yes, I own a tape measure, and I am not afraid to use it.”
Done right, a picture frame grid can make a hallway feel finished, a living room feel more collected, and a blank wall feel less like an awkward pause in your decorating story. The secret is not fancy design training. It is simply a mix of planning, consistent spacing, proper hardware, and enough patience to resist eyeballing anything. Eyeballing is how chaos sneaks in wearing a tool belt.
Why a Grid of Picture Frames Works So Well
A grid layout is the more tailored cousin of the casual gallery wall. It works because the repetition creates rhythm. When frames line up in neat rows and columns, the eye reads them as a single visual statement instead of a bunch of separate objects floating around the wall having independent emotional journeys.
This makes a grid especially effective in spaces where you want calm, balance, and symmetry. Think above a sofa, over a console table, in a hallway, along a staircase landing, in a home office, or over a bed with enough clearance. Matching frame sizes create the most traditional grid, but you can also build a great-looking arrangement with frames that share the same outer dimensions even if the photo openings or mat sizes differ.
A formal grid also makes decision-making easier. Instead of asking, “Should this one go here or here or maybe over there?” you are working within a clear system. And systems, unlike vibes, are easier to level.
What You Need Before You Start
- Picture frames, ideally with consistent outer dimensions
- Printed photos or artwork
- Tape measure
- Pencil
- Painter’s tape or kraft paper templates
- Level or laser level
- Stud finder
- Hammer or drill
- Picture hooks, nails, screws, or wall anchors
- Step stool or ladder
- Optional felt pads for the bottom corners of frames
If your frames are heavier than they look, do not gamble. Choose hardware based on the wall material and the frame weight. Drywall, plaster, brick, and concrete do not all play by the same rules, and your wall should not become a trust fall exercise for your artwork.
Step 1: Decide Where the Grid Belongs
Before you measure a single inch, choose the wall and the purpose of the display. Are you creating a family photo feature in the hallway? A black-and-white print wall above the sofa? A clean home office backdrop that looks good on video calls and quietly implies you have your life together?
The best walls for a frame grid are usually straight, uninterrupted surfaces where symmetry can shine. If the wall has vents, switches, shelves, or awkward trim slicing through your plan, a strict grid becomes much harder to pull off. A formal grid likes order. It does not enjoy obstacles.
Also think about scale. A tiny four-frame grid on a giant wall can look timid. A huge nine-frame installation on a narrow strip of wall can feel crowded. The grid should have room to breathe, but not so much room that it looks like it got lost on the way to the furniture.
Step 2: Choose the Layout and Do the Math
The most popular frame grids are 2 by 2, 2 by 3, 3 by 3, and 2 by 4. Which one works best depends on your wall size, your photo collection, and whether you want the display to read as a compact statement or a larger focal point.
Common grid options
- 2 x 2: Great for small walls, entryways, and corners that need a little structure
- 2 x 3: Ideal above a desk, buffet, or bench
- 3 x 3: The classic statement grid for living rooms and hallways
- 2 x 4: Excellent for long horizontal spaces above a sofa or console
To calculate the total width of your arrangement, multiply the frame width by the number of columns, then add the gaps between frames. Do the same for the height.
For example, a 3 by 3 grid using frames that are 12 inches wide and 16 inches tall with 2-inch gaps would be:
Total width: (12 x 3) + (2 x 2) = 40 inches
Total height: (16 x 3) + (2 x 2) = 52 inches
This simple math matters because it tells you whether your plan fits the wall before you commit. Which is far more fun than discovering that your “perfect” layout is three inches too wide after seven holes.
Step 3: Find the Right Hanging Height
For most walls, the center of the entire grouping should land around eye level. In practical terms, that often means the visual center of the whole grid falls somewhere around 57 to 60 inches from the floor. If the grid is going above furniture, adjust so the bottom row sits comfortably above the piece, usually with a few inches of breathing room so the art still feels connected to the furniture below.
The key idea is this: treat the entire grid as one large piece of art. Do not measure each frame independently from the floor. That is the decorating equivalent of assembling a puzzle by yelling at the box.
Step 4: Lay It Out Before You Make Holes
This is the step that separates a satisfying Saturday project from a Sunday spent patching drywall.
Start by arranging the frames on the floor. Play with spacing. Step back. Check whether the proportions feel right. If the grid uses matching frames, this part is fairly quick. If the frames are similar but not identical, take extra time to make sure the outer edges align the way you want.
Once you like the arrangement, create a mock-up on the wall. You can do this with kraft paper templates, butcher paper, or painter’s tape rectangles. Label each template so you know which frame goes where. This lets you test the layout at full scale without punching unnecessary holes in the wall.
This step is also handy when hanging over furniture. You can sit on the sofa, stare at the taped layout, and decide whether the whole arrangement needs to move up, down, wider, or tighter before tools get involved. Your future self will be annoyingly grateful.
Step 5: Mark the Grid Like a Pro
Once the templates are in place, mark the overall center point of the arrangement on the wall. Then use a level or laser level to create straight guide lines for the top row or center line. From there, mark the exact hanging points for each frame.
This is where many people go wrong: they measure the outside of the frame, but forget to measure the actual hardware placement on the back. The hanging point is what matters. If the frame uses wire, pull the wire taut to the point where it will rest on the hook, then measure from that point to the top of the frame. If the frame uses sawtooth hangers, D-rings, or two hooks, measure those positions carefully.
If you are working with two-hook frames, use both hooks. They are more stable and less likely to tilt. A grid lives or dies on alignment, and a frame that constantly leans left will drive you slightly bonkers in under 48 hours.
Step 6: Choose the Right Hardware for the Wall
Lightweight frames on drywall may be fine with standard picture hooks or small nails. Heavier frames usually need more support, especially if there is no stud where you need one. In that case, drywall anchors, specialty hooks, or heavier-duty hanging systems are the safer choice.
If you are hanging on plaster, brick, stone, or tile, the hardware and installation method change. You may need pilot holes, masonry bits, or anchors designed for that surface. The frame weight matters too. Use hardware rated for more than the actual frame weight when possible, especially in busy areas where doors slam or the wall may vibrate a little.
For very heavy frames, a French cleat or heavy-duty rated hanger may make more sense than ordinary hooks. Stability matters. Art should inspire conversation, not sudden panic.
Step 7: Hang the First Frame and Build Outward
When the layout is centered and the holes are marked, hang the first frame. Many people find it easiest to begin with the center frame of the grid, or with the bottom-center frame in a larger arrangement, then work outward. That keeps the spacing visually balanced as you go.
After hanging the first frame, level it immediately. Then hang the frame next to it and measure the gap. Use a spacer block, ruler, or pre-cut cardboard guide if you want perfect consistency. Repeat row by row.
Do not assume all frames are manufactured equally. Even matching sets can vary slightly. Measure the actual edges as you go. A grid can hide many things, but drifting spacing is not one of them.
Step 8: Fine-Tune the Spacing
Consistent spacing is the magic ingredient in a frame grid. For a tight, modern look, around 2 inches between frames often looks crisp and tailored. For larger pieces or a slightly airier layout, 3 to 6 inches can work well. What matters most is consistency, not blindly following one magic number.
Smaller gaps usually make the arrangement feel like one unified feature. Wider gaps can make each frame feel more individual. If your goal is a formal grid, keep the spacing equal in every direction. This is not the time for “close enough.” In a symmetrical layout, close enough has a way of becoming wildly obvious from across the room.
Mistakes to Avoid When Hanging a Grid of Picture Frames
1. Hanging the whole thing too high
This is one of the most common wall art mistakes. If the arrangement floats too far above the furniture or eye level, it looks disconnected from the room.
2. Ignoring the actual hardware position
The top of the frame is not the hanging point. Measure the wire, hook, or D-ring placement before marking the wall.
3. Using inconsistent gaps
If one gap is 2 inches and the next is 2 and three-quarters, people may not know why it looks off, but they will know it looks off.
4. Mixing frame sizes without a plan
A grid is most successful when the outer dimensions line up. If sizes vary, the arrangement can stop looking like a grid and start looking like confusion with corners.
5. Using weak hardware for heavy pieces
Pretty frames still obey gravity. Choose hardware for the weight and wall type, not whatever happens to be rolling around in the junk drawer.
How To Make the Grid Look More Expensive
You do not need museum money to get a polished result. A few styling choices go a long way.
- Use matching mats for cohesion, even if the artwork varies
- Keep the color palette of the images somewhat related
- Choose frames with similar depth and finish for a tailored look
- Add felt pads to keep frames from shifting or scuffing the wall
- Consider black frames with white mats for a timeless look
- Use lighting nearby to help the display feel intentional
If you want the wall to feel collected rather than strict, you can mix frames, but keep some unifying thread such as mat color, subject matter, finish family, or photo treatment. A grid does not have to feel sterile. It just needs a visual system.
Best Spots in the House for a Picture Frame Grid
A frame grid works beautifully in a living room, hallway, entryway, home office, bedroom, or above a console. It is especially effective in places where you want order and structure. Hallways love grids. Home offices love grids. Blank walls that have been silently judging you for months also love grids.
If you are decorating a staircase wall, a strict grid can be trickier unless the wall is a large uninterrupted rectangle. For angled walls, a looser gallery wall often feels more natural. Grids like straight lines. Staircases like making life interesting.
Real-Life Lessons From Hanging a Grid of Picture Frames
The most useful lessons about hanging a grid of picture frames usually show up after the measuring tape comes out and reality taps you on the shoulder. On paper, the project seems almost suspiciously simple: buy frames, decide on spacing, hang them in rows, admire yourself. In real life, there are small surprises everywhere, and knowing them in advance makes the entire job smoother.
First, walls are rarely as perfect as they look. The ceiling may be slightly off. The furniture below may not be centered on the wall. The floor may slope a touch in an older house. That means a perfectly measured grid can still look visually wrong if it is aligned to something crooked nearby. One of the smartest things you can do is step back every few frames and trust the room as much as the ruler. Precision matters, but so does visual balance.
Second, identical frames are not always truly identical. You may buy a set and assume every hanging hook is in exactly the same place, only to discover one frame is a tiny bit different on the back. That tiny difference becomes very noticeable when all the frames sit in a formal grid. The fix is easy: measure each frame’s hardware instead of assuming the manufacturer did the math for you. This takes a few extra minutes and saves a lot of crooked-language later.
Third, templates are not overkill. They feel a little fussy at first, but once they are on the wall, they become your best friend. You can shift the entire layout left or right, raise it, lower it, tighten the spacing, or decide that a 3 by 3 grid suddenly wants to become a 2 by 4. All of that is much easier with paper and painter’s tape than with patched holes and regret.
Fourth, the first frame sets the tone for everything that follows. If that first piece is off, the rest of the wall will keep repeating the mistake in crisp, orderly rows. So take your time with the first one. Level it. Recheck it. Walk away and look again from across the room. This is not paranoia. This is wisdom.
Fifth, lightweight shortcuts have limits. Adhesive strips can be useful for very light pieces on appropriate surfaces, but formal grids often involve multiple frames, real glass, and enough total weight that proper hooks or anchors make more sense. No one wants the bottom row of a beautiful family photo wall to stage a dramatic midnight collapse.
Finally, hanging a grid teaches patience in the best way. It is a project where careful planning actually pays off in visible, immediate beauty. When the lines are level, the gaps are consistent, and the photos work together as one clean composition, the result feels calm and finished. That is the real reward. Not just a prettier wall, but the satisfying knowledge that you beat a deceptively picky DIY project and came out looking like you knew what you were doing the whole time.
Final Thoughts
Hanging a grid of picture frames is one of the best ways to create a high-impact wall display without drifting into clutter. It is neat, timeless, and surprisingly flexible. Whether you are showcasing family photos, art prints, travel memories, or a collection of black-and-white images, the formula is the same: plan the layout, treat the grouping as one unit, measure the hardware carefully, use the right anchors, and keep the spacing consistent.
In other words, be patient, be precise, and do not let “close enough” run the show. A good frame grid looks effortless, but the secret is that a little effort happened first. Thankfully, now you know exactly where to put it.