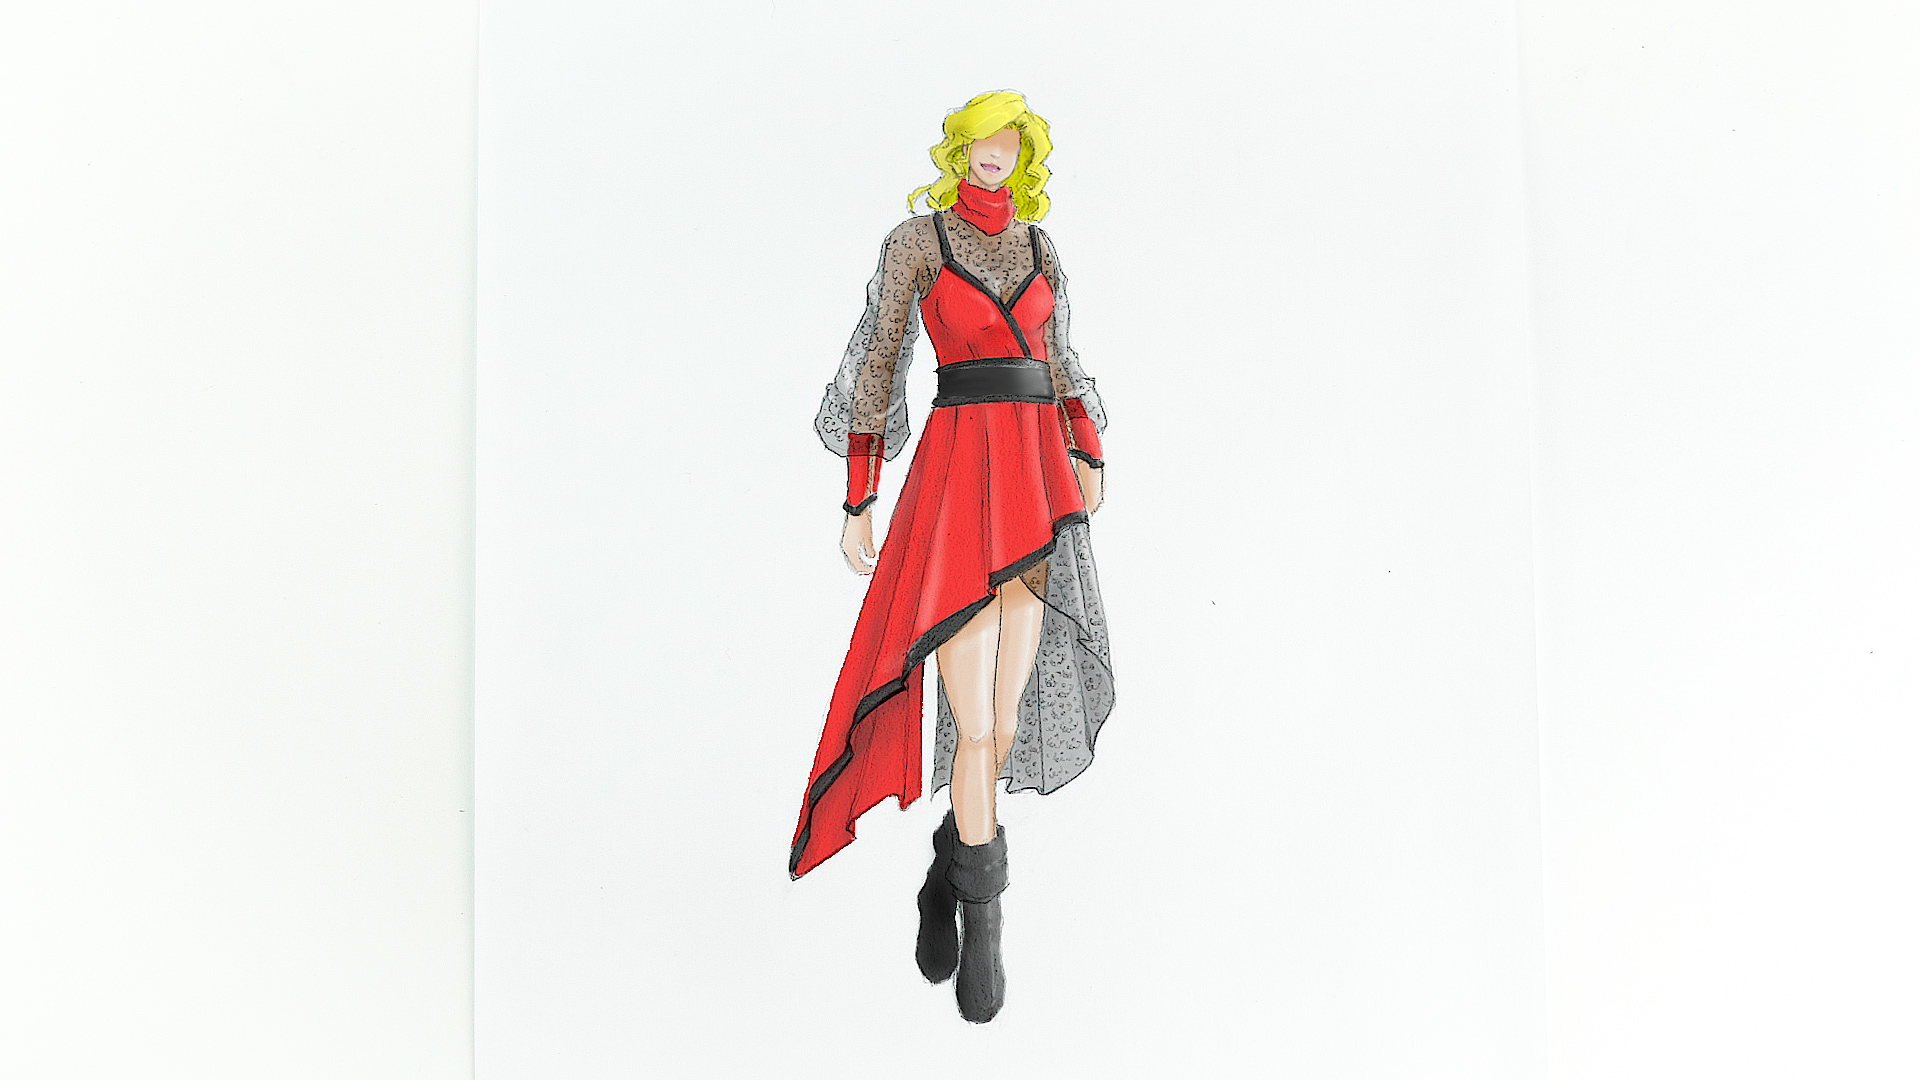
Fashion sketching is where a clothing idea stops being a vague cloud in your brain and starts acting like a real design. It is the bridge between inspiration and construction, between “I saw a cool sleeve in a dream” and “Here is exactly how that sleeve sits on the shoulder.” Whether you want to design a runway gown, a streetwear capsule, a prom dress, or a perfectly oversized blazer that says “creative director” without requiring a corner office, learning how to draw fashion sketches gives your ideas structure.
At the center of this process is the croquis, a quick fashion figure used as a base for drawing clothing. A croquis is not meant to represent a realistic body standard. It is a working template, often elongated and simplified, that helps designers test silhouette, proportion, movement, fabric, seams, and styling. Once you understand how to build or use one, fashion drawing becomes less intimidating and much more useful.
This guide walks through how to draw fashion sketches from a croquis to finished clothing, including tools, proportions, garment details, fabric rendering, color, flats, and practical experience-based tips for improving your sketchbook over time.
What Is a Croquis in Fashion Sketching?
A fashion croquis is a simplified figure drawing used as the foundation for clothing design. Designers sketch garments over the croquis to visualize fit, shape, length, proportion, and movement. Think of it as the fashion designer’s mannequin on paper. It stands there politely while you throw dramatic coats, experimental sleeves, pleated skirts, cargo pants, and questionable first ideas at it.
Traditional fashion croquis figures are often drawn around nine heads tall, which creates a long, elegant silhouette. This proportion is commonly used because it gives extra space to show garments clearly, especially long dresses, trousers, coats, and layered looks. However, you do not have to use one body type or one style of template. Modern fashion illustration can and should include different proportions, body shapes, gender presentations, ages, and poses depending on the customer, brand, and purpose of the design.
Croquis vs. Fashion Illustration vs. Flats
These terms are related, but they are not identical. A croquis is the figure template. A fashion illustration is the expressive drawing that shows the mood, attitude, styling, and drama of the clothing. A fashion flat is a technical drawing of the garment laid flat, usually shown from the front and back, without a posed figure.
In a real design process, you may use all three. The croquis helps you explore the look on a body. The illustration sells the emotion. The flat explains the construction. If fashion illustration is the movie trailer, the flat sketch is the instruction manual.
Tools You Need to Draw Fashion Sketches
You do not need a luxury art supply haul to start. A clean pencil, eraser, paper, and a willingness to draw some awkward first legs will take you surprisingly far. Still, the right tools make the process smoother.
Basic Traditional Tools
Start with an HB pencil for light construction lines and a 2B pencil for darker finishing lines. Use a kneaded eraser if you like gentle corrections, or a standard white eraser if your sketchbook occasionally needs a full apology. Fine-tip black pens are helpful for final outlines, seams, buttons, zippers, and topstitching. Colored pencils, markers, watercolor, and gouache can add fabric texture and mood.
Digital Fashion Sketching Tools
Digital sketching is popular because it allows layers, easy edits, imported croquis templates, color testing, brush effects, and fast duplication. Apps such as Adobe Fresco, Adobe Illustrator, Procreate, and similar drawing tools can help designers create clean illustrations and technical flats. Digital tools are especially useful when developing a collection because you can test several colorways without redrawing the same jacket twelve times and questioning your life choices.
Step 1: Start with a Simple Fashion Croquis
To draw your own croquis, begin with a vertical balance line. This line keeps the pose organized and prevents the figure from looking like it is slowly falling off the page. Mark the head at the top, then divide the height into equal sections. In a common fashion proportion system, the figure is about nine heads tall. The chin, bust, waist, hip, knee, calf, ankle, and foot areas are placed along that structure.
Keep the first croquis light and simple. Draw the head as an oval, the shoulders as a slanted line, the torso as a tapered shape, and the pelvis as a soft block or oval. Add legs and arms with simple tapered cylinders. Do not worry about perfect anatomy at this stage. The goal is a useful drawing base, not a museum-ready figure study.
Use Templates When You Are Learning
Beginners can use printed or digital croquis templates to practice garment design faster. This is not cheating. It is a practical learning method. Tracing over croquis templates helps you focus on clothing details, proportion, and silhouette before you are comfortable drawing the figure from scratch. Over time, you can create your own croquis library with front, back, side, walking, sitting, plus-size, menswear, childrenswear, and activewear poses.
Step 2: Choose the Pose Based on the Garment
The pose should serve the clothing. If you are sketching a tailored blazer, a strong standing pose shows shoulder line, lapels, buttons, waist shaping, and sleeve length. If you are designing a flowing evening gown, a walking pose may show movement better. If the garment has an interesting back, include a back view. If the design is all about a dramatic sleeve, avoid a pose where the arm hides the sleeve. Fashion sketching is partly art and partly making sure your best idea does not get blocked by an elbow.
For beginners, start with a front-facing pose. It is easier to control symmetry and garment placement. Once you are comfortable, experiment with three-quarter poses and movement. Dynamic poses can make sketches more exciting, but clarity should come first.
Step 3: Draw the Garment Silhouette First
Before adding buttons, seams, prints, lace, zippers, bows, and other tiny fashion confetti, block in the overall silhouette. Ask: Is the garment fitted, oversized, flared, cropped, long, structured, soft, or layered? Draw the outside shape lightly over the croquis. A pencil line can become a blazer, a ball gown, a jumpsuit, or a cape if you give it the right structure.
Example: Sketching a Basic Dress
For a simple A-line dress, mark the neckline first. Then draw the shoulder straps or sleeves. Place the waistline, then sketch the skirt expanding gently from waist to hem. Make sure both sides of the skirt relate to the body’s center line, but do not make them stiffly identical if the pose has movement. Add the hemline last, curving it slightly to show that fabric wraps around the body.
Example: Sketching a Blazer
For a blazer, start with the shoulder width and jacket length. Add the center front opening, lapels, collar, sleeve caps, cuffs, and hem. Then place darts, pockets, buttons, and seam lines. A blazer sketch depends on structure, so use confident, clean lines. If the blazer is oversized, draw it slightly away from the body. If it is fitted, let it follow the waist and torso more closely.
Step 4: Understand How Clothing Sits on the Body
Clothing does not float around the croquis like a polite ghost. It hangs from points of support: shoulders, bust, waist, hips, elbows, knees, and ankles. When drawing fashion sketches, identify where the garment touches the body and where it falls away.
A fitted turtleneck follows the neck, shoulders, bust, waist, and arms. A loose linen shirt hangs from the shoulders and creates folds near the underarm, cuff, and hem. A circle skirt falls from the waist and moves outward with volume. Denim jeans wrap around the hips and knees, with folds near the crotch, back knee, and hem. Observing real clothes on real people is one of the fastest ways to improve your sketches.
Step 5: Add Construction Details
Once the silhouette works, add design details. These include seam lines, darts, pleats, gathers, collars, cuffs, pockets, waistbands, zippers, buttons, snaps, drawstrings, topstitching, vents, yokes, and hems. Details are what turn “a dress” into “a square-neck midi dress with princess seams, puff sleeves, and a gathered waist.” Specificity matters.
Common Details to Practice
Practice drawing collars from different angles: pointed collars, mandarin collars, shawl collars, notched lapels, and hood shapes. Sketch sleeve types such as cap sleeves, bishop sleeves, raglan sleeves, puff sleeves, and dropped shoulders. Draw pocket variations, including patch pockets, welt pockets, cargo pockets, and side-seam pockets. The more details you know, the more design vocabulary you can use.
Step 6: Show Fabric, Texture, and Movement
Fabric changes everything. The same dress shape looks different in silk, denim, wool, tulle, jersey, leather, cotton poplin, or satin. To render fabric convincingly, study weight, texture, shine, transparency, and drape.
Lightweight fabrics create soft folds and movement. Heavy fabrics create fewer, stronger folds. Shiny fabrics need highlights and contrast. Matte fabrics need softer shading. Sheer fabrics may show parts of the garment or figure underneath. Knit fabrics can cling, stretch, and curve around the body. Structured fabrics hold shape and create crisp edges.
How to Draw Folds
Folds usually appear where fabric is compressed, pulled, gathered, or hanging. Look around elbows, knees, waistlines, cuffs, hems, and closures. Draw folds in the direction of tension. For example, gathers at a waistband often radiate downward. A sleeve bent at the elbow creates curved folds around the joint. A long skirt may have vertical folds that widen toward the hem.
Step 7: Add Color and Mood
Color should support the design idea. A black wool coat may feel classic and urban. The same coat in butter yellow may feel playful and editorial. A red satin dress suggests drama, while a cream linen version feels relaxed. Use color with intention, not just because your marker set has a shade named “Electric Melon” and you feel emotionally obligated to use it.
When coloring fashion sketches, leave tiny highlights on shiny areas and build shadows gradually. For print design, simplify patterns so they follow the garment’s form. Stripes should curve with the body and folds. Florals should shrink slightly where fabric turns away. Plaid needs structure and patience; plaid is basically fashion’s way of asking, “How steady is your hand today?”
Step 8: Create Technical Flats
After drawing the garment on a croquis, create a flat sketch. A fashion flat shows the garment as if it were laid flat on a table. It is usually clean, symmetrical, and technical. Flats are used in portfolios, line sheets, tech packs, production notes, and communication with patternmakers or manufacturers.
A good flat includes accurate proportions, front and back views, seam placement, closures, pocket details, stitch lines, trims, and sometimes callouts. Unlike expressive fashion illustration, a flat should be easy to understand. It does not need attitude. It needs information.
Step 9: Build a Fashion Sketchbook Habit
A fashion sketchbook is more than a place to draw pretty outfits. It is a design lab. Use it for thumbnails, croquis practice, fabric swatches, color palettes, notes, inspiration, silhouette experiments, styling ideas, and construction questions. Some pages will look polished. Others will look like your pencil had a dramatic personal crisis. Both are useful.
Sketch small and often. Try drawing ten sleeve ideas in ten minutes. Redesign one basic white shirt five different ways. Create a mini collection inspired by architecture, vintage sportswear, flowers, street photography, or your favorite coffee shop. The more you sketch, the faster you move from copying shapes to designing with purpose.
Common Fashion Sketching Mistakes to Avoid
Drawing Details Before the Silhouette Works
Beginners often jump into buttons and lace before checking the overall shape. Start with the silhouette. If the shape is weak, details will not save it. A beautifully shaded pocket on a confusing coat is still a beautifully shaded pocket on a confusing coat.
Ignoring Fabric Behavior
A chiffon gown and a denim jumpsuit should not fold the same way. Study real garments. Touch fabric. Notice stiffness, stretch, transparency, shine, and weight. Your drawings will improve when your eyes understand what your pencil is trying to describe.
Using Only One Croquis Body Type
Fashion design serves people, not just templates. Practice drawing clothes on different body proportions and poses. This helps you create more thoughtful designs and avoids the trap of designing only for one narrow fashion figure.
Forgetting the Back View
Many garments have important back details: closures, yokes, vents, straps, cutouts, pleats, pockets, or seam shaping. A design is not finished just because the front looks good. Clothes have a back. So do people. Shocking, but true.
Practice Exercises for Better Fashion Sketches
The 5-Minute Croquis Drill
Set a timer for five minutes and draw a simple croquis. Do not erase too much. Focus on balance, gesture, and proportion. Repeat this exercise daily for a week. You will notice your figures becoming more confident and less stiff.
The One Garment, Five Fabrics Exercise
Draw the same skirt five times and render it in different fabrics: denim, satin, tulle, wool, and jersey. This teaches you how fabric changes shape, shine, and movement.
The Closet Study
Choose one garment from your closet and sketch it on a croquis. Then draw the flat. Label the seams, closures, hem, fabric, and details. This exercise trains both your artistic eye and your technical design thinking.
Experience Notes: What Drawing Fashion Sketches Teaches You Over Time
The biggest lesson from practicing fashion sketching is that good drawings are built, not magically summoned. Beginners often expect the first line to look elegant, but fashion sketches usually begin as light, strange, uncertain marks. That is normal. The early sketch is not the final design. It is the conversation before the design learns how to speak clearly.
One helpful experience is learning to separate the figure from the clothing. At first, many people spend too much time trying to perfect the croquis. The face gets attention, the hair gets dramatic, the eyelashes somehow become the main character, and the garment sits there unfinished. Over time, you learn that the croquis should support the design, not steal the runway. A clean, simple figure often works better than a heavily detailed one.
Another lesson is that real clothing observation beats guessing. When you sketch from imagination only, folds can become random spaghetti lines. But when you study how a hoodie bunches at the wrist, how trousers break over sneakers, or how a satin skirt catches light, your drawings instantly become more believable. Keep a small visual library of garment photos, fabric samples, and your own quick notes. Even five minutes of looking closely can improve a sketch more than an hour of drawing from memory.
Experience also teaches you that mistakes are useful design tools. A sleeve drawn too large might inspire a dramatic oversized silhouette. A crooked hem might become an asymmetrical dress. A color combination that looks odd at first might become the spark for a whole collection. Not every mistake deserves to be erased immediately. Sometimes the sketchbook is trying to give you a better idea while pretending to be a problem.
Working from croquis to clothing also builds patience with refinement. The first version of a design might show the mood, but the second version clarifies the fit. The third version fixes the collar. The fourth version adds better seam placement. Professional-looking fashion sketches often come from revision, not from one perfect attempt. This is especially true when creating portfolio work or technical flats.
Finally, drawing fashion sketches teaches visual communication. A sketch is not just decoration; it is a message. It tells someone what the garment is, how it moves, where it opens, what fabric it might use, and what kind of person or moment it is designed for. When your drawing communicates clearly, your idea becomes easier to develop, sew, present, sell, or improve. That is the real power of fashion sketching: it turns imagination into something others can understand.
Conclusion
Learning how to draw fashion sketches, from a croquis to clothing, is one of the most valuable skills for anyone interested in fashion design. Start with a simple croquis, choose a pose that supports the garment, block in the silhouette, add construction details, study fabric behavior, apply color thoughtfully, and create technical flats when clarity matters. You do not need perfect drawing skills to begin. You need observation, practice, curiosity, and a sketchbook that is allowed to look messy while your ideas get better.
Fashion sketching is both creative and practical. It helps you explore style, solve design problems, communicate garment details, and build a stronger design process. Whether you are sketching a capsule collection, a fantasy gown, or the perfect pair of trousers, the croquis gives your idea a place to stand. From there, clothing can finally take shape.