Every 3D printer owner eventually meets the tiny villain that can ruin an otherwise perfect print: the little booger of molten filament clinging to the nozzle like it pays rent. You heat the bed, slice the model, level the gantry, pray to the gods of extrusion, and thenright before the first layerthe nozzle drags a burnt plastic crumb across the build plate like a dog wiping muddy paws on a white sofa.
That is where the 3D printer nozzle wipe is supposed to ride in wearing a cape. A brush, silicone pad, purge line, nozzle rub, cleaning macro, or wiper station should remove old plastic before it becomes a first-layer disaster. In theory, it is simple: move the hot nozzle over a brush, knock off the debris, and start printing cleanly. In practice, the nozzle wipe can fail in wonderfully annoying ways. Sometimes it misses the nozzle. Sometimes it smears the goo. Sometimes it collects plastic until it becomes a tiny landfill. And sometimes, as this week’s fail reminds us, the wipe simply won’t.
This is not just a funny workshop story. A failing nozzle cleaning system can cause poor first layer adhesion, under-extrusion, blobs, z-offset errors, filament contamination, print surface damage, and the kind of emotional weather normally associated with assembling flat-pack furniture at midnight. Let’s dig into why a 3D printer nozzle wipe fails, what it teaches us about printer design, and how to make your own machine less likely to turn a five-minute calibration into a two-hour detective drama.
What Is a 3D Printer Nozzle Wipe?
A 3D printer nozzle wipe is any system designed to clean filament residue from the outside of the hotend nozzle before, during, or after printing. On basic printers, this might be a purge line printed along the edge of the build plate. On more advanced machines, it may be a silicone wiper, brass brush, cleaning pad, purge bucket, or dedicated toolhead cleaning station. Multi-material printers often use wiping and purging systems to reduce color contamination and prevent old filament from joining the next layer uninvited.
The job is small but important. A nozzle may ooze plastic while heating. That plastic can curl upward, stick to the nozzle tip, burn, and later drop into a print as a dark blob. On a first layer, even a tiny piece of stuck filament can interfere with bed probing, automatic leveling, and smooth extrusion. If the printer uses the nozzle itself as part of a probing routine, leftover plastic can make the machine misread the bed height. Congratulations, your printer is now confidently wrong.
The Classic Fail: A Brush That Sounds Right but Doesn’t Work
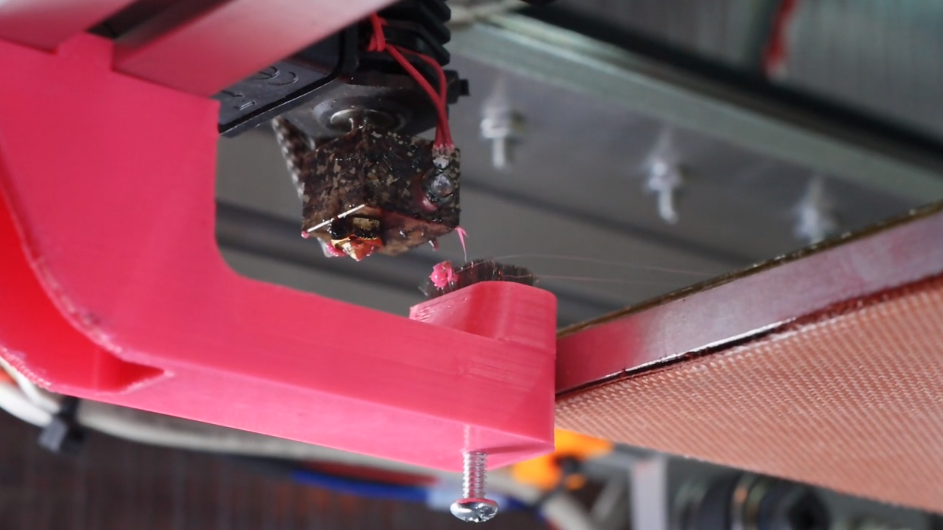
The infamous “nozzle wipe that won’t” concept is beautifully simple: mount a brush somewhere inside the printer, then command the hotend to sweep across it before printing. The brush should knock away stray plastic. The bed stays clean. The nozzle starts fresh. Everyone claps. The printer bows.
Except the real world arrives with a wrench.
A brush-based nozzle wipe can fail because the brush is too soft, too stiff, too low, too high, too far from the nozzle path, too close to fragile printer parts, or made from a material that does not enjoy being repeatedly introduced to a hot brass nozzle. The hotend may glide over the brush without enough pressure to clean anything. Or it may dig into the bristles and push the whole assembly out of position. If molten filament is sticky enough, the brush simply paints it around the nozzle instead of removing it.
In other words, the nozzle wipe can become less of a cleaning tool and more of a tiny spa treatment for burnt PLA.
Why Nozzle Wiping Is Harder Than It Looks
1. Filament Is Sticky at the Worst Possible Time
PLA, PETG, ABS, ASA, TPU, nylon, and other common filaments behave differently when hot. PLA may soften and smear. PETG is famously clingy and can grab the nozzle like warm chewing gum. TPU can flex and stretch. Carbon-fiber blends can leave abrasive residue. A wiper that handles one material well may fail miserably with another.
PETG deserves special mention. It loves to stick to metal, curl around the nozzle, and form shiny little goblins that later fall into your print. A wipe routine that seems perfect with PLA may become a comedy routine with PETG. The printer makes a confident wiping motion, the plastic nods politely, and then stays exactly where it was.
2. The Nozzle Is Hot, Small, and Moving Fast
A 0.4 mm nozzle is not exactly a snowplow. It has a small contact area, a rounded tip, and a temperature often sitting between 190°C and 260°C depending on the material. Cleaning it mechanically requires the right balance of contact, speed, pressure, and heat. Too little contact does nothing. Too much contact can bend a brush, scrape the nozzle, shift the toolhead, or create extra wear.
That balance gets even more complicated when the printer accelerates, vibrates, and repeats the motion hundreds of times. A wiper must be located precisely, stay mounted securely, avoid the build surface, survive heat, and remain clean enough to keep doing its job. That is a lot of responsibility for something that looks like a toothbrush lost in a robot garage.
3. The Wiper Gets Dirty Too
Nozzle wipers do not magically vaporize plastic. They collect it. Silicone pads, brushes, and purge buckets all need maintenance. A neglected wiper can become a filament compost pile. Instead of cleaning the nozzle, it transfers old crumbs back onto the hotend or flicks debris onto the print bed. If your printer starts leaving mystery confetti on the build plate, the cleaning system may be the culprit.
This is especially common with machines that print many colors or materials. Purged filament builds up quickly. If the printer’s “cleaning zone” is not emptied, trimmed, brushed, or inspected, it can become a second nozzle problem sitting beside the first nozzle problem. Workshop poetry, really.
Common Signs Your Nozzle Wipe Is Failing
A nozzle wipe problem often disguises itself as another issue. Before you blame the slicer, the filament, the moon phase, or your printer’s personality, look for these symptoms:
- Small blobs or burnt specks appear on the first layer.
- The purge line prints, but the nozzle still carries a string of filament.
- Automatic bed leveling gives inconsistent z-offset results.
- The nozzle drags old material across the build plate before printing.
- A silicone wiper or brush is visibly packed with plastic debris.
- Filament curls upward instead of extruding straight down.
- The first layer starts clean sometimes, then fails randomly.
- The printer makes wiping motions but the nozzle looks just as dirty afterward.
The maddening part is inconsistency. A bad wiper may work on Tuesday and sabotage you on Wednesday. That is because nozzle ooze depends on temperature, filament moisture, retraction, heat-up time, prior material, travel path, and even how long the printer sits hot before printing. A nozzle wipe is only one piece of the mess-control puzzle.
Brush, Silicone Pad, Purge Line, or Cold Pull?
Brass Brush
A brass brush is a popular nozzle-cleaning tool because brass is softer than steel and less likely to damage a brass nozzle. It can remove exterior debris when used carefully. However, a brush mounted inside the printer must be positioned correctly, and users must avoid steel brushes, which may scratch or damage components. A brush is good for outside grime but does not fix an internal clog.
Silicone Wiper
Silicone nozzle wipers are common on newer printers because silicone tolerates heat, flexes around the nozzle, and can scrape away soft filament without aggressive abrasion. They work well when clean and properly aligned. But the bristles can wear, tear, collect debris, or lose effectiveness over time. A damaged silicone wiper is like a windshield wiper with a chunk missing: technically present, emotionally absent.
Purge Line
The purge line is the old reliable method. Before the model begins, the printer extrudes a line along the side of the bed to prime the nozzle. This clears some old filament and confirms flow. It does not always remove plastic stuck to the outside of the nozzle, though. The purge line solves “nothing is coming out” better than it solves “something gross is stuck to the tip.”
Cold Pull
A cold pull is a maintenance technique for cleaning the inside of the nozzle and hotend. The printer heats filament, cools it to a specific temperature, and then the user pulls it out, ideally carrying burnt residue and debris with it. Cold pulls are useful for partial clogs, color contamination, and inconsistent extrusion. They are not the same as wiping the outside of the nozzle, but they often solve problems that wiping cannot.
The Engineering Lesson: Simple Ideas Need Ugly Testing
The nozzle wipe fail is funny because the idea feels so obvious. Add brush. Move nozzle. Remove gunk. Print happy. Done. But practical 3D printer upgrades live in the land of details. The brush height must match the nozzle. The G-code must approach from the right direction. The plastic must be soft enough to release but not so liquid that it smears everywhere. The wiper must be reachable without crashing into clips, probes, ducts, or bed edges. The mount must survive vibration. The cleaning cycle must not add more time than users are willing to tolerate.
That is why real printer design often looks overbuilt. A commercial wiper station may include a purge bucket, silicone scraper, controlled toolpath, retraction move, temperature logic, and firmware coordination. It is not because engineers enjoy making things complicated. Well, they do, but that is not the whole reason. It is because plastic at printing temperature behaves like a sticky toddler with a physics degree.
How to Make a Nozzle Wipe Work Better
Start With the Right Temperature
If the nozzle is too cool, residue may be hard and difficult to remove. If it is too hot, filament may smear instead of breaking free. Use the normal printing temperature range for the material, then adjust carefully. PLA often cleans well when softened but not fully runny. PETG may need a more deliberate wipe and stronger purge strategy.
Use a Safe Cleaning Material
For manual cleaning, a brass brush is generally safer than steel for common brass nozzles. For automated wiping, high-temperature silicone is often preferred because it flexes and reduces scratching. Avoid mystery plastics near a hotend unless you enjoy discovering new smells and regrettable chemistry.
Clean the Cleaner
Inspect the wiper, brush, pad, or purge bucket regularly. Remove old filament chunks. Replace worn silicone bristles. Make sure the wiper has not shifted. A nozzle wipe is a maintenance item, not a magical self-cleaning shrine.
Tune the Toolpath
A cleaning motion should make meaningful contact with the nozzle. Try multiple short strokes rather than one dramatic swipe. Approach from a direction that pulls filament away from the tip. Add a small retraction before wiping if ooze is excessive. After wiping, purge a short line to confirm clean flow.
Do Not Ignore Filament Moisture
Wet filament can pop, ooze, string, and leave messy deposits. If a printer suddenly starts producing more nozzle snot than usual, the filament may be part of the problem. Drying filament can reduce stringing and make wiping more effective.
When the Wipe Is Not the Real Problem
Sometimes the nozzle wipe gets blamed for failures it did not cause. If filament curls upward immediately after extrusion, the nozzle may be partially clogged. If extrusion is thin or inconsistent, the issue may be a dirty hotend, worn nozzle, incorrect temperature, heat creep, low extruder tension, or debris inside the filament path. If the nozzle keeps collecting blobs during printing, the first layer may be too close, causing material to squish upward and stick to the nozzle.
In these cases, improving the wipe helps only a little. The real fix may be a cold pull, nozzle replacement, hotend inspection, filament drying, z-offset adjustment, or slicer tuning. A wiper is not a cure-all. It is a broom. If the ceiling is leaking, buying a fancier broom is not the complete strategy.
Safety Matters: Hot Nozzles Are Tiny Branding Irons
Cleaning a 3D printer nozzle involves heat, tools, and sometimes stubborn plastic. Always treat the nozzle and heater block as burn hazards. Use pliers, tweezers, gloves where appropriate, and enough light to see what you are doing. Do not grab melted filament with bare fingers. Do not jam tools into the nozzle with force while the printer is moving. Disable motors or use manual controls carefully when inspecting the hotend.
Also avoid scraping delicate surfaces, damaging probes, or leaving loose brush wires near electronics. A nozzle cleaning upgrade should not introduce a new failure mode. The goal is fewer disasters, not a printer that now comes with bonus sparks.
Specific Example: The “Almost Works” Wiper
Picture a home-built CoreXY printer with a brush mounted at the front corner. The nozzle moves over, sweeps left and right, and heads to the bed. The first test looks promising. A little thread of PLA disappears. The maker celebrates. Then PETG enters the chat.
Now the filament sticks to the nozzle, stretches across the brush, snaps, and lands on the bed. The brush bristles collect residue. After a few prints, the brush is no longer a brush; it is a plastic hedgehog. The nozzle wipes across the mess and picks up a burnt fleck from two prints ago. That fleck lands in the first layer of a white part, creating a black scar right on the visible face. The printer technically completed the cleaning routine. It also technically betrayed everyone involved.
The fix might include replacing the brush with a silicone wiper, changing the wipe height, adding a purge before the wipe, adding a second wipe after the purge, trimming the brush, slowing the motion, or adding a small bucket where waste can fall. The important lesson is that a nozzle wipe must be tested under real printing conditions, with real materials, after repeated cycles. One clean wipe does not prove the system. Fifty messy prints do.
Best Practices for Preventing Nozzle Wipe Drama
- Inspect the nozzle before long prints, especially after material changes.
- Use a purge line or purge routine to confirm extrusion before the model starts.
- Keep silicone wipers, brushes, and purge buckets free of old plastic.
- Dry hygroscopic filaments such as nylon, PETG, TPU, and some composites.
- Run a cold pull when extrusion becomes inconsistent or color contamination persists.
- Replace worn nozzles rather than endlessly cleaning a damaged one.
- Check z-offset if plastic is scraping upward and sticking to the nozzle during the first layer.
- Use printer-specific maintenance instructions when available.
Why This Fail Is Actually Useful
The best maker fails are not useless. They reveal hidden assumptions. The nozzle wipe that won’t teaches us that 3D printing is not just about melting plastic and drawing shapes. It is about managing heat, flow, residue, motion, materials, and timing. It reminds us that a small blob of filament can defeat a large amount of confidence.
It also shows why the 3D printing community keeps improving. Someone tries a brush. It fails. Someone else tries silicone. Another maker changes the G-code. A third adds a purge bucket. A fourth designs a printable mount. A fifth says, “Why not use a dedicated tool-changing nozzle system?” Then everyone argues online, uploads files, tests again, and somehow the hobby moves forward one tiny plastic booger at a time.
Extra Experiences: Lessons From Living With a Nozzle That Refuses to Behave
The most important experience with nozzle wiping is learning that the printer usually gives warning signs before it ruins your afternoon. A little extra stringing during heat-up, a small curl of filament on the purge line, a brown speck on the nozzle, or a first layer that looks slightly plowed can all point to residue building up. New users often ignore these tiny signals because the printer still “works.” Experienced users know that “works” is sometimes just “has not failed loudly yet.”
One practical habit is to watch the start of the print for at least the first minute. Even with automatic bed leveling and fancy cleaning routines, the first layer remains the truth serum of FDM printing. If the nozzle wipe misses a blob, you will usually see it immediately. Pause, remove the debris safely, restart if needed, and fix the routine later. Walking away before the first layer is complete is brave. Sometimes it is also how you create modern art in spaghetti form.
Another useful lesson is to separate outside-nozzle problems from inside-nozzle problems. If plastic is stuck around the nozzle tip, an external wipe, brush, or careful manual cleaning may solve it. If filament flow is weak, uneven, clicking, curling, or contaminated, the problem may be inside the nozzle or heatbreak. That is when a cold pull, cleaning filament, or nozzle replacement becomes more useful than another wipe. Wiping the outside of a clogged nozzle is like washing a car with no engine. It may look better, but it is still not going anywhere.
Material changes are another common source of trouble. Switching from a high-temperature filament to a lower-temperature filament can leave residue that does not fully melt during the next print. For example, if a printer has been running PETG or ABS and then switches back to PLA, old material may remain in the hotend. Later, it can break loose as a dark blob. A good purge and occasional cold pull after material changes can prevent those surprise artifacts.
Wiper placement also matters more than most people expect. A brush mounted a millimeter too low may barely touch the nozzle. A brush mounted too high may flex the toolhead or stress the carriage. A wiper placed too close to the build plate may fling debris onto the print surface. A wiper placed too far away may add unnecessary travel time and ooze before the print begins. Good nozzle cleaning is not just about having a wiper; it is about giving the nozzle the right path, pressure, temperature, and timing.
Finally, the best emotional strategy is to treat nozzle wiping as maintenance, not magic. The printer is melting plastic through a tiny hole for hours at a time. Some mess is normal. The goal is not perfection; it is control. Keep the nozzle clean, keep the wiper clean, keep filament dry, and keep expectations realistic. When the nozzle wipe fails, laugh first, then troubleshoot. The blob has already won the first round. Do not let it take your mood too.
Conclusion
The 3D printer nozzle wipe that won’t is a perfect “Fail Of The Week” because it turns a simple idea into a full engineering lesson. A nozzle cleaning system seems easy until sticky filament, hot metal, worn bristles, dirty pads, bad toolpaths, and inconsistent materials all start voting against you. But the failure is not pointless. It teaches better maintenance, better design, and better troubleshooting.
A reliable nozzle wipe can improve first layer adhesion, reduce blobs, protect print quality, and make remote printing less nerve-racking. But it must be paired with clean filament, good temperature control, correct z-offset, a sensible purge routine, and regular inspection. The nozzle wipe is not a superhero. It is a very small janitor working next to a volcano. Help it out.
Note: This article is based on real 3D printer maintenance practices, common nozzle cleaning methods, and documented community troubleshooting experiences. It has been rewritten as original editorial content for web publication without source-link clutter.