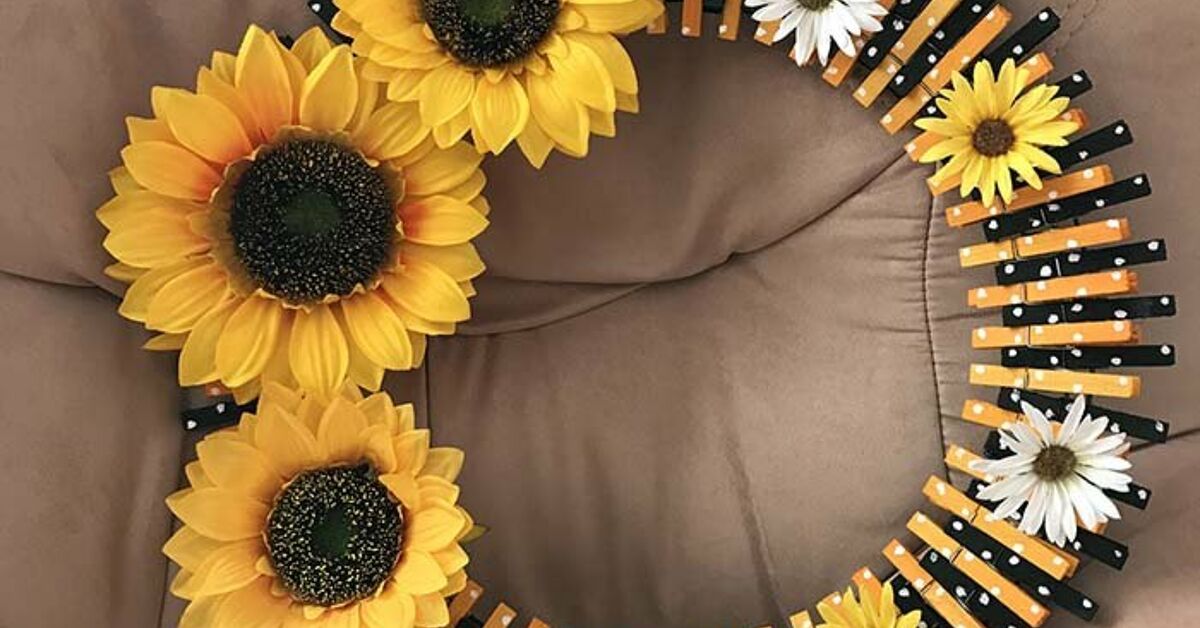
A sunflower is basically nature’s way of hanging a cheerful yellow sign on the landscape. Fortunately, you do not need a garden, perfect weather, or a mysterious ability to keep plants alive to enjoy one. With wooden clothespins, a wire wreath frame, paint, and a little patience, you can create an easy clothespin sunflower wreath that stays bright through summer and well into fall.
This beginner-friendly DIY wreath uses painted clothespins as petals and brown-tipped pins as the textured center. The finished decoration looks impressively detailed, but its construction is mostly clipping, arranging, and admiring your increasingly flower-shaped creation. It is affordable, customizable, and forgiving enough that one crooked petal will not cause a botanical emergency.
Why Make a Clothespin Sunflower Wreath?
A clothespin sunflower wreath offers plenty of decorative impact without requiring advanced crafting skills. Wooden clothespins already have the narrow, elongated shape needed to suggest flower petals. Once they are painted yellow and arranged around a circular frame, most of the design work practically happens by itself.
This homemade sunflower wreath is also easy to personalize. You can choose soft butter yellow for farmhouse décor, deep golden yellow for an autumn porch, or several shades for a more natural appearance. A ribbon, wooden sign, artificial greenery, or a few miniature flowers can change the entire personality of the project.
Because the clothespins clip onto the frame, you can test different arrangements before committing to glue. That makes this an approachable project for beginners, families, and anyone whose craft strategy occasionally includes the phrase, “Let’s see what happens.”
Materials and Tools
Essential supplies
- One 14-inch, four-ring wire wreath form
- Approximately 117 standard wooden spring clothespins
- Yellow craft paint or spray paint suitable for wood
- Brown craft paint or spray paint
- Painter’s tape
- Strong craft adhesive or weather-resistant hot glue
- Twine, floral wire, or ribbon for hanging
- Cardboard, a drop cloth, or another protected work surface
Optional embellishments
- Wired ribbon for a bow
- Artificial sunflower leaves or greenery
- A small “Welcome” or “Hello Sunshine” sign
- Clear protective coating labeled for indoor and outdoor use
- Foam brushes if you prefer hand-painting
- Disposable gloves
The number of clothespins depends on the frame size, clip dimensions, and spacing. For the three-layer pattern described below, 117 pins create 39 repeating groups. Keep a few extras nearby because wooden clothespins occasionally split, twist, or launch their springs across the room as though escaping a tiny wooden prison.
Preparation Before You Start
Inspect the clothespins
Remove broken, splintered, or severely warped pins. Open each clothespin once to confirm that the spring works properly. Lightly sand rough edges if necessary, then wipe away the dust. Smooth wood produces a cleaner painted finish and is more pleasant to handle during assembly.
Test the arrangement
Before painting everything, clip six to nine unpainted clothespins onto the wreath frame in the intended pattern. This small test reveals how tightly the pins will fit and whether you like their angle. It also provides a more accurate material count for frames that differ from the standard 14-inch model.
Choose a painting method
Spray paint is fast and reaches the sides, grooves, and metal springs efficiently. Use it outdoors or in a properly ventilated area, protect nearby surfaces, and follow all instructions on the product label. Several light coats generally produce a smoother finish than one enthusiastic, drip-heavy blast.
Acrylic craft paint gives you more color control and avoids overspray. However, painting more than 100 clothespins by hand can turn a quick afternoon craft into a surprisingly intimate relationship with a foam brush. Water-based wood stain or dye is another option when you want the grain to remain visible.
How to Make an Easy Clothespin Sunflower Wreath
Step 1: Paint the yellow petals
Paint all 117 clothespins yellow. One efficient method is to clip them around a spare wire frame, cardboard edge, or sturdy box flap. This holds them upright and lets you reach multiple surfaces without chasing loose pins around the worktable.
If using spray paint, shake the can for the time specified on its label and test the spray on scrap cardboard. Keep the can moving in smooth, overlapping passes. Rotate the pins after the first coat so the sides, tips, and areas around the springs receive coverage. Thin coats reduce runs and help the clothespins continue opening normally.
Allow the paint to dry between coats and cure for the manufacturer’s recommended time. Paint that feels dry on top may still be soft underneath. Assembling too early can leave fingerprints, sticky contact points, and yellow marks on your hands that make you look suspiciously involved in a mustard incident.
Step 2: Create the sunflower center
Select 39 painted clothespins. These will form the flower’s dark inner ring. Apply painter’s tape across each pin just below its upper gripping end, leaving the tip exposed. Keep the tape line reasonably consistent, although tiny variations will make the center appear more organic.
Paint the exposed ends brown. A dark chocolate shade creates strong contrast, while warm chestnut produces a softer farmhouse look. Apply a second coat if the yellow remains visible. Once the brown paint has dried, remove the tape slowly. Pulling it back over itself rather than straight upward can help reduce peeling.
If a little yellow paint lifts, turn the imperfect side toward the back or touch it up with a small brush. Sunflowers are not measured with rulers, and neither should your wreath be.
Step 3: Paint the wire frame
This step is optional, but it gives the finished DIY sunflower wreath a more polished appearance. Paint most of the wire frame yellow so exposed areas blend with the petals. Add brown to the innermost section where the two-tone clothespins will sit.
Let the frame dry completely before assembly. Wet paint can transfer to the clothespins and may act like weak, unpredictable glue in places where you do not want it.
Step 4: Build the first repeating group
Place the wreath form faceup with its curved side toward you. Clip one brown-tipped clothespin across the two inner rings, positioning the brown end toward the center. This piece begins the seed-like inner section.
Clip one all-yellow clothespin onto the outermost ring behind it. Add a second yellow pin across the two middle rings. Angle the pins slightly so their ends fan outward like petals. You now have one three-pin group: a brown-centered inner petal, a middle yellow petal, and an outer yellow petal.
Step 5: Repeat the pattern around the frame
Continue adding the same three-piece sequence. Work one section of the wire frame at a time, using its crossbars as visual checkpoints. Keep the spacing even, but do not pack the clothespins so tightly that they twist sideways.
Pause after every section and view the wreath from several feet away. Up close, a quarter-inch gap can seem catastrophic. From normal viewing distance, it usually disappears into the pattern. Adjust the angles while the pins are still unglued.
When you reach the final section, redistribute the pins if the remaining space is too large or too narrow. Moving each clothespin only slightly is less noticeable than forcing the last few into a crowded wooden traffic jam.
Step 6: Secure loose clothespins
Many clothespins will grip the wire frame securely without adhesive. However, clips attached to a single ring may rotate or shift when the wreath is moved. Add a small amount of adhesive at the back wherever one pin touches another or meets the frame.
Hot glue is convenient for an indoor wreath or a protected display. For a wreath exposed to summer heat, choose an adhesive specifically labeled for wood, metal, and the intended environment. Some hot-melt adhesives can soften on a hot door. Always follow the adhesive manufacturer’s curing instructions.
Step 7: Add a hanger and decorations
Tie twine, floral wire, or ribbon securely around the upper portion of the frame. Test the hanger over a soft surface before placing the wreath on a door. A completed clothespin wreath carries more weight than its cheerful appearance suggests.
Add a bow near the bottom or slightly off-center for visual balance. Wired ribbon is especially helpful because its loops hold their shape. Faux leaves can be tucked beneath the bow, while a small sign may be wired across the opening. Keep embellishments proportional so the clothespin sunflower remains the star rather than becoming background scenery for an enormous bow.
Design Variations and Creative Ideas
Use several shades of yellow
Mix lemon yellow, golden yellow, and a small amount of orange to create depth. Arrange the colors randomly for a natural look or place darker petals near the center and lighter ones around the outside.
Make a rustic farmhouse version
Apply diluted yellow paint or wood stain instead of an opaque coating. Allow some grain to show, then add a burlap bow and muted olive greenery. A lightly distressed wooden welcome sign completes the relaxed farmhouse style.
Create a fall sunflower wreath
Combine mustard yellow, burnt orange, and deep brown clothespins. Add faux wheat, miniature pumpkins, plaid ribbon, or burgundy leaves. This variation transitions easily from late summer into Thanksgiving décor.
Add a solid center
Cut a circle from thin wood, sturdy cardboard, cork, or a textured rubber mat. Paint it brown and attach it behind the inner opening. A solid center makes the wreath resemble a complete sunflower and provides space for a greeting or family name.
Try a smaller wreath
An eight- or ten-inch frame creates a charming kitchen, office, or apartment-door decoration. Dry-fit the pins before buying supplies because a smaller frame changes both the number of clothespins and the angle at which they overlap.
Common Problems and Easy Fixes
The paint looks uneven
Uneven color usually results from spraying too close, applying a heavy coat, or failing to rotate the clothespins. Let the surface dry, lightly smooth rough areas, and apply another thin coat. Primer can improve coverage on very porous wood, especially when using pale yellow paint.
The clothespins keep moving
First, confirm that each spring is seated correctly and gripping an appropriate wire. Then add a small adhesive bead on the back at the contact point. Avoid flooding the mechanism, since excess glue may show through the front or prevent the clothespin from closing.
The last section will not fit
Do not immediately remove half the wreath in a moment of craft-based despair. Loosen the surrounding sections and reduce the spacing gradually around the entire frame. If necessary, remove one complete three-pin group to preserve the repeating pattern.
The wreath looks crooked
Lay it flat and compare the distance between the petal tips and the center. Rotate individual clips until the outer edge appears circular. Check the hanging loop as well; a centered wreath can still hang crooked if the loop is tied off-center.
The paint peels from the clips
Peeling often occurs when the paint has not cured, the wood contains dust, or the clips are handled aggressively during assembly. Touch up small areas with a brush. For future projects, clean the wood, consider using primer, and allow the finish to cure fully before clipping the pieces onto metal wire.
Where and How to Display the Wreath
This wooden clothespin wreath performs best indoors or on a covered porch protected from direct rain. Even outdoor-rated paint and clear coating cannot make unfinished joints, metal springs, and natural wood permanently immune to moisture.
Avoid placing the wreath between a storm door and an exterior door if that space becomes extremely hot. Prolonged heat can affect some adhesives and decorative materials. Indoors, the wreath works beautifully above a mantel, in an entryway, over a kitchen buffet, or as part of a seasonal gallery wall.
Dust it with a soft brush or low-power handheld vacuum. At the end of the season, store it flat or hang it inside a wreath container. Do not stack heavy decorations on top; crushed clothespin petals are not known for bouncing back with dignity.
Frequently Asked Questions
How many clothespins are needed for a sunflower wreath?
A 14-inch wire frame commonly requires about 90 to 120 standard clothespins, depending on the pattern and spacing. The three-layer design in this guide uses approximately 117. Always dry-fit a sample because frame and clothespin dimensions vary.
Can I use acrylic paint instead of spray paint?
Yes. Acrylic craft paint works well on unfinished wooden clothespins and offers precise control over color placement. Use a foam brush, apply thin coats, and paint around the spring carefully. It takes longer but creates less overspray.
Does every clothespin need to be glued?
Not necessarily. Strong clips placed across two wires may remain secure on their own. Glue the pins that rotate, slide, or attach to only one ring. Using less adhesive also makes future repairs and color changes easier.
Can children make this wreath?
Children can help sort, clip, and hand-paint clothespins with age-appropriate materials. An adult should handle spray paint, strong adhesives, wire cutters, and hot glue guns. Follow every product label and supervise the work area.
How long does the project take?
Hands-on assembly may take one to two hours. Painting and curing add more time, so the project is easiest when divided across an afternoon or two shorter sessions. Rushing the drying stage is the fastest route to fingerprints and stuck clothespins.
Final Thoughts
An easy clothespin sunflower wreath turns basic household-style materials into bright seasonal décor without demanding specialized equipment or advanced technique. The repeating clip pattern creates impressive texture, while paint and embellishments leave plenty of room for personal style.
Take time to prepare the wood, use light paint coats, test the arrangement, and secure only the pieces that need extra support. The result is a sunny DIY door decoration that feels welcoming from spring through falland never once asks to be watered.
Real-World Experience: Lessons That Make the Project Easier
The first practical lesson makers commonly discover is that preparation takes longer than assembly. Clipping the finished petals onto the frame is satisfyingly fast. Painting more than 100 clothespins, however, is the portion that determines whether the wreath looks professionally finished or like it survived a yellow paint storm.
Organizing the clothespins in batches helps. Separate them into groups before painting, and reserve the exact number needed for brown tips. An egg carton, cardboard strip, or spare wire frame makes a useful drying rack. Without one, freshly painted clips tend to touch each other, stick to paper, or roll onto the floor at the precise moment you decide everything is going unusually well.
Another useful experience is learning to assemble the pattern loosely at first. It is tempting to squeeze every clothespin tightly against its neighbor. That creates problems near the final section, where there may not be enough space to complete the sequence. Leaving a narrow gap between groups gives you room to adjust the entire circle later.
The wreath also looks different when it is hanging than when it is lying flat. Gravity may rotate pins that appeared stable on the table. Before gluing, hang the wreath temporarily and gently tap the frame. Mark any shifting pieces with removable tape, return the wreath to the work surface, and reinforce those specific areas. This targeted approach uses less glue and keeps the back neater.
Color choice can be surprisingly important. A single bright yellow creates a bold, graphic sunflower that stands out against a dark door. Multiple yellow tones create softer depth but require more planning. When mixing shades, distribute them intentionally around the circle. Large clusters of one color can look accidental unless you are deliberately creating an ombré pattern.
The brown center deserves attention, too. If the brown section is too short, the wreath reads as a yellow pinwheel rather than a sunflower. If it extends too far, the flower may look visually heavy. Placing the color break near the clothespin groove usually creates a balanced division between the center and petals.
A common temptation is to add every available embellishment. Sunflowers, leaves, signs, raffia, ribbon, beads, and miniature scarecrows may all be charming individually, but together they can conceal the clothespin pattern that makes the project distinctive. Adding decorations one at a timeand stopping earlier than expectedusually creates a stronger design.
Display conditions matter more than many first-time makers expect. A protected porch is far kinder to wooden clips than an exposed fence or gate. Moisture can swell the wood, while strong sunlight may fade paint or soften certain adhesives. A clear exterior-rated coating can improve resistance, but sheltered placement remains the most reliable protection.
Finally, perfection is not required. Slight differences in angle and spacing imitate the irregularity of real petals. From several feet away, small paint flaws disappear while the overall color and shape take over. That is perhaps the nicest part of this project: it rewards care without demanding microscopic precision. You finish with a cheerful handmade sunflower, a brighter doorway, and the pleasant realization that laundry supplies have unexpected career options.
Note: Use paints, sealers, and adhesives only as directed by their manufacturers. Work in a ventilated area, protect surrounding surfaces, and provide adult supervision whenever hot glue, cutting tools, or aerosol products are used.