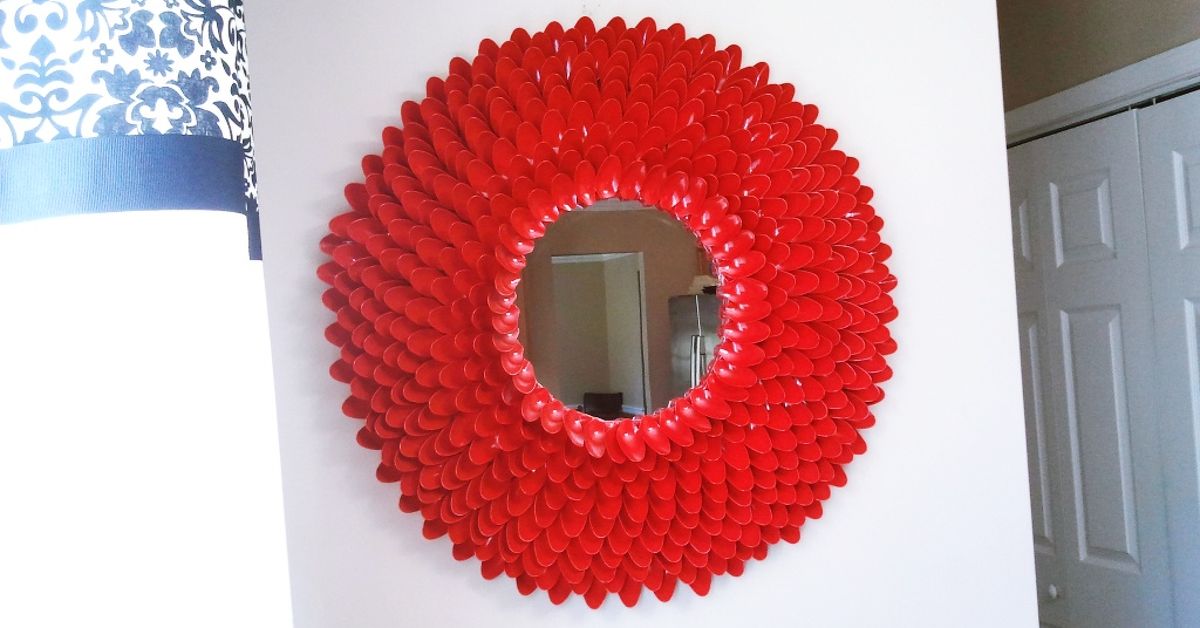
If you have ever looked at a pile of plastic spoons and thought, “You know what you could be? Fancy,” this project is for you. A DIY plastic spoon mirror is one of those gloriously weird home decor ideas that sounds questionable for about five seconds, then suddenly looks like something a trendy boutique would sell for far too much money. The magic is all in repetition: dozens of spoon heads layered in rings create a petal-like frame that can look modern, glam, boho, or slightly dramatic in the best possible way.
The beauty of this project is that it is cheap, beginner-friendly, and surprisingly customizable. You can make it gold and glamorous, matte black and moody, pearly white and coastal, or bright coral if your decorating style says “I fear no color.” You do not need advanced woodworking skills, a workshop, or the patience of a saint. You mostly need spoons, glue, a round mirror, and the willingness to cut off a truly suspicious number of spoon handles.
In this guide, you will learn how to make a DIY plastic spoon mirror step by step, how to choose the right materials, how to avoid common mistakes, and how to style the finished piece so it looks intentional rather than “I got lost in the party supplies aisle.”
Why a DIY Plastic Spoon Mirror Actually Looks Good
At first glance, plastic spoons do not scream luxury. They whisper “picnic,” “birthday cake,” and “someone forgot real silverware.” But when you remove the handles and layer the rounded spoon bowls in overlapping circles, the shape starts to mimic flower petals, fish scales, or a sunburst frame. That repeated texture catches light beautifully and makes even a simple mirror look more expensive.
This is why the DIY plastic spoon mirror has stuck around as a favorite upcycled decor project. It turns a low-cost material into something sculptural. It also fits a lot of decorating styles. In a minimalist room, one monochrome spoon mirror becomes a statement piece. In a maximalist room, it can play right along with bold art, metallic accents, and dramatic lighting. In a kid’s room or craft room, it adds personality without draining your wallet.
It is also a satisfying project because the transformation is dramatic. You start with a plain mirror and a pile of disposable utensils. A few hours later, you have wall decor that looks layered, textured, and custom. That is the kind of DIY project that makes people ask, “Wait, you made that?” which is basically the highest honor in crafting.
Materials for a Plastic Spoon Mirror
You do not need a huge supply list, but choosing the right materials can make the project easier and the final result sturdier.
Main supplies
- 1 round mirror, preferably lightweight
- 40 to 100 plastic spoons, depending on mirror size
- 1 sturdy backing board such as foam board, MDF, plywood, or thick cardboard
- Hot glue gun and plenty of glue sticks
- Strong craft scissors or utility snips for cutting spoon handles
- Spray paint or craft paint
- Painter’s tape and paper to protect the mirror while painting
- Hanging hardware, such as a sawtooth hanger, D-rings, or strong picture wire
Optional extras
- Primer for plastic if your paint requires it
- Clear sealer for extra durability
- Ruler or compass for spacing rings evenly
- Rubber bumpers for the back if the mirror will hang on a wall
A quick tip: choose spoons that are all the same size and shape. Mixing brands sounds harmless until one spoon looks like it came from a tea party and the next looks ready to shovel mashed potatoes. Consistency matters here.
Best Mirror and Base Choices
A small to medium round mirror is the easiest place to start. Something in the 10- to 16-inch range is manageable, affordable, and large enough to show off the spoon pattern. Lightweight mirrors are ideal because the spoon frame adds bulk but not much structural strength. You want the backing and hanging hardware to do the heavy lifting, not the spoons themselves.
For the base, cut a round board several inches wider than your mirror. That extra space is where the spoon heads will be glued in layers. Thick cardboard can work for small decorative mirrors, but MDF, plywood, or sturdy foam board usually gives a more reliable result. If the mirror will actually hang on a wall instead of leaning on a shelf, the backing should be solid and not flimsy.
Think of the project in layers: base first, mirror second, decorative spoon rings third, hardware last. When you build it in that order, the whole piece feels more secure and polished.
How to Make a DIY Plastic Spoon Mirror
Step 1: Plan your layout
Before you glue a single thing, place the mirror on your backing board and trace around it. Then sketch the outer size of the finished mirror frame. This will help you estimate how many rows of spoons you can fit. Most DIY plastic spoon mirror designs use three to five rings of spoon heads, slightly overlapping as they move inward.
Dry-fit a few spoon heads first. This saves you from the classic crafting mistake of confidently starting in one direction, then realizing halfway through that your spacing math was built on pure optimism.
Step 2: Cut the spoon handles
Using strong scissors or snips, cut the handles off the plastic spoons. Try to keep the cuts as neat and consistent as possible. You want each spoon head to sit flat against the backing. If any cut edges are jagged, trim them a little more so they do not create awkward gaps.
This is the least glamorous part of the project, but it goes faster if you batch it. Put on a show, listen to a podcast, and enter your “tiny plastic manufacturing plant” era.
Step 3: Paint before or after gluing
You have two options here, and both can work.
Paint before gluing: This is usually cleaner and faster. Lay out the spoon heads on a protected surface and apply several light coats of paint. Let them dry fully before attaching them.
Paint after gluing: This can create a more seamless finish because the whole frame ends up the exact same color. If you do this, cover the mirror carefully with paper and painter’s tape before painting.
If you are using spray paint, light coats are your best friend. Heavy coats can drip, pool, or make the spoon surface look thick and gummy. Metallic gold, champagne, bronze, matte black, and glossy white are especially good choices for this project because they highlight the petal texture beautifully.
Step 4: Attach the mirror to the base
Center the mirror on the base and secure it with an adhesive suitable for the mirror and backing material. If you are using a lightweight craft mirror, this step is simple. If you are using a heavier glass mirror, make sure your adhesive and backing board are appropriate for the weight. Let the bond set before moving on.
Do not rely on the spoon layer to help hold the mirror in place. The spoons are decorative. They are here for glamour, not structural responsibility.
Step 5: Start the outer ring
Begin with the outermost row of spoon heads. Apply hot glue to the cut end or back of each spoon head and press it onto the backing board, curved side up. Work your way around in a circle, overlapping them slightly so they resemble petals.
This first ring establishes the shape of the whole project, so take your time. Even spacing now will make the rest of the rows much easier. If one spoon goes rogue, pull it off before the glue fully hardens and reset it.
Step 6: Build inward
Add the second ring so each spoon head overlaps the gaps between two spoons in the outer ring. This staggered placement gives the frame a fuller, layered look. Keep repeating until you reach the edge of the mirror.
The closer you get to the center, the more precise your placement should be. Small gaps are more noticeable near the mirror edge, so slow down there. If needed, trim a few spoon heads slightly to help them fit neatly around the mirror.
Step 7: Finish the center edge
The innermost ring should look tidy and deliberate. You want the spoon heads to frame the mirror, not crowd it. Once everything is glued down, step back and check the shape from a distance. Little imperfections that disappear up close sometimes become obvious from six feet away. Home decor loves a dramatic reveal.
Step 8: Add paint touch-ups and seal if desired
If you painted beforehand, now is the time to touch up any nicks or exposed cut edges. If you waited to paint until after assembly, remove the masking from the mirror only after the paint is completely dry.
A clear sealer is optional, but it can help protect the finish, especially if the mirror will hang in a bathroom, entryway, or other high-traffic spot.
Step 9: Add hanging hardware
Attach the appropriate hanging hardware to the back of the base. For a lightweight mirror, a sturdy sawtooth hanger may be enough. For a heavier piece, D-rings or picture wire attached securely to the backing are smarter options. Always match your wall anchor or hanging hardware to the total weight of the finished mirror.
Common Mistakes to Avoid
Using the wrong glue
Not all plastic is equally cooperative. Some hot glue formulas bond to many plastics, but certain plastics can be trickier. If you are unsure, test one spoon first. A five-minute glue test is better than a future rainstorm of decorative petals.
Skipping surface prep
If your spoons are dusty, oily, or glossy, paint may not adhere as well. Wipe them clean first. If your chosen paint system recommends primer for plastic, use it. Better prep usually means better color, smoother coverage, and less frustration.
Applying too much paint at once
Thick paint coats can leave drips, tacky patches, and a finish that looks more “melting science experiment” than “designer wall art.” Several thin coats almost always look better.
Making the base too small
If the backing board barely extends beyond the mirror, you will not have enough room for layered rings. Give yourself a generous border so the frame has visual impact.
Ignoring hanging strength
A decorative mirror still needs practical support. Make sure your hanging method suits the final weight and wall type. Cute decor is wonderful. Cute decor crashing at 2 a.m. is not.
Color Ideas for a Plastic Spoon Mirror
One of the best parts of making a DIY plastic spoon mirror is how easily you can customize the look.
Gold glam
Gold is the classic choice because it turns the spoon shapes into a faux sunburst or floral statement piece. It works especially well in bedrooms, entryways, or powder rooms.
Matte black
For a modern or moody room, matte black looks sleek and sculptural. It makes the texture more subtle and architectural.
Pearl or white
White gives the mirror a soft, petal-like appearance that feels airy and coastal. It is a great fit for nurseries, bathrooms, or cottage-inspired decor.
Ombre shades
Paint each ring a slightly different shade for an ombre effect. This works especially well with blues, pinks, greens, or sunset tones.
Mixed metallics
Try bronze on the outer ring, gold in the middle, and champagne near the mirror for a dimensional, layered finish that catches the light beautifully.
Where to Use a DIY Plastic Spoon Mirror
This project can work in more places than you might think. A small plastic spoon mirror looks great in a gallery wall, above a vanity, in a hallway, or layered on a shelf. In a bathroom, it can add playful texture, but make sure the finish is protected from moisture. In a bedroom, it can act as both wall art and a functional accent. In a craft room, it simply announces that fun lives here.
You can also scale the idea. A mini version works as decor over a desk or dresser. A larger version can become a focal point in a living room or entryway. Just remember that bigger mirrors need sturdier bases, more spoons, and stronger hanging hardware.
Is a DIY Plastic Spoon Mirror Worth Making?
Absolutely, especially if you love budget-friendly DIY home decor that does not look obviously cheap. This project combines upcycling spirit with real visual payoff. It is affordable, flexible, and beginner-friendly. You do not need to be a professional crafter. You just need a little patience, a good layout, and enough plastic spoons to briefly concern everyone in your household.
The finished result is textured, eye-catching, and delightfully unexpected. It proves that creative design is not always about expensive materials. Sometimes it is about noticing that a plastic spoon has a surprisingly elegant shape once you stop expecting it to serve potato salad.
Real-World Experiences With a DIY Plastic Spoon Mirror
The first time I made a DIY plastic spoon mirror, I expected two things: a relaxing afternoon craft and a stylish result. What I actually got was a tiny lesson in patience, problem-solving, and how quickly a harmless project can take over a dining table. At the start, the supplies looked almost laughably ordinary. A bag of white plastic spoons, a round mirror, glue sticks, spray paint, and a backing board did not exactly scream “future statement piece.” But that is part of the charm of this project. It looks unimpressive right until the moment it suddenly does not.
The cutting stage was where reality arrived. Snipping spoon handles sounds simple, but after the first dozen, you begin to understand the emotional journey of assembly-line work. By spoon number thirty, I had developed opinions, a rhythm, and mild suspicion toward any spoon with an oddly shaped bowl. Still, once the pile of cut spoon heads started growing, the project became exciting. It was easier to imagine the final flower-like shape, and that made the repetitive prep worth it.
The next surprise was how important spacing is. I tried to rush the first outer ring, and the frame immediately looked uneven. Not tragic, but definitely not the effortlessly polished look I was going for. So I peeled up a few pieces, reset them, and learned the key truth of this project: the first ring is the boss. Once that row is balanced, everything else falls into place much more easily. It is the crafting equivalent of making your bed. Annoying at first, but weirdly helpful later.
Painting was the part that transformed the whole project. Before paint, the spoon frame looked clever but still very much made of plastic cutlery. After paint, it changed character completely. The finish unified the shape, softened the cheapness of the material, and turned the layered spoons into something that looked floral and sculptural. I understood immediately why metallic paint is so popular for this project. It highlights the texture beautifully and makes the light bounce across the raised edges.
I also learned that this mirror gets compliments from people who would never guess what it is made of. They see texture first, not utensils. That is probably the most satisfying part of the experience. A DIY plastic spoon mirror is a reminder that design is often about repetition, finish, and placement more than the raw material itself. When something ordinary is arranged thoughtfully, it stops looking ordinary.
Another real-world lesson is that this project feels more enjoyable when you do not treat it like a race. It is better as a slow weekend craft than a “let me finish this in forty-five minutes before dinner” situation. The more carefully you line up the rows and the more patient you are with drying time, the more polished the result looks. It rewards attention. It also rewards humor, because at some point you will absolutely look around your workspace and think, “Why are there fifty spoon heads on my floor?” That is just part of the artistic process.
In the end, the experience of making one is more satisfying than you might expect. It is affordable enough to feel low-risk, creative enough to feel personal, and dramatic enough to look like you spent much more than you did. That combination is why the project remains such a favorite. It is not just a clever craft. It is the kind of DIY that teaches you to look at everyday objects differently, which is honestly one of the best side effects any creative project can have.
Conclusion
A DIY plastic spoon mirror is proof that great home decor does not have to start with fancy materials. With a plain mirror, a sturdy base, and a pile of plastic spoons, you can create a textured statement piece that feels playful, stylish, and completely your own. Whether you go for glam gold, modern black, or a colorful ombre finish, this is the kind of craft that delivers big visual impact on a small budget.
Best of all, it is a project with personality. It is creative without being complicated, affordable without looking flimsy, and unusual in a way that makes a room more interesting. So yes, the next time you see a pack of plastic spoons, you may never look at it the same way again. Some people see party supplies. You now see wall art.