Disney+ is wonderfully simple when all you want to do is press play and vanish into a galaxy far, far away. But the moment subtitles appear in the wrong language, autoplay keeps launching the next episode at midnight, or your phone burns through mobile data like a lightsaber through a blast door, the settings menu suddenly becomes the most important place in the kingdom.
The good news: changing your Disney+ settings is not complicated. The slightly annoying news: the exact path can vary depending on whether you are using a web browser, iPhone, Android phone, smart TV, Roku, Fire TV, Apple TV, PlayStation, Xbox, or another supported device. Some settings live inside your Disney+ profile, some live inside the Disney+ app, and a fewespecially caption stylingmay depend on your device’s accessibility settings.
This guide explains how to change Disney+ settings on all major devices, including profile options, parental controls, subtitles, audio language, data usage, download quality, account details, autoplay, and playback preferences. Think of it as your remote control for the remote control.
Understanding the Main Types of Disney+ Settings
Before tapping every button like you are trying to unlock a secret Marvel post-credit scene, it helps to know where Disney+ puts different settings. Most options fall into three categories: profile settings, app settings, and account settings.
Profile Settings
Profile settings affect the individual viewer. These include profile name, avatar, app language, autoplay, background video, content rating, Profile PIN, and Junior Mode. If your household has multiple people using one subscription, profile settings are where everyone gets their own little corner of the castle.
App Settings
App settings usually control the way Disney+ behaves on the device you are currently using. On phones and tablets, this is where you may find data usage, download quality, Wi-Fi-only downloads, and storage information. On web browsers, app settings can include data usage controls for streaming.
Account Settings
Account settings are tied to the subscription owner. This area may include email address, password, subscription details, billing information, and plan management. For security and subscription changes, Disney+ usually directs users to account settings through DisneyPlus.com or the mobile app.
How to Change Disney+ Profile Settings
Profile settings are the best place to start because they follow you across devices. If you turn off autoplay or change the app language for one profile, that preference generally applies to that profile wherever you watch.
On a Web Browser
- Go to DisneyPlus.com and sign in.
- Select your profile icon.
- Choose Edit Profiles.
- Select the profile you want to update.
- Change the profile name, avatar, app language, autoplay, background video, parental controls, or PIN settings.
- Select Save when finished.
On iPhone, iPad, or Android
- Open the Disney+ app.
- Tap your profile icon, usually in the lower corner.
- Select Edit Profiles.
- Choose the profile you want to change.
- Update the available settings.
- Tap Done or Save.
On Smart TVs and Streaming Devices
On smart TVs, Roku, Fire TV, Apple TV, Android TV, Google TV, and similar devices, open Disney+, go to the profile screen, and look for Edit Profiles. Use your remote to select the pencil icon or edit option. TV menus can be slower than mobile menus, so be patient. The remote is not ignoring you; it is just having a dramatic pause.
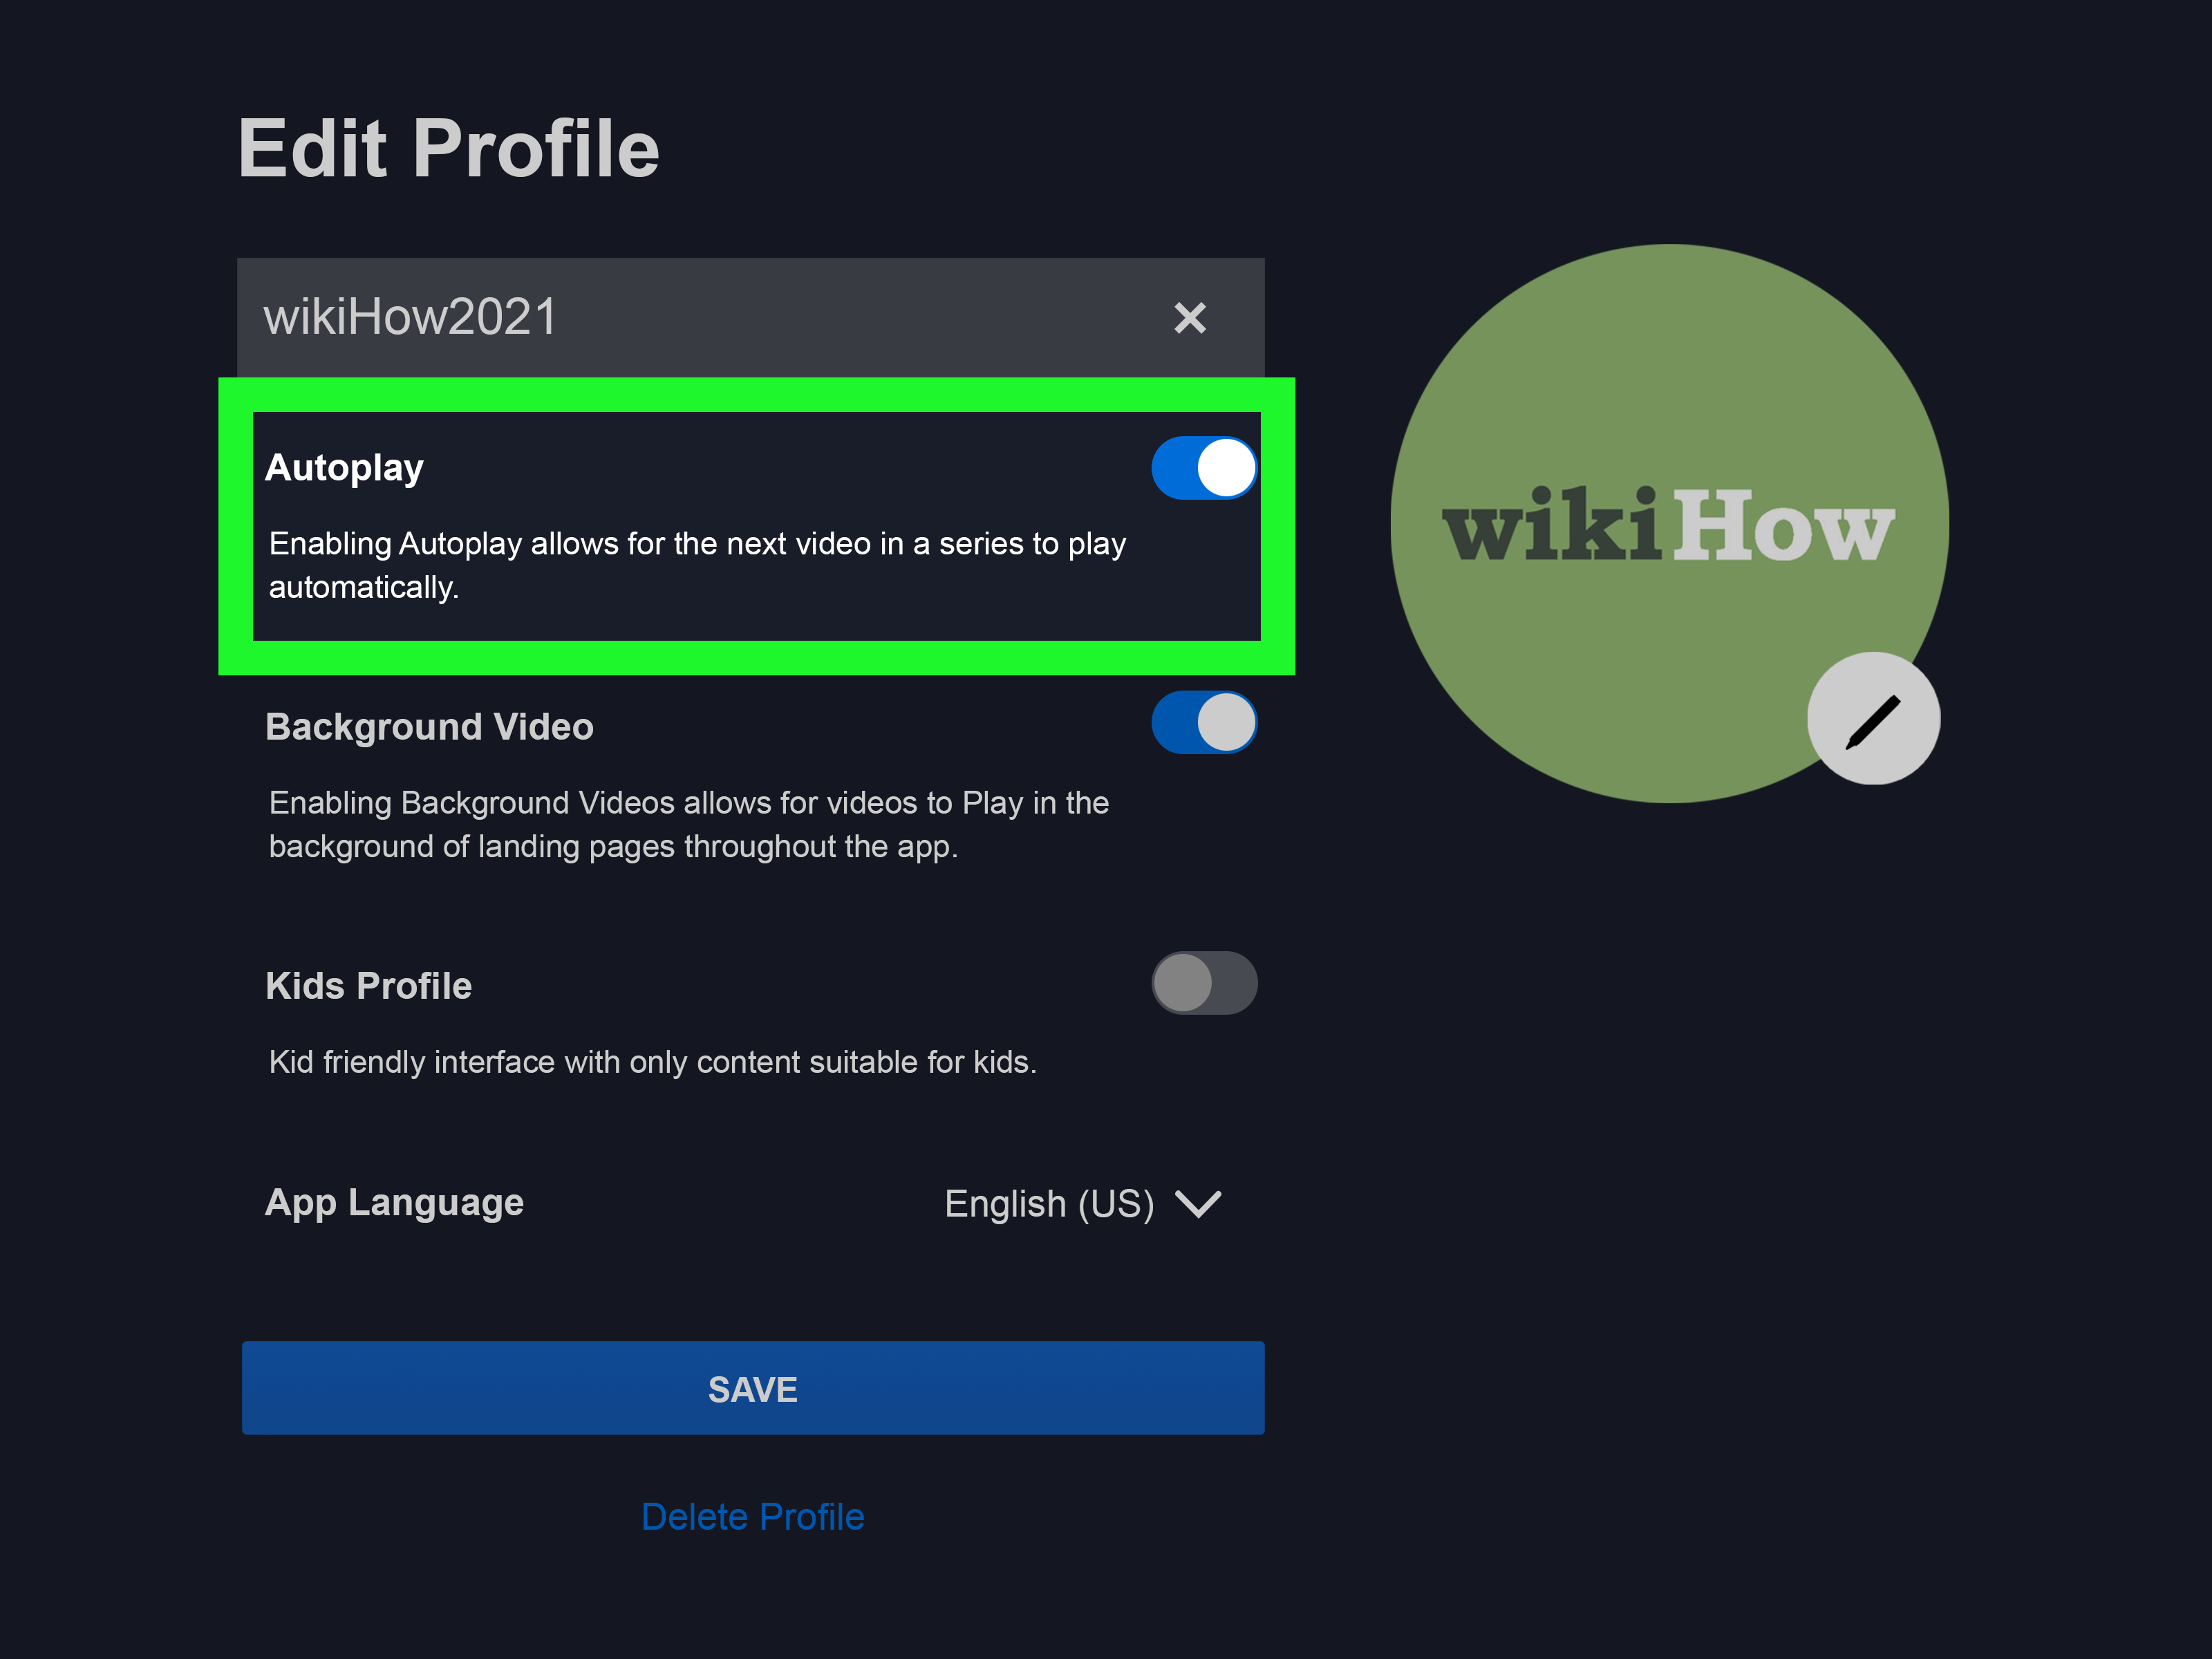
How to Turn Disney+ Autoplay On or Off
Autoplay automatically starts the next episode in a series. It is great when you are watching a Saturday movie marathon. It is less great when you planned to watch one episode and suddenly know the entire emotional arc of a season.
Steps to Change Autoplay
- Open Disney+.
- Go to Edit Profiles.
- Select the profile you want to update.
- Find Autoplay.
- Toggle it on or off.
- Save your changes.
Autoplay is controlled per profile, so adults can keep binge mode on while kids’ profiles can have it turned off for better screen-time control.
How to Change Background Video Settings
Background video plays previews or motion content while you browse. Some viewers enjoy the cinematic feel. Others find it distracting, especially when the living room suddenly sounds like a trailer festival.
To change it, go to Edit Profiles, choose a profile, find Background Video, toggle it on or off, and save. If the option is not visible on your device, try changing it through a web browser or mobile app.
How to Change Disney+ Language Settings
Disney+ has two major language areas: the app interface language and the audio or subtitle language during playback. These are related, but they are not the same thing.
Change the App Language
- Open Disney+ and go to Edit Profiles.
- Select the profile you want to change.
- Choose App Language.
- Select your preferred language.
- Save the profile.
This changes menus, labels, and navigation text for that profile where supported.
Change Audio Language While Watching
- Start playing a movie or show.
- Open the audio and subtitles menu. It may look like a speech bubble, keyboard, or settings icon depending on the device.
- Choose the available audio language.
- Close the menu and continue watching.
Not every title has the same audio languages. A brand-new global release may offer many options, while an older or region-specific title may have fewer. If the language you want is not listed, the title may not support it in your region.
How to Turn Disney+ Subtitles and Captions On or Off
Subtitles are helpful when dialogue gets quiet, accents vary, or someone in the room decides chips are a percussion instrument. Disney+ lets you turn subtitles and closed captions on or off from the video player.
General Steps for Most Devices
- Play a movie or episode.
- Pause or bring up the player controls.
- Select the audio/subtitles icon.
- Choose your subtitle or caption language.
- Select Off if you want to remove subtitles.
Caption Appearance
Changing the look of captionssuch as text size, font, color, or backgroundmay depend on your device. On iPhone, iPad, Android, smart TVs, Apple TV, Roku, and game consoles, caption styling is often controlled through the device’s accessibility or caption settings rather than only inside Disney+.
If captions look too small on your TV, check your device accessibility settings first. The fix may not be in the Disney+ app at all, which feels sneaky, but it is common across streaming platforms.
How to Change Disney+ Data Usage and Streaming Quality
Disney+ automatically adjusts video quality based on your device, internet connection, display capabilities, and plan features. Still, you can manage data usage on many devices, especially mobile devices and web browsers.
On a Web Browser
- Open DisneyPlus.com.
- Select your profile icon.
- Choose App Settings.
- Select the data usage option that fits your needs.
- Save your changes.
On Mobile Devices
- Open the Disney+ app.
- Tap your profile icon.
- Go to App Settings.
- Look for Wi-Fi data usage, cellular data usage, or similar options.
- Choose the setting that balances quality and data savings.
Choose higher-quality streaming when you are on strong Wi-Fi and want the best picture. Choose data-saving settings when you are using mobile data or a slower connection. Your future phone bill may send you a thank-you card.
How to Change Disney+ Download Settings
Downloads are available on supported mobile devices, making them perfect for flights, road trips, waiting rooms, and any place where Wi-Fi behaves like a mythical creature.
Change Download Quality
- Open the Disney+ mobile app.
- Tap your profile icon.
- Select App Settings.
- Find Download Quality.
- Choose the quality level you prefer.
Higher quality looks better but uses more storage. Lower quality saves space and downloads faster. If your phone storage is already full of photos, memes, and screenshots you promised to delete in 2022, choose a lower download quality.
Enable Download Over Wi-Fi Only
Inside App Settings, look for Download Over Wi-Fi Only. Turn it on to avoid using mobile data for downloads. This is one of the most practical Disney+ settings for families, travelers, and anyone with a limited data plan.
How to Change Disney+ Parental Controls
Disney+ parental controls let you customize what each profile can access. This is especially useful because Disney+ includes content across Disney, Pixar, Marvel, Star Wars, National Geographic, and, in many regions or bundles, more mature programming.
Change Content Rating
- Go to Edit Profiles.
- Select the profile you want to manage.
- Find Parental Controls.
- Select Content Rating.
- Enter the account password if prompted.
- Choose the highest rating allowed for that profile.
- Save your changes.
After a content rating is set, that profile should only show titles at or below the selected rating. This makes it easier to create separate viewing spaces for young children, teens, and adults.
Set or Change a Profile PIN
- Open Edit Profiles.
- Select the profile you want to protect.
- Choose Profile PIN.
- Enter your account password if required.
- Create, change, or remove the four-digit PIN.
- Save the update.
A Profile PIN helps stop kids from simply switching into an adult profile. Without a PIN, parental controls are a bit like locking the front door and leaving a ladder under the window.
Turn On Junior Mode
Junior Mode creates a simplified Disney+ experience with content intended for younger viewers. To enable it, go to Edit Profiles, choose the child’s profile, find Junior Mode, turn it on, and save. Junior Mode is best for younger kids who need a cleaner, easier browsing experience.
How to Change Disney+ Account Settings
Account settings are where you manage information tied to the subscription itself. This may include email address, password, billing details, subscription status, and plan information.
Change Email Address
- Go to DisneyPlus.com or open the Disney+ app.
- Select your profile.
- Choose Account.
- Look for your email address or account information.
- Follow the prompts to update the email.
Change Password
- Open Disney+ or DisneyPlus.com.
- Go to Account.
- Select the password option.
- Follow the verification steps.
- Create a strong new password.
Use a password that is unique to Disney+. Reusing passwords across streaming, email, and shopping accounts is convenient until one account has a bad day and invites trouble to all the others.
How to Change Disney+ Settings by Device
Web Browser
The web browser is one of the easiest places to manage Disney+ settings. Use it for profile edits, language settings, parental controls, account details, and data usage. If a setting is hard to find on a TV app, try the browser version first.
iPhone and iPad
On iPhone and iPad, the Disney+ app supports profile editing, app settings, downloads, subtitle selection, audio language, and playback controls. For caption appearance, check iOS accessibility settings. For subscription or billing changes, you may need to manage your account through Disney+ directly or through the billing provider connected to your subscription.
Android Phones and Tablets
Android users can manage profiles, app settings, downloads, data usage, subtitles, and audio language from the Disney+ app. Caption style may be controlled through Android accessibility or caption preferences. Because Android devices vary by manufacturer, menu names can differ slightly.
Roku
On Roku, you can change playback subtitles and audio while watching a title. Profile changes may also be available in the app, but deeper account changes are usually easier through a web browser or mobile app. Roku caption appearance may be influenced by Roku’s system caption settings.
Amazon Fire TV
Fire TV users can adjust subtitles and audio from the player menu. For profile settings, open Disney+ and look for the profile edit area. For caption formatting, check Fire TV accessibility settings if Disney+ does not show the style you want.
Apple TV
Apple TV supports Disney+ playback controls, profiles, subtitles, audio options, and a polished living-room experience. Caption appearance may connect to Apple TV accessibility settings. If you use Apple SharePlay, each viewer may still control certain personal playback settings, such as subtitles, separately.
Smart TVs
Samsung, LG, Android TV, Google TV, and other smart TV platforms can run Disney+ if the model is supported. Use the Disney+ app for profile switching, playback settings, and subtitles. For account changes, the TV app may be less convenient than a phone or browser.
PlayStation and Xbox
Game consoles are great for streaming Disney+ on a big screen. Use the controller to open playback menus for subtitles and audio. For profile edits and parental controls, the console app may work, but a browser or mobile device is usually faster.
Troubleshooting Disney+ Settings That Will Not Save
If your Disney+ settings refuse to stick, do not immediately blame the nearest droid. Try these practical fixes first:
- Update the app: Older app versions may not display current settings correctly.
- Restart the device: Simple, boring, and surprisingly effective.
- Sign out and sign back in: This can refresh profile and account data.
- Try another device: If a setting is missing on your TV, change it on a phone or browser.
- Check device settings: Caption appearance and accessibility options may live outside Disney+.
- Confirm profile selection: You may have changed the wrong profile. It happens. No judgment.
Best Disney+ Settings for Families
For families, the best setup is usually a combination of separate profiles, clear content ratings, Profile PINs, and thoughtful autoplay settings. Create one profile for each regular viewer. Set age-appropriate ratings for children. Add a PIN to adult profiles. Turn off autoplay for younger kids if you want better control over viewing time.
For shared living-room devices, consider keeping subtitles easy to access, especially if family members watch in different languages or need captions. On mobile devices, turn on Wi-Fi-only downloads to prevent surprise data usage. These small adjustments can make Disney+ feel less like a shared remote-control battlefield and more like an organized entertainment hub.
Best Disney+ Settings for Travelers
Travelers should focus on downloads, download quality, and data usage. Before leaving home, download movies and episodes over Wi-Fi. Choose a download quality that matches your storage space. Turn on Wi-Fi-only downloads unless you truly want to use mobile data.
Also check subtitles and audio before traveling. If you need a specific language, start the title briefly and confirm that the audio or subtitle option is available. Nothing ruins a plane ride faster than discovering your carefully downloaded movie is missing the setting you expected.
Best Disney+ Settings for Better Picture and Sound
For the best video quality, use a supported device, a strong internet connection, and a display that supports higher-resolution formats. Disney+ automatically detects device capability and connection quality, so there may not be a simple “force 4K” button on every device. If the picture looks soft, check your internet speed, HDMI connection, TV settings, and Disney+ data usage settings.
For sound, choose the preferred audio track from the player menu. If surround sound is not working, check the audio settings on your TV, streaming device, receiver, or soundbar. The Disney+ app can provide the stream, but your hardware has to pass the audio correctly. Technology loves teamwork, especially when it can make you troubleshoot three remotes.
Real-World Experiences: What Actually Helps When Changing Disney+ Settings
In everyday use, the easiest Disney+ settings strategy is to separate “profile problems” from “device problems.” When a setting follows you everywhere, such as autoplay, app language, content rating, or Profile PIN, treat it as a profile issue. Change it once in Edit Profiles, preferably on a phone or web browser, and it should be much easier to manage. When a setting only looks wrong on one screen, such as tiny captions on the living-room TV, treat it as a device issue and check that device’s accessibility settings.
One common experience is the subtitle mystery. A viewer turns subtitles off on a tablet, then sees captions still appearing on a smart TV. The likely reason is that the TV or streaming device has its own caption preferences. The fix is not to keep poking Disney+ angrily. Instead, open the device’s system settings and look for accessibility, captions, subtitles, or closed captioning. Once adjusted there, Disney+ usually behaves more predictably.
Another frequent situation happens with kids’ profiles. Parents may set a content rating but forget to protect adult profiles with a PIN. Kids are clever. If a dinosaur can open a kitchen door in a movie, a child can probably figure out profile switching. The better setup is to combine content ratings on children’s profiles with PINs on adult profiles. That way, the child profile stays age-appropriate and the adult profile does not become the secret tunnel to everything else.
Travelers often learn the value of download settings the hard way. Downloading in high quality looks great, but it can fill storage quickly. A practical approach is to download big movies in standard or medium quality for small screens and save higher quality for tablets with more space. For children’s road trips, downloading several shorter episodes may be better than one huge movie because it gives more flexibility when attention spans begin doing gymnastics.
Data usage settings also matter more than people expect. Streaming on mobile data at high quality can drain a monthly data plan quickly. A smart habit is to set Disney+ to save data on cellular and reserve higher-quality streaming for Wi-Fi. This is especially useful for students, commuters, and families using shared data plans.
The most reliable workflow is simple: use a browser or phone for serious settings changes, use the TV app mainly for watching, and check device accessibility settings when subtitles or captions look wrong. Disney+ is designed to be easy, but every device adds its own little personality. Once you know which settings live where, changing Disney+ becomes less confusing and much faster.
Conclusion
Changing your Disney+ settings on all devices is mostly about knowing where each option lives. Profile settings control personal preferences like autoplay, app language, parental controls, Junior Mode, and Profile PINs. App settings handle practical viewing choices like data usage and downloads. Account settings manage subscription details, email, and password. Playback menus control subtitles and audio while you watch.
If you remember one rule, make it this: use your phone or web browser for the cleanest settings experience, then fine-tune device-specific options on your TV, streaming stick, or console. With a few smart adjustments, Disney+ becomes easier to use, safer for families, better for travel, and far less likely to surprise you with autoplay at 1:00 a.m.