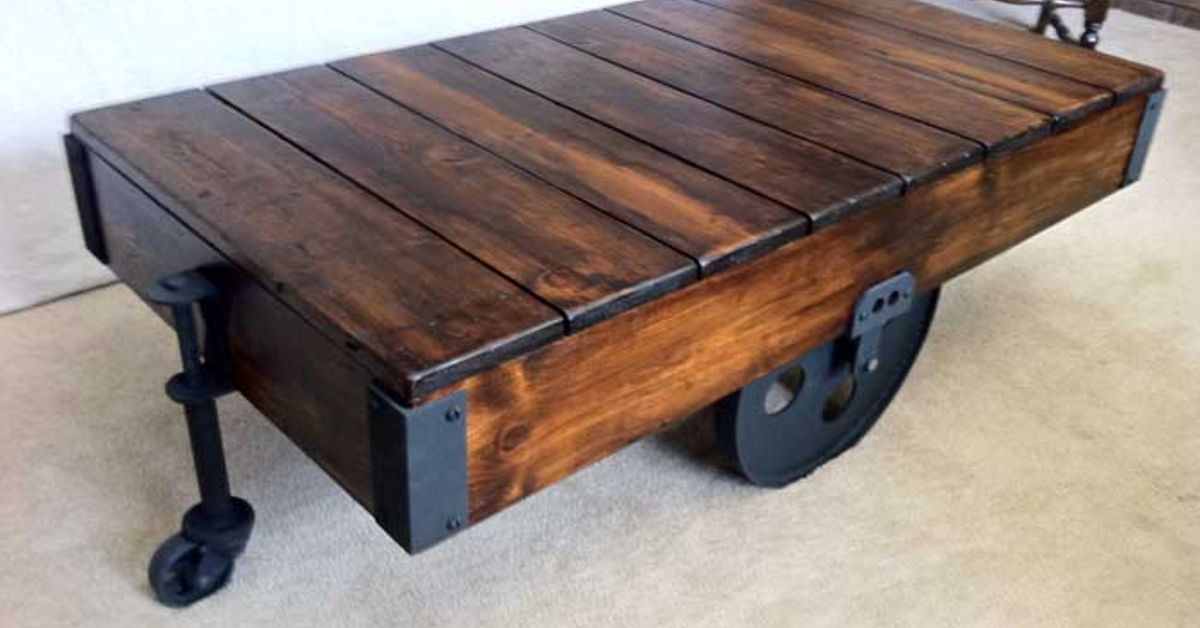
A factory cart coffee table brings the rugged personality of an old warehouse cart into the living roomwithout requiring you to chase down a century-old industrial relic that weighs as much as a compact car. With thick wooden planks, exposed hardware, chunky casters, and a convincingly aged finish, this DIY project delivers vintage industrial style while remaining practical enough for everyday use.
The version in this guide measures approximately 48 inches long by 28 inches wide. Its final height will usually fall between 15 and 18 inches, depending on the casters you choose. The design uses a thick solid-wood top, a recessed structural frame, and four plate-mounted wheels. Two locking casters keep the table from wandering across the room whenever someone reaches for the popcorn.
This is an approachable intermediate woodworking project. You do not need complicated mortise-and-tenon joinery, but accurate cutting, careful clamping, and patient finishing will make the difference between “authentic industrial furniture” and “lumber rolling around on wheels.”
Why Build a Factory Cart Coffee Table?
Original factory carts were designed to move materials through warehouses, mills, and manufacturing plants. Their thick platforms, large wheels, metal hardware, and heavily worn surfaces were functional rather than decorative. That utilitarian construction is exactly what makes the style so appealing today.
A DIY factory cart coffee table offers several advantages:
- You can size it specifically for your sofa and living room.
- You control the wood species, stain color, caster style, and distressing.
- Locking wheels make cleaning and rearranging furniture easier.
- The heavy base feels substantial and resists wobbling.
- New lumber avoids the hidden nails, pests, chemicals, and mystery stains sometimes found in salvaged wood.
The finished piece works with industrial, farmhouse, rustic, loft, transitional, and eclectic interiors. It can also be adapted into a rolling media table, oversized ottoman base, or low display cart.
Recommended Dimensions and Design
A coffee table generally looks balanced when it is roughly two-thirds the length of the sofa. It should also sit close to the height of the sofa cushions or slightly below them. Before buying lumber, measure the room rather than trusting a generic plan. Furniture has an amusing habit of looking reasonably sized in the garage and enormous once it enters the house.
| Component | Recommended Measurement |
|---|---|
| Finished tabletop | 48 inches by approximately 27 3/4 inches |
| Base frame | 42 inches by 22 inches |
| Long frame rails | Two pieces at 42 inches |
| Short frame rails | Two pieces at 19 inches |
| Internal cross braces | Two pieces at 19 inches |
| Typical finished height | 15 to 18 inches, depending on casters |
This plan uses three 2-by-10 boards for the top. Standard dimensional lumber is smaller than its nominal name, so three boards approximately 9 1/4 inches wide create a tabletop close to 27 3/4 inches wide.
Materials for a DIY Factory Cart Coffee Table
Lumber
- Three kiln-dried 2-by-10 boards, each at least 48 inches long
- Two 2-by-8 boards for the rectangular base frame
- One 2-by-4 board for internal cross braces
- Four thick hardwood or plywood blocks for caster mounting, if needed
- Scrap lumber for clamping cauls and test samples
Pine, Douglas fir, and spruce are affordable and easy to distress. Oak, ash, and maple provide greater hardness but cost more and can make the completed table extremely heavy. Select straight boards with minimal twisting, severe cupping, or loose knots. A dramatic knot may look charming until it drops into someone’s coffee.
Hardware and Finishing Supplies
- Four swivel plate casters, preferably 4 to 6 inches in diameter
- At least two locking casters
- Lag screws or structural screws sized for the caster plates
- Wood glue
- Pocket-hole screws, structural screws, or carriage bolts for the frame
- Figure-eight tabletop fasteners or screws with washers and elongated holes
- Wood conditioner for softwood
- Interior wood stain
- Clear polyurethane, furniture varnish, or another durable topcoat
- Sandpaper in approximately 80-, 120-, 150-, 180-, and 220-grit
- Clean cotton rags, brushes, and protective gloves for finishing
Tools
- Circular saw, track saw, or miter saw
- Drill and impact driver
- Random-orbit sander
- Long clamps or pipe clamps
- Combination square and tape measure
- Drill bits and countersink bit
- Pocket-hole jig, if using pocket-hole joinery
- Socket wrench for caster hardware
- Eye protection, hearing protection, and suitable dust protection
How to Build a Factory Cart Coffee Table
Step 1: Inspect and Acclimate the Lumber
Bring the lumber into a dry, protected workspace and allow it to acclimate before assembly. Lay the boards flat with spacers between them so air can circulate. Construction lumber that is still damp may shrink, twist, or open along glue joints after the table enters a climate-controlled home.
Inspect every board from both ends and sight down its length. Assign the straightest, most attractive faces to the tabletop. Less photogenic pieces can serve in the base, where they will spend their lives in honorable obscurity.
Step 2: Cut the Tabletop Boards
Cut three 2-by-10 boards to 48 inches. Use a straightedge guide with a circular saw if you do not have a miter saw or track saw. Square ends matter because small cutting errors become obvious when the boards are joined.
Dimensional lumber often has rounded factory edges. You can leave them intact to create narrow grooves between the top planks, reinforcing the cart-like appearance. For a smoother furniture-grade top, rip approximately 1/8 inch from each mating edge before gluing the boards together.
Arrange the boards for the best grain pattern and mark their order with chalk. If one board rocks against the work surface, correct the problem before glue-up rather than attempting to defeat it with heroic quantities of clamp pressure.
Step 3: Glue the Solid-Wood Top
Apply a thin, even layer of wood glue to each mating edge. Join the boards and place clamps above and below the panel to balance the pressure. Tighten them only until the joints close and a small, consistent line of glue appears. Excessive pressure can bow the panel or squeeze away too much adhesive.
Use straight scrap boards as cauls across the top if the planks want to rise out of alignment. Protect the tabletop with wax paper or packing tape so the cauls do not become permanent architectural features.
After the glue reaches the manufacturer’s recommended cure time, remove the clamps. Scrape away hardened squeeze-out and sand the panel flat. Begin with a coarse grit only where necessary, then progress through the finer grits. Sand with the grain during the final passes.
Step 4: Build the Recessed Base Frame
Cut two 2-by-8 rails to 42 inches and two to 19 inches. Place the shorter rails between the longer pieces to create a rectangular frame measuring approximately 42 by 22 inches.
Check both diagonal measurements. When they match, the frame is square. Join the corners with wood glue and structural screws, pocket-hole screws, or carriage bolts. Carriage bolts create the most obvious industrial appearance, while pocket holes are faster and easier to conceal.
Add two 2-by-4 cross braces between the long rails. Position them near the caster mounting areas or approximately one-third of the way from each end. These braces prevent racking and provide extra support beneath the tabletop.
Step 5: Prepare the Caster Mounting Areas
Plate casters need a broad, flat mounting surface. Depending on the dimensions of your caster plates, the bottom edges of the frame may already provide enough room. Otherwise, attach thick hardwood or exterior-grade plywood blocks inside the four corners.
Hold each caster plate in position and mark the holes. Keep the plate far enough from the surrounding rails that the wheel can rotate through a full circle without striking the wood. Predrill the holes to reduce splitting, especially near board ends.
Choose casters based on the combined weight of the table and anything likely to be placed on it. Divide the expected load among the wheels, then select a rating comfortably above that figure. Larger wheels generally roll more easily across rugs and thresholds, while non-marking polyurethane or thermoplastic rubber wheels are friendlier to finished floors.
Step 6: Install the Wheels
Attach the caster plates using lag screws, through-bolts, or structural screws recommended by the hardware manufacturer. Ordinary drywall screws are not appropriate; they are brittle and were never designed to support a mobile wooden tank disguised as a coffee table.
Place the locking casters on opposite corners. This arrangement makes the brakes easier to reach and helps stabilize the cart. Test the swivel action before permanently tightening every fastener.
Step 7: Add Controlled Distressing
Distressing should imitate years of believable use rather than an argument between the table and a medieval weapon collection. Concentrate wear along corners, edges, and areas that would naturally receive contact.
Possible techniques include:
- Rounding selected edges with coarse sandpaper
- Making shallow dents with a small hammer
- Dragging a stiff wire brush with the grain
- Creating a few scratches with an awl or old screwdriver
- Pressing a short length of chain lightly against the surface
- Adding dark glaze selectively around joints and hardware
Step back frequently and inspect the effect. Random damage is easy to add and nearly impossible to subtract.
Step 8: Condition and Stain the Wood
Vacuum the sanding dust and wipe the surfaces clean. Softwoods such as pine can absorb stain unevenly, producing blotches and dark patches. A compatible pre-stain conditioner helps moderate absorption and create a more consistent color.
Always test the full finishing schedule on scrap from the same boards. Apply the conditioner, stain, optional glaze, and topcoat exactly as planned. A stain that looks like warm reclaimed oak on the sample card may become “haunted chocolate basement” on your particular pine board.
Apply stain in manageable sections and wipe away the excess in the direction of the grain. Let the first coat dry fully before deciding whether a second coat is needed. For a layered antique effect, use a medium brown base stain and add a darker glaze selectively around dents, corners, seams, and bolt heads.
Step 9: Apply a Durable Protective Finish
A coffee table must withstand condensation, snacks, remote controls, shoes, decorative trays, and that one guest who treats every horizontal surface as a chair. Protect the stain with multiple thin coats of a clear interior finish.
Satin polyurethane is a practical choice because it resists abrasion without looking excessively glossy. Water-based products usually preserve a lighter wood color, while oil-based products tend to add warmth. Follow the label for drying time, ventilation, temperature, recoating, and disposal instructions.
Lightly sand between coats when directed, remove all dust, and allow the final finish to cure before regular use. Dry to the touch does not always mean fully hardened.
Step 10: Attach the Top While Allowing Wood Movement
Center the frame beneath the inverted tabletop. The frame should be recessed approximately 3 inches from each end and about 3 inches from each side.
Do not rigidly screw a wide solid-wood top to the frame through tight round holes at every location. Solid wood expands and contracts across its width as humidity changes. Use figure-eight fasteners, tabletop clips, or screws passing through elongated holes in the cross braces. Tighten the screws enough to hold the top securely while still allowing slight seasonal movement.
Turn the completed cart upright with assistance. Thick lumber and industrial casters can make this project surprisingly heavy. Confirm that all four wheels contact the floor and that the frame remains square.
Ways to Customize the Industrial Coffee Table
Add Authentic-Looking Metal Details
Decorative corner straps, oversized washers, black carriage bolts, and flat steel bars can create a more convincing vintage factory-cart appearance. Paint new hardware with matte black or dark bronze metal paint. For a worn effect, lightly rub the edges after the paint cures so a small amount of metal shows through.
Create a Lower Storage Shelf
A shelf can hold blankets, books, or baskets, but it must not interfere with the caster swivel. Install narrow cleats inside the frame and place slats across them. Leave small gaps between the slats and avoid permanently gluing a wide solid panel across the grain.
Use a Removable Glass Top
A custom tempered-glass panel creates a flatter surface while preserving the visual character of rough planks. Support the glass with clear pads and have the edges professionally polished. Ordinary window glass is not a safe substitute.
Try a Two-Tone Finish
Stain the top a warm brown and paint the base charcoal, muted black, olive green, or deep navy. Distress the painted edges lightly to expose either bare wood or a contrasting undercoat. This approach works well when the lumber used for the frame is structurally sound but visually unremarkable.
Common Factory Cart Coffee Table Mistakes
Using Undersized Casters
Tiny furniture wheels look out of proportion beneath a chunky industrial table and struggle on rugs. Choose casters large enough to match the visual weight of the top, but calculate the completed height before buying them.
Ignoring the Caster’s Overall Height
A wheel advertised as 5 inches in diameter may have a significantly greater overall mounting height once the bracket and swivel assembly are included. Use the manufacturer’s full dimensional drawing when determining the frame height.
Overdoing the Distressing
Authentic wear is concentrated and irregular. Covering every square inch with identical dents produces a theatrical prop rather than convincing reclaimed furniture.
Skipping a Test Board
Wood species, sanding grit, conditioner, stain, and topcoat all influence the final color. A test board is less expensive than sanding a 48-inch tabletop back to bare wood.
Fastening the Top Too Rigidly
A solid tabletop needs room for seasonal movement. Restricting it can contribute to cracks, split joints, or a distorted frame.
Forgetting to Lock the Wheels
A mobile coffee table is useful. A coffee table that rolls away while someone sets down a drink is slapstick furniture. Install brakes and use them.
Practical Safety Considerations
Wear impact-rated eye protection when cutting, drilling, sanding, or installing hardware. Use hearing protection around power saws and sanders. Connect tools to dust extraction when possible and use suitable respiratory protection for airborne wood dust and finishing products.
Follow the operating instructions supplied with every tool. Keep hands away from blades, unplug equipment before changing accessories, and do not wear loose clothing or gloves near rotating machinery. Provide ventilation when applying stains and clear finishes, and follow label instructions for handling oily rags. Some oil-soaked materials can generate heat as they cure, so store and dispose of them exactly as the manufacturer directs.
Builder Experience: What This Project Teaches You
Building a DIY factory cart coffee table is one of those projects that appears simple from across the workshop. It is a rectangle with wheelswhat could possibly become complicated? In practice, it teaches several useful woodworking lessons, beginning with the fact that thick lumber has opinions.
The most common early surprise is board movement. A 2-by-10 that looks straight on a store rack may reveal a slight cup or twist once it is placed beside two other boards. Builders usually get better results by arranging the planks on a flat surface before cutting anything. Moving one board to the opposite side or turning it end for end can dramatically improve the glue-up. Choosing lumber carefully often saves more time than any fancy tool.
Clamping is the next learning experience. Beginners frequently tighten every clamp as hard as possible, expecting raw strength to create a flatter panel. Instead, excessive pressure may pull the top into a curve or force most of the adhesive out of the joint. Moderate, balanced pressure works better. Alternating clamps above and below the panel is a small change that often produces a noticeably flatter result.
The finishing stage also rewards restraint. Rough industrial furniture should retain texture, but rough does not have to mean splintered. A successful build feels smooth wherever hands, clothing, or cleaning cloths will touch it. Corners can appear worn while remaining comfortable. Deep saw marks may look interesting until they collect crumbs like tiny wooden parking garages.
Many builders also discover that stain becomes darker around dents, scratches, and end grain. This can be used intentionally. Applying conditioner first, staining the entire project, and then adding a darker glaze only in selected areas creates more depth than simply choosing the darkest stain on the shelf. The surface begins to look layered rather than painted brown.
Caster selection is another lesson that rarely receives enough attention. Large steel wheels look wonderful in photographs, but hard metal wheels can be noisy and unforgiving on finished floors. Polyurethane or rubber-like treads are usually more practical indoors. Swivel casters make the table easy to maneuver, while locking models prevent accidental movement. Measuring the total caster height before building the frame avoids producing a coffee table tall enough to apply for work as a dining table.
The final lesson is patience. The woodworking may be completed over a weekend, but finishes need sufficient drying and curing time. Installing hardware or decorating the top too soon can leave impressions in a soft coating. Allowing each stage to finish properly produces a table that looks better and survives normal living-room abuse.
Once completed, the cart tends to become more than a decorative centerpiece. It can roll aside for cleaning, move closer during game night, and handle heavy books or serving trays without feeling delicate. The best result looks old, functions like new furniture, and carries enough handmade character that minor imperfections feel appropriate rather than embarrassing.
Conclusion
A DIY factory cart coffee table combines straightforward construction with plenty of opportunities for creative customization. Thick planks provide visual weight, a recessed frame supplies strength, and oversized locking casters deliver the industrial personality that defines the design.
The key is to balance rugged style with proper furniture-building practices. Select dry, straight lumber, keep the frame square, use adequately rated casters, allow the solid-wood top to move, and protect the finished surface with a durable clear coat. Distress the wood selectively rather than attacking it with every blunt object in the garage.
The result is a practical rolling coffee table that looks as though it once transported machine parts through an old factoryeven if its most demanding modern assignment is carrying coffee, magazines, and a bowl of pretzels.