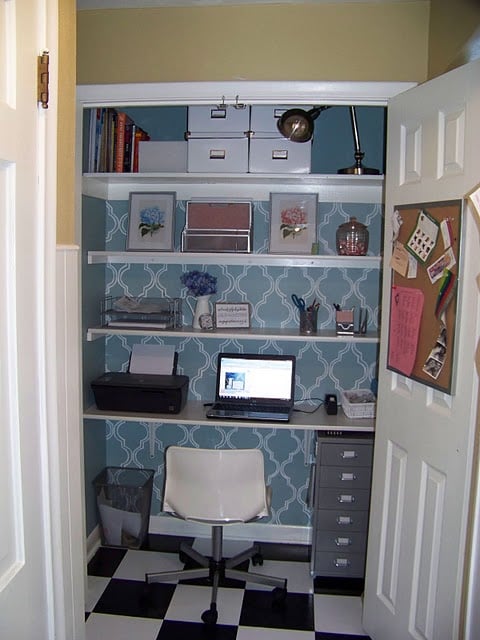
An unused closet may currently be storing winter coats, mystery cables, and a printer that has not worked since three routers ago. With thoughtful planning, however, that overlooked space can become a compact, comfortable computer office that looks intentional rather than improvised.
A successful computer closet office remodeloften called a “cloffice”is not simply a shelf with a laptop placed on top. It requires adequate desk depth, dependable electrical service, effective lighting, ventilation, cable management, storage, and an ergonomic setup. The goal is to create a workstation where you can concentrate for hours without overheating your computer, bruising your knees, or developing the posture of a question mark.
This guide explains how to plan and complete a closet office conversion, including practical measurements, remodeling steps, design ideas, common mistakes, and experience-based lessons from real projects.
What Is a Computer Closet Office?
A computer closet office is a workspace built inside a reach-in closet, linen closet, coat closet, or walk-in closet. Depending on the available space, it may include a floating desktop, monitor, keyboard, task lighting, shelves, drawers, filing space, and doors that conceal everything after work.
The greatest advantage is efficient use of square footage. Instead of placing a desk in the middle of a bedroom or sacrificing an entire guest room, you turn an underused recess into a dedicated work zone. Closing the doors at the end of the day can also create a useful psychological boundary between work and home life.
Closet offices work especially well in apartments, guest bedrooms, hallways, finished basements, and homes where a traditional office is unavailable. Even a modest reach-in closet can become a capable laptop station if the dimensions, lighting, and seating are carefully planned.
Plan the Closet Office Before Removing Anything
Measure the Entire Opening
Start by measuring the closet’s width, height, and depth. Measure at the front, middle, and rear because older walls are not always perfectly square. Record the location of trim, baseboards, outlets, vents, light switches, hinges, and door tracks.
Do not assume the desk can fill every inch. You need space for cables, monitor stands, wall irregularities, and installation clearance. A surface that fits perfectly on paper may become permanently wedged halfway into the closetwhich is an interesting design choice but not a useful one.
Test the proposed layout with painter’s tape. Mark the desk height and depth on the walls, then place your chair in front of the opening. Sit down and simulate typing. Confirm that your knees, elbows, and chair arms have adequate clearance.
Inventory Your Computer Equipment
List everything the office must support:
- Laptop or desktop computer
- One or more monitors
- Keyboard and mouse
- Speakers, webcam, microphone, or headset
- Printer or scanner
- Router, network switch, or docking station
- Charging cables and power adapters
- Paperwork, notebooks, and office supplies
A laptop-only office can use a relatively compact desktop. A gaming computer, large monitor, audio equipment, or full-size tower requires greater depth, more electrical capacity, and considerably more airflow.
Decide What to Do With the Doors
Closet doors affect both appearance and usability. Sliding doors often block part of the opening and may need to be removed. Traditional hinged doors can remain if they open without colliding with the chair. Bifold doors save space but may reduce access near the side walls.
Removing the doors creates a more open office and improves airflow. Keeping them allows you to hide the workstation when it is not in use. Another option is replacing bulky doors with curtains, pocket doors, or doors that fold completely against the adjacent wall.
Never operate heat-producing computer equipment for long periods inside a tightly closed closet unless the space has been designed with appropriate ventilation.
Prepare the Closet for Remodeling
Empty the closet completely before beginning demolition. Remove the hanging rod, unwanted shelves, brackets, and loose hardware. If the original components may be reused elsewhere, label them rather than throwing everything into a bucket that will later become an archaeological site.
Patch holes and damaged drywall with joint compound. Once dry, sand the repairs smooth and clean away the dust. Inspect the walls for moisture stains, mildew, pest damage, or previous electrical problems before covering them with paint or wallpaper.
Remove baseboards only when they interfere with cabinets, desk supports, or drawer units. Otherwise, leaving them in place usually creates a cleaner and more reversible remodel.
Choose a Durable Wall Finish
Paint is the simplest way to make a former storage closet feel like a deliberate room. Light colors reflect illumination and can make a shallow closet feel larger. Dark colors create a dramatic built-in appearance but usually require stronger lighting.
Satin or eggshell paint is easier to clean than a completely flat finish. Low-VOC or zero-VOC products can reduce the pollutant load associated with remodeling, although the space should still be ventilated according to the manufacturer’s directions while paint, adhesive, or finish cures.
Wallpaper, beadboard, wood slats, or peel-and-stick panels can give the back wall visual interest. In a compact office, one patterned wall is often enough. Covering every surface with an energetic print may make video meetings look as though you work inside a kaleidoscope.
Build a Strong, Comfortable Desktop
Select the Right Desk Depth
Desk depth is one of the most important decisions in a computer closet office remodel. A shallow writing surface may fit neatly but leave the monitor uncomfortably close to your eyes. OSHA’s workstation guidance recommends enough depth to place a monitor at least about 20 inches from the user, although individual needs and screen sizes vary.
For a laptop station, a desktop around 20 to 24 inches deep may be workable. A desktop computer with a separate monitor and full-size keyboard often benefits from approximately 24 to 30 inches. Measure the actual equipment rather than relying on generic furniture dimensions.
Choose the Desk Height
A conventional seated desk is commonly installed around 29 to 30 inches above the floor, but the correct height depends on the user, chair, keyboard position, and work style. The shoulders should remain relaxed while the elbows stay close to the body and the forearms approach a level position.
For a custom installation, sit in your office chair and test several heights before fastening the desktop. A surface that is one inch too high may not sound serious until your shoulders spend every afternoon trying to become earrings.
Support the Surface Properly
A floating desk creates a clean appearance and preserves floor space. It can be supported by wall cleats, heavy-duty brackets, side cabinets, or a combination of these methods. Fasten structural supports to wall studs whenever possible and choose hardware rated for the expected load.
Remember that the desktop must support more than a keyboard. Monitors, computer equipment, books, leaning elbows, and the occasional frustrated thump all add weight. Long spans may require a front support rail, center bracket, drawer unit, or thicker material to prevent sagging.
Common desktop materials include butcher block, hardwood plywood, laminated panels, solid wood, and high-quality furniture board. Finish exposed wood on all sides to help minimize uneven moisture absorption and warping.
Install Safe Power and Data Connections
Modern computer equipment can require numerous connections, including power, USB charging, Ethernet, monitor cables, and audio wiring. Plan these routes before installing the desktop and shelving.
A permanent receptacle located above or below the work surface is generally more practical than running extension cords through the closet opening. Ask a qualified electrician to evaluate the circuit, install receptacles, or relocate wiring when necessary. Local permit and electrical-code requirements vary, so verify them before modifying household wiring.
Do not route extension cords through walls, ceilings, floors, doorways, or beneath rugs. Extension cords are intended for temporary use and should not replace permanent wiring. Avoid overloading power strips, daisy-chaining them together, or burying adapters in a pile of paper and cables.
A listed surge protector can help organize low-power computer accessories, but it does not increase the capacity of the electrical circuit. High-demand appliances such as space heaters should not share a crowded computer power strip.
For dependable internet service, consider installing an Ethernet connection or using a properly positioned wireless access point. Test Wi-Fi performance inside the closet before completing the remodel, particularly if the doors will remain closed.
Provide Ventilation for You and the Computer
Closets are designed to store objects, not people and heat-generating electronics. A computer tower, monitor, charger, and human occupant can quickly warm a small recess.
Whenever possible, keep the closet opening unobstructed while working. Do not block existing HVAC registers or return vents. Leave open space around the computer according to the equipment manufacturer’s recommendations, and avoid placing a desktop tower inside an airtight cabinet.
If the office becomes noticeably warmer than the surrounding room, improve circulation with door grilles, open shelving, a quiet fan, or a professionally designed ventilation solution. Computer fans need access to cooler intake air and a route for warm exhaust air to escape.
Dust also accumulates rapidly in tight areas. Provide enough clearance to vacuum around the equipment and clean filters. A perfectly fitted cabinet that requires dismantling the office to remove one dust bunny is not actually perfect.
Layer the Closet Office Lighting
Most closets have limited natural light, and a single ceiling bulb often creates shadows over the keyboard. A comfortable workspace usually combines ambient lighting with targeted task lighting.
Useful options include:
- A slim ceiling fixture for general illumination
- LED strips beneath shelves
- Wall-mounted sconces that preserve desk space
- An adjustable lamp aimed at documents rather than the monitor
- Soft background lighting behind the monitor
Position fixtures to minimize screen reflections and glare. If you are right-handed, placing a document light toward the left can reduce shadows from your writing hand; reverse the arrangement if you are left-handed.
LED fixtures are particularly suitable for compact offices because they use substantially less energy than traditional incandescent lighting and are available in slim designs for shelves, walls, and ceilings. Choose a color temperature that supports concentration without making the office feel like either a candlelit restaurant or an interrogation room.
Create Vertical Storage Without Crowding the Desk
Closet offices have limited horizontal space, so the walls should perform most of the storage work. Install shelves above the monitor for books, reference materials, storage boxes, and equipment used less frequently.
Leave sufficient clearance between the monitor and lowest shelf. A shelf mounted too low can make the desk feel cramped and interfere with future monitor upgrades. Adjustable shelving provides greater flexibility as equipment and storage needs change.
Pegboards, magnetic strips, cork panels, small wall pockets, and hanging organizers can hold lightweight supplies without consuming desktop space. Closed boxes or cabinets reduce visual clutter, while open shelves keep frequently used items accessible.
A narrow drawer below the desktop can store pens and small accessories, but confirm that it will not reduce leg clearance. Under-desk filing cabinets can support one end of the desktop while providing storage, provided their height matches the planned work surface.
Build Cable Management Into the Remodel
Cable management is easiest before the desktop is installed. Drill or order appropriately sized grommet openings for power, monitor, and data cables. Position them near equipment without placing them directly behind structural brackets.
Attach a cable tray beneath the desktop to hold power adapters and excess cord length. Reusable hook-and-loop straps make future changes easier than permanent zip ties. Label both ends of less obvious cables so you do not unplug the router while attempting to disconnect a lamp.
Keep cables away from chair wheels, sharp edges, and heat-producing equipment. Separate power and data cables where practical, and leave enough slack to move a monitor or pull out a computer tower for maintenance.
Make the Workstation Ergonomic
A beautiful closet office is unsuccessful if it causes neck, wrist, or back discomfort. Choose an adjustable chair that supports the spine and fits beneath the desktop. Your feet should rest flat on the floor or on a stable footrest, with your thighs approximately parallel to the floor.
Place the keyboard directly in front of you. Keep your wrists in a neutral position, elbows near your body, and shoulders relaxed. Frequently used items should remain within comfortable reach.
Position the primary monitor in front of you, generally with the top of the screen at or slightly below eye level. Adjust the distance until text can be read without leaning forward. Laptop users should consider a separate keyboard and mouse so the screen can be raised without raising the typing surface.
No posture remains comfortable forever. Make small adjustments, stand periodically, stretch, and walk for a few minutes during the day. A closet office should save space, not turn its occupant into part of the built-in cabinetry.
Add Style Without Sacrificing Function
Because the office is compact, a few intentional design choices can have a strong effect. Paint the desktop and shelves to coordinate with the surrounding room, or use natural wood to add warmth. A wallpapered back panel, framed print, small plant, or attractive pinboard can make the space feel personal.
Keep decorations shallow and secure. Large accessories steal work space, and loose objects on high shelves may fall whenever a door closes. Use matching storage boxes or baskets to create a calmer appearance.
If the closet doors remain, consider painting their interior surfaces, adding organizers, or mounting a lightweight planning board. The doors can provide useful storage without altering the visible room when they are closed.
Budgeting for a Computer Closet Office Remodel
A basic conversion can be completed with paint, a prefabricated desktop, brackets, a lamp, and simple shelves. A more advanced remodel may include custom cabinetry, new wiring, upgraded doors, built-in lighting, and a professionally fabricated work surface.
Budget-Friendly Approach
Reuse existing shelving, purchase a laminated desktop, install plug-in LED lighting, and choose removable wallpaper. This approach is appropriate for renters when every modification is allowed by the lease and can be reversed.
Midrange Approach
Use butcher block or quality plywood, heavy-duty supports, adjustable shelves, an ergonomic chair, integrated cable management, and a professionally installed receptacle.
Custom Built-In Approach
Add fitted cabinets, custom drawers, finished trim, dedicated electrical and network connections, integrated ventilation, premium lighting, and doors designed to conceal the entire workstation.
Reserve part of the budget for practical items such as hardware, primer, electrical work, cable trays, and ventilation. Decorative purchases are more exciting, but floral wallpaper cannot power a monitor.
Common Closet Office Remodeling Mistakes
- Choosing appearance over desk depth: A slim desk may photograph well but place the screen too close to the user.
- Ignoring the chair: Measure the chair width, armrest height, and movement before building the desktop.
- Using weak shelf brackets: Computer equipment and books can exceed the capacity of decorative hardware.
- Forgetting ventilation: Enclosed electronics generate heat, especially behind closed doors.
- Relying on permanent extension cords: Plan safe receptacle locations before finishing the walls.
- Installing shelves too low: Leave room for the monitor, webcam, lighting, and future equipment.
- Skipping cable access: A pristine desktop becomes less attractive when every cord hangs over its front edge.
- Eliminating all storage: Consider where the items formerly kept in the closet will go before demolition.
Note: Structural, electrical, ventilation, and permit requirements differ by location and building type. Consult qualified professionals when the project involves household wiring, load-bearing components, HVAC alterations, or conditions you cannot safely evaluate.
Experience-Based Lessons From Computer Closet Office Remodels
Real-world closet office projects tend to reveal details that are easy to miss during the exciting sketch-and-shopping phase. The first lesson is that the chair controls more of the design than expected. Homeowners often measure the closet carefully but forget to test the chair inside the room. A wide chair may strike the door casing, while tall armrests can prevent it from sliding under the desk. Testing the exact chair before installing the desktop avoids an expensive and irritating mismatch.
Another common experience is discovering that a closet feels darker after shelves and a monitor are installed. An empty white closet may appear adequately illuminated by its ceiling fixture, but the desktop creates shadows and upper shelves block light. Adding an under-shelf LED fixture often improves usability more than adding another decorative object. It is easier to install the wiring channel before the shelves are full of books, plants, and coffee mugs with motivational statements.
Desktop depth also looks different in daily use than it does in a drawing. In one typical reach-in closet layout, a shallow surface initially seemed ideal because it kept the chair from extending far into the bedroom. Once a monitor, keyboard, and docking station were added, however, there was barely enough room for the user’s forearms. Replacing the surface with a deeper topor mounting the monitor on an adjustable armcreated a much more comfortable workstation.
Wall conditions are another frequent surprise. After old closet hardware is removed, the drywall may contain numerous holes, uneven patches, or anchors that cannot support new shelves. Locating studs before finalizing the shelf widths makes the installation safer and reduces reliance on drywall anchors. In older homes, walls may also be visibly out of square. Cutting the desktop from a cardboard template can produce a better fit than assuming both sides require identical 90-degree cuts.
Heat often becomes noticeable only after the office has been used for several hours. A laptop may perform well in an open closet, while a gaming tower and dual monitors can make the same space uncomfortable. Leaving the doors open, raising the computer tower above the floor, keeping intake vents clear, and adding quiet air circulation can make a substantial difference. Installing beautiful doors and then discovering that they must remain open all day is not a disaster, but it is a reason to plan ventilation early.
Cable access is another lesson learned quickly. A single small grommet may be sufficient on installation day, but computer setups evolve. Additional monitors, chargers, webcams, speakers, and external drives appear over time. A larger cable opening, removable access panel, or under-desk tray makes future upgrades less frustrating. Removable cable straps are particularly helpful because they allow changes without cutting apart the entire wiring bundle.
Storage tends to work best when divided into three zones. Everyday supplies belong within arm’s reach. Weekly-use items can occupy the first shelf above the monitor. Rarely used equipment should go on the highest shelf or elsewhere in the home. When every inch is filled simply because shelving exists, the closet begins to feel like storage again rather than an office.
Finally, successful remodels usually include one feature that signals the beginning and end of the workday. It might be closing the doors, switching off dedicated task lighting, placing the keyboard in a drawer, or folding up the desktop. That small ritual helps the office disappear mentally even when it cannot disappear physically. In a home where work and personal life share the same square footage, this may be the most valuable feature of the entire remodel.
Conclusion
A well-designed computer closet office remodel can transform unused storage space into a productive and attractive workstation. Begin with accurate measurements and a complete inventory of your computer equipment. Build a sturdy desktop with sufficient depth, install safe power connections, provide airflow, layer the lighting, and organize cables before they become a synthetic jungle.
Most importantly, design the closet office around the person who will use it. Proper monitor placement, chair clearance, keyboard height, and movement breaks matter more than any decorative trend. When function and appearance are planned together, even a small closet can become a surprisingly comfortable place to work.