Importing Excel into Access sounds like one of those tasks that should require a mug of coffee, three IT tickets, and a quiet room. Good news: it is much easier than that. If your Excel spreadsheet has grown from “helpful little list” into “monster workbook with 19 tabs, mystery formulas, and one column named Final_FINAL_UseThis,” Microsoft Access can help you turn that data into something cleaner, searchable, and more powerful.
In this tutorial, you will learn how to import Excel into Access, how to prepare your spreadsheet first, when to import versus link, how to avoid common errors, and what to do after the data lands in your Access database. We will keep the process practical, beginner-friendly, and slightly less terrifying than opening someone else’s spreadsheet at 4:55 p.m. on Friday.
Note: This guide focuses on Microsoft Access desktop databases and modern Excel workbooks such as .xlsx files. Menu names may vary slightly depending on your Microsoft 365, Access 2024, Access 2021, Access 2019, or Access 2016 version, but the core workflow is the same.
Why Import Excel into Access?
Excel is fantastic for calculations, quick lists, charts, and flexible analysis. But once your workbook becomes a shared business process, Excel can start acting like a junk drawer with formulas. Access is designed for structured data management. It stores information in tables, lets you create queries, forms, and reports, and helps connect related data through primary keys and relationships.
For example, imagine you run a small repair business. In Excel, you may have one sheet with customer names, addresses, phone numbers, service dates, invoice totals, technician names, and payment status. That works for a while. Then customers return, addresses change, technicians get assigned to multiple jobs, and suddenly one typo turns “Johnson Hardware” into three different customers. Access helps by separating data into related tables such as Customers, Jobs, Technicians, and Payments.
That is the real reason to import Excel into Access: not just to move data, but to make it easier to search, update, protect, report on, and scale.
Import vs. Link: Which Option Should You Choose?
Before clicking buttons, decide what relationship Access should have with your Excel file. Access gives you three common choices: import the data into a new table, append the data to an existing table, or link to the Excel worksheet.
Import into a New Table
Choose this when you want Access to create a fresh table from your Excel worksheet. This is the easiest option for beginners. Access copies the spreadsheet data into the database, and future changes in Excel do not automatically update the Access table.
Append to an Existing Table
Choose this when the Access table already exists and you want to add new rows from Excel. This is useful for monthly sales reports, customer signups, inventory updates, or exported system reports. The catch: your Excel columns must match the Access table structure closely, including field names and data types.
Link to the Excel File
Choose this when you want Access to read data from Excel without copying it permanently into Access. A linked spreadsheet remains connected to the source workbook. This can be handy for reporting, but linked Excel data is usually less flexible than native Access tables. If your goal is a proper database, importing is normally the better starting point.
Step 1: Prepare Your Excel Spreadsheet
The success of an Access import often depends on the cleanliness of the Excel file. Access is smart, but it is not a magician wearing a tiny database cape. If your spreadsheet is messy, Access may guess the wrong data type, skip fields, or create import errors.
Start by making sure the first row contains clear column headers. Use names such as CustomerID, FirstName, LastName, Email, OrderDate, and AmountPaid. Avoid blank headers, merged cells, special symbols, repeated column names, and headings like “Stuff” or “Important Things.” Access uses these headers to create field names, so make them boring in the best possible way.
Next, remove empty rows and columns around your data. Access imports ranges more reliably when the worksheet is shaped like a clean table: one header row, one record per row, and one type of information per column.
You should also check for inconsistent data. A date column should contain dates, not a mix of dates, text notes, and one cell that says “sometime in July??” A price column should contain numbers or currency values, not “paid,” “unknown,” and “ask Dave.” Mixed data makes Access guess, and Access guesses like a tired office worker: usually fine, occasionally dramatic.
Quick Excel Cleanup Checklist
- Use one header row with unique column names.
- Remove blank rows and blank columns inside the data range.
- Unmerge cells before importing.
- Make each column contain one data type.
- Remove totals, notes, logos, and decorative rows.
- Check duplicates before importing customer, product, or ID data.
- Save a backup copy of the workbook before making major changes.
For best results, format your data as an Excel table. Select any cell in the range, go to Home > Format as Table, confirm the range, and make sure “My table has headers” is selected. This helps define the data area clearly before you import it into Access.
Step 2: Open or Create an Access Database
Now open Microsoft Access. If you already have a database, open it. If not, create a new one by choosing Blank database, entering a file name, choosing a location, and clicking Create.
Choose the file location carefully. If this database will be used for work, save it somewhere organized and backed up. Do not hide it in Downloads next to a PDF coupon from 2021. For shared business use, talk to your IT team about storage, permissions, backups, and whether Access is the right long-term solution.
Step 3: Start the Excel Import Wizard
With your Access database open, go to the ribbon and select:
External Data > New Data Source > From File > Excel
Access will open the import wizard. Click Browse and choose your Excel workbook. Then select one of the import options:
- Import the source data into a new table if this is a new dataset.
- Append a copy of the records to the table if you are adding rows to an existing table.
- Link to the data source if you want Access to connect to the Excel workbook instead of storing a copy.
For most beginners learning how to import Excel into Access, choose Import the source data into a new table. It is straightforward, safe, and gives you a native Access table to work with afterward.
Step 4: Choose the Worksheet or Named Range
After selecting the workbook, Access will ask which worksheet or named range you want to import. If your workbook has several sheets, choose the one containing the clean table. If you created a named range in Excel, you can select that instead.
A named range is useful when your worksheet contains extra notes, charts, or calculations that you do not want in Access. Instead of asking Access to interpret the whole sheet, you tell it exactly which cells matter. Think of it as giving Access a map instead of saying, “The treasure is somewhere in this workbook. Good luck.”
Step 5: Confirm Column Headings
The wizard will ask whether the first row contains column headings. If your first row contains names like ProductID, ProductName, Category, Cost, and Supplier, check the box. Access will use those names as field names.
If the first row is actual data, leave the box unchecked. But in most professional imports, you should have column headings. They make your database easier to understand, query, and maintain.
Step 6: Review Field Names and Data Types
Next, Access lets you review each field. This is where you can rename fields, skip unnecessary columns, and check the data type Access has selected. Common Access field types include Short Text, Long Text, Number, Date/Time, Currency, Yes/No, and AutoNumber.
Pay close attention here. If Access imports ZIP codes as numbers, leading zeros may disappear. If product IDs contain letters and numbers, they should usually be Short Text, not Number. If a column contains dollar amounts, Currency is often a better fit than Short Text. If a date column imports as text, later date-based queries may become annoying enough to make you reconsider several life choices.
A useful rule: choose data types based on how the data behaves, not how it looks. Phone numbers, ZIP codes, invoice codes, and employee IDs are often text because you do not calculate with them. Sales totals, quantities, and prices are numbers or currency because you may sort, sum, average, or compare them.
Step 7: Choose a Primary Key
Access will ask you to choose a primary key. A primary key is a field that uniquely identifies each record. It is one of the most important ideas in database design.
You usually have three choices:
- Let Access add a primary key automatically.
- Choose an existing field as the primary key.
- Import without a primary key.
If your Excel file already has a reliable unique ID, such as CustomerID or OrderID, you can use it as the primary key. If not, let Access add an AutoNumber primary key. Avoid using names, email addresses, or phone numbers as primary keys unless you are absolutely sure they are unique and stable. People change emails, share phone numbers, and occasionally spell their own names differently. Databases do not enjoy that kind of personality.
Step 8: Name the Access Table
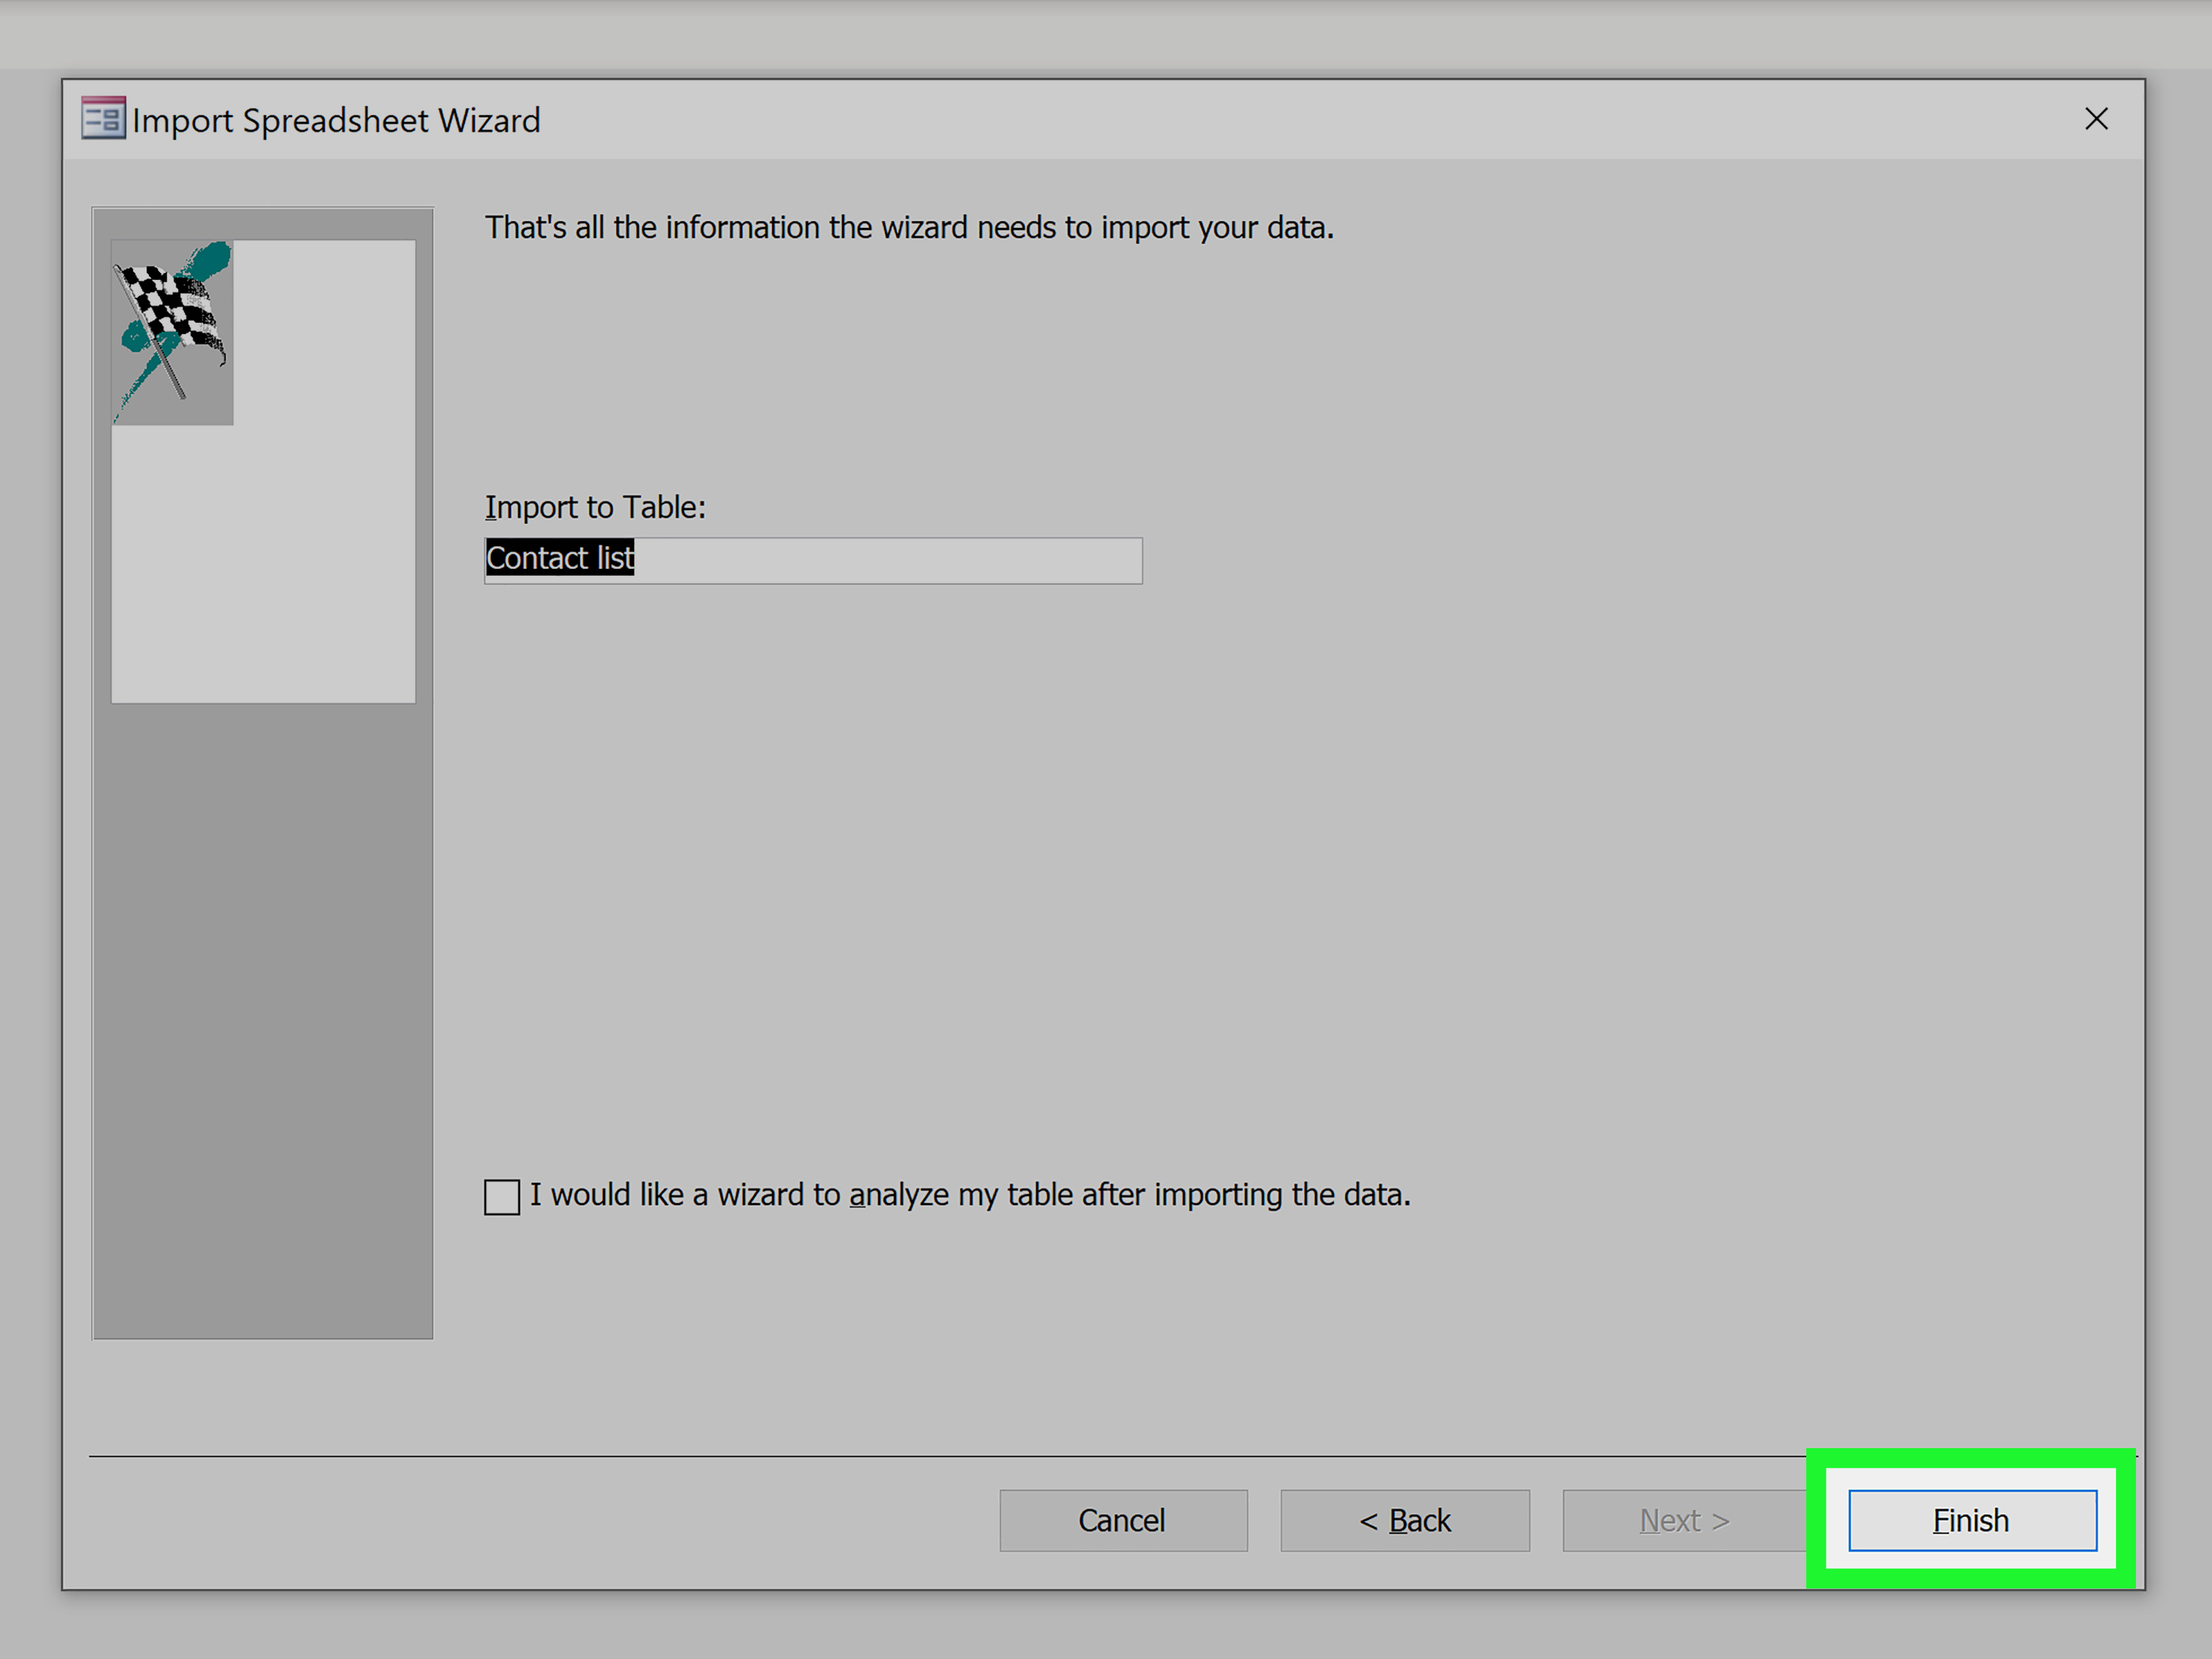
Finally, Access will ask you to name the table. Use a clear, descriptive name such as Customers, Orders, InventoryItems, or SalesImport_2026. Avoid spaces and strange punctuation if possible. While Access can handle spaces in object names, names without spaces are easier to use in queries, macros, and VBA later.
Click Finish. Access may ask whether you want to save the import steps. If you plan to import the same type of Excel file regularly, saving the steps is a smart move. For one-time imports, you can skip it.
Step 9: Check the Imported Data
Do not celebrate just yet. Well, maybe a tiny celebration. But before you trust the imported table, open it and review the data.
Check the number of records. Compare the row count in Excel with the record count in Access. Review date fields, currency fields, ID fields, and any columns that had mixed values. Look for blank fields, strange characters, missing leading zeros, or import error tables. If Access creates a table with import errors, open it and read what happened. It often tells you which rows or fields had trouble.
This review step is not glamorous, but it prevents embarrassing reports later. Nobody wants to discover during a meeting that every order date imported as text and February is somehow sorting before April because the database thinks dates are words.
Common Problems When Importing Excel into Access
Problem: Access Imports the Wrong Data Type
This usually happens when a column contains mixed values. For example, the first several rows may contain numbers, but lower rows contain text. Access samples the data and chooses what it thinks is best. Clean the column in Excel, or import the field as text and convert it later with an update query if needed.
Problem: Leading Zeros Disappear
ZIP codes, product codes, and account numbers should often be stored as text. Format them as text in Excel before importing, and make sure Access uses Short Text for that field.
Problem: The Import Wizard Skips Rows
This can happen when rows are blank, hidden, filtered, or outside the selected range. Format the data as a table or create a named range so Access imports exactly the correct cells.
Problem: Duplicate Records Appear
Duplicates often come from repeated rows in Excel or from appending data without a unique key. Before importing, use Excel’s duplicate tools to review possible duplicates. In Access, use indexes, primary keys, or Find Duplicates queries to keep important data clean.
Problem: Appending Data Fails
Appending requires the Excel data to match the existing Access table structure. Field names, field order, required fields, and data types can all matter. If the append fails, import into a temporary table first, inspect the data, then use an append query to move clean records into the final table.
Example: Importing a Customer List from Excel into Access
Let’s say you have an Excel file named Customer_List.xlsx with these columns:
- CustomerID
- FirstName
- LastName
- Phone
- City
- State
- SignupDate
Before importing, you check that CustomerID is unique, Phone is stored as text, SignupDate contains real dates, and there are no blank header names. Then you open Access, create a blank database called CustomerDatabase.accdb, and choose External Data > New Data Source > From File > Excel.
You select the workbook, import into a new table, confirm the worksheet, check that the first row contains column headings, set CustomerID as the primary key, and name the table Customers. After clicking Finish, you open the Customers table and confirm the records look correct.
Now the customer list is not just a spreadsheet. It is a table in a relational database. You can build a customer form, create a query for customers by state, generate mailing reports, or connect it to an Orders table later.
What to Do After Importing Excel into Access
Importing is only the first step. To get the real value from Access, think about structure. If your imported Excel sheet contains multiple topics in one table, you may need to normalize it.
Normalization means organizing data into related tables so information is not repeated unnecessarily. For example, instead of storing customer address details in every order row, you store customers once in a Customers table and orders separately in an Orders table. The Orders table stores a CustomerID that connects each order back to the right customer.
This structure reduces duplicates, improves accuracy, and makes reporting easier. If you update a customer’s phone number, you update it once. Without normalization, you might have to fix it in 47 order rows, which is not data management. That is punishment with columns.
Create Relationships
After importing related tables, use the Relationships window in Access to connect them. A Customers table might have a one-to-many relationship with an Orders table. One customer can have many orders, but each order belongs to one customer. Enforcing referential integrity helps prevent orphan records, such as an order assigned to a customer who does not exist.
Build Queries
Queries are where Access starts to shine. You can filter customers by state, calculate total sales, find unpaid invoices, or combine fields from multiple tables. If Excel filters are a flashlight, Access queries are a proper searchlight.
Create Forms
Forms make data entry easier and safer. Instead of letting users type directly into tables, build a form with labels, dropdowns, required fields, and buttons. A good form reduces mistakes and makes your database feel like an application instead of a spreadsheet with better manners.
Create Reports
Reports turn your data into printable or shareable summaries. You can create invoices, customer lists, inventory reports, monthly sales summaries, or exception reports showing missing information.
Best Practices for a Smooth Excel-to-Access Import
First, keep a copy of the original Excel file. Always. Data imports are usually safe, but backups are cheaper than panic.
Second, clean before importing. It is tempting to throw the spreadsheet into Access and fix everything later. Sometimes that works. Usually, it creates a database that looks organized from far away but smells suspicious up close.
Third, import into a temporary staging table when working with messy or repeated data. A staging table lets you inspect, clean, transform, and validate records before moving them into production tables.
Fourth, use meaningful field names. Short, clear names make queries and reports easier. CustomerEmail is better than Column7. OrderDate is better than DateThing. Database users of the future, including future you, will be grateful.
Fifth, do not try to force every Excel habit into Access. Access is not just Excel with tables. It is a relational database tool. That means you should think in records, fields, keys, relationships, queries, forms, and reports.
When Access May Not Be Enough
Access is excellent for small business databases, department tools, prototypes, reporting systems, and structured desktop applications. However, it may not be the right choice for every situation. If you need a large multi-user web application, advanced security, heavy automation, cloud-native scaling, or millions of records with high concurrency, you may eventually need SQL Server, Azure SQL, Dataverse, or another database platform.
Still, for many everyday business problems, importing Excel into Access is a practical upgrade. It gives you structure without requiring a full software development project. Sometimes the best tool is not the biggest hammer; it is the one that keeps your spreadsheet from becoming a haunted house.
Experience-Based Tips: What Real Excel-to-Access Imports Teach You
After you have imported a few Excel files into Access, you start noticing patterns. The first lesson is that spreadsheet appearance can be misleading. A worksheet may look clean because it has borders, colors, frozen panes, and a nice title row. But Access does not care about decoration. It cares whether the data is consistent. A beautiful spreadsheet with merged cells, blank rows, and mixed data types is still a messy import waiting to happen.
One practical experience is to always inspect the first 20 rows and the last 20 rows before importing. Many spreadsheets start clean but get weird at the bottom. You may find totals, notes, copied email signatures, or a row that says “Ask manager before using.” Access may try to import those rows as records, and suddenly your customer table has a customer named “Grand Total.” Charming? Yes. Useful? Not even a little.
Another lesson is to treat IDs carefully. In Excel, users often sort, paste, and manually edit ID columns. In Access, IDs become much more important because they may become primary keys or foreign keys. Before using an Excel ID as a primary key, check for duplicates, blanks, and accidental spaces. “A102” and “A102 ” may look the same to a person, but software may treat them differently. A quick cleanup using trim functions in Excel can prevent hours of troubleshooting later.
Date fields also deserve special attention. Excel can display dates in many formats, and sometimes dates are actually stored as text. Access works best when imported dates are true date values. Before importing, try sorting the date column in Excel from oldest to newest. If some values refuse to sort correctly, they may be text. Fix them before importing. Your future queries will thank you politely.
For recurring imports, create a repeatable process. Do not rely on memory. Write down the steps: where the Excel file comes from, which worksheet to use, which columns to keep, what cleanup is required, what table receives the data, and what checks must be performed afterward. This simple documentation turns a risky monthly chore into a reliable workflow.
A staging table is another professional habit worth adopting. Instead of appending Excel data directly into your main Customers or Orders table, import it into a temporary table first. Then review the records, run validation queries, remove duplicates, fix formatting issues, and append only approved rows. It is like washing vegetables before cooking. Technically, you can skip it. Emotionally, please do not.
Finally, remember that importing Excel into Access is not just a technical task. It is a data-quality decision. Every spreadsheet tells a story about how people collect information. Access helps you turn that story into a system. When you clean the source file, choose good field types, set a primary key, and build relationships, you are not just moving cells from one Microsoft app to another. You are creating a database that can support better decisions, faster reports, and fewer “who changed this formula?” mysteries.
Conclusion
Learning how to import Excel into Access is one of the fastest ways to bring order to growing business data. The process is simple: prepare your Excel spreadsheet, open or create an Access database, launch the Excel import wizard, choose the worksheet or range, confirm headers, review field types, select a primary key, name the table, and verify the results.
The bigger win comes after the import. Once your data is in Access, you can build queries, forms, reports, and relationships that make the information easier to manage. Excel is still a wonderful tool, but when your spreadsheet starts acting like a database, it may be time to let Access do the database work.
Clean data first, import carefully, check the results, and build structure as you go. Do that, and your Excel-to-Access workflow will be less “technical headache” and more “why didn’t we do this sooner?”