A toddler can ignore a carefully selected educational toy, walk across the room, and become completely fascinated by the latch on a kitchen cabinet. Apparently, the secret to irresistible entertainment is making something look mildly forbidden.
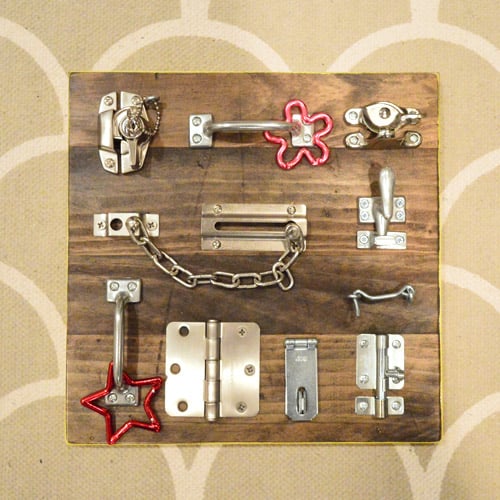
A DIY busy board with latches brings those tempting household mechanisms into a controlled play space. Mounted on a smooth wooden panel, simple items such as slide bolts, hinges, buckles, knobs, and spinning wheels give children opportunities to grasp, pull, twist, open, close, and solve small mechanical puzzles.
The project is affordable, customizable, and manageable for a beginner with basic woodworking tools. The important word, however, is safe. A homemade activity board must be designed around the child’s age, strength, mouthing habits, and ability to pull much harder than any reasonable adult expects.
Safety note: A homemade busy board is not a certified commercial toy. It should be used under active adult supervision and inspected regularly. Avoid small detachable components, accessible batteries, long cords, sharp hardware, strong magnets, electrical connections, and mechanisms capable of pinching fingers. The Consumer Product Safety Commission and the American Academy of Pediatrics emphasize that toys for young children should not contain small or easily detached parts that may become choking hazards.
Why Make a Busy Board With Latches?
Busy boards are sometimes called activity boards, sensory boards, latch boards, or Montessori-inspired boards. Whatever name appears on the craft-store label, the basic idea is the same: children learn by manipulating real objects with their hands.
A latch board can encourage fine motor development because each activity requires a slightly different movement. A barrel bolt calls for pushing and pulling. A knob requires wrist rotation. A buckle demands two-handed coordination. A small door introduces the sequence of releasing a latch before opening the panel.
Fine motor skills involve the smaller muscles of the hands, fingers, and wrists. These skills eventually contribute to everyday tasks such as holding utensils, turning pages, fastening clothing, drawing, and using tools. Head Start and the National Association for the Education of Young Children identify grasping, manipulating, buttoning, lacing, and similar hands-on activities as useful opportunities for developing coordination.
The board also creates simple cause-and-effect experiences. Slide the bolt, and the door opens. Turn the wheel, and the painted arrow moves. Fasten the buckle, and two pieces connect. These tiny victories can hold a preschooler’s attention longer than a toy that performs every trick automatically.
There is also room for language development. A caregiver can describe actions using words such as open, closed, up, down, turn, push, pull, inside, and behind. Children can practice following short sequences without realizing that the grown-up has quietly turned playtime into a lesson.
Choose an Age-Appropriate Design
The safest design depends on the child who will use it. A board for a four-year-old can include more complicated mechanisms than a board intended for a young toddler. Children younger than three are especially likely to explore objects with their mouths, so every attached item must be large, durable, and impossible to pull free.
A small-parts tester is the best way to evaluate possible choking hazards. Some safety organizations also suggest using a cardboard toilet-paper tube as a quick preliminary screen, although it is not a replacement for an official tester. If a loose component fits inside, do not place it on a board intended for a child younger than three.
For younger children, concentrate on oversized handles, wide fabric straps, large wheels, securely mounted hinges, and simple rounded latches. Older preschoolers may enjoy multi-step activities, matching colors, numbered doors, or a pretend control panel.
Materials for a Safe DIY Busy Board
Recommended Board
A piece of cabinet-grade birch, maple, or sanded plywood makes a strong base. A panel approximately 24 inches wide by 30 inches tall provides enough room for eight to twelve activities without becoming overwhelmingly large.
Choose plywood between 1/2 inch and 3/4 inch thick. A 3/4-inch panel is heavier but gives screws and mounting hardware more material to grip. Avoid warped sheets, rough construction plywood, splintered lumber, pressure-treated wood, and painted reclaimed boards of unknown origin.
Older painted furniture and salvaged materials may contain lead or other unsuitable coatings. The Environmental Protection Agency advises particular caution with deteriorating painted surfaces and older painted toys or furniture that children might touch or chew.
Child-Friendly Activities
- One large barrel bolt with rounded ends
- One surface-mounted cabinet latch
- One oversized draw latch
- A short piano hinge attached to a wooden door
- A large rotating wooden wheel
- A wide nylon buckle from a new strap
- A wooden knob mounted on a rotating disk
- A short section of wide hook-and-loop fastening tape
- A sturdy doorstop that can be safely flicked
- Large interlocking rings that cannot be detached
- A sliding wooden shape trapped permanently within a track
- A child-safe mirror made from acrylic rather than glass
Items to Leave Off the Board
Do not install real electrical outlets, plugs connected to cords, powered lights, exposed wiring, glass mirrors, loose keys, removable padlocks, chains, sharp hook-and-eye fasteners, rusty hardware, fishing swivels, strong magnets, bells with removable clappers, or anything containing a coin-cell battery.
Button batteries can cause severe internal injury when swallowed. Poison Control recommends keeping batteries completely inaccessible and using only products with battery compartments that require a tool or child-resistant mechanism to open. The safer choice for a homemade toddler board is to eliminate batteries entirely.
Tools and Supplies
- Measuring tape and pencil
- Drill and assorted drill bits
- Jigsaw or circular saw, if the panel is not precut
- Clamps
- Random-orbit sander or sanding block
- 120-, 180-, and 220-grit sandpaper
- Safety glasses, hearing protection, and dust mask
- Pan-head screws, through-bolts, washers, and locking nuts
- Wood glue
- Water-based finish suitable for children’s furniture
- Wall-mounting hardware appropriate for the wall type
Plan the Board Before Drilling
Place every activity on the unfinished board and experiment with the layout before making holes. Leave at least two inches between moving mechanisms so that one activity does not trap a child’s hand against another.
Put simple activities near the bottom and harder latches higher up. Position doors so they do not swing across neighboring components. Test every latch using your own fingers, then imagine fingers about the size of grapes investigating the same space with tremendous enthusiasm and no respect for engineering conventions.
A balanced layout usually includes several types of movement:
- Sliding: barrel bolts and wooden tracks
- Rotating: wheels, knobs, and disks
- Opening: doors, flaps, and hinges
- Fastening: buckles and hook-and-loop straps
- Pressing: large spring-loaded buttons without electronics
- Texture: permanently attached smooth, ridged, and soft surfaces
Trace each item lightly with a pencil and mark its screw holes. Open every door and latch during this stage. A mechanism that looks perfectly placed while closed may collide with something else when opened.
How to Build a DIY Busy Board With Latches
Step 1: Cut and Shape the Panel
Cut the plywood to the desired dimensions or ask the home-improvement store to cut it. A rectangle is easiest to mount, but the upper corners can be rounded with a jigsaw for a softer appearance.
Round every exposed corner. Even a well-sanded square corner can hurt when a child stands up underneath it with the timing of a tiny slapstick comedian.
Step 2: Sand Every Surface
Begin with 120-grit sandpaper to remove rough areas. Continue with 180 grit and finish with 220 grit. Sand the front, back, edges, corners, drilled holes, and wooden activity pieces.
Run a cotton cloth over the finished wood. If fibers catch, continue sanding. Home-improvement woodworking guidance similarly recommends preparing wood finishes by eliminating scratches, snags, and rough areas before coating.
Step 3: Add Color and Labels
Paint the board before installing the hardware. Use a water-based product whose manufacturer identifies it as appropriate for children’s furniture or toys. Follow all ventilation, drying, recoating, and curing directions.
Do not assume that dry paint is fully cured. A surface may feel dry within hours while still requiring several days to reach its final hardness. Keep the board away from children until the coating has completely cured and no odor remains.
Use color with purpose rather than covering every inch in visual confetti. Paint the inside of each little door a different color, add large numbers, or draw simple animals and vehicles. High contrast can make individual activities easier to identify.
Step 4: Build the Doors
Cut two or three doors from 1/4-inch or 1/2-inch plywood. A practical size is approximately 5 by 6 inches. Round the corners and sand them thoroughly.
Attach each door with a sturdy hinge. Make sure the gap around the hinge is too narrow for fingers to enter deeply but not so tight that the wood binds. CPSC toy guidance specifically recognizes that holes, clearances, and accessible moving mechanisms must not create cutting or pinching hazards.
Behind each door, paint a picture, glue down a sealed family photo, add a large letter, or create a matching game. Keep decorative items beneath a smooth protective layer so they cannot be peeled away.
Step 5: Attach the Latches
Install one latch at a time and test it repeatedly. Rounded, surface-mounted mechanisms are generally easier to make safe than hardware containing pointed hooks.
Whenever possible, use through-bolts with washers and nylon-insert locking nuts. Cover the entire back with a second thin panel or mount the board on wooden spacers so children cannot reach bolt ends. Acorn nuts can cover certain exposed threads, but they must also be secured against loosening.
When using screws, choose lengths that remain fully inside the plywood. Drill pilot holes to reduce splitting. After installation, inspect the back with your fingers rather than trusting the number printed on the screw package.
Step 6: Add Non-Latch Activities
A board made entirely of stubborn latches can feel more like a locksmith certification exam than a toy. Add a few easy successes between the harder activities.
A large wooden wheel can spin on a through-bolt with washers. A wide buckle can be attached using short straps whose ends are folded, stitched, and bolted beneath metal plates. A doorstop can provide a satisfying wobble, provided it has no removable rubber cap.
Test all rotating pieces to confirm that fingers, clothing, and hair cannot become trapped behind them. Keep straps extremely short so they cannot form a loop around the child’s neck, wrist, or ankle.
Step 7: Secure the Board
A wall-mounted busy board should be fastened to structural framing or another solid support using hardware rated for the board’s weight and the force of a pulling child. Do not rely on lightweight picture hangers or a single drywall anchor.
Mount the panel with its center near the child’s chest height. This position lets the child reach most activities without climbing. Use at least four secure mounting points and verify that the board sits flat without rocking.
If the busy board is attached to a cabinet, play table, or other piece of furniture, that furniture must also be anchored. CPSC safety campaigns stress that children can be injured when they climb on, lean against, or pull on unsecured furniture.
Step 8: Perform a Serious Final Inspection
Before inviting the official toddler testing department into the room, inspect the board as though you expect it to fail.
- Pull hard on every component.
- Try to rotate fixed pieces.
- Check for exposed screw tips and sharp edges.
- Look for finger-sized gaps near hinges.
- Confirm that straps cannot form dangerous loops.
- Verify that no part fits inside a small-parts tester.
- Open and close each mechanism at least 25 times.
- Shake the panel and test every mounting point.
- Remove anything that cracks, loosens, or feels questionable.
How to Introduce the Busy Board
Demonstrate only two or three activities at first. Open a latch slowly, describe the movement, and let the child copy you. Resist the urge to complete every puzzle immediately. Waiting gives the child time to experiment, plan, and correct an unsuccessful attempt.
Use simple prompts such as, “What happens when you slide it?” or “Can you find the blue door?” For an older preschooler, create short sequences: open the red latch, turn the wheel twice, and close the buckle.
Activities that involve remembering steps, maintaining attention, and switching between actions can gently exercise skills related to working memory, mental flexibility, and self-control. Harvard’s Center on the Developing Child describes these abilities as central parts of executive function.
Keep sessions relaxed. A busy board is not a standardized test disguised as plywood. Some children will repeat one latch for ten minutes. Others will inspect every activity, announce that the doorstop is the clear champion, and leave.
Cleaning and Maintenance
Wipe the board with a damp cloth and mild soap. Avoid soaking the wood or spraying cleaner directly into hinges and latches. Dry the surface immediately.
Inspect the board weekly during frequent use. Tighten hardware only when the child is not present, and account for every tool, screw, washer, and nut before play resumes. Remove the board from service immediately if the wood cracks, a finish begins peeling, a strap frays, or any mechanism becomes loose.
As the child grows, replace activities rather than simply adding more hardware to crowded spaces. An uncluttered board is easier to understand, clean, and inspect.
Builder’s Experience: What Usually Matters After the Board Is Finished
The Favorite Activity Is Rarely the Fancy One
One of the most common surprises in a latch-board project is how confidently children ignore the feature that required the most work. A carefully painted three-door puzzle may receive a polite glance, while a basic barrel bolt becomes the main attraction for three consecutive weeks.
This is useful information rather than a creative defeat. Children often prefer an activity that offers a clear result and can be repeated quickly. Slide, click, open, close, repeat. The predictable rhythm helps them practice the same movement until it becomes easier.
For that reason, a successful board does not need twenty activities. Eight well-spaced mechanisms can be more engaging than a crowded collection of hardware. Leaving open space also makes later repairs and replacements much easier.
Children Pull Harder Than Expected
During adult testing, a latch may seem securely attached because it survives a gentle tug. A child does not perform a gentle tug. A child grabs the handle with both hands, plants both feet, leans backward, and conducts a structural experiment worthy of a building inspector.
The most dependable builds treat every activity as a potential handhold. Through-bolts, large washers, locking nuts, and a protected back generally offer more confidence than tiny decorative screws. Wall mounting deserves the same level of attention. The panel should remain motionless when an adult pulls firmly on its upper corners.
Spacing Solves Problems That Extra Hardware Creates
On the workbench, components often look too far apart. Once small hands begin moving doors and rotating wheels, that empty space suddenly makes sense. Generous spacing reduces collisions, improves visibility, and gives caregivers room to clean around each mechanism.
Spacing also allows two children to use the board together without immediately negotiating ownership of the same three-square-inch area. They may still negotiate loudly, of course, but at least the woodworking will not be responsible.
The First Design Will Probably Change
A practical busy board evolves after observation. A latch may be too stiff. A door may open in the wrong direction. A wheel may sit too close to the wall. One activity may be developmentally frustrating while another is already too easy.
These discoveries are normal. Build the first version with replaceable modules when possible. Small activity panels can be bolted to the main board, allowing a mechanism to be removed without refinishing the entire surface.
Observation is more valuable than guessing. Watch where the child places each hand, which movements cause frustration, and whether clothing or fingers approach a dangerous gap. Adjust the board based on actual play rather than assuming the original layout is permanent.
Simple Storytelling Extends the Board’s Life
Once the mechanical novelty begins to fade, stories can transform the same board. The doors become animal houses. The wheel controls a pretend spaceship. The buckle secures a delivery truck. The child must open latch number two to find a missing teddy bear.
Adding removable story cards for the caregivernot loose pieces for the childcreates new challenges without changing the hardware. One card might say, “Close every door before the rain arrives.” Another might ask the child to find three yellow objects or complete a sequence from left to right.
This approach keeps the board useful beyond the earliest stage of repetitive manipulation. It also encourages conversation, pretend play, memory, and turn-taking while preserving the satisfying clicks and clacks that made the board interesting in the first place.
Maintenance Becomes Part of the Routine
A handmade board should never be installed and forgotten. Hardware gradually loosens. Wood expands and contracts. Straps wear at their mounting points. A child who could barely move a latch last month may suddenly have enough strength to pull it apart.
A quick weekly inspection soon becomes automatic. Caregivers can pull each component, check the mounting points, wipe the surfaces, and confirm that nothing has cracked or shifted. The inspection takes only a few minutes and protects the value of all the careful work completed during the build.
Conclusion
A DIY busy board with latches can turn ordinary hardware into a rich hands-on play experience. The most successful version is not the board with the greatest number of gadgets. It is the one built around thoughtful spacing, smooth materials, oversized components, secure fasteners, reliable mounting, and the abilities of a specific child.
Start with a sturdy plywood panel, choose eight to twelve age-appropriate activities, and install each piece as though a determined toddler intends to remove it. Because, sooner or later, one probably will.
With careful construction and regular inspection, the finished latch board can support fine motor practice, problem-solving, language, imaginative play, and many quiet minutes of opening and closing the same tiny door. For a parent, that final benefit may qualify as advanced engineering.
SEO Metadata
Note: This project requires active adult supervision. Inspect all hardware and mounting points before every play session, and remove the board immediately if any component becomes loose, damaged, sharp, or small enough to present a choking hazard.