Note: HTML body only, as requested
There comes a moment in almost every electronics project when the prototype looks smart, the code compiles, the LED blinks on command, and then the control knob decides to behave like a loose tooth. You touch the potentiometer, the whole breadboard flinches, and suddenly your “simple test circuit” has the structural integrity of a noodle in a rainstorm. That, in a nutshell, is why breadboards eventually go to pot.
The phrase is funny, but the issue is real. Solderless breadboards are fantastic for temporary circuits, quick learning, and low-stakes experimentation. Potentiometers, meanwhile, are one of the most useful analog input devices in the hobby and prototyping world. They let you dim lights, adjust speed, tune thresholds, control volume, set timing, and generally feel like a wizard with a knob. The problem is that full-size potentiometers and flimsy breadboard contacts are not exactly soulmates. One is a physical control meant to be touched. The other is a temporary connection system that prefers everyone to sit still and not make a scene.
So when people say breadboards have gone to pot, they are really talking about a smart shift in prototyping culture: making potentiometers easier to mount, easier to turn, easier to trust, and easier to carry from rough prototype to finished build. It is a story about usability, mechanical stability, better demos, and a tiny but important improvement that makes breadboard circuits feel less like science fair chaos and more like actual product design.
What the Phrase Really Means
At the center of the phrase is a simple truth: breadboards are great at holding parts that mostly stay put, and not nearly as good at holding parts that humans keep grabbing. A resistor does not demand attention. A DIP chip usually minds its business. But a potentiometer? A potentiometer practically begs to be touched. It is the extrovert at the component party.
That matters because the classic solderless breadboard was built around a 0.1-inch grid and spring contacts. It works beautifully for through-hole parts and jumpers, but larger controls can be awkward. Some trim pots are already friendly to breadboards, and some specially designed panel-mount pots have leg spacing that fits nicely. But many standard potentiometers are mechanically clumsy in this environment. They may fit, sort of. They may work, mostly. They may also wiggle, lean, twist, loosen, and generally test your emotional resilience.
The modern solution is refreshingly practical: use breadboard-friendly potentiometers, use small trim pots when appropriate, or use adapter boards that secure a full-size shaft potentiometer to the breadboard. That small change can transform a fiddly demo into something people actually want to touch and explore.
Why Breadboards and Big Pots Have a Complicated Relationship
The Mechanical Problem
The first problem is not electrical at all. It is physical. Full-size rotary potentiometers are meant to be turned with fingers. Breadboards are meant to hold pins with spring tension. Those are two very different design goals. When you twist a regular potentiometer that is only hanging on by a few leads or improvised wires, the force travels straight into the connections. That is how good prototypes become bad improv theater.
This is why breadboard-friendly panel-mount potentiometers are such a nice upgrade. They are designed with pin spacing that fits prototyping boards more naturally, and some can move from breadboard to enclosure without requiring you to replace the part later. That is not just convenient. It is efficient design thinking. You prototype with the same human interface part you may use in the final build, which means fewer surprises when your project graduates from “bench blob” to “thing you show other people.”
Trim potentiometers solve a different version of the same problem. They are smaller, lighter, and easier to fit directly into a breadboard. They are ideal when you want a compact adjustable resistor for calibration or occasional tweaking. But they are less satisfying when you need a user-facing knob. Nobody dreams of a product with “please adjust this tiny blue square with a screwdriver” as the main interface.
The Electrical Problem
The second issue is where breadboards stop being friendly and start being educational. Solderless breadboards add parasitic resistance, capacitance, and inductance. Their rails are convenient, but they are not magical. For low-frequency circuits, quick analog experiments, and microcontroller demos, that is usually fine. For precision analog work, noisy layouts, and high-speed designs, it can become a headache wearing a lab coat.
That is one reason the “pot on a breadboard” problem matters more than it first appears. A shaky control does not just feel cheap. It can also create inconsistent contact, noisy readings, or weird intermittent behavior that sends you hunting for bugs in software that are actually caused by a mechanical connection issue. In other words, the breadboard is not always broken, but it absolutely can lie to you with confidence.
What a Potentiometer Actually Does in a Prototype
A potentiometer is usually used in one of two ways. First, it can act as a variable voltage divider, where the outer terminals connect to power and ground and the center wiper provides an adjustable signal. This is the classic beginner setup for reading analog input on a microcontroller. Turn the knob, change the voltage, read the result, smile like you invented interactivity.
Second, it can act as a rheostat, where only two terminals are used to create an adjustable resistance. That setup appears in tuning, biasing, calibration, and other situations where you want to adjust resistance directly rather than generate a variable control voltage.
For many microcontroller projects, values in the 10K to 100K range are common and practical. A 10K linear potentiometer is a particularly popular all-purpose choice because it behaves predictably, plays well in control circuits, and does not usually turn your breadboard exercise into a drama about current draw. Linear taper is typically the go-to for control knobs where you want a straightforward response. Logarithmic, or audio taper, is more appropriate for applications like volume control, where the human ear hears change in a non-linear way. Use the wrong taper and the control may technically work while emotionally insulting the user.
How Makers Fixed the Problem
1. Breadboard-Friendly Potentiometers
One of the easiest fixes is to use components specifically designed for prototyping. Breadboard-friendly potentiometers are made so their leads align with the breadboard grid. Some even double as panel-mount parts, which is wonderfully lazy in the best possible way: one part for the prototype and the final enclosure.
These are especially useful for Arduino-style demos, LED dimmers, menu controls, sensor tuning, and classroom builds where you want reliable input without having to invent a mounting strategy with wires, hope, and zip ties.
2. Trim Pots for Tight Spaces
Trim potentiometers are small, inexpensive, and perfect for situations where the knob is not the star of the show. They fit nicely, often match the breadboard spacing well, and are excellent for calibration. If you are setting a threshold once and leaving it alone, a trim pot is often the smartest choice. If users need to keep turning it, though, a full-size shaft control will feel far better.
3. Adapter Boards and Pot Carriers
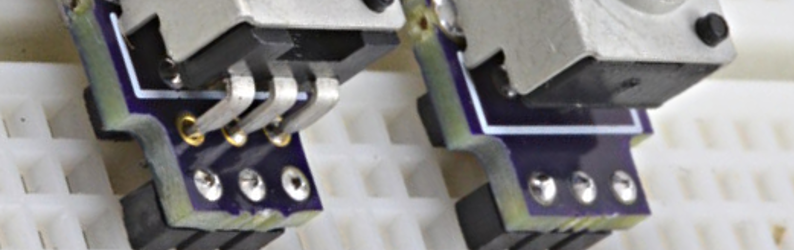
This is where the phrase “Breadboards Go To Pot” really earns its stripes. Adapter boards let a standard shaft potentiometer sit securely on a small PCB that plugs into the breadboard with a stronger footprint. It is such a simple idea that it feels obvious in retrospect, which is how many good hardware ideas arrive: late, sensible, and just smug enough to make everyone wish they had thought of them first.
These adapters improve grip, make knobs easier to use in demos, and reduce the chance that touching the control will pull the whole thing out of alignment. They also make a prototype look less like a temporary accident and more like an intentional interface.
4. Breakouts for Modern Parts
The broader lesson is that breadboards increasingly rely on adapters and breakout boards anyway. Modern electronics are full of parts that do not naturally fit the old-school through-hole rhythm of a solderless board. So adding a potentiometer adapter is part of a larger trend: using little helper boards to make prototypes easier to build, easier to debug, and closer to finished hardware behavior.
Best Practices for a Better Breadboard Pot Setup
If you want your breadboard prototype to feel more professional and less haunted, a few habits go a long way.
Choose the right potentiometer value and taper. For general analog input, a linear 10K pot is a safe and common choice. For audio volume, a log taper is usually the better fit.
Keep wiring short and organized. Long jumper wires invite noise, confusion, and accidental disconnections. Shorter runs make the circuit easier to read and usually easier to trust.
Do not ask a breadboard to be a finished product. It is a prototype platform, not a permanent home. When the circuit works and the interface matters, move to perfboard, a custom PCB, or another sturdier form of assembly.
Use mechanical support. If the control will be turned often, give it a proper mount, a breadboard-friendly body, or an adapter board. Your future self will send a thank-you card.
Remember electrical limits. Breadboards are excellent for many low-frequency learning and prototyping tasks, but they are not ideal for every analog, RF, or high-speed design. If the readings look noisy or inconsistent, layout and contact quality may be part of the story.
Real-World Examples Where This Matters
A beginner LED dimmer is the classic case. A potentiometer on the breadboard feeds an analog pin, the microcontroller maps that value to a PWM output, and the LED brightness changes as you twist the knob. It is simple, visual, and very satisfying. It is also much more enjoyable when the knob feels stable instead of threatening to detach from civilization.
In audio projects, the issue becomes even more obvious. Volume knobs, filter controls, and synth parameters are meant to be played, not merely adjusted once. A secure potentiometer turns a demo into an instrument. A loose one turns it into a trust exercise.
Sensor calibration is another quiet but important use case. A trim pot or a well-mounted linear pot can help tune thresholds, offsets, and response curves in test circuits. When the control is physically reliable, you can focus on the measurement rather than wondering whether the value changed because the circuit moved, the contact shifted, or the electronics gods wanted entertainment.
From Breadboard Prototype to Finished Build
The smartest part of this whole “go to pot” movement is that it encourages a better path from prototype to product. When you use breadboard-friendly or panel-mount-capable potentiometers early, you learn what the control feels like in actual use. You think about ergonomics sooner. You stop treating the user interface as something to bolt on later.
That may sound like a small improvement, but it changes how people prototype. A project stops being just an electrical proof of concept and starts becoming a human-facing object. That is the difference between a circuit that merely works and one that invites interaction.
And that is really what this topic is about. “Breadboards Go To Pot” is not just a goofy headline. It is a neat little lesson in better prototyping: the moment you make your controls easier to use, your whole project gets better. The circuit behaves better. The demo feels better. The learning happens faster. And the prototype suddenly looks like it has plans.
Experience: What It Feels Like When Breadboards Go To Pot
In practice, the experience usually starts with optimism. You plug a potentiometer into the breadboard, wire up power, ground, and the wiper, upload a quick sketch, and watch an LED respond. For about thirty seconds, you feel unstoppable. The knob works, the numbers change, and the breadboard seems like the greatest invention since sliced bread, which is fitting because that is basically where the name came from in spirit. Then you reach over to make a finer adjustment, and the control leans a little. The reading jumps. You wiggle it back. The LED flickers like it just got bad news. That is when the lesson arrives.
The lesson is not that breadboards are bad. They are wonderful. The lesson is that temporary electrical contact and repeated mechanical force are very different beasts. The first time you use a better-mounted potentiometer, a trim pot that actually fits well, or an adapter board that gives the control some backbone, the change feels oddly dramatic. Suddenly the prototype is calmer. You can turn the knob with one hand without bracing the board with the other like you are landing an airplane in crosswinds. The circuit responds more predictably. Your brain stops wasting energy on whether the hardware is slipping and starts paying attention to the behavior you are actually trying to test.
That is also when breadboarding becomes more fun. A stable control encourages experimentation. You try subtle changes instead of broad, clumsy ones. You compare thresholds. You fine-tune timing. You notice what linear taper feels like versus log taper. You begin to understand why some knobs feel natural in audio circuits and others feel weirdly aggressive. You start caring about the user experience, even if the “user” is just you, sitting at a desk with a coffee and a suspicious number of jumper wires.
There is also a confidence boost that comes from a cleaner prototype. A breadboard with a secure potentiometer looks intentional. It feels like a tool instead of a temporary accident. That matters in classrooms, demos, maker fairs, and even solo projects, because neat hardware changes how people interact with it. They are more willing to touch it. More willing to test it. More willing to believe it works.
And maybe that is the most relatable part of the whole topic. When breadboards go to pot, they do not become less serious. They become more usable. The humble knob brings a circuit to life, but only if it is mounted in a way that respects both electricity and fingers. Once you experience that difference, it is hard to go back. You stop seeing a potentiometer as “just another part” and start seeing it as the handshake between the person and the prototype. A good handshake matters. A floppy one does not inspire confidence. Electronics, it turns out, is no different.
Conclusion
“Breadboards Go To Pot” captures a small but meaningful evolution in electronics prototyping. Breadboards remain one of the best tools for learning, experimenting, and validating circuit ideas. Potentiometers remain one of the easiest ways to add human control. Bringing those two together successfully means respecting both the electrical realities and the mechanical realities of prototyping.
When makers use breadboard-friendly pots, trim pots, or adapter boards, they are not being fancy. They are solving a real usability problem. The reward is a prototype that is easier to adjust, easier to debug, and much closer to something a real person would actually enjoy using. That is a lot of value from one little knob.