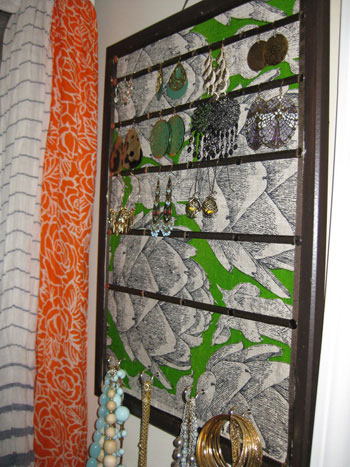
Jewelry has a sneaky way of turning from “beautiful collection” into “tiny metallic spaghetti” overnight. One minute your necklaces are elegant little finishing touches; the next, they are locked in a knot so dramatic it deserves its own reality show. That is exactly why a pimped out pin board jewelry display is such a clever, stylish, and surprisingly practical solution.
A pin board may sound humble at first. It brings to mind office reminders, grocery lists, and that one inspirational quote you swore would change your life. But with a little creativity, a basic cork board, fabric board, or framed pegboard can become a boutique-style jewelry organizer that keeps your favorite pieces visible, untangled, and easy to grab before you leave the house. It is storage, wall decor, and a tiny personal jewelry gallery all in one.
This guide explores how to create a unique jewelry display board that looks polished instead of random, works for different types of jewelry, and gives your bedroom, closet, vanity area, or dressing corner a major upgrade. Think of it as giving your jewelry the VIP lounge it has always believed it deserved.
Why a Pin Board Makes Such a Smart Jewelry Display
A pin board works beautifully because it uses vertical space. Instead of letting necklaces pile up in a drawer or earrings disappear into a dish, you move everything onto the wall where it is visible and accessible. This is especially helpful in small bedrooms, apartments, dorm rooms, and shared bathrooms where surface space is precious.
Visibility is one of the biggest advantages. When jewelry is hidden in a box, it is easy to forget what you own. You may keep wearing the same necklace three days in a row while a perfectly good pair of earrings sits in the back of a drawer thinking, “Remember me?” A wall-mounted jewelry organizer solves that problem by displaying your pieces like art.
It also helps prevent tangling. Necklaces can hang separately from small hooks, bracelets can rest on pins or knobs, and earrings can be grouped on mesh, ribbon, or fabric strips. Rings and delicate items can still live in trays or small dishes nearby, but the bulk of your collection becomes easier to manage.
What Does “Pimped Out” Mean for a Pin Board?
In this case, “pimped out” does not mean adding flashing lights, a fog machine, and a tiny velvet ropealthough no judgment if your earrings demand bottle service. It simply means taking a basic board and upgrading it with better materials, a stronger design, and smart organizing features.
A plain cork board can become stylish with fabric, paint, trim, hooks, ribbon, brass tacks, decorative knobs, mini shelves, or even a vintage frame. The goal is to make the board look intentional, not like you panicked and stabbed your jewelry into the nearest office supply item.
Popular Pin Board Styles
The best design depends on your room and your jewelry collection. A soft linen-covered cork board feels calm and classic. A black-painted cork board with brass hooks looks modern and dramatic. A floral fabric board brings cottage charm. A white pegboard with wooden pegs can feel clean, Scandinavian, and extremely organizedbasically the home decor equivalent of drinking enough water.
You can also create a framed jewelry display board using an old picture frame. Remove the glass, add cork or foam board, cover it with fabric, and insert it back into the frame. This gives the piece a finished look and makes it feel more like decor than storage.
Materials You Need for a DIY Jewelry Pin Board
You do not need a professional workshop to make this project work. Most materials are affordable and easy to find at craft stores, hardware stores, or online. The key is choosing pieces that support your jewelry without looking cluttered.
Basic Supplies
- Cork board, fabric bulletin board, foam board, or pegboard
- Decorative frame or wood trim
- Fabric, wallpaper, contact paper, or paint
- Push pins, cup hooks, screw hooks, or small knobs
- Ribbon, mesh, lace, or wire for earrings
- Hot glue, staple gun, craft adhesive, or small screws
- Wall anchors or hanging hardware
- Small trays or dishes for rings and studs
If you have heavier necklaces, use screw-in hooks rather than simple push pins. Push pins are fine for lightweight earrings or dainty chains, but statement necklaces need more support. Nobody wants a dramatic necklace landslide at 2 a.m.
How to Make a Pimped Out Pin Board Jewelry Display
The beauty of this project is that it can be as simple or as fancy as you want. You can finish a basic version in an afternoon, or you can go full designer mode with trim, paint, fabric, and custom sections.
Step 1: Sort Your Jewelry First
Before you build anything, lay out your jewelry by type: necklaces, earrings, bracelets, watches, brooches, rings, and sentimental pieces. This step matters because your board should match what you actually own. If you have 27 necklaces and two bracelets, do not design a board with one necklace hook and a bracelet kingdom.
Use this moment to declutter. Set aside broken pieces for repair, donate items you no longer wear, and separate fine jewelry from costume jewelry. Delicate gold, gemstones, pearls, and heirloom items may need softer storage than a public spot on the wall.
Step 2: Choose the Right Board
Cork is the easiest choice because pins and hooks go in smoothly. A fabric bulletin board looks softer and more decorative. Pegboard is excellent if you want flexibility because hooks and pegs can be moved around as your collection changes. Foam board can work for a lightweight display, but it is not ideal for heavy jewelry.
For a bedroom or closet, a medium board is usually enough. For a vanity wall, a smaller framed board can look elegant. For a serious jewelry collection, consider using two boards: one for everyday pieces and one for statement items.
Step 3: Cover or Paint the Surface
This is where the transformation begins. Cover the board with fabric that complements your room. Linen, velvet, cotton, canvas, or printed fabric can all work. Pull the fabric tight around the board and secure it on the back with staples or hot glue. Smooth fabric gives jewelry a clean background and makes colors pop.
If you prefer paint, choose a matte finish for a modern look. Black, cream, sage green, dusty blue, and warm beige all make jewelry stand out. Metallic accents can be added to the frame or hooks for a more polished look.
Step 4: Add Hooks, Pins, and Display Zones
Divide the board into sections. Long necklaces need space at the bottom so they can hang freely. Short necklaces and chokers can go higher. Earrings work well on ribbon strips, lace, mesh, or rows of pins. Bracelets can hang from knobs or thicker hooks.
Try placing hooks in staggered rows rather than perfectly straight lines. This prevents necklaces from overlapping too much and creates a more natural display. Leave empty space between pieces so the board looks curated, not crowded.
Step 5: Add Decorative Details
This is the “pimped out” part. Add small drawer pulls for chunky bracelets. Use brass cup hooks for a boutique feel. Attach a mini shelf at the bottom for perfume, ring dishes, or sunglasses. Add a strip of lace for earrings. Use patterned ribbon to create rows for studs and hoops.
You can also label sections if you enjoy that extra-organized feeling. Small tags such as “daily,” “statement,” “gold,” “silver,” and “party pieces” can help you choose faster. Because nothing says “I have my life together” like a labeled earring zone.
Design Ideas for Different Decor Styles
A jewelry pin board can fit almost any room style. The trick is matching the materials to your existing decor.
Modern Minimalist
Use a black or white board with simple gold or matte black hooks. Keep spacing clean and avoid too many decorative extras. This style works well with delicate necklaces, geometric earrings, and a neutral bedroom palette.
Boho Chic
Choose natural cork, woven fabric, macrame trim, wooden pegs, and warm colors. Add a few decorative tassels or a small woven basket below the board for rings and hair accessories. Boho jewelry displays look best when they feel relaxed but still organized.
Vintage Glam
Find an ornate frame at a thrift store, paint it gold or antique white, and add velvet or floral fabric inside. Decorative knobs can hold necklaces, while lace strips can display earrings. This look is perfect for pearls, brooches, cocktail rings, and dramatic pieces that enjoy applause.
Colorful Creative
Use bold fabric, bright paint, mismatched knobs, and playful pins. This works beautifully in craft rooms, teen bedrooms, or eclectic apartments. The board becomes both a jewelry organizer and a mood booster.
Best Jewelry Types for a Pin Board Display
Not every piece of jewelry belongs on a wall, but many do. Necklaces are the obvious winners because hanging keeps them untangled. Earrings are also great candidates, especially hooks, hoops, and dangly styles. Bracelets and watches can hang from small knobs or rest on mini dowels.
Brooches and pins look fantastic on cork because they can attach directly to the surface. They become tiny pieces of art. Rings, however, are better stored in a dish, ring roll, or small tray. Stud earrings can also be tricky unless you add mesh, ribbon, or a dedicated earring panel.
What to Keep Off the Board
Very valuable jewelry, delicate pearls, soft gemstones, and pieces that tarnish easily may need more protective storage. A pin board is best for everyday jewelry and fashion pieces you enjoy seeing and wearing often. Fine jewelry should be stored separately in lined compartments, pouches, or boxes that reduce scratching and exposure.
Smart Organization Tips for a Cleaner Look
A jewelry display should be easy to use, but it should also avoid looking chaotic. Start by grouping items by category. Keep gold with gold, silver with silver, or organize by type if that feels more natural. Daily wear pieces should be easiest to reach.
Leave breathing room. The most common mistake is trying to display everything at once. If your board is overloaded, it becomes visually noisy and less useful. Rotate seasonal or statement pieces instead. In summer, show colorful beads and lightweight hoops. In winter, swap in metallics, velvet chokers, and richer tones.
Use the lower section for longer items and the top section for smaller pieces. Keep heavier items near stronger hooks. Add a small tray or shelf below the board to catch rings, backs of earrings, or that one mystery charm you are emotionally attached to but cannot identify.
Where to Hang Your Jewelry Pin Board
The best location is somewhere convenient but safe. A closet wall, vanity corner, bedroom nook, or dressing area works well. Avoid hanging jewelry in a humid bathroom if your pieces are prone to tarnish or damage. Moisture is not a friend to many metals, and it is definitely not invited to the jewelry party.
Hang the board at eye level so you can see everything clearly. If you use it daily, place it near a mirror. This makes styling easier because you can compare pieces with your outfit without sprinting across the room like you are in a very low-stakes Olympic event.
Why This Project Works Better Than a Traditional Jewelry Box
Jewelry boxes are classic, but they are not always ideal for people who want visibility. A box can protect pieces, but it can also hide them. A pin board display encourages you to wear more of what you own because everything is right in front of you.
It is also customizable. A jewelry box has fixed compartments. A pin board can change whenever your collection changes. Add more hooks, move pins, swap fabric, repaint the frame, or attach a new ribbon strip. It grows with your style.
Most importantly, it adds personality. A store-bought organizer may be practical, but a DIY jewelry display board feels personal. It reflects your taste, your room, your collection, and maybe your mild addiction to cute earrings. We support creative self-awareness here.
Budget-Friendly Ways to Upgrade the Look
You do not have to spend much to make this project beautiful. Check thrift stores for frames, drawer pulls, old trays, and decorative fabric. Repurpose leftover wallpaper or fabric scraps. Use paint you already have. Swap basic silver push pins for brass upholstery tacks or pearl-head pins.
Small details create a high-end effect. A neat frame, balanced layout, and consistent hardware can make a basic board look custom. Even a dollar-store cork board can look boutique-worthy once it gets fabric, trim, and thoughtful spacing.
Common Mistakes to Avoid
The first mistake is using weak pins for heavy jewelry. Always match the hanging method to the weight of the piece. The second mistake is overcrowding. A packed board may hold more, but it becomes harder to use and less attractive.
Another mistake is skipping wall support. If your board is large or heavy, use proper hanging hardware and anchors. A fully loaded jewelry board can weigh more than expected. Earrings may be tiny, but a whole collection can gang up quickly.
Finally, do not ignore jewelry care. Clean pieces before displaying them, avoid placing delicate items in direct sunlight, and store precious pieces separately. A pin board should make your life easier, not turn your favorite necklace into a cautionary tale.
Real-Life Experience: What It Feels Like to Use a Jewelry Pin Board Every Day
The best part of using a pimped out pin board is the tiny daily convenience it brings. Before setting one up, jewelry often becomes an afterthought. You get dressed, look in the mirror, and realize something is missingbut your necklaces are tangled, your earrings are hiding, and your bracelet is apparently living in another dimension. So you leave without jewelry and promise yourself you will organize it later. Spoiler: later rarely arrives wearing a cape.
With a jewelry pin board, choosing accessories becomes easier and more enjoyable. You can see your options at a glance. A plain white T-shirt suddenly gets paired with layered gold chains. A simple black dress finds the bold earrings it was secretly waiting for. Even casual outfits feel more intentional because the finishing touches are right there, not buried in a drawer under receipts and lip balm.
Another experience many people notice is that they rediscover pieces they forgot they owned. A pair of earrings from a vacation, a bracelet from a friend, or a necklace bought on sale “just because” can suddenly rejoin daily life. Jewelry carries memories, and displaying it gives those memories a place to breathe. Instead of being hidden away, your collection becomes part of the room’s personality.
The pin board also makes mornings faster. When jewelry has a specific home, cleanup becomes simple. At the end of the day, you hang the necklace back on its hook instead of dropping it on the dresser. Earrings return to their row. Bracelets go back to their knobs. The system works because it is visible and low effort. Organization that requires too many steps tends to fail, usually by Wednesday.
There is also something satisfying about customizing the board over time. You may start with a basic cork board and a few hooks, then add a better frame, a strip of lace for earrings, or a mini shelf for perfume. Maybe you paint the frame when your room style changes. Maybe you rearrange the hooks when your necklace collection grows. The board becomes a living little design project, which is much more fun than digging through a jewelry box muttering, “Where is the other hoop?”
From a decor perspective, the board adds texture and sparkle to a room. Jewelry naturally catches light, so even a simple display can make a vanity area feel prettier. It is especially useful in small spaces because it turns storage into decoration. Instead of adding another box, tray, or tabletop organizer, you use the wall. That frees up surfaces and makes the room feel less cluttered.
The only real lesson is to edit the board occasionally. If everything you own goes on display, the look can become messy. Keep everyday favorites and visually interesting pieces on the board, then store sentimental or delicate items elsewhere. Think of the board as a rotating gallery, not a storage unit with earrings.
Overall, a pimped out pin board is one of those DIY projects that feels small but makes a real difference. It solves a practical problem, adds personality to your space, and gives your jewelry the attention it deserves. Plus, it is hard not to feel a little fancy when your necklaces are hanging neatly like they are waiting backstage at a fashion show.
Conclusion
A pimped out pin board is a unique, affordable, and stylish way to display your jewelry while keeping your favorite pieces organized and easy to use. With the right board, fabric, hooks, frame, and layout, you can create a DIY jewelry organizer that looks like decor and works like a daily styling assistant. It prevents tangles, saves space, shows off your personality, and makes getting ready more fun. Whether your style is modern, boho, vintage, colorful, or somewhere between “minimalist” and “I own too many earrings but refuse to apologize,” this project can be customized to fit your room and your collection.
Note: This article is written for web publishing and synthesizes current U.S. home organization, DIY decor, jewelry storage, and small-space styling guidance into original, natural content.