Note: This article is written as original, publication-ready web content based on practical DIY guidance, common home-improvement standards, and real entryway design best practices.
The foyer by the front door has one very important job: it must greet people warmly while quietly absorbing the daily chaos of coats, backpacks, dog leashes, umbrellas, tote bags, hats, and the one mystery scarf nobody admits belongs to them. That is a lot to ask from a plain wall.
That is why adding board and batten with coat hooks to the foyer by the front door is one of the smartest small-home upgrades you can make. It adds architectural character, protects the wall, creates practical storage, and makes the entryway look intentional instead of like a landing zone for everyone’s “I’ll put it away later” items.
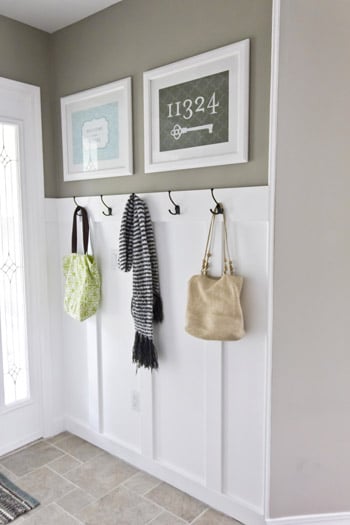
Board and batten is a classic wall treatment made from flat panels or wall surfaces accented with vertical battens and horizontal rails. In a foyer, it works especially well because it gives the front door area structure. Add a row of sturdy coat hooks, and suddenly your wall is no longer just standing there looking bored. It has a career.
Why Board and Batten Works So Well in a Foyer
A foyer is often small, narrow, or awkwardly shaped. Full-size mudroom cabinets may not fit, and a freestanding coat rack can turn into a wobbly tree of winter jackets. Board and batten solves the problem by using vertical wall space, which is usually underused near the front door.
The beauty of this project is that it combines form and function. The battens add dimension and shadow lines, giving the entryway a custom-built look. The hooks create everyday storage. The painted surface makes scuffs easier to clean than bare drywall. And the whole design can be scaled up or down depending on the size of your foyer.
For a small entryway, a half-wall board and batten treatment with four or five hooks can feel like a mini mudroom. For a larger foyer, you can extend the board and batten higher, add a picture ledge, include a bench, or pair it with baskets for shoes and accessories.
Planning the Board and Batten Layout
Before buying wood, paint, and hooks, spend time planning the layout. This is the part where patience saves you from standing in the lumber aisle whispering, “Why did I think math was optional?”
Measure the Wall First
Start by measuring the width and height of the wall near the front door. Decide whether the board and batten will cover the full wall, two-thirds of the wall, or a classic wainscoting height. Many homeowners choose a height between 48 and 60 inches for entryway board and batten because it gives enough room for hooks while keeping the space open.
If the foyer has tall ceilings, a higher treatment can look elegant. If the space is narrow, a lower height may feel less crowded. The goal is balance: the feature should look built-in, not like it is trying to climb the wall and escape.
Choose Batten Spacing
Common batten spacing ranges from about 12 to 18 inches apart, depending on the wall size and the look you want. Closer spacing feels traditional and detailed. Wider spacing feels modern and clean. For a foyer with coat hooks, spacing should also consider where the hooks will go.
A practical approach is to align each hook with a vertical batten or place hooks along a horizontal rail between battens. If you want five hooks, plan the layout so they look evenly distributed. Avoid placing hooks too close together, or bulky coats will fight for space like commuters on a packed train.
Account for Light Switches, Outlets, and Trim
Most foyers have at least one switch near the door. Work around electrical plates carefully. You may need to adjust batten spacing slightly so a vertical board does not run directly into a switch plate. Also consider existing baseboards, door casing, thermostat controls, alarm panels, and any return vents.
The best board and batten designs look like they belong to the house. That means the new trim should relate to the existing trim. If your door casing is slim and simple, choose battens that feel similar. If the home has chunky craftsman-style trim, wider boards may look more natural.
Materials You May Need
The exact material list depends on your wall and design, but most foyer board and batten projects use a similar set of supplies:
- 1×2, 1×3, or 1×4 boards for battens and rails
- MDF, pine, poplar, or primed trim boards
- Construction adhesive
- Finish nails or a brad nailer
- Wood filler or spackle
- Paintable caulk
- Primer and durable interior paint
- Coat hooks or hook rail hardware
- Stud finder, level, tape measure, pencil, and saw
- Screws long enough to secure hooks into solid backing or studs
MDF is popular because it is smooth and affordable, but it does not love moisture. Pine and poplar are stronger options, especially in a hard-working entryway. If your foyer sees wet raincoats, snow gear, or muddy backpacks, choose materials and paint finishes that can handle real life.
Should You Use the Existing Drywall or Add Backer Panels?
Some DIYers install battens directly over the existing drywall and paint the wall and trim the same color. This is budget-friendly and works well if the wall is smooth. Others install a thin backer panel first, then attach battens over it. A backer panel can hide wall texture, create a smoother finish, and make the project look more like true paneling.
If your walls have heavy orange peel texture, dents, or uneven patches, a backer panel may be worth the extra effort. If your wall is already smooth, you can save time by using the drywall as the panel surface.
How to Add Board and Batten With Coat Hooks
This project is manageable for a confident beginner, especially if you take your time with measuring and leveling. The steps below describe a practical method for adding board and batten with coat hooks to the foyer by the front door.
Step 1: Mark the Wall
Use painter’s tape to map the top rail, bottom rail, and vertical battens on the wall. This simple preview helps you spot awkward spacing before cutting wood. Stand back and look at the wall from the front door, hallway, and nearby rooms. If something feels visually off, adjust it now while the “boards” are still tape.
Step 2: Locate the Studs
Use a stud finder to mark the studs behind the wall. This is especially important for the coat hooks. Coats, backpacks, and bags can be heavier than expected, so the hook area needs solid support. If the hooks cannot line up with studs, install them into a sturdy horizontal rail that is itself secured to studs, or use appropriate wall anchors based on the wall type and hook load rating.
Step 3: Install the Horizontal Rails
Install the top rail first, making sure it is perfectly level. This rail often becomes the anchor point for hooks, so secure it well. Then install the bottom rail or work with the existing baseboard if it fits the design. Some homeowners replace thin baseboards with a taller 1×6 board to create a more finished look.
If you are adding a cap ledge above the top rail, keep it narrow enough that it does not interfere with coats hanging from the hooks. A small ledge can hold framed art, seasonal decor, or a tiny plant that will hopefully survive the foyer draft.
Step 4: Install the Vertical Battens
Cut each batten to size and dry-fit it before attaching. Walls and floors are not always perfectly square, so measure each board individually instead of assuming every cut will be identical. Use a level for every batten. A slightly crooked vertical board will be surprisingly visible once painted.
Attach battens with construction adhesive and finish nails. When possible, nail into studs. If a batten does not land on a stud, adhesive helps hold it flat against the wall. Wipe away excess adhesive before it dries.
Step 5: Fill, Sand, and Caulk
This is the step that separates “nice DIY project” from “wait, did a carpenter do this?” Fill nail holes with wood filler or spackle. Sand smooth after it dries. Then caulk the seams where boards meet the wall and where boards meet each other.
Caulk is the magic eraser of trim work. It hides tiny gaps, softens edges, and makes the entire board and batten treatment look seamless after paint. Use paintable caulk and avoid over-applying it. A neat bead is better than a frosting situation.
Step 6: Prime and Paint
Primer helps seal raw wood or MDF and creates an even surface for paint. For a foyer, choose a durable paint finish that can handle fingerprints, shoulder bags, and the occasional umbrella attack. Satin, semi-gloss, or trim enamel finishes are popular because they are easier to wipe clean than flat paint.
White board and batten is timeless, but it is not the only option. Soft greige, warm taupe, sage green, navy, charcoal, and creamy off-white can all look beautiful in an entryway. Painting the door, trim, and board and batten in the same color can create a polished, designer-style effect. Using a contrasting upper wall color can add depth.
Step 7: Install the Coat Hooks
Once the paint has fully dried, mark the hook locations. A common hook height for adults is around 60 to 66 inches from the floor, but in family homes, a lower row can help kids hang their own coats and backpacks. That tiny bit of independence can reduce the number of jackets living on the floor. No promises, but hope is important.
Install hooks into the horizontal rail, studs, or solid backing. Use screws suited to the hook design and wall structure. If each hook has a stated weight capacity, respect it. Heavy-duty hooks are best for backpacks, winter coats, and bags. Decorative hooks are lovely, but if they bend the first time someone hangs a loaded school bag on them, they become wall jewelry with trust issues.
Design Ideas for a Stylish Front Door Foyer
Board and batten with coat hooks can fit many design styles. The trick is choosing proportions, colors, and hardware that match the home.
Modern Farmhouse
Use crisp white board and batten, matte black hooks, a natural wood bench, and woven baskets. This look is simple, welcoming, and practical. It pairs well with black front door hardware and warm wood flooring.
Classic Cottage
Choose creamy paint, antique brass hooks, and a narrow picture ledge. Add a floral cushion on a nearby bench or a small vintage mirror. The result feels charming without becoming overly precious.
Transitional and Clean
Try wider batten spacing, a soft neutral paint color, and brushed nickel or aged bronze hooks. Keep accessories minimal. This style works especially well in newer homes where you want character without making the foyer feel too rustic.
Bold and Moody
Paint the board and batten a deep green, navy, or charcoal. Pair it with brass hooks and a warm wood shelf. Dark colors can make a small foyer feel intentional and dramatic, especially when balanced with good lighting and a lighter ceiling.
Practical Storage Tips for the Hook Area
Hooks are helpful, but too many can make the foyer look cluttered. Think of the hook wall as daily storage, not a permanent archive for every coat your household has owned since 2016.
Assign one hook per person, plus one guest hook if space allows. Add a small basket nearby for gloves, sunglasses, dog leashes, or keys. If shoes pile up by the door, place a low bench or boot tray underneath the board and batten. This creates a complete drop zone without requiring a full mudroom.
For families, consider double hooks. The upper hook can hold coats, while the lower hook can hold backpacks or hats. For smaller children, install one or two hooks lower on the wall. When storage is easy to reach, people are more likely to use it.
Common Mistakes to Avoid
Skipping the Layout Plan
Eyeballing board spacing rarely ends well. Even if the final design looks simple, it depends on careful measurements. Use tape, sketches, and a calculator before cutting boards.
Using Weak Hooks
Coat hooks in a foyer are not purely decorative. They need to hold real weight. Choose sturdy hooks and install them securely into studs, solid rails, or proper anchors.
Forgetting Door Swing Clearance
Check how far the front door opens. If hooks or hanging coats interfere with the door, the foyer will become annoying fast. Leave enough clearance so the door can open comfortably.
Painting Too Soon
Let caulk and filler dry fully before priming and painting. Rushing this step can lead to cracks, smudges, or uneven spots. Trim work rewards patience, even when patience is not your favorite personality trait.
Maintenance: Keeping the Entryway Looking Fresh
A board and batten foyer is designed to work hard, but it still needs a little care. Wipe hooks and painted surfaces regularly, especially during rainy or snowy seasons. Touch up paint chips as needed. Tighten hook screws if they loosen over time.
To keep the area from looking overloaded, rotate seasonal items. Store heavy winter coats elsewhere during warmer months. Keep only the everyday essentials by the front door. A beautiful entryway can become a coat mountain quickly, and coat mountains do not count as architectural features.
Cost and Time Expectations
The cost of adding board and batten with coat hooks depends on the wall size, materials, paint, and hardware. A small foyer wall can often be completed with basic trim boards, a few hooks, caulk, filler, and paint. Higher-end wood, custom hooks, and added shelving will raise the budget.
Most DIYers can complete the project over a weekend, with drying time included. The cutting and installation may happen in one day, while filling, sanding, caulking, priming, painting, and installing hooks may stretch into the next. It is not the fastest project, but the transformation is immediate and satisfying.
Experience Notes: What It Is Really Like to Add Board and Batten With Coat Hooks
After working through this kind of foyer upgrade, the biggest lesson is that the project feels simple until you meet the wall. Every wall has a personality. Some are straight and cooperative. Others have waves, dips, mystery bumps, and baseboards that seem to have been installed during an earthquake. This does not mean the project is too hard; it means you should measure often and expect small adjustments.
One useful experience is to paint a sample area before committing to the final color. Entryways receive changing light throughout the day. A white that looks clean in the morning may turn chilly at night. A dark green that looks elegant online may feel heavier in a narrow foyer. Testing paint near the front door, trim, and flooring helps prevent regret.
Another practical lesson is that hook placement deserves more attention than people give it. It is tempting to install hooks wherever they look cute, but the real question is how they will function when loaded. Hang a coat, a tote, and a backpack in your imagination before drilling. Better yet, hold actual items against the wall. This helps you avoid hooks that are too high, too low, too close together, or too close to the door casing.
For homes with kids, lower hooks are surprisingly helpful. They encourage children to hang their own items instead of dropping everything two feet from the door as if the floor submitted an application to become a closet. A lower hook row can be incorporated into the design without looking childish if the spacing and hardware match the rest of the wall.
Caulking is another area where experience matters. At first, it may feel like an unnecessary finishing step. Then you paint the wall and realize caulk is basically the fairy godmother of DIY trim. It hides the tiny shadows between boards and drywall and makes the whole installation look intentional. The key is to use a small bead, smooth it carefully, and remove excess before it dries.
One of the best design decisions is choosing hooks that match the lifestyle of the household. If the foyer is mostly for guests, decorative hooks are fine. If it will hold school bags, laptop totes, winter coats, and reusable grocery bags, choose heavy-duty hooks with a strong mounting method. Pretty hardware is nice. Pretty hardware that stays attached to the wall is better.
Living with a board and batten hook wall also teaches you that storage must be edited. The project creates a convenient drop zone, but convenience can attract clutter. A good rule is to keep only current-season items on the hooks. If the wall starts holding rain jackets, beach bags, snow pants, Halloween costumes, and three hats nobody wears, it is time for a reset.
The payoff is huge. The foyer feels more finished, more useful, and more welcoming. Guests instantly understand where to hang a coat. Family members have fewer excuses for dumping bags on the floor. The wall gains texture and charm. Best of all, the front door area starts to feel like a designed space rather than a hallway that accidentally got a job in storage.
Conclusion
Adding board and batten with coat hooks to the foyer by the front door is a practical upgrade with a lot of visual reward. It turns a plain wall into a hardworking entryway feature, adds architectural character, and creates a convenient place for coats, bags, hats, and everyday essentials.
The best results come from careful planning: measure the wall, choose balanced batten spacing, secure hooks properly, and use durable paint. Whether your style is modern farmhouse, classic cottage, transitional, or bold and moody, this project can be customized to fit your home.
In the end, a board and batten foyer does more than look good. It makes daily life smoother. It gives clutter a place to land. It welcomes guests with charm. And it politely tells your family, “The floor is not a coat hook.” That alone may be worth the entire project.