Note: This guide focuses on Microsoft Word desktop versions such as Word for Microsoft 365, Word 2024, Word 2021, Word 2019, and Word 2016. The exact ribbon labels may look slightly different depending on your screen size, Word version, or whether you are using Windows, Mac, or Word for the web.
Tables in Microsoft Word are wonderful until they are not. One minute, your document looks like a polished report. The next, your table has grown into a giant spreadsheet-shaped octopus crawling across three pages, swallowing your headings, and making your formatting look like it gave up and moved to another state.
The good news: learning how to split a table in Microsoft Word is quick, simple, and far less dramatic than Word sometimes makes it seem. Whether you want to separate one long table into two smaller sections, insert text between table parts, move part of a table to another page, or organize data under different headings, the Split Table feature is built exactly for that job.
In this in-depth guide, you will learn the fastest way to split a table in Word, when to use the ribbon command, how the keyboard shortcut works, how to split cells instead of whole tables, and how to fix common formatting problems after the split. Let’s rescue your document from table chaos.
What Does “Split a Table” Mean in Microsoft Word?
To split a table in Microsoft Word means to divide one table into two separate tables. The row where your cursor is placed becomes the first row of the new lower table. Everything above that row remains in the original table.
For example, imagine you have a table with ten rows. If you click inside row six and choose Split Table, Word separates the table between rows five and six. Rows one through five stay in the first table, and rows six through ten become a second table. Word also inserts a blank paragraph between them, giving you space to type a heading, note, explanation, or page break.
This is different from splitting cells. Splitting a table divides the entire table into two table blocks. Splitting cells divides selected cells into more rows or columns inside the same table. Same family, different cousins.
Why You Might Need to Split a Table in Word
Splitting a table is useful whenever a table becomes too long, too crowded, or too hard to read as one continuous block. A long table can be technically correct but visually exhausting. Nobody opens a Word document hoping to be greeted by a 47-row wall of tiny boxes.
Common reasons to split a Word table
- You want to add a heading between two parts of a table.
- You need to move the second part of a table to a new page.
- You want to separate old data from new data.
- You are creating different sections in a report, proposal, manual, invoice, or academic document.
- You want to improve readability without rebuilding the table from scratch.
- You need to insert explanatory text, bullet points, or images between table sections.
The feature is especially helpful in business reports, school assignments, technical documentation, meeting minutes, project plans, and forms. Instead of copying rows, deleting half the table, pasting content elsewhere, and hoping nothing explodes, you can split the table cleanly in a few clicks.
How to Split a Table in Microsoft Word: Quick Steps
Here is the fastest method for splitting a table in Microsoft Word using the ribbon.
Step 1: Click inside the row where the new table should begin
Place your cursor in any cell of the row that you want to become the first row of the second table. This is the most important step. Word does not split above the row you selected by accident; it splits exactly based on where your cursor is sitting.
For example, if you want rows one through four to stay in the first table and rows five through eight to become a new table, click inside row five.
Step 2: Open the Table Layout tab
After clicking inside the table, Word displays table-specific tabs on the ribbon. Look for Table Layout. In older layouts, you may see Table Tools with a Layout tab underneath it.
If you do not see Table Layout, click inside the table again. Word only shows those table tools when it knows you are working with a table. Word is helpful, but only after you tap it on the shoulder.
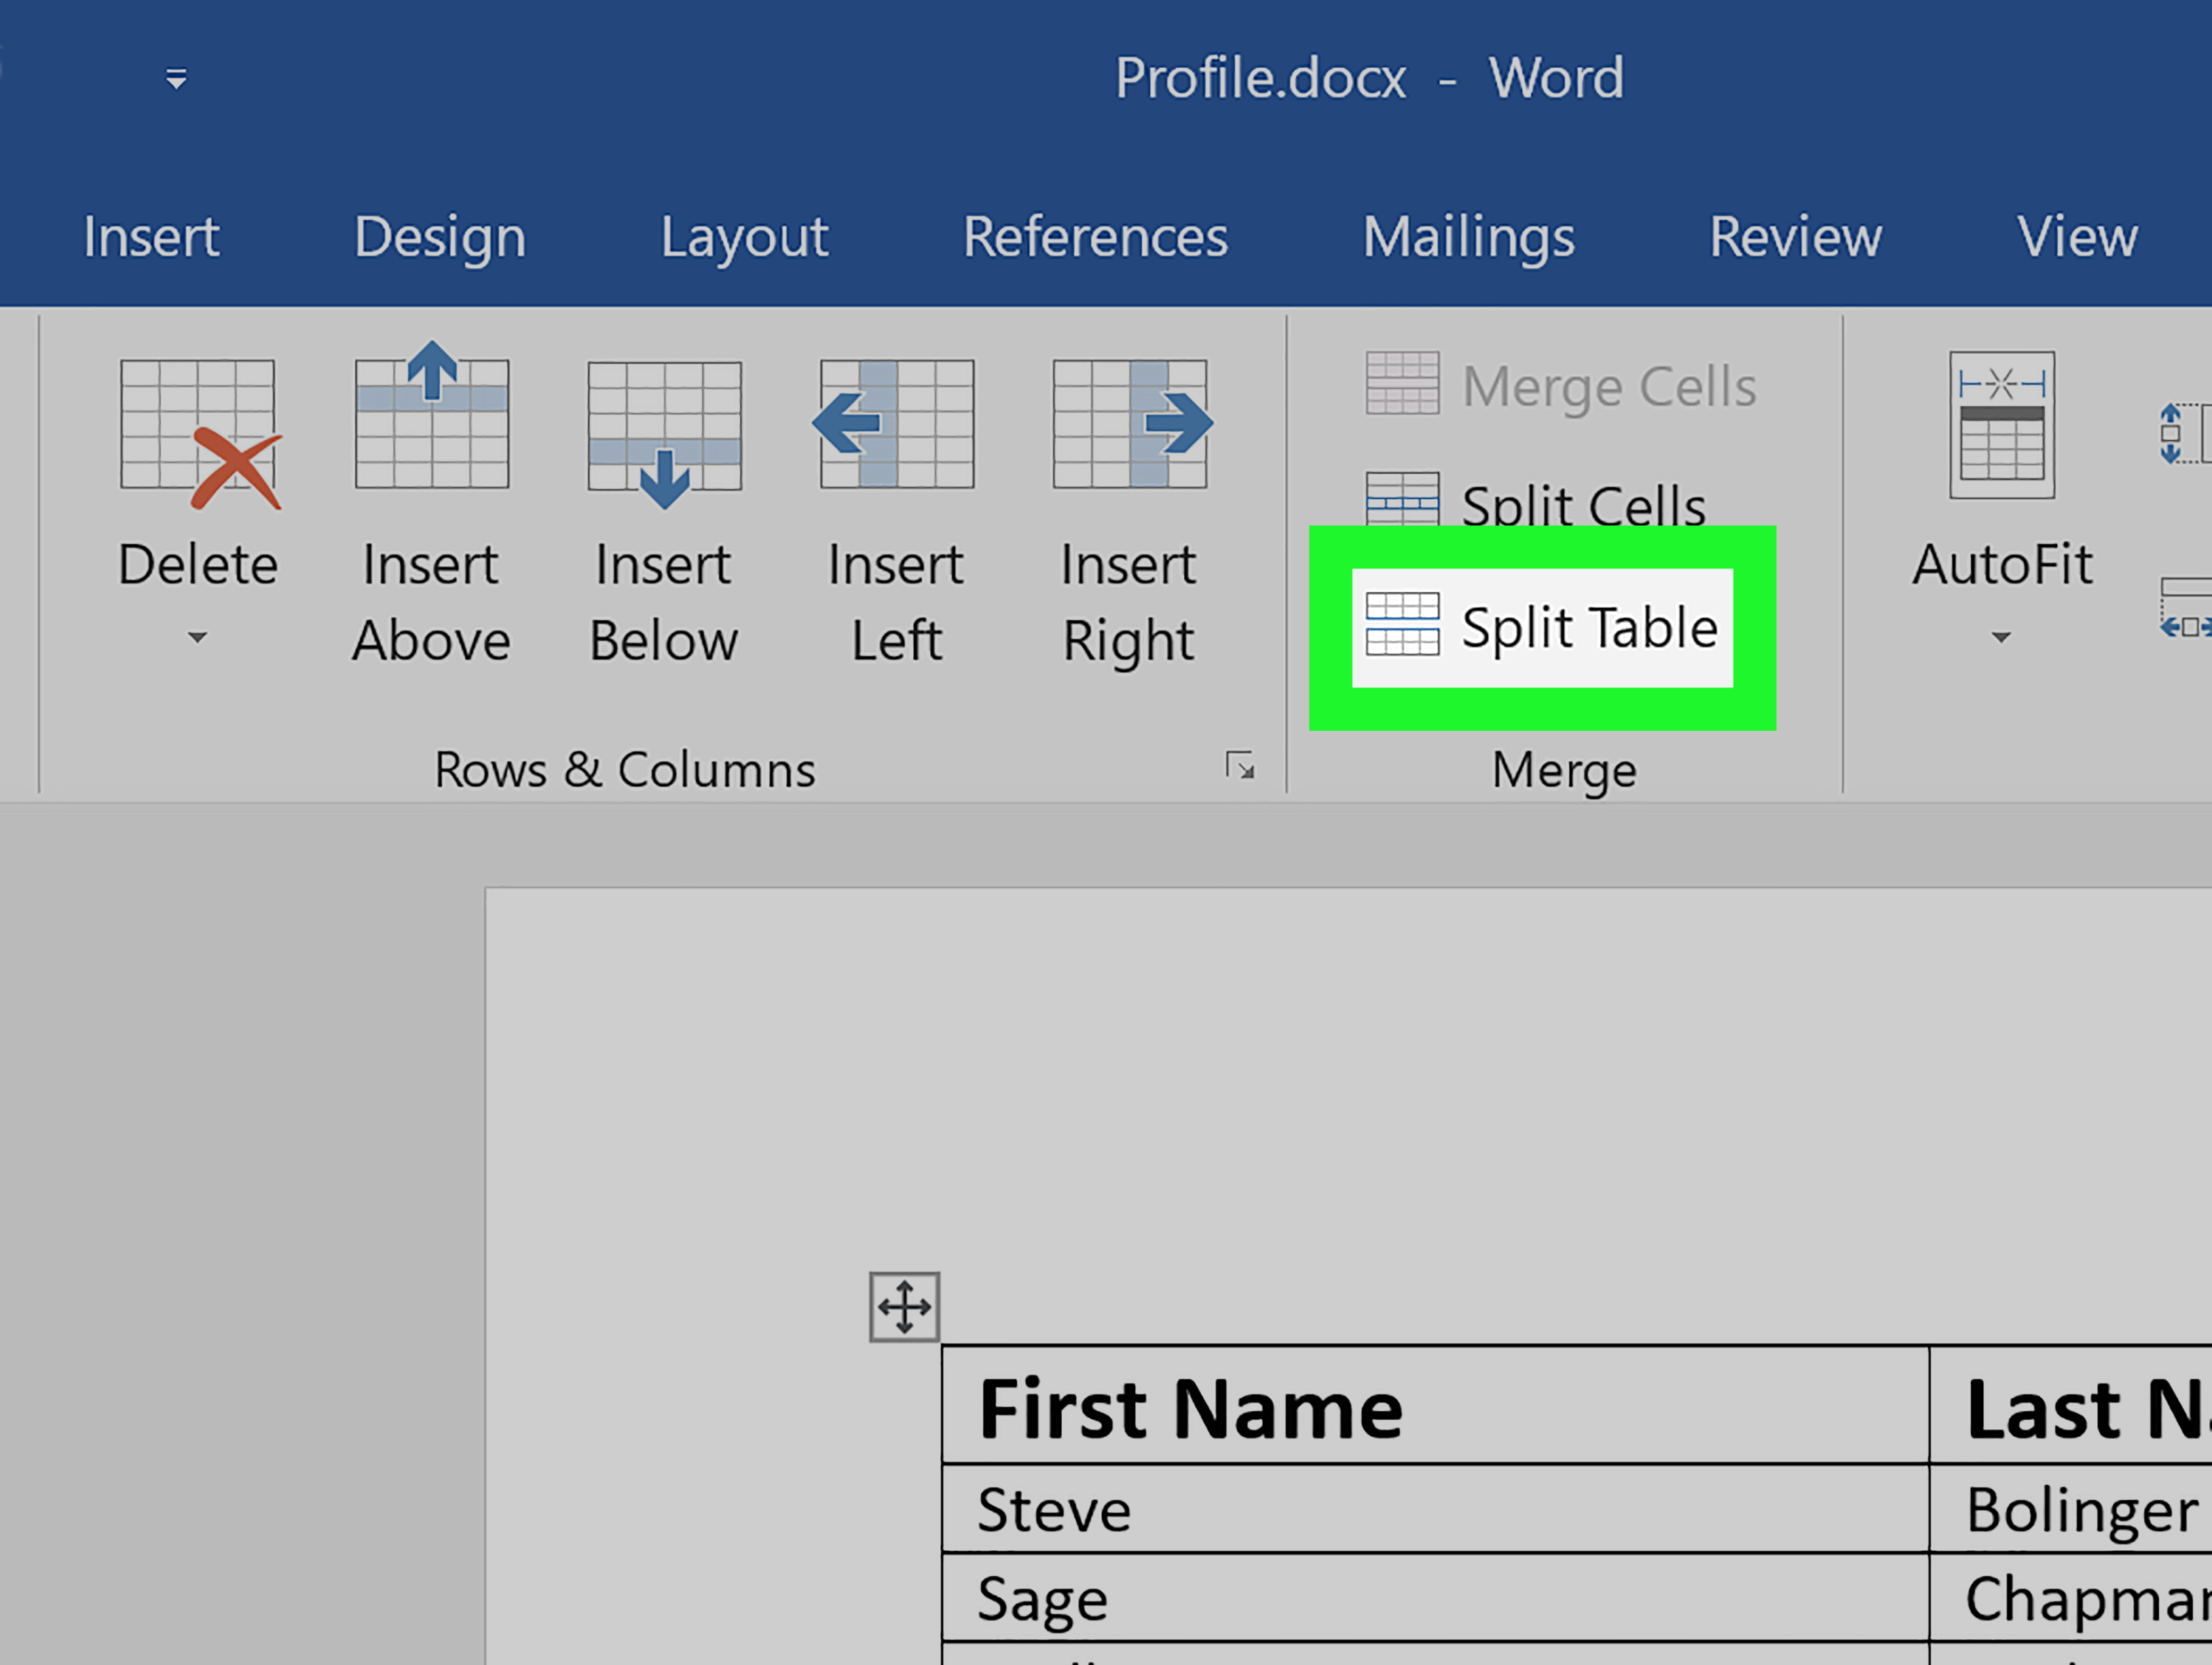
Step 3: Choose Split Table
On the Table Layout tab, find the Merge group, then select Split Table. Word immediately divides the table into two separate tables and inserts a paragraph mark between them.
Step 4: Add text, spacing, or formatting between the tables
Once the table is split, you can type a heading, add a paragraph, insert a page break, or adjust spacing between the two tables. This is where splitting becomes powerful. Instead of fighting one oversized table, you now have two manageable table sections.
How to Split a Table with a Keyboard Shortcut
In many desktop versions of Microsoft Word, you can split a table by placing your cursor in the row where the new table should begin and pressing Ctrl + Shift + Enter.
This shortcut can be a major time-saver if you edit tables often. However, keyboard behavior can vary depending on your Word version, keyboard layout, operating system, or context. If the shortcut does not work as expected, use the ribbon method: Table Layout > Split Table. The ribbon command is the most reliable path because it clearly tells Word what you want.
A practical workflow is simple: use the keyboard shortcut when you are moving fast, and use the ribbon command when accuracy matters or when you are helping someone else follow along.
Example: Splitting a Project Schedule Table
Let’s say you have a project schedule table with these rows:
- Planning
- Research
- Design
- Development
- Testing
- Launch
- Post-launch review
You decide that the first three rows belong under a heading called “Preparation Phase,” while the remaining rows should appear under “Execution Phase.” Instead of creating a new table manually, you can click inside the Development row, choose Table Layout > Split Table, and Word will separate the table at that point.
Then you can type Execution Phase between the two tables. The result is cleaner, more organized, and much easier for readers to scan.
How to Split a Table Across Pages
Sometimes you do not just want a visual split; you want the second table to start on a new page. The easiest way is to split the table first, then insert a page break between the two tables.
Steps to split a table and move the second part to a new page
- Click inside the row that should start the second table.
- Go to Table Layout > Split Table.
- Click in the blank paragraph between the two tables.
- Press Ctrl + Enter to insert a page break.
This method gives you better control than trying to force a long table to behave with repeated pressing of the Enter key. Pressing Enter over and over is not formatting; it is digital begging. Use a page break instead.
Split Table vs. Split Cells: Do Not Mix Them Up
One of the most common mistakes in Microsoft Word table editing is confusing Split Table with Split Cells. The names sound similar, but the results are very different.
Split Table
Split Table separates one table into two separate tables. Use it when you want to divide table sections, add content between table parts, or move part of a table elsewhere in the document.
Split Cells
Split Cells divides a selected cell into multiple rows or columns. Use it when you need a more complex layout inside the same table, such as turning one wide cell into two smaller cells.
Here is a quick rule: if you want two separate table blocks, use Split Table. If you want more little boxes inside the same table, use Split Cells.
How to Split Cells in a Word Table
If your goal is to divide a cell rather than the entire table, follow these steps:
- Select the cell or cells you want to divide.
- Go to Table Layout.
- Select Split Cells.
- Choose the number of columns and rows you want.
- Select OK.
This is useful for creating custom headers, multi-column labels, form fields, or special table structures. Just remember that complex table designs can become harder to edit later, so use split cells thoughtfully. Word tables are powerful, but they are not always patient.
What Happens to Formatting After You Split a Table?
When you split a table in Microsoft Word, most formatting usually stays intact. Borders, shading, fonts, alignment, and table styles often carry over because Word is dividing the table rather than rebuilding it. However, some layout details may need attention.
Spacing may appear between tables
Word inserts a paragraph mark between the two tables. That paragraph creates space. If the gap looks too large, click in the blank line and adjust paragraph spacing from the Home tab. You can also turn on formatting marks by selecting the paragraph symbol so you can see what is causing the space.
Header rows may need to be repeated again
If your original table had header rows that repeated across pages, check the new table after splitting. You may need to select the header row in the second table and enable Repeat Header Rows again from the Table Layout tab.
Table widths may need adjustment
Sometimes the two tables look slightly different after editing. If that happens, select each table and check the width, alignment, and AutoFit settings. For a polished document, both tables should usually share the same width and alignment unless you intentionally want them different.
How to Merge Split Tables Back Together
Changed your mind? No problem. You can usually merge two split tables by deleting the paragraph mark between them.
- Click at the beginning of the paragraph between the two tables.
- Press Backspace, or click at the end of the first table and press Delete.
- Repeat carefully until the two tables join again.
If the tables do not merge immediately, check for extra paragraph marks, page breaks, section breaks, or text between them. Turning on formatting marks can make the hidden structure visible. Word often hides the tiny things causing the biggest headaches, because apparently every document needs a mystery subplot.
Troubleshooting: Split Table Is Missing or Not Working
If you cannot find the Split Table command, do not panic. It is usually one of a few simple issues.
You are not clicked inside a table
The Table Layout tab only appears when your cursor is inside a table. Click inside any cell and look again.
You are looking at the wrong Layout tab
Microsoft Word may show more than one tab named Layout. The general Layout tab controls page setup. The table-specific Table Layout tab controls table features. You want the table one.
You are using Word for the web or a limited version
Some features may be limited or arranged differently in browser and mobile versions of Word. If you cannot find Split Table, open the document in the desktop version of Microsoft Word for the most complete table tools.
Your cursor is in the first row
If your cursor is in the first row, there is nothing above it to separate into a first table. Choose a lower row where the second table should begin.
Best Practices for Splitting Tables Cleanly
A split table should make your document easier to read, not create a formatting circus. Use these best practices for cleaner results.
Split at a logical section break
Do not split randomly in the middle of related data. Choose a row where the topic, date range, category, or phase changes. Readers should understand why the table was divided.
Add a clear heading between tables
A heading helps readers know what changed. For example, use headings like “Quarter 1 Results,” “Phase Two Tasks,” or “Approved Expenses.” A split without a label can feel like the table tripped over itself.
Keep formatting consistent
After splitting, compare both tables. Check borders, fonts, column widths, and alignment. Consistency makes your document look intentional rather than patched together during a caffeine emergency.
Use page breaks instead of blank lines
If the second table should begin on a new page, insert a page break. Do not press Enter fifteen times. Extra blank paragraphs can shift unpredictably when you edit the document later.
Repeat headers for long tables
If the second table spans multiple pages, repeat the header row so readers do not have to scroll backward to remember what each column means. This is especially important in reports, contracts, manuals, and academic documents.
SEO-Friendly Quick Summary
To split a table in Microsoft Word, click inside the row that should become the first row of the new table. Then go to Table Layout > Split Table. Word will separate the original table into two tables and place a blank paragraph between them. You can then add headings, text, page breaks, or formatting between the two parts.
The main thing to remember is that the selected row becomes the start of the new table. If the split happens in the wrong place, undo it with Ctrl + Z, click the correct row, and try again. No shame. Even experienced Word users occasionally click one row too high and briefly question their life choices.
Real-World Experience: What Splitting Tables Teaches You About Word
After working with Microsoft Word tables in real documents, one lesson becomes clear: tables are not just containers for data; they are tiny layout machines. When they are short and simple, they behave beautifully. When they become long, nested, heavily formatted, or copied from another file, they can start acting like they have a personal grudge against productivity.
The most useful experience with splitting tables is learning to split before the document becomes messy. Many users wait until a table is already overflowing across pages, headings are floating in odd places, and half the content is squeezed into rows that look like they are gasping for air. At that point, splitting still helps, but cleanup takes longer. A smarter habit is to scan the table early and ask: “Would this be easier to read in sections?” If the answer is yes, split it before the layout turns into a puzzle.
Another practical lesson is that the row you choose matters more than the button you click. The Split Table command is simple, but the decision point is editorial. For example, in a budget table, it makes sense to split between departments, quarters, or expense categories. In a project timeline, it makes sense to split between planning, execution, and review. In a training manual, it makes sense to split between beginner steps and advanced steps. A good split tells the reader, “We are moving to a new idea now.” A bad split says, “Something happened here, and no one knows why.”
Real documents also teach you to respect hidden formatting marks. When two tables refuse to merge, when spacing looks too large, or when a page break appears out of nowhere, the problem is often a paragraph mark, page break, or spacing setting hiding between table sections. Turning on formatting marks is like turning on the lights in a messy room. You may not love what you see, but at least you can finally fix it.
One common workplace scenario involves reports with long tables and repeated headers. Splitting the table makes the report easier to navigate, but it can also require reapplying header rows to the second table. That small step makes a big difference. A table that continues for two pages without headers forces readers to guess what each column means. That is not a reading experience; that is a memory test wearing a business suit.
Another experience-based tip: use headings between split tables generously. A simple heading can make a document feel organized instantly. For example, instead of one long table called “Marketing Tasks,” split it into “Completed Tasks,” “In Progress,” and “Upcoming Tasks.” The data is the same, but the reader’s brain relaxes because the structure is clearer.
Finally, splitting tables teaches a bigger Word lesson: do not fight the software with manual spacing when there is a proper command available. Use Split Table for structure. Use page breaks for new pages. Use Repeat Header Rows for long tables. Use paragraph spacing for controlled gaps. When you use the right tools, Word becomes less of a formatting jungle and more of a document editor that occasionally behaves like a responsible adult.
Conclusion
Splitting a table in Microsoft Word is one of those small skills that saves a surprising amount of time. The process is simple: click in the row where the new table should begin, open Table Layout, and select Split Table. From there, you can add headings, insert page breaks, separate sections, and make your document easier to read.
The real advantage is control. Instead of letting one oversized table dominate your document, you can divide it into clean, logical sections. You can separate phases, categories, dates, or topics. You can also avoid messy manual workarounds that create more formatting problems later.
Once you understand the difference between splitting a table and splitting cells, the feature becomes even more useful. Use Split Table when you want two separate tables. Use Split Cells when you want to divide a cell into smaller parts. Keep formatting consistent, repeat headers when needed, and use page breaks instead of endless blank lines.
In short, Microsoft Word tables do not have to be scary. They just need structure, patience, and the occasional firm click on the right ribbon button.