Walls collect evidence. Every picture frame, floating shelf, curtain bracket, and “temporary” wall hook leaves behind a tiny reminder of your decorating decisions. When those decorations move, the holes remain, staring at you like miniature accusations.
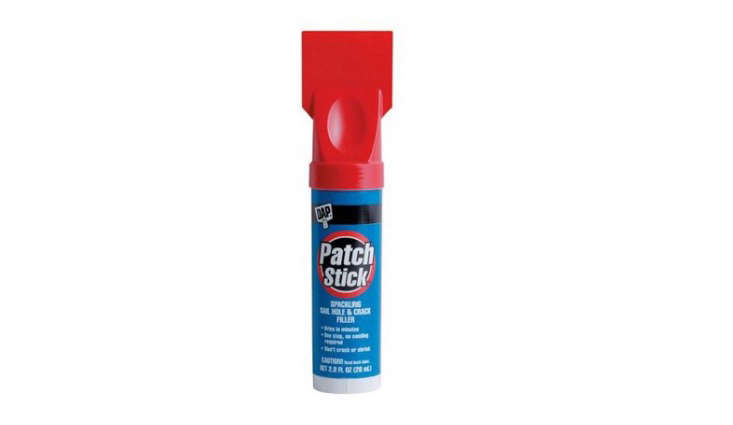
DAP Patch Stick Spackling Nail Hole and Crack Filler was created for exactly this kind of cosmetic damage. Instead of opening a large tub of spackling compound, finding a putty knife, and wondering whether the dried lump inside the container is still technically usable, you twist up a small amount of filler, press it into the damaged area, and smooth it with the finishing tool built into the cap.
The product is compact, ready to use, and intended primarily for nail holes, shallow dents, and minor cracks. It can make small wall repairs faster and less messy, but it is not a magic wand for every drywall problem. Understanding where it worksand where it absolutely does notwill help you get a smooth repair instead of a suspicious white bump that becomes even more obvious after painting.
What Is DAP Patch Stick?
DAP Patch Stick is a lightweight spackling compound packaged in a twist-up applicator resembling an oversized glue stick. Older retail listings commonly identify the product as a 2.8-ounce Patch Stick Nail Hole and Crack Filler, including model 12316. Related versions have also appeared under DAP’s Patch-N-Paint branding, so packaging, model numbers, and exact label wording may vary.
The classic Patch Stick design contains white or off-white filler and includes a small finishing tool in the cap. Manufacturer documentation describes it as a quick repair product for nail holes, small dents, and minor cosmetic cracks in walls, ceilings, and woodwork. It dries quickly, is formulated to resist shrinking and cracking, and generally requires little or no sanding when applied neatly.
The twist-up package is the product’s biggest selling point. You expose only a small amount of compound at a time, reducing the mess associated with a tub of spackle. The container is easy to store in a toolbox, paint-supply drawer, apartment maintenance kit, or the mysterious kitchen cabinet where spare screws, batteries, and three unidentified Allen wrenches live together.
What Makes the Patch Stick Different?
A Compact All-in-One Format
Traditional spackling paste usually comes in a tub or squeeze tube and requires a separate putty knife. DAP Patch Stick combines the filler and finishing tool in one small package. That matters when you have only six nail holes to repair and do not want to prepare for the project as though you are renovating an airport terminal.
Controlled Application
Twisting up approximately 1/16 inch of material gives you a manageable amount of filler. You can apply it directly to the damaged area or transfer some compound to the cap tool first. Because the exposed surface is small, it is easier to avoid spreading spackle over half the wall.
Quick Paint Preparation
Product literature has described the filler as drying in minutes and being paint-ready quickly with latex paint. However, deeper repairs, high humidity, cool temperatures, and oil-based coatings may require more drying time. Some technical guidance lists approximately three hours for thorough drying, depending on the depth of the repair and surrounding conditions. Follow the directions printed on your specific package rather than treating “dries in minutes” as permission to attack the wall immediately with a loaded paint roller.
Best Uses for DAP Patch Stick Spackling
The Patch Stick performs best when the repair is small, shallow, stable, and cosmetic. In other words, it is designed for annoying little blemishesnot walls attempting to leave the building.
Nail and Picture-Hanger Holes
Small holes left by picture nails are the ideal application. The compound can be pressed into the opening, smoothed flush, and painted after it has dried. This makes the product especially useful when rearranging wall art, preparing a rental for inspection, or removing decorations before repainting a room.
Small Screw Holes
It can also fill small screw holes after the screw and anchor have been removed. If removing an anchor tears away a larger section of drywall paper, the area may need a stronger patching compound or more than one coat.
Minor Dents and Surface Dings
Furniture corners, vacuum cleaner handles, door hardware, and everyday household activity can create shallow dents. A thin application of lightweight spackling can level these imperfections before painting.
Fine, Stable Cracks
Very small cosmetic cracks that are no longer moving may be candidates for Patch Stick filler. Clean out loose material before filling them. If a crack repeatedly returns, grows, appears around doors or windows, or runs diagonally across a wall, investigate the underlying cause instead of repeatedly feeding it spackle.
Ceiling Nail Holes
The lightweight formula is convenient for minor ceiling repairs because it is less likely to sag than a heavy, wet application of general-purpose joint compound. Working overhead is still awkward, of course. Gravity has never respected a DIY schedule.
Small Imperfections in Paint-Grade Woodwork
Manufacturer guidance has included minor defects in woodwork among the suggested uses. It may be suitable for small nail holes in painted trim or molding. For stained wood, deep gouges, exterior wood movement, or repairs that must accept stain, a dedicated wood filler is usually the better choice.
When You Should Not Use a Patch Stick
Lightweight spackling has limits. DAP’s own repair guidance reserves lightweight products for smaller nail holes and dents, while larger or deeper damage may require heavyweight spackling, a mesh patch, joint tape, joint compound, or replacement drywall. Home-repair specialists likewise recommend reinforced methods when a hole is too large to support filler on its own.
Large or Deep Drywall Holes
If you can insert multiple fingers into the opening, step away from the Patch Stick. Larger holes normally need backing material, a drywall patch, mesh reinforcement, or a new piece of drywall. Packing an unsupported cavity with lightweight filler may look promising while wet and then shrink, crack, crumble, or fall into the wall.
Failed Drywall Seams
Long cracks following a drywall joint often indicate loose tape, movement, or improper finishing. These repairs usually require removing damaged material, retaping the seam, and applying joint compound in wider feathered coats.
Recurring Structural Cracks
A crack that returns after repair is delivering information. Possible causes include settling, framing movement, foundation problems, seasonal expansion, or moisture. Cosmetic filler may hide it temporarily, but it cannot stabilize a moving structure.
Wet or Water-Damaged Surfaces
Do not seal over damp drywall, active leaks, swollen wallboard, mold, or bubbling paint. Identify and correct the moisture source first. Damaged drywall may need to be removed rather than patched.
High-Heat Areas
Standard lightweight spackling is not a specialized high-temperature repair material. Avoid using it where the surface will be exposed to intense heat, such as directly adjacent to certain fireplaces, stoves, heating equipment, or hot pipes unless the package specifically approves that application.
Flexible Gaps Between Different Materials
Cracks where trim meets drywall or where two materials expand at different rates are often better filled with paintable acrylic latex caulk. Spackle becomes rigid after drying, while caulk is designed to accommodate limited movement.
How to Apply DAP Patch Stick Correctly
Step 1: Inspect the Damage
Determine whether you are looking at a simple nail hole or evidence of a bigger problem. Check for moisture, loose drywall paper, crumbling plaster, recurring movement, exposed fasteners, or cracks extending well beyond the visible blemish.
Step 2: Prepare the Surface
The surface should be clean, dry, and free from dust, wax, dirt, loose paint, and crumbling plaster. Scrape away unstable material carefully. If drywall paper fibers are sticking outward, press or trim them so they do not create a bump beneath the filler.
Proper preparation is not glamorous, but it determines whether the repair bonds to the wall or merely rests on top of a layer of household dust. Manufacturer and professional painting guidance consistently emphasize patching only clean, sound, dry surfaces.
Step 3: Twist Up a Small Amount
Remove the cap and twist the bottom until only a small amount of filler is exposedroughly 1/16 inch according to classic product instructions. Exposing too much increases the chance of breaking, smearing, or drying the material unnecessarily.
Step 4: Press Filler Into the Hole
Move the stick across the damaged area while applying gentle pressure. The goal is to force filler into the opening rather than merely frosting the wall around it. For a narrow crack, work across the crack from more than one direction to improve contact with the edges.
Step 5: Smooth the Repair
Use the finishing tool in the cap to remove excess compound. Hold it at a slight angle and make a clean pass across the patch. A second pass from another direction can help level the surface.
Try to leave the repair flush with the surrounding wall. A tiny amount of excess is manageable, but a thick mound creates more work and may remain visible beneath paint.
Step 6: Let It Dry
Drying time depends on temperature, humidity, airflow, repair depth, and the amount applied. A tiny nail hole may firm up quickly, while a deeper defect can remain soft beneath the surface. Do not judge dryness only by touching the outer skin.
Step 7: Inspect Under Side Lighting
Shine a flashlight across the wall rather than directly at it. Side lighting reveals raised edges, depressions, ridges, and tool marks that normal room lighting can hide. Apply another thin coat if the hole remains visible.
Step 8: Sand Only If Necessary
One advantage of Patch Stick is that careful application may eliminate sanding. When a ridge remains, use fine-grit sandpaper or a fine sanding sponge with very light pressure. Aggressive sanding can damage the paint around the repair and turn a pinhole project into a dinner-plate-sized touch-up.
Step 9: Prime and Paint
Although some lightweight formulas are promoted as patch-and-prime products, spot priming may still improve uniformityespecially under glossy paint, strong lighting, dark colors, or porous surrounding surfaces. Use the original wall paint when possible and feather the touch-up beyond the patch.
Tips for Making the Repair Disappear
Use Less Filler Than You Think
Most unattractive patches are not underfilled; they are surrounded by too much material. Start with a small amount and add more only when necessary. Bob Vila’s nail-hole guidance similarly notes that streaks around the repair often mean too much spackling was used.
Keep the Finishing Tool Clean
Dried crumbs on the tool can drag through fresh filler and leave grooves. Wipe the edge between passes so it remains smooth.
Match the Existing Texture
A perfectly smooth patch may still stand out on an orange-peel, knockdown, or heavily rolled wall. For textured surfaces, reproduce the surrounding texture before painting. Tiny repairs may be blended with careful stippling, while larger textured areas may require a matching aerosol texture or professional technique.
Consider Paint Sheen
Flat paint hides minor imperfections better than satin, semi-gloss, or gloss. Shiny coatings reflect light across every ridge and depression. A repair that looks invisible before painting can suddenly announce itself once a glossy topcoat arrives.
Use the Same Paint Batch When Possible
Even when the color name matches, aging, sunlight, cleaning, and manufacturing variation can make fresh paint look different. Touch-ups are easiest with leftover paint from the original project. Stir it thoroughly before use.
Do Not Rush a Deep Repair
For a hole deeper than a simple nail puncture, several thin applications usually perform better than one thick plug. Let each layer dry before adding the next. Thin coats reduce internal moisture and make the final surface easier to control.
DAP Patch Stick vs. Other Repair Materials
Patch Stick vs. Tub Spackle
Patch Stick is more convenient for a handful of small holes. A tub offers better value and flexibility when repairing dozens of holes, wider dents, or several rooms. Tub spackle is also easier to load onto full-size putty knives for wider feathering.
Patch Stick vs. Joint Compound
Joint compound is designed for drywall seams, tape, broad repairs, and multi-coat finishing. It spreads easily over a large area but generally requires more drying, sanding, and skill. Spackle is thicker and better suited to quick cosmetic repairs. Industry guidance generally reserves spackle for nail holes and small cracks, with joint compound and reinforcement used for larger damage.
Patch Stick vs. Caulk
Use Patch Stick on rigid surface defects such as small holes and dents. Use paintable caulk in narrow joints where limited flexibility is helpful, including certain gaps around trim. Caulk is difficult to sand and should not be treated as a universal wall filler.
Patch Stick vs. Wood Filler
Paint-grade molding may accept lightweight spackle for tiny nail holes. Unfinished or stained wood usually needs a wood filler that can be sanded, shaped, and colored to match the grain.
Safety and Cleanup
Small repairs produce limited mess, particularly when no sanding is required. Even so, protect the floor beneath the work area and avoid breathing dust if scraping or sanding becomes necessary. Safety glasses can prevent debris from falling into your eyes during ceiling repairs.
Homes built before 1978 may contain lead-based paint. Sanding, scraping, or disturbing those painted surfaces can release hazardous lead dust. The U.S. Environmental Protection Agency recommends determining whether lead paint is present and using lead-safe work practices or a certified contractor where appropriate. NIOSH also warns that repeated drywall-sanding dust exposure can irritate the respiratory system.
Close the container immediately after use and store it according to the label. Protect water-based filler from extreme temperatures that may damage its consistency. Keep the product away from children and pets, and consult the package or applicable safety data sheet for complete handling information.
Advantages and Limitations
Advantages
- Compact and easy to store
- Ready to use without mixing
- Built-in finishing tool
- Good control on tiny repairs
- Minimal cleanup
- Fast drying for shallow applications
- Often requires little or no sanding
- Useful for renters, homeowners, and quick paint preparation
Limitations
- Not economical for large projects
- Not intended for large or unsupported holes
- Cannot correct structural movement or water damage
- May require additional coats in deeper defects
- Smooth filler may not automatically match textured walls
- Touch-up paint may remain visible if the existing coating has faded
- Availability and branding may vary by retailer
Frequently Asked Questions
Does DAP Patch Stick Need Sanding?
It is designed to minimize or eliminate sanding on small repairs. If you remove excess filler before it dries, the patch may need only a light touch with fine-grit sandpaperor none at all.
Can You Paint Over It Immediately?
Some product instructions allow quick application of latex paint, but drying conditions vary. Waiting until the filler is firm throughout produces a safer result. Oil-based paint generally requires the patch to dry thoroughly.
Can It Repair Drywall Anchor Holes?
It may repair small anchor holes after the anchor is removed cleanly. A torn or enlarged opening may need multiple coats, a stronger compound, or a reinforced patch.
Can It Be Used on Plaster?
It can handle small cosmetic imperfections on sound plaster. Loose, crumbling, bulging, or extensively cracked plaster requires a more substantial repair.
Will the Patch Be Visible After Painting?
The filler itself can be made smooth, but visibility also depends on wall texture, paint color, sheen, application method, and the age of the surrounding coating. Spot priming and careful feathering help prevent flashing.
Is It Suitable for Exterior Repairs?
Product generations and labels have differed. Some related Patch-N-Paint documentation describes interior and exterior use, while older Patch Stick information focuses on interior surfaces. Follow the exact directions on the package in your possession.
A Practical Experience With DAP Patch Stick
A realistic test for this product is not a dramatic drywall disaster. It is an ordinary bedroom wall after the removal of several framed photographs, a lightweight shelf, and one plastic anchor that refuses to leave peacefully.
The first impression is convenience. There is no tub to stir and no full-size putty knife to locate. After removing the cap, the filler twists upward like a glue stick. That familiar motion makes the product feel approachable, even for someone whose previous home-repair strategy involved moving a plant in front of the damage.
On clean nail holes, application is extremely fast. A short pass pushes material across each opening, and the cap tool removes the excess. The best results come from resisting the urge to keep adding filler. One or two controlled passes leave less material around the hole and reduce the risk of creating a raised halo.
The smallest holes practically disappear before painting. When the filler is applied flush, the repair may not need sanding. Under normal room lighting, the wall can look finished almost immediately. A flashlight held sideways, however, may reveal a faint edge. One gentle pass with a fine sanding sponge usually handles it.
The damaged anchor hole is more demanding. Pulling out the anchor leaves torn paper and a shallow crater larger than the original opening. Applying the Patch Stick directly over the fuzzy paper creates an uneven surface, demonstrating why preparation matters. Trimming loose fibers and pressing the edges inward produces a cleaner base.
That larger defect also shows the weakness of trying to complete everything in one thick application. The surface may appear dry while the center remains soft. A better approach is to fill most of the cavity, let it dry, and apply a second thin finishing coat. The process takes longer but gives the repair a flatter, more stable surface.
A narrow cosmetic crack behaves differently. The filler enters the opening easily, but smoothing directly along the crack tends to pull material back out. Working across the crack first and then making a light finishing pass along its length provides better coverage. If the crack reappears later, that is a signal to investigate movement rather than apply the Patch Stick for the ninth time and hope the wall becomes embarrassed.
Painting reveals another practical lesson: repairing the hole and matching the finish are separate jobs. On a flat white wall, a careful touch-up blends reasonably well. On a satin wall exposed to daylight, the fresh paint may flash because its sheen and cleanliness differ from the older surrounding coating. Extending the paint slightly beyond the patch with a small roller can blend the texture better than dabbing it with a brush.
The built-in tool works well for tiny spots, although it is not a replacement for a flexible putty knife on wider dents. The small edge offers excellent control but cannot feather material across several inches as smoothly as a larger blade.
Cleanup is nearly nonexistent. Excess filler can be wiped from the cap tool before the container is closed. Compared with washing a putty knife and cleaning the rim of a spackle tub, the Patch Stick feels pleasantly civilized.
The overall experience is strongest when expectations remain realistic. For nail holes and shallow cosmetic damage, the product is quick, tidy, and beginner-friendly. For torn drywall, deep anchor holes, moving cracks, or broad repairs, it starts to feel undersized. That is not a failure of the product; it is simply the difference between using a pocket tool and bringing the entire toolbox.
Conclusion
DAP Patch Stick Spackling Nail Hole and Crack Filler is a practical solution for the small wall defects that appear after pictures, hooks, nails, and lightweight hardware are removed. Its twist-up design and built-in finishing tool simplify application, limit mess, and make it especially convenient for quick touch-ups.
The product performs best on clean, dry, stable, and shallow damage. It should not be used as a substitute for mesh patches, drywall tape, joint compound, moisture repairs, or structural investigation. Apply a small amount, remove the excess, allow sufficient drying time, and inspect the patch under side lighting before painting.
Used within those limits, the Patch Stick can turn a wall full of tiny holes into a paint-ready surface without opening a large container of spackle. Your walls may still remember every decorating decision you have made, but at least they will stop displaying the evidence.
Note: Product branding, availability, specifications, and application directions may change. Always follow the instructions and safety information printed on the specific DAP package you are using.