Just when you thought winter was finally packing its bags, your lawn delivers one last surprise: weird, crusty, matted patches that look like your grass lost a fight with a wet blanket. Congratulations, you may be dealing with snow mold. The name sounds dramatic, but the problem is extremely common in cool-season lawns after a long winter, especially where snow sat on unfrozen ground, leaves piled up, or shady, damp areas stayed soggy for too long.
The good news? Snow mold usually looks worse than it is. In many cases, the grass recovers with a little patience, better airflow, and a few smart lawn-care moves. The trick is recognizing the signs early, resisting the urge to panic-buy every lawn product in the store, and using the right fix at the right time. This guide breaks down the four biggest signs of snow mold, how to tell if it is gray or pink snow mold, and how to repair the damage like someone who absolutely knows what they are doing.
What Is Snow Mold, Exactly?
Snow mold is a fungal lawn disease that shows up in late winter or early spring. It thrives when turf stays cold, wet, and covered for long stretches. There are two main culprits homeowners hear about most often: gray snow mold and pink snow mold. Gray snow mold is more closely tied to prolonged snow cover. Pink snow mold, also called Microdochium patch, can also develop during cool, wet weather even without a thick snow blanket.
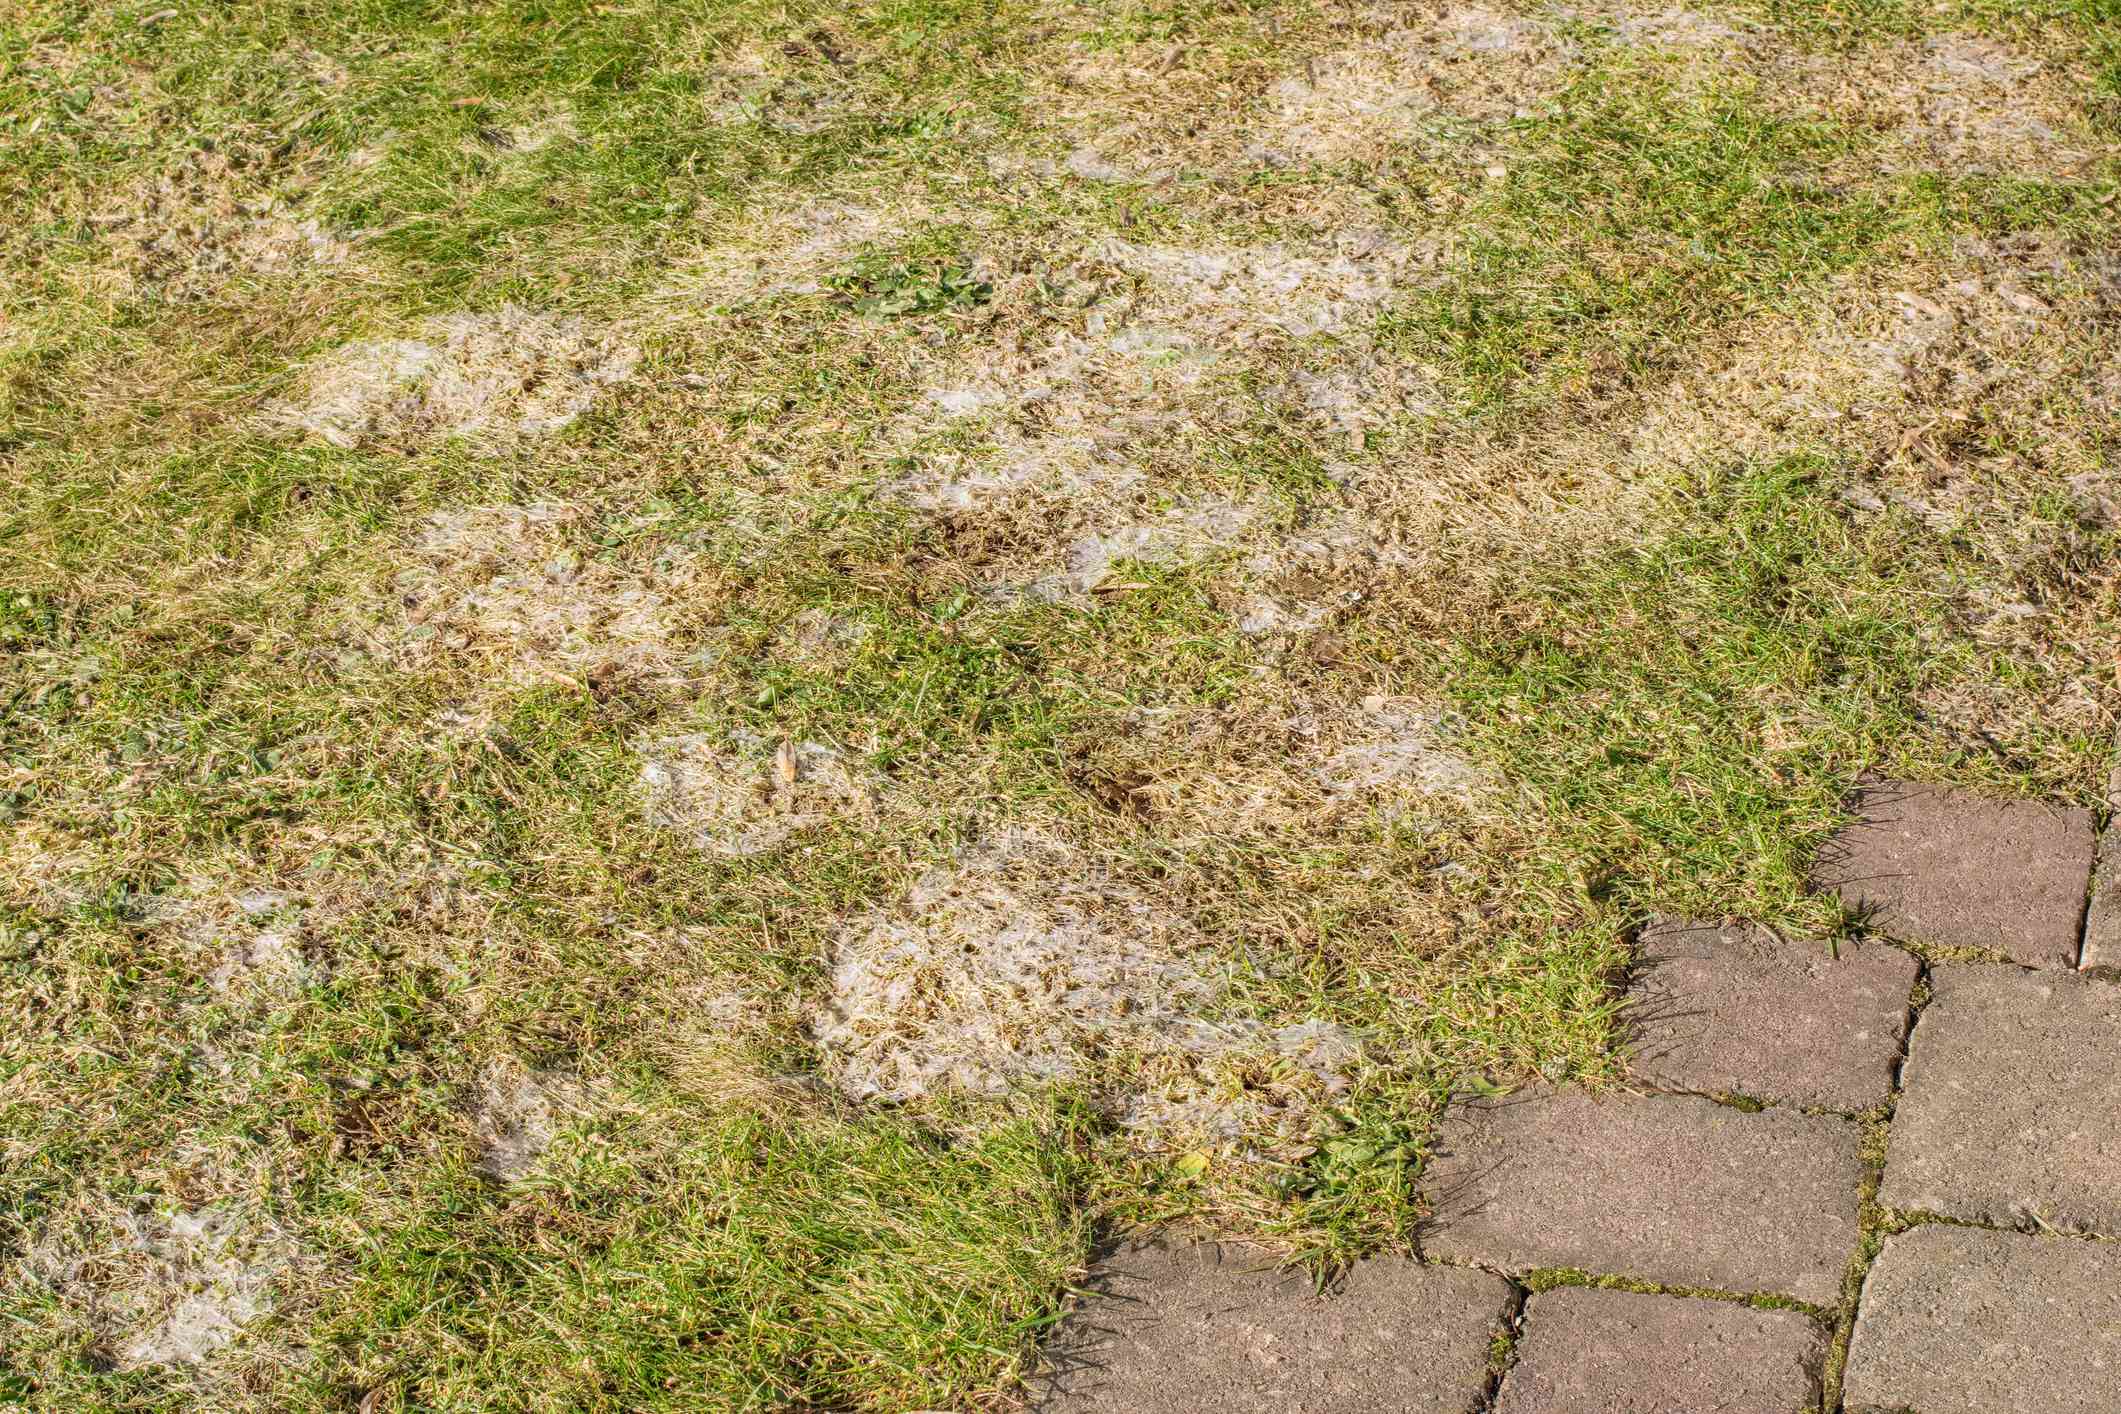
Both diseases leave patches of blighted, matted grass, but they are not identical. Gray snow mold often looks straw-colored, whitish, or silvery-gray. Pink snow mold may have a faint pink, salmon, or reddish ring around the outer edge when it is active. Either way, the lawn does not exactly scream “spring beauty.” It screams “What happened here?”
4 Signs You Have Snow Mold
1. Your Lawn Has Circular, Matted-Down Patches
The first classic sign of snow mold is the appearance of round or irregular patches of flattened grass after the snow melts. These patches may be a few inches across or merge into larger damaged areas. Instead of standing upright, the blades are pressed together in a soggy, tangled mat.
This is the symptom most homeowners notice first. One day the snow recedes, and the next day the yard looks like someone set down giant wet dinner plates on the lawn all winter. If the patches are concentrated where snowdrifts sat, where the plow dumped snow, or where leaves were left on the grass, that is another clue you are not just looking at random winter injury.
Pro tip: Snow mold patches often show up in shady, poorly drained, or heavily thatched areas first. So if the same corner of your yard misbehaves every spring, it is probably not a coincidence. That spot has a reputation.
2. You See White, Gray, or Pink Fuzzy Growth
When the lawn is damp in the morning, snow mold can look almost spooky. You may see a thin webby coating or fuzzy fungal growth on the grass. With gray snow mold, the growth may look white to gray. With pink snow mold, the outer edge can appear pinkish, salmon-colored, or reddish-brown when the disease is active.
This fungal growth may disappear quickly as the area dries out, so timing matters. If you inspect your lawn later in the day, you might only see bleached or tan patches and miss the fuzzy clue. That is why many homeowners say, “It looked moldy this morning, but now it just looks sad.” Both observations can be true.
If you are trying to distinguish between the two types, color helps. Gray snow mold usually has pale, straw-like patches without a strong colored border. Pink snow mold is more likely to show a colored edge and can linger during cool, wet spring weather.
3. The Grass Blades Feel Brittle, Crusted, or Stuck Together
Healthy spring grass should begin perking up as temperatures rise. Snow mold-damaged turf does the opposite. The blades may feel brittle, papery, slimy, or glued together. In gray snow mold cases, tiny hardened fungal bodies called sclerotia may be present on the dead tissue. You probably will not kneel down and cheer when you spot them, but they can help confirm what you are dealing with.
At this stage, the lawn often looks thinner than usual because the blades are damaged and air cannot move well through the mat. Even if the crowns and roots are still alive, the grass struggles to resume normal growth until the crusty layer is loosened.
This is one reason snow mold can seem scarier than it really is. The surface looks awful, but the deeper growing points may still be okay. That means recovery is possible without turning your yard into a full renovation project.
4. Certain Areas Stay Brown and Slow to Green Up
Another big sign of snow mold is uneven spring green-up. While the rest of the lawn starts waking up, infected patches remain brown, tan, or bleached-looking. You might notice this most around sidewalks, at the bottom of slopes, near snow piles, under leaf cover, or in spots with poor air circulation.
These patches may improve slowly as the weather warms, but some areas stay thin for weeks. If the damage is superficial, the turf usually rebounds once you rake lightly and let the area dry out. If the crowns were injured or the grass completely died, the patch will remain bare and need overseeding or patch repair.
In other words, a slow recovery does not always mean total loss. It does mean the lawn needs a little help instead of a pep talk from the porch.
How to Fix Snow Mold Like a Pro
Now for the part every homeowner wants to know: what do you actually do? The biggest mistake is treating snow mold like an emergency that requires aggressive chemicals the second you spot it. Most home lawns recover with a practical spring repair plan.
Step 1: Wait Until the Lawn Is Not Muddy
If the ground is still saturated, do not stomp all over it with heroic intentions. Walking on muddy turf can compact the soil and cause more stress. Give the lawn a little time to firm up before you start raking or repairing. Patience is annoying, but compacted soil is more annoying.
Step 2: Lightly Rake the Affected Areas
This is the classic first move for a reason. Use a leaf rake or a light spring rake to gently fluff the matted grass and break up the crusty surface. The goal is not to scalp the lawn into next Tuesday. You just want to improve airflow, let sunlight reach the crowns, and help the grass dry out faster.
As you rake, remove any lingering debris, dead leaves, or loose matted tissue. In many cases, this simple step dramatically improves how fast the lawn recovers.
Step 3: Let Air, Sun, and Time Do Some Heavy Lifting
Snow mold fungi love cold, wet, stagnant conditions. Once spring weather becomes warmer and drier, the disease usually stops advancing. That is why improving airflow matters so much. Open the area up, avoid overwatering, and let natural drying work in your favor.
If the area is shaded by low tree limbs or boxed in by dense landscaping, consider whether better air movement could help next year. Sometimes the lawn is sending you a polite little message that says, “I could use fewer soggy surprises.”
Step 4: Resume Normal Mowing and Consider a Light Feeding
Once the lawn starts growing, mow as needed and avoid taking off too much at once. Normal mowing helps remove damaged leaf tissue and encourages fresh growth. A modest spring fertilizer application may help recovery if your lawn genuinely needs it, but more is not always better. Think “supportive brunch,” not “all-you-can-eat nitrogen buffet.”
If you already follow a soil-based fertilization plan, stick with that. If not, use a reasonable lawn fertilizer according to label directions and avoid going heavy-handed, especially if your lawn tends to stay lush and damp.
Step 5: Overseed or Patch Bare Spots That Do Not Recover
Most snow mold damage is cosmetic and temporary. But if certain patches stay bare after the lawn should reasonably be growing, those spots may need reseeding. Rake the area smooth, add seed that matches your lawn type, lightly cover it if needed, keep the seedbed moist, and give it time.
Spring overseeding works well for many cool-season lawns, especially when damage is limited. If the patch is large or the area has chronic drainage issues, fix the site problem too. Otherwise, you are basically inviting snow mold back for a sequel nobody asked for.
Step 6: Skip the “Spring Rescue Fungicide” Idea
Here is the blunt truth: fungicides are generally preventive, not curative, for snow mold on home lawns in spring. By the time you see the damage, the main infection period is usually over. Spraying fungicide then rarely makes sense for typical residential turf.
Preventive fungicides may be used in late fall on golf greens, athletic fields, or other high-value turf where snow mold is severe year after year. For most homeowners, the better strategy is cultural control: proper mowing height, leaf cleanup, good drainage, thatch management, and avoiding snow mountains on the lawn from driveway shoveling.
How to Prevent Snow Mold Next Winter
Keep Mowing Until Growth Stops
Do not let the lawn go into winter long, shaggy, and matted. Continue mowing through fall as long as the grass keeps growing. For many lawns, slightly shorter heading into winter can help, but do not scalp it. The goal is tidy turf, not a buzz cut.
Rake Leaves and Remove Debris
Leaves trap moisture, block airflow, and create the kind of damp blanket fungi adore. Clean up leaf litter before winter, especially in corners and along fences where debris loves to collect.
Avoid Excessive Late-Fall Nitrogen
Overdoing fast-release fertilizer late in the season can increase lush, vulnerable growth. Follow a sound lawn fertility program and avoid the temptation to feed heavily just because the bag makes big promises.
Manage Thatch, Drainage, and Snow Piles
Excess thatch and poor drainage set the stage for prolonged wetness. If you have a thick thatch layer, compacted soil, or chronic puddling, address those issues. Also try not to pile shoveled snow in the same lawn area every winter. Giant snowbanks melt slowly and create prime snow mold real estate.
Real-World Experiences Homeowners Often Have With Snow Mold
One of the most common snow mold experiences goes like this: the snow finally melts, you step outside feeling hopeful, and then you see a patchy lawn that looks as if somebody rolled up an old rug and left it there all winter. The first reaction is usually panic. The second is denial. The third is an online search that starts with, “Why is my grass gray and gross?” That sequence is practically a spring tradition in northern yards.
Homeowners with lawns near driveways often notice the worst damage exactly where shoveled snow was piled all season. This makes perfect sense. Snow piles melt slowly, keep the turf wet longer, and compress the grass into a damp mat. People often assume road salt is the only villain in these spots, but snow mold can absolutely be part of the story. In real yards, winter damage is often a team effort, and unfortunately it is not a dream team.
Another familiar experience is discovering that the “mystery dead patch” is not actually dead. After a light raking, a little sunshine, and a week or two of warmer weather, what looked doomed starts sending up fresh green blades. This surprises a lot of first-time homeowners. Snow mold damage can look dramatic on the surface while the crowns below are still alive. That is why lawn pros are usually calmer about it than the average person holding a rake and muttering suspiciously at the turf.
People with shaded backyards also tend to report recurring problems in the same places. Maybe it is the area under the big maple, the side yard that never gets much sun, or the low spot where snow and leaves collect every year. If snow mold keeps returning in one section, that is usually a clue that the site conditions are helping the disease. In those cases, the fix is not just spring cleanup. It is also changing the environment: better leaf removal, improved drainage, less thatch, smarter snow placement, and sometimes a turf type better suited to the conditions.
Then there is the emotional experience of overreacting just a little. Many homeowners immediately assume they need fungicide, top-tier equipment, and possibly an emergency lawn intervention team. Usually, they do not. Most snow mold cases on home lawns respond best to a lighter touch: wait for the soil to firm up, gently rake the area, resume mowing, and reseed only where recovery clearly is not happening. The lawn often rewards patience more than panic.
The most seasoned homeowners tend to say the same thing after dealing with snow mold a few times: spring lawn repair starts in fall. The years with the least damage are usually the years when leaves were removed, mowing continued late into the season, snow piles were spread out when possible, and the lawn was not sent into winter buried under debris and bad decisions. That may not be the glamorous answer, but it is the one that works.
Final Takeaway
If your lawn has circular matted patches, fuzzy gray or pink growth, brittle stuck-together blades, and areas that lag behind the rest of the yard in spring, snow mold is a very likely suspect. The encouraging part is that most lawns are not doomed. A professional-looking recovery usually comes down to light raking, improved drying, patient observation, normal mowing, and reseeding only where needed.
So yes, your lawn may currently look like it had a rough winter breakup. But with the right approach, it can recover beautifully. And next fall, when the leaves start piling up and the shovel comes out, you will know exactly how to keep snow mold from making itself at home again.