IKEA furniture is the blank canvas of the decorating world: affordable, practical, and occasionally suspiciously difficult to assemble at 11:47 p.m. But here is the good news: your BILLY bookcase, MALM dresser, KALLAX shelf, BESTA cabinet, PAX wardrobe, or TARVA chest does not have to look like it came straight from aisle 17 with a meatball receipt tucked inside.
With a few clever upgrades, IKEA furniture can look custom, designer-inspired, and surprisingly expensive. The secret is not one magical trick. It is a mix of better proportions, upgraded finishes, thoughtful styling, and tiny details that whisper “bespoke” instead of shouting “Allen wrench.” Below are 17 practical ways to make IKEA furniture look high-end, plus real-life experience tips to help your project survive paint, patience, and the occasional crooked drawer pull.
Why IKEA Furniture Is So Easy to Upgrade
IKEA pieces are popular because they are simple, modular, and widely available. That simplicity is exactly what makes them easy to hack. Clean lines allow you to add trim, swap doors, paint surfaces, install new legs, or build pieces into a room without fighting overly decorative details. In other words, IKEA gives you the cake. You get to add the frosting, sprinkles, and dramatic “yes, I made that” reveal.
17 Ways to Make IKEA Furniture Look Amazingly High-End
1. Swap the Basic Hardware
The fastest way to make IKEA furniture look expensive is to replace standard knobs and pulls. Basic hardware often gives away budget furniture, while brass, matte black, antique bronze, leather, glass, or oversized pulls instantly create a more custom look.
Try slim brass handles on BESTA cabinets, round wooden knobs on a TARVA dresser, or leather tab pulls on a HEMNES piece. For a polished result, measure the existing screw spacing before buying new hardware. Nothing ruins a luxury moment faster than discovering your new handles are one-quarter inch off and now your drawer has freckles.
2. Paint It Like You Mean It
Paint is one of the most powerful IKEA hacks, but it only looks high-end when the prep work is done properly. Many IKEA pieces have laminate or veneer surfaces, so regular wall paint slapped on in a moment of optimism may peel faster than a sunburn.
Clean the surface, lightly sand it, use a bonding primer, and apply thin coats of durable cabinet or furniture paint. Deep navy, olive green, warm greige, charcoal, creamy white, and muted terracotta can all make flat-pack furniture feel more intentional. Choose satin, eggshell, or semi-gloss depending on the piece and how much daily abuse it receives.
3. Add Molding and Trim
Molding is where IKEA furniture enters its “old-money library” era. Add crown molding to BILLY bookcases, picture-frame molding to wardrobe doors, fluted trim to drawer fronts, or baseboard trim around the bottom of cabinets.
Trim hides seams, adds architectural depth, and makes basic pieces feel built for the room. Even simple half-round molding can transform a plain MALM dresser into something that looks boutique. Caulk the gaps, fill nail holes, sand lightly, and paint everything the same color for that seamless, custom-cabinet effect.
4. Turn Bookcases Into Built-Ins
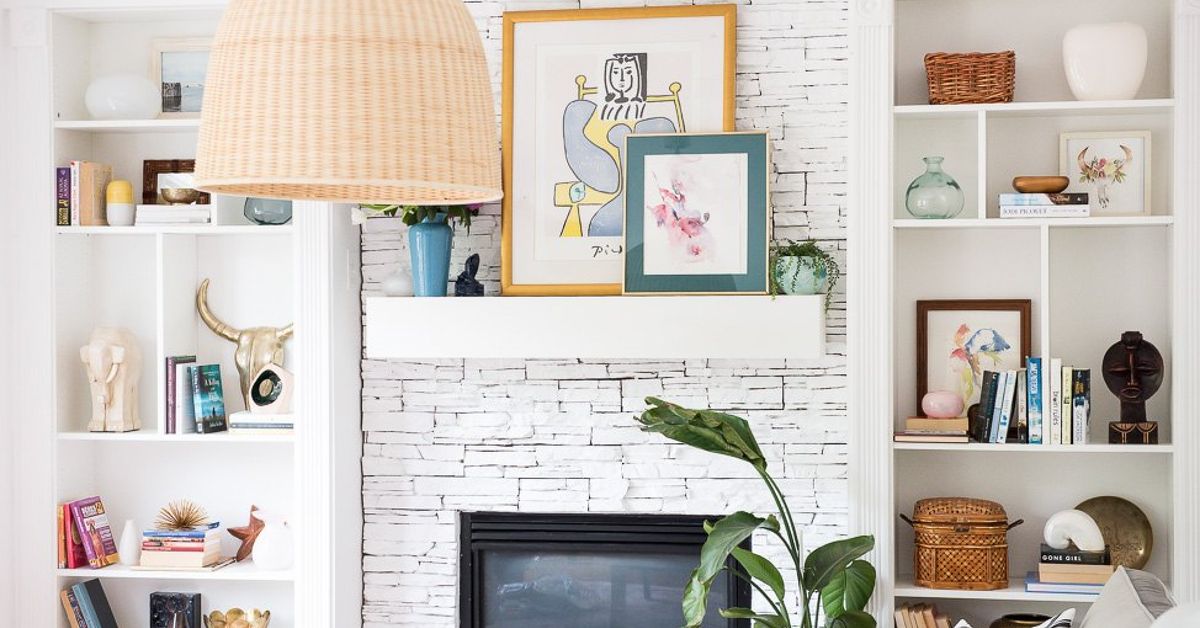
If you want the biggest visual payoff, use IKEA bookcases or cabinets to create built-ins. BILLY, HAVSTA, BESTA, and PAX are popular choices because they can be combined, framed, trimmed, and painted to look like permanent millwork.
The trick is to close the gaps. Build a simple base, secure units to wall studs, add side filler pieces, install crown or base molding, and paint the furniture and surrounding trim in one unified finish. Suddenly, your “budget shelf situation” becomes a dramatic wall of storage worthy of a slow camera pan.
5. Upgrade the Legs
Cheap-looking legs can make otherwise decent furniture feel flimsy. Replacing basic IKEA legs with tapered wood legs, metal legs, bun feet, or sculptural supports can dramatically improve the silhouette.
Try taller legs on a BESTA media console for an airy midcentury look. Add chunky wood feet to a dresser for a traditional feel. Use sleek black metal legs for a modern cabinet. Just make sure the legs can support the weight of the furniture, especially if the piece will hold books, dishes, or your impressive collection of “important papers” you never open.
6. Use Contact Paper, Wallpaper, or Grasscloth
Texture is a luxury shortcut. Wallpaper or peel-and-stick paper can dress up drawer fronts, cabinet backs, wardrobe panels, and open shelving. Grasscloth-style paper looks especially high-end because it adds subtle depth without screaming for attention.
Line the back of a BILLY bookcase with botanical wallpaper. Add faux linen paper to MALM drawer fronts. Use marble-look contact paper on a desktop or side table. The key is restraint: cover one feature area, then let the rest of the piece breathe.
7. Replace Cabinet Doors and Drawer Fronts
For IKEA kitchen cabinets, BESTA units, PAX wardrobes, and SEKTION systems, upgraded doors and fronts can completely change the final look. Several companies make custom fronts specifically for IKEA frames, offering shaker, slab, fluted, cane, wood veneer, and painted options.
This approach costs more than a simple hardware swap, but it can still be far less expensive than fully custom cabinetry. It is especially useful for media walls, mudrooms, home offices, laundry rooms, and kitchens where the cabinet boxes are functional but the fronts need more personality.
8. Add Cane, Rattan, or Reeded Inserts
Cane and rattan details bring warmth and texture to IKEA furniture. Replace the center panel of a door with cane webbing, attach cane to drawer fronts, or use reeded panels for a tailored look.
This works beautifully on IVAR cabinets, TARVA dressers, and simple storage units. Natural cane pairs well with white, black, sage green, walnut stain, and light oak finishes. It also softens modern pieces, making them feel more collected and less “I bought an entire room in one Saturday.”
9. Stain Raw Wood Pieces
Some IKEA pieces, such as TARVA and IVAR, are made with unfinished or minimally finished wood, which makes them excellent candidates for staining. A rich walnut, warm oak, or soft whitewash can make the piece look more expensive while keeping the natural grain visible.
Always test stain on a hidden area first, because wood can absorb color unevenly. Use wood conditioner if needed, apply thin coats, and seal the piece for durability. Staining takes patience, but the result can look far more custom than paint alone.
10. Make the Piece Look Heavier
High-end furniture often has visual weight. That does not mean it has to be bulky, but it should look grounded. Thin, floating, or awkward bases can make furniture feel temporary. Adding a plinth base, thicker top, side panels, or substantial legs can make IKEA furniture look more expensive.
For example, build a simple wood base under BESTA cabinets to make them look like a custom sideboard. Add a thicker wood top to a dresser. Frame bookcases with vertical side panels. These changes improve proportions and give the eye a reason to believe the piece belongs exactly where it is.
11. Install Picture Lights
Lighting is the jewelry of furniture. Add picture lights above IKEA built-ins, sconces near shelving, LED strips inside glass cabinets, or puck lights under floating shelves. A simple bookcase suddenly feels like a boutique hotel library.
Battery-operated picture lights are renter-friendly and easy to install. Hardwired lights look more seamless if you are doing a larger renovation. Either way, lighting adds mood, highlights styling, and makes affordable furniture feel intentional.
12. Style Shelves With Breathing Room
Even the most beautiful IKEA hack can look chaotic if every shelf is packed like a tiny storage emergency. High-end styling usually includes negative space, varied heights, and a mix of books, objects, art, baskets, and greenery.
Group items in odd numbers, stack some books horizontally, lean small artwork, and use boxes to hide clutter. Leave open space so the eye can rest. Remember: a luxury shelf does not need to display every candle you have owned since 2018.
13. Add a Stone, Wood, or Butcher Block Top
A better top can make IKEA cabinets and dressers look instantly more expensive. Add a wood slab, butcher block, quartz remnant, marble-look surface, or stained plywood top to create contrast and durability.
This works especially well on BESTA units, kitchen islands, bathroom vanities, and office storage. A thicker top can also hide seams between multiple cabinets. For a budget-friendly option, use quality plywood with edge banding and a rich stain.
14. Hide the Seams
Seams are the little tattletales of flat-pack furniture. High-end pieces look continuous, so focus on hiding joins, holes, gaps, and exposed edges. Use wood filler, caulk, edge banding, trim, and paint to create a unified finish.
On bookcases, fill unused shelf holes. On cabinets, cover side gaps with filler strips. On painted pieces, caulk where trim meets the furniture. These small steps can be tedious, but they are what separate “DIY project” from “Wait, where did you buy that?”
15. Customize Sofas and Chairs With Slipcovers
IKEA sofas and chairs become far more stylish with upgraded slipcovers. Linen, velvet, cotton canvas, bouclé-style fabric, and textured neutrals can all elevate a basic frame. Custom slipcovers also let you change the style without replacing the whole piece.
For a designer look, choose fabric that suits the room’s mood. Washed linen feels relaxed and coastal. Velvet feels rich and dramatic. Cream bouclé-style covers add softness and trend appeal. Bonus: removable covers are practical for real homes, especially homes with pets, snacks, or mysterious stains nobody wants to discuss.
16. Mix IKEA With Vintage and Custom Pieces
The easiest way to make IKEA look less like IKEA is to avoid using only IKEA. Pair flat-pack furniture with vintage lamps, antique mirrors, handmade pottery, framed art, quality rugs, or custom pillows. Contrast makes the affordable pieces feel curated.
A BESTA console under a vintage gilt mirror looks more elevated. A simple IKEA dining table with antique chairs feels collected. A KALLAX shelf styled with woven baskets and art books looks thoughtful instead of dorm-room desperate.
17. Choose a Cohesive Color Palette
Luxury interiors usually feel cohesive. That does not mean boring; it means the colors talk to each other politely instead of yelling across the room. When upgrading IKEA furniture, choose a palette before you start.
Try warm white, oak, brass, and linen for a calm look. Use black, walnut, leather, and cream for modern drama. Combine sage green, cane, and antique brass for a cozy traditional style. When the furniture, hardware, wall color, and accessories work together, even budget pieces look more refined.
Best IKEA Pieces to Hack for a High-End Look
Some IKEA pieces are especially good candidates for upgrades. BILLY bookcases are ideal for built-ins and library walls. BESTA cabinets work well as media consoles, floating storage, and sideboards. PAX wardrobes can look custom with trim, doors, paint, and lighting. TARVA and IVAR pieces are great for stain, paint, cane, and furniture-leg upgrades. MALM dressers are simple enough to accept fluting, overlays, new pulls, or textured finishes.
The best piece depends on your goal. If you need storage, start with BESTA, HAVSTA, KALLAX, or PAX. If you want a bedroom makeover, look at MALM, HEMNES, or TARVA. If you want a home-office upgrade, combine ALEX drawers with a better desktop, custom handles, and warm lighting.
Common Mistakes That Make IKEA Hacks Look Cheap
The biggest mistake is rushing the finish. Paint without primer, trim without caulk, and hardware installed without measuring can make a project look homemade in the unfortunate sense. Another common issue is choosing trendy details that fight the room. Fluted fronts, cane panels, and gold hardware are beautiful, but not all at once on every piece unless your dresser is auditioning for a design reality show.
Scale matters too. Tiny hardware on a large cabinet can look skimpy. Legs that are too thin can make a heavy storage unit feel unstable. Shelves crammed with too many tiny objects can make even custom built-ins look cluttered. When in doubt, simplify.
Experience-Based Tips for Making IKEA Furniture Look High-End
Here is the honest experience section: IKEA hacking is not difficult, but it rewards patience more than bravery. The projects that look expensive usually have one thing in commonthey do not skip the boring parts. Sanding is boring. Waiting for primer to dry is boring. Measuring the same handle holes three times is boring. But the boring parts are where the magic hides, wearing old sweatpants and holding a sanding block.
One of the best experiences with upgrading IKEA furniture comes from starting small. A hardware swap on a nightstand or dresser teaches you how much difference details make. You can take a plain piece and give it a completely different personality in under an hour. Brass knobs can make it feel classic. Matte black pulls make it modern. Wood knobs make it Scandinavian and soft. This is the beginner-friendly gateway project, and yes, it may lead to staring at every cabinet in your home while whispering, “I could fix you.”
Painting is the next level, and it is where many people learn that enthusiasm is not a substitute for primer. The best painted IKEA pieces usually begin with cleaning. Furniture collects dust, oils, and residue, even when it looks clean. After cleaning, light sanding gives the primer something to grip. Then comes bonding primer, thin paint coats, and drying time. The difference between one thick coat and two or three thin coats is huge. Thick paint can leave drips and brush marks; thin coats look smoother and more professional.
Built-ins require more planning, but they can be the most satisfying. The experience feels a little like stage design: you are creating the illusion that separate boxes have always belonged to the architecture. The secret is to treat the wall, furniture, and trim as one system. Raise bookcases on a base so they do not look like freestanding shelves. Add filler pieces where the units meet the wall. Use crown molding at the top and base trim at the bottom. Once everything is painted the same color, the brain stops seeing “several IKEA units” and starts seeing “custom storage wall.” Very dramatic. Very satisfying. Very likely to make guests ask annoying questions about whether you are available to help with theirs.
Another lesson: good styling can rescue an average hack, while bad styling can sabotage a great one. After upgrading shelves or cabinets, do not immediately fill every inch. Use baskets to hide practical items. Add books in stacks and rows. Include one or two sculptural objects. Bring in a lamp or picture light. Add something organic, such as a plant, branch arrangement, or ceramic bowl. High-end spaces rarely look like everything was purchased on the same day from the same store. Mix new, old, smooth, rough, shiny, and matte.
Finally, it helps to accept that not every IKEA hack needs to become a masterpiece. Sometimes the goal is simply to make a piece fit your home better. Maybe that means painting a cabinet the same color as the wall so it disappears. Maybe it means adding cane to warm up a plain door. Maybe it means replacing wobbly legs with sturdy wood ones. The best high-end IKEA upgrades are not about hiding where the furniture came from out of shame. They are about making affordable furniture feel personal, useful, and beautiful. That is the real luxury: a home that works hard, looks good, and does not require selling a kidney to buy a sideboard.
Conclusion
Making IKEA furniture look amazingly high-end is less about spending a fortune and more about making smart design decisions. Upgrade the hardware, improve the finish, add architectural details, hide seams, play with texture, and style with intention. A simple IKEA dresser can become a statement piece. A row of bookcases can become a built-in library. A basic cabinet can become a designer-looking sideboard with the right legs, pulls, and paint color.
The beauty of IKEA furniture is that it gives you a functional starting point. From there, your choices determine whether the piece looks basic or custom. Take your time, measure twice, prime properly, and remember that caulk is basically confidence in a tube. With these 17 ideas, your IKEA furniture can look polished, expensive, and completely your own.
Note: This article synthesizes practical guidance from reputable home design, DIY, and interior styling resources in the United States, including expert advice on IKEA hacks, furniture painting, built-ins, hardware upgrades, custom fronts, slipcovers, and shelf styling.