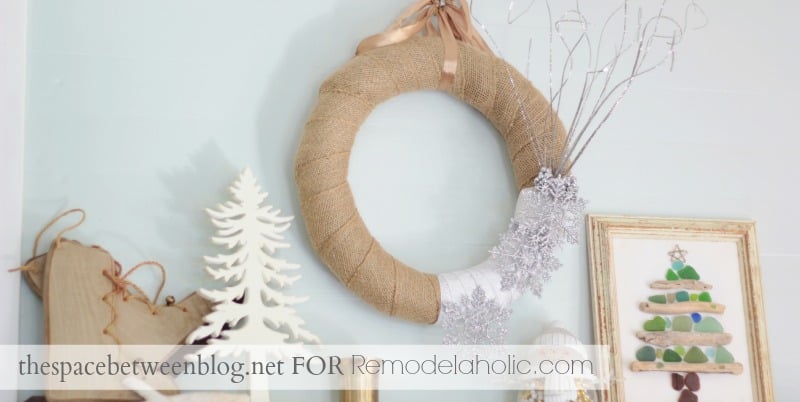
A winter wreath with burlap and snowflakes is the decorating equivalent of a warm cabin wearing a freshly pressed white scarf. It combines the rough, earthy texture of burlap with crisp snowflake details, creating a front-door decoration that feels rustic, cheerful, and appropriately wintry without screaming, “Christmas exploded here.”
Better still, this DIY winter wreath can remain on display after the ornaments are packed away. A neutral palette of natural tan, snowy white, silver, and soft blue works from December through the last stubborn cold snap of early spring. The design is easy to customize, forgiving enough for beginners, and impressive enough to make visitors assume you own a secret craft studio.
Why Burlap and Snowflakes Work So Well Together
Good seasonal decor usually balances contrast. Burlap is warm, coarse, and natural, while snowflakes are delicate, cool, and geometric. Put them together, and each material makes the other more interesting. The burlap prevents white snowflakes from looking too formal, and the snowflakes keep the burlap from wandering into potato-sack territory.
Natural fibers, pinecones, twigs, greenery, and rustic ribbon are commonly used to give wreaths a farmhouse or woodland character. Winter-white accents, frosted finishes, and snowflake shapes can then shift that rustic base toward a calmer seasonal look that remains suitable after Christmas.
A Versatile Winter Color Palette
The safest color combination is natural burlap, white snowflakes, and a small amount of silver. It works with nearly any door color, including black, navy, forest green, red, white, and stained wood.
For a more personalized wreath, consider one of these variations:
- Farmhouse winter: Natural burlap, white snowflakes, pinecones, and cotton stems.
- Coastal winter: Ivory burlap, pale blue ribbon, white snowflakes, and silver beads.
- Woodland winter: Brown burlap, evergreen sprigs, frosted pinecones, and wood snowflakes.
- Modern winter: White burlap, charcoal ribbon, metallic snowflakes, and minimal greenery.
- Traditional holiday: Natural burlap, red berries, white snowflakes, and a plaid bow.
Materials for a DIY Winter Wreath
A wire wreath frame is the most practical base for a looped burlap design because its separate rings provide multiple attachment points. A foam form also works, especially when you prefer a smooth, fully wrapped wreath. Grapevine is another sturdy option when you want branches to remain visible around the edges. Major craft and home-decor guides commonly use wire, foam, straw, or grapevine forms depending on the desired texture and construction method.
Basic Supplies
- One 14- to 18-inch wire wreath frame
- Two or three rolls of 5- to 6-inch wired burlap ribbon
- Six to twelve lightweight snowflake ornaments
- Floral wire, chenille stems, or small zip ties
- Hot-glue gun and glue sticks
- Wire cutters and sharp fabric scissors
- One narrow coordinating ribbon
- A loop of sturdy ribbon or wire for hanging
Optional Embellishments
- Faux evergreen picks
- Small pinecones
- White berry stems
- Miniature bells
- Wood beads
- Battery-operated micro lights
- White craft paint or artificial snow spray
- A wooden “Let It Snow” or “Welcome Winter” sign
Keep optional decorations lightweight. A wreath can gain surprising heft once greenery, signs, ornaments, and bows start piling on. That is charming on the worktable but less charming when the entire arrangement slides down the door during dinner.
How to Make a Winter Wreath with Burlap and Snowflakes
Step 1: Prepare the Work Area
Cover the table with kraft paper, cardboard, or an old cloth. Hot glue has a remarkable ability to locate the one unprotected inch of a surface. Plug in the glue gun, organize the decorations by size, and place the wreath frame flat in front of you.
If you plan to paint wooden snowflakes or add artificial frost, complete that work first. Follow the product label, use adequate ventilation, and allow everything to dry completely before assembly.
Step 2: Attach the Burlap to the Frame
Turn the wreath frame so the curved side faces upward. Secure the end of the burlap ribbon to an inner wire ring with floral wire, a chenille stem, or a zip tie. Leave the fastener slightly loose until the first few loops are positioned correctly.
Do not rely on hot glue alone to hold the main burlap structure. Mechanical fasteners provide a stronger foundation and make later repairs easier.
Step 3: Create Full Burlap Loops
Push a section of burlap upward through the innermost opening of the frame, creating a loop about 3 to 4 inches high. Push the next loop through the middle opening and a third through the outer opening. Gently twist the ribbon underneath the frame before beginning the next set of loops.
Continue around the wreath, grouping three loops at a time. Compress each group against the previous one so the metal frame disappears. A fuller wreath may require more ribbon, but it will also look softer and more polished.
Every few inches, turn the frame over and secure the burlap to a crossbar. This prevents the loops from migrating around the form like confused sheep. When you reach the starting point, trim the ribbon and fasten the end securely.
Step 4: Fluff and Shape the Burlap
Place the wreath upright and spread the loops in different directions. Pull some toward the center, some outward, and some slightly sideways. The goal is controlled fullness, not perfect symmetry.
Wired burlap ribbon is especially helpful because the edges can be shaped and reshaped. Natural burlap may shed fibers or fray, so trim loose strands rather than pulling them. One innocent tug can turn into a long, dramatic thread that appears to have personal ambitions.
Step 5: Plan the Snowflake Arrangement
Lay the snowflakes on top of the wreath before attaching anything. Test several arrangements and photograph your favorite with a phone. Planning the full composition before gluing is a reliable way to maintain even spacing and avoid discovering too late that every large decoration has gathered on one side.
Three layouts work particularly well:
- Balanced circle: Distribute snowflakes evenly around the entire wreath.
- Diagonal drift: Arrange them from the upper left to the lower right, as if wind carried them across the wreath.
- Feature cluster: Group several snowflakes near the lower corner and balance them with a bow on the opposite side.
Vary the snowflake sizes to create depth. A wreath made entirely from identical ornaments can look flat, while a mixture of small, medium, and large pieces creates a natural visual rhythm.
Step 6: Secure the Snowflakes
Attach lightweight snowflakes with floral wire whenever possible. Thread the wire through an ornament opening, twist it at the back, and anchor it to the metal frame beneath the burlap.
For wooden or foam snowflakes without openings, apply hot glue to several contact points and press them into the burlap until the adhesive begins to set. Craft instructions from JOANN, Michaels, Home Depot, and other home sources commonly combine wire, zip ties, inserted stems, and hot glue according to the weight and shape of each decoration.
Step 7: Add Greenery and Winter Details
Cut faux evergreen branches into smaller sprigs. Insert them around the snowflakes, pointing the stems in the same general direction. Concentrate greenery in one or two areas rather than placing a sprig after every burlap loop.
Add small white berries, pinecones, bells, or wood beads. Use odd-numbered groupings, such as three pinecones or five berry clusters, to keep the design relaxed. Larger ornaments should be anchored to both the frame and nearby materials whenever possible.
A light frosted finish can strengthen the winter theme, but use restraint. The objective is “fresh snowfall,” not “wreath involved in a powdered-sugar incident.”
Step 8: Make the Bow
A layered bow gives the wreath a finished appearance. Start with a wide burlap ribbon, add a narrower white or snowflake-patterned ribbon, and finish with a small silver or blue accent.
Place the bow at the bottom center for a traditional look or along the lower left or right side for a more contemporary arrangement. Secure it directly to the wire frame instead of attaching it only to the burlap loops.
Step 9: Inspect the Finished Wreath
Hold the wreath upright, step back, and rotate it slightly. Check for exposed wire, uneven areas, loose ornaments, and decorations that interfere with the center opening. Shake the wreath gently over the worktable. Anything that falls off has kindly volunteered for additional glue or wire before reaching the front door.
How to Hang and Protect the Wreath
Use a hanger or hook rated for more than the wreath’s completed weight. Over-the-door hangers work well on many entry doors, while suction-cup hooks can be useful on glass storm doors. Adhesive hooks are another option when their surface and weight instructions match the application.
Outdoor placement requires extra care because natural burlap absorbs moisture and may fade, sag, or develop stains. Display the wreath beneath a covered porch whenever possible. Craft sellers and home-decor experts commonly recommend protecting burlap or embellished wreaths from heavy rain, snow, strong wind, and prolonged exposure.
A storm door can provide protection, but measure the available depth before hanging the wreath between two doors. A design with oversized loops, pinecones, or a large sign may be compressed whenever the door closes. Slim snowflakes and shallow embellishments are better for tight spaces.
Design Mistakes to Avoid
Using Too Many Competing Decorations
Burlap, snowflakes, greenery, berries, bells, lights, signs, ribbon, and pinecones can work together, but they do not all need starring roles. Choose one main feature, one supporting texture, and one small accent.
Making Every Section Identical
Exact repetition can make a handmade wreath look manufactured. Maintain overall balance while allowing slight differences in loop size, greenery placement, and snowflake angle.
Gluing Before Testing the Layout
Hot glue is loyal, decisive, and uninterested in second thoughts. Arrange every major component before attaching it.
Ignoring the Door Color
A white wreath may disappear against a white door. Add natural burlap, charcoal ribbon, greenery, or metallic accents to establish contrast. On a very dark door, white snowflakes and pale ribbon will stand out beautifully.
Forgetting About Movement
Front doors open, close, shake, and occasionally receive an enthusiastic shoulder from someone carrying groceries. Secure each large decoration to the frame, not merely to another ornament.
Ways to Customize Your Snowflake Burlap Wreath
Add a Removable Seasonal Sign
Attach a small wooden sign with wire rather than glue. You can display “Merry Christmas” in December, switch to “Let It Snow” in January, and use “Warm Winter Welcome” through February.
Use Handmade Snowflakes
Create snowflakes from painted craft sticks, wooden clothespins, felt, or sturdy paper. Craft-stick snowflakes are more durable than ordinary paper and can be painted white, silver, or icy blue. Snowflake ornaments can also be layered over contrasting ribbon for stronger definition.
Introduce Subtle Lighting
Wrap a short strand of battery-operated micro lights around the metal frame before adding final decorations. Hide the battery pack behind the wreath and keep its switch accessible. Use lighting specifically rated for the intended indoor or outdoor location.
Create a Matching Mini Wreath
Use leftover ribbon and snowflakes to decorate a small embroidery hoop or grapevine ring. Hang it on a pantry door, kitchen cabinet, guest-room mirror, or covered porch window.
Storing the Wreath After Winter
Remove the wreath carefully and inspect it for moisture before storage. Allow damp burlap to dry fully. Dust the snowflakes and greenery with a soft brush, repair loose pieces, and reshape crushed loops.
Store the wreath in a rigid wreath box or a roomy plastic container. Avoid squeezing it into a narrow bag, where the burlap may flatten and the snowflakes may crack. Place tissue paper around delicate ornaments and keep the container in a cool, dry space away from direct sunlight.
Label the box clearly. Otherwise, next winter may begin with opening six containers marked “decor,” finding three extension cords, a ceramic turkey, and absolutely no wreath.
Practical Experiences and Lessons from Making a Burlap Snowflake Wreath
The experience of making a winter wreath with burlap and snowflakes usually begins with confidence. The materials look simple, the frame is circular, and the online inspiration appears wonderfully orderly. Then the first few burlap loops emerge at different heights, one snowflake refuses to lie flat, and a strand of hot glue stretches across the table like a transparent spiderweb. This is normal. The wreath is not failing; it is merely passing through its awkward adolescent phase.
The first useful lesson is that burlap needs more volume than expected. A few loose loops may look generous while the wreath is flat on the table, yet sparse once it is held upright. Compressing each group of loops closely against the previous group creates a fuller result and hides the metal frame. It is better to keep the loops moderately sized and densely packed than to create enormous loops with wide gaps between them.
The second lesson concerns texture. Natural burlap has character, but that character includes shedding. Loose fibers collect on clothing, tabletops, and apparently every object within a ten-foot radius. Sharp scissors help minimize fraying, and wired ribbon is easier to shape than plain fabric strips. Keeping a small trash bowl nearby makes cleanup less irritating.
Snowflake placement often requires more experimentation than the burlap itself. When all the snowflakes are distributed evenly, the design can feel neat but slightly predictable. Clustering several ornaments along one side generally produces more movement. A large snowflake can serve as the focal point, while smaller pieces appear to drift away from it. Taking a photograph before gluing is surprisingly helpful because the camera reveals empty spaces and visual imbalance that may not be obvious at close range.
Another common discovery is that “just one more embellishment” is rarely just one. A pinecone leads to berries, berries invite greenery, greenery seems lonely without a bow, and suddenly the snowflakes have become supporting actors in their own movie. Pausing after each decorative layer helps preserve the original theme. When the wreath already looks finished, adding more material is not generosity; it is craft-based peer pressure.
Durability also becomes important during the hanging test. An ornament that feels secure on a horizontal worktable may droop when the wreath is vertical. Wire is usually more dependable than glue for heavy pieces. Hot glue remains useful for preventing rotation, but it should not always carry the entire load. Testing the wreath with a gentle shake before hanging it can prevent an unexpected pinecone avalanche.
Finally, the most satisfying part of the project is its flexibility. The wreath does not need machine-perfect loops or identical snowflakes to look attractive. Small variations give handmade decor its warmth. From several feet away, viewers notice the overall balance of natural burlap, crisp white shapes, and winter greenerynot the one loop that sits half an inch higher than its neighbor.
The best finished wreath is therefore not necessarily the most complicated one. It is the wreath that suits the door, survives ordinary use, and still makes its maker smile after the glue strings have been removed. A simple burlap base, a thoughtful snowflake arrangement, and a restrained handful of wintry accents are enough to create a decoration that feels cozy, distinctive, and ready for the season.
Conclusion
A winter wreath with burlap and snowflakes offers an easy way to decorate beyond the Christmas season. Burlap supplies warmth and rustic texture, while snowflakes introduce brightness and unmistakable winter charm. With a sturdy frame, securely fastened loops, lightweight ornaments, and a balanced arrangement, even a first-time wreath maker can create polished front-door decor.
Start with a simple palette, plan the layout before gluing, and resist the urge to invite every decoration in the craft aisle onto the same wreath. The result will be welcoming, durable, and personala little winter wonderland that does not require shoveling.