A rolling sandbox is the backyard upgrade that says, “Yes, we encourage outdoor creativity,” while quietly admitting, “Also, we need the patio back by dinner.”
What Is a Sandbox on Wheels?
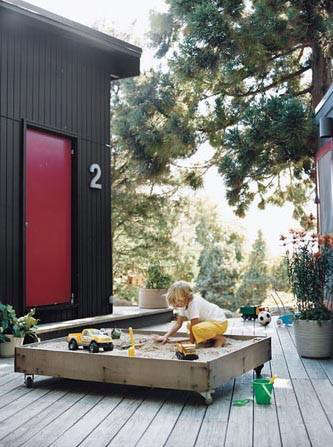
A sandbox on wheels is exactly what it sounds like: a portable outdoor sandbox built into a sturdy box, cart, or low rolling platform with casters. It gives kids a dedicated place to dig, scoop, pour, build, bury toy dinosaurs, and conduct very serious dump-truck engineering projectswithout permanently sacrificing a corner of the yard.
Unlike a traditional in-ground or heavy wooden sandbox, a wheeled sandbox can be moved into shade, tucked under a covered patio, rolled away before storms, or stored when the play season slows down. For families with small yards, rental homes, townhomes, decks, or shared outdoor spaces, the idea is wonderfully practical. It is outdoor sensory play with a parking brake.
The key is smart design. Sand is heavier than it looks. A tiny bag seems friendly in the store, but once you pour several of them into a box, your cute weekend project can become a beach-themed refrigerator. A good sandbox on wheels is shallow, balanced, weather-resistant, easy to cover, and built with wheels strong enough for the load.
Why a Rolling Sandbox Makes Sense for Outdoor Play
Outdoor play is not just a way to burn off popsicle energy. It helps children practice coordination, balance, problem-solving, language, cooperation, and independent thinking. Sand play adds another layer because it is open-ended. There is no correct way to play with sand. A child can build a castle, flatten a road, dig a tunnel, sift for rocks, or announce that the entire sandbox is now a bakery specializing in invisible muffins.
A sandbox on wheels brings that open-ended play into spaces where a permanent sandbox may not work. It can live on a patio, balcony-style terrace where allowed, garage apron, deck, driveway, or compact backyard. Parents can reposition it depending on weather, supervision, shade, and convenience.
Benefits of a Portable Sandbox
The biggest benefit is flexibility. You can roll the sandbox out during playtime and roll it away when adults reclaim the space. That matters when the same patio hosts morning coffee, afternoon kid chaos, and evening grilling.
Another benefit is cleanliness. A covered rolling sandbox can be stored away from falling leaves, sprinklers, pets, and heavy rain. A cover will not turn sand into a sterile laboratorychildren will still introduce sticks, pebbles, and mystery crumbsbut it helps keep the play area fresher.
Mobility also improves comfort. On hot days, move the sandbox into shade. After rain, roll it into a breezier spot so the sand can dry. If bugs are bad in one area, relocate the fun. The sandbox becomes less like a fixed backyard monument and more like a tiny construction site with better management.
Planning the Perfect Sandbox on Wheels
Before buying lumber or clicking “add to cart” on casters, decide how the sandbox will actually be used. A rolling sandbox for toddlers is different from one for three grade-schoolers with an entire fleet of excavator toys. Bigger is not always better, especially when wheels are involved.
Choose the Right Size
For most families, a small-to-medium sandbox is the sweet spot. A box around 24 by 36 inches can entertain one or two young children while staying manageable. A 3-by-4-foot box gives more room, but the weight rises quickly. Sand has a sneaky way of turning basic math into cardio.
Keep the depth moderate. Four to six inches of sand is often enough for scooping, shaping, digging, and toy-truck play. A deeper box may sound luxurious, but it adds weight and makes the structure harder to move. For a wheeled design, shallow and sturdy beats giant and immovable.
Think About Where It Will Roll
Casters behave differently depending on the surface. Smooth patios and garage floors are easy. Deck boards are usually fine if the wheels are wide enough. Grass is tougher, especially when the ground is soft. Gravel is the final boss.
If the sandbox will stay mostly on concrete or pavers, heavy-duty locking swivel casters can work well. If it must cross lawn, consider larger wheels, wagon-style tires, or a pull-handle cart design. Tiny office-chair casters belong in offices, not under 300 pounds of sand and childhood ambition.
Build for Weight, Not Just Looks
A sandbox on wheels needs a strong frame, not just pretty sides. Use exterior-rated screws, sturdy corner bracing, and a bottom panel that will not sag. If using plywood, choose exterior-grade material and seal it carefully. Cedar, redwood, or other rot-resistant woods are popular for outdoor children’s projects because they hold up well and look friendly in a backyard setting.
Avoid using old, salvaged, or unknown pressure-treated lumber for surfaces children will touch often. If you use treated wood, choose modern materials intended for residential outdoor use and seal exposed surfaces. For kid projects, smooth edges and clean materials are more important than saving a few dollars from the questionable lumber pile behind the shed.
Materials for a DIY Sandbox on Wheels
A basic rolling sandbox can be built with common materials from a home improvement store. The design can be simple: a low wooden tray, reinforced bottom, four locking wheels, a removable lid, and a breathable liner or drainage plan. Fancy extras are optional. Children do not require architectural drama to enjoy sand. Give them a scoop and a plastic dinosaur, and they are basically urban planners.
Recommended Materials
- Exterior-grade lumber or cedar boards for the sides
- Exterior plywood or deck boards for the base
- Heavy-duty locking casters rated well above the total loaded weight
- Exterior screws or stainless/galvanized fasteners
- Corner brackets or wood blocks for reinforcement
- Landscape fabric or drainage holes, depending on the design
- Child-safe exterior sealant or outdoor finish
- A fitted cover, hinged lid, tarp, or slatted wooden top
- Washed play sand made for sandboxes
Choosing Play Sand
Use play sand labeled for children’s sandboxes. Play sand is typically washed and screened so it feels softer and contains fewer unwanted particles than construction sand. Avoid masonry sand, paver sand, or random fill sand. Those materials may be too coarse, dusty, dirty, or simply not intended for children’s hands.
Check the bag label and product details. Many common play sands are sold in 50-pound bags and cover roughly half a cubic foot. That means a sandbox with several cubic feet of volume may need many bags. It also means the finished project may weigh hundreds of pounds. This is why wheel ratings matter.
How to Build a Sandbox on Wheels
You do not need to be a master carpenter to build a rolling sandbox, but you do need to respect weight, drainage, and stability. The goal is a low, strong, smooth-sided box that moves only when an adult wants it to move.
Step 1: Design the Frame
Start with a rectangle or square. Keep the height low enough for children to reach in comfortably, usually around 8 to 12 inches total. The actual sand depth can be less. Cut the side boards to length and assemble them into a box with exterior screws. Reinforce the inside corners with blocks or metal brackets.
Round or sand all edges. Children have an amazing talent for finding the one splinter you missed. Smooth corners make the sandbox more comfortable and reduce the chance of scrapes.
Step 2: Add a Strong Bottom
A wheeled sandbox usually needs a bottom, unlike many traditional ground-level sandboxes that drain directly into soil. Use exterior plywood or closely spaced deck boards secured to the frame. If using plywood, drill drainage holes so rainwater does not sit inside and turn the sandbox into a sad beige soup.
For better drainage, line the inside bottom with landscape fabric. It helps keep sand in place while allowing some water to pass through. Do not use solid plastic as the only liner unless the sandbox will always be stored under cover, because trapped water leads to mildew, odor, and clumpy sand.
Step 3: Mount the Wheels
Install heavy-duty casters at the corners, attaching them to reinforced blocks or a strong underside frame. Choose casters with brakes. Ideally, at least two wheels should lock, and four locking casters are even better. The sandbox should roll when you push it, then stay put when children play.
Check the weight rating. Add the estimated weight of sand, wood, toys, and any child who may lean on the edge. Then choose casters rated comfortably above that number. Do not cut it close. Wheels are not a place for optimism.
Step 4: Seal the Wood
Apply an outdoor finish, especially to end grain, screw holes, and the bottom edges where moisture collects. Use a finish appropriate for children’s outdoor furniture and follow curing directions before adding sand. A sealed sandbox lasts longer, resists moisture better, and looks less like it fought a thunderstorm and lost.
Step 5: Add Sand and Test Movement
Pour in play sand gradually. Test movement after each few bags. If the sandbox becomes hard to roll halfway through filling, stop and rethink. It is better to have a lighter sandbox that moves easily than an oversized one that technically has wheels but emotionally identifies as a boulder.
Step 6: Make a Cover
A cover is not optional. It keeps out leaves, rain, insects, neighborhood cats, and whatever else nature feels like contributing. A hinged wooden cover looks tidy, but it can be heavy. A lightweight slatted lid, fitted outdoor fabric cover, or marine-grade tarp with secure corners may be easier for daily use.
Make sure the cover does not seal moisture inside. Sand should be able to dry between play sessions. If the lid traps humidity, prop it open after rain or choose a breathable design.
Safety Tips for a Rolling Sandbox
A sandbox is simple, but safe outdoor play still needs attention. The best rolling sandbox is stable, clean, shaded when necessary, and supervised.
Lock the Wheels Every Time
Before play begins, lock the casters. Then give the box a gentle push to confirm it stays still. A sandbox that scoots across the patio while a toddler is leaning on it is not whimsical. It is a physics lesson nobody requested.
Keep It Low and Stable
A low sandbox is safer than a tall one. Children should not need to climb into a high box, and the structure should not tip if someone leans on one side. Wider bases, low walls, and evenly distributed sand all help.
Inspect Often
Check for loose screws, cracked boards, sharp edges, rusting hardware, and damaged wheels. Outdoor projects age faster than indoor furniture because sun, rain, and temperature changes are relentless. A monthly inspection is a good habit during active use.
Use Shade Wisely
Sand, plastic toys, metal handles, and hardware can get hot in direct sunlight. Test surfaces with your hand before play, especially in summer. If it feels too hot for your palm, it is too hot for small hands and bare legs. A rolling sandbox makes shade management easier because you can move it under a tree, canopy, pergola, or covered patio.
Wash Hands After Sand Play
Handwashing after sandbox time is a simple rule that prevents a lot of “why is there grit in your sandwich?” moments. It also helps reduce exposure to germs from outdoor surfaces, soil, pets, insects, and shared toys. Keep a small handwashing station, wipes, or sanitizer nearby when outdoor plumbing is not convenient.
Supervise Young Children
Children under three may put sand or small objects in their mouths. Supervision matters, especially with toddlers. Keep small toys, pebbles, caps, and broken plastic pieces out of the sandbox to reduce choking hazards.
Maintenance: Keeping the Sandbox Clean and Useful
A sandbox is not a set-it-and-forget-it project. Fortunately, maintenance is simple when the sandbox is small and portable.
Sift the Sand Regularly
Use a sand sifter, colander, or toy rake to remove leaves, sticks, clumps, and debris. Children can help with this task, especially if you frame it as “treasure hunting” rather than “maintenance.” Parenting is mostly marketing.
Let Wet Sand Dry
Wet sand is great for castles but bad for long-term storage. After rain or water play, uncover the sandbox when weather allows and let the sand dry. Stirring the sand helps moisture escape. If it smells musty, stays wet, or looks contaminated, replace it.
Cover It After Every Use
A cover keeps the sandbox cleaner and discourages animals from treating it like a luxury restroom. Secure the cover so wind cannot lift it. If the sandbox is stored against a wall or under a patio table, make sure air can still circulate.
Refresh Sand as Needed
Even well-kept sand does not last forever. Replace some or all of it if it becomes dirty, compacted, smelly, or mixed with too much yard debris. Smaller rolling sandboxes make this easier because there is less sand to shovel out when refresh time arrives.
Design Ideas for a Better Sandbox on Wheels
The basic rolling box works beautifully, but small upgrades can make it more useful and more fun.
Add a Pull Handle
A rope handle or wagon-style handle makes moving the sandbox easier. Attach it to the frame, not just a thin side board. Keep the handle short enough that children do not trip over it during play.
Create Built-In Toy Storage
A small side bin or removable tray can hold scoops, molds, trucks, and sifters. Drainage holes are helpful because sand toys often come inside wet, dirty, or carrying half the sandbox with them.
Use a Convertible Lid
A lid can double as a play road, work surface, or bench when designed carefully. For example, two hinged panels can fold open and rest on the sides. Just make sure any seating surface is strong enough and does not pinch fingers.
Add a Shade Attachment
A small umbrella mount or removable canopy can make summer play more comfortable. Keep shade attachments lightweight and secure. If the wind picks up, remove them. A flying umbrella is not charming; it is a patio incident report.
Try a Two-Zone Sensory Cart
For younger kids, consider a split design: one shallow bin for sand and one for water, pebbles, or nature finds. Use removable plastic tubs set into a wooden rolling frame. This keeps the structure lighter and makes cleanup faster.
Common Mistakes to Avoid
The most common mistake is building too big. A full-size sandbox on wheels sounds useful until you realize it weighs as much as a small appliance store. Keep it compact.
The second mistake is using weak casters. Always check ratings and choose wheels made for outdoor or utility use. Cheap casters may crack, jam, rust, or refuse to roll once loaded.
The third mistake is forgetting drainage. Rainwater needs somewhere to go. Without drainage, sand becomes heavy, sour-smelling, and unpleasant.
The fourth mistake is skipping the cover. An uncovered sandbox quickly becomes a collection zone for leaves, bugs, pet hair, and neighborhood wildlife opinions.
The final mistake is assuming mobility means children should move it themselves. A sandbox on wheels should be moved by adults. Kids can help choose the location, but adults should handle rolling, parking, and locking.
Who Should Consider a Sandbox on Wheels?
A rolling sandbox is a great option for families who want outdoor play without a permanent installation. It works especially well for small yards, patios, decks, rental homes, grandparents’ houses, and families who like flexible outdoor spaces.
It is also useful for parents who want to supervise play from nearby seating. Roll the sandbox near the garden while you weed, near the patio table while you drink coffee, or near the garage while you organize tools. Children get sensory play; adults get proximity and fewer shouts of “Watch this!” from across the yard.
However, if you have several older children who want to dig deep trenches and build giant sand cities, a traditional ground-level sandbox may be better. Wheels are best for compact, shallow, flexible playnot for recreating the Grand Canyon behind the garage.
Real-Life Experience: Living With a Sandbox on Wheels
The first thing you notice about a sandbox on wheels is that children treat it like magic furniture. One minute it is parked beside the patio chair, and the next it becomes a construction zone, dinosaur dig site, bakery, mountain range, soup kitchen, and “do not touch this because it is science” laboratory. The wheels are for adults, but the imagination belongs entirely to the kids.
In everyday use, the best part is control. A regular sandbox tends to become part of the yard forever, like a tree stump or that one garden hose nobody admits buying. A rolling sandbox can be moved out when the weather is good and tucked away when the space is needed. If guests are coming over, the sandbox can slide under a covered area. If the sun shifts, it can move with the shade. If rain clouds appear, it can be covered and rolled close to the house before the first dramatic splash.
Parents quickly learn that sand quantity matters. The temptation is to fill the box high because more sand seems like more fun. In practice, a shallow layer works surprisingly well. Kids do not need a beach. They need enough sand to scoop, pour, pack, and bury a toy truck up to its headlights. Less sand also means easier rolling, faster drying, and simpler replacement.
The cover becomes part of the routine. After play, toys get shaken off, the sand gets raked flat, and the lid goes on. This small habit makes the next play session more pleasant. Nobody wants to start the morning by removing wet leaves from yesterday’s castle kingdom.
Another lesson is that the sandbox should have a “parking spot.” A dedicated place keeps it from becoming an obstacle. The best spot is shaded, level, and close enough for supervision. A covered patio, garage corner, or side-yard nook can work well. Once the family knows where the sandbox lives, cleanup becomes automatic.
The wheels are useful, but they are not a license to drag the box everywhere. Smooth surfaces are easy. Grass can be annoying. Gravel is where optimism goes to retire. If the sandbox must cross rough ground, larger wheels or a wagon-style base are worth the upgrade.
Most importantly, a sandbox on wheels encourages short, frequent outdoor play. Children can spend ten minutes scooping while dinner cooks or an hour building a city after lunch. It does not require a park trip, a complicated setup, or a perfectly landscaped yard. It brings the best parts of messy, creative outdoor play into a format that fits modern family spaces. And when playtime is over, you lock the lid, roll it away, and enjoy the rare parenting miracle of fun that cleans up in under five minutes.
Conclusion
A sandbox on wheels is one of those outdoor ideas that feels simple because it is simplebut the details matter. Keep it compact, use clean play sand, build a strong frame, choose serious locking casters, provide drainage, and cover it after each use. Do that, and you get a flexible backyard play station that supports creativity, sensory learning, and good old-fashioned digging.
It is not just a box of sand. It is a mobile imagination station. It is a tiny beach with brakes. It is a place where children can test gravity, invent stories, practice sharing, and discover that sand somehow gets into socks even when socks were never involved. For families who want more outdoor play without giving up precious space, the sandbox on wheels earns its parking spot.
Note
This article synthesizes current U.S. child safety, outdoor play, home improvement, and sandbox maintenance guidance into original web-ready content without embedded source links.