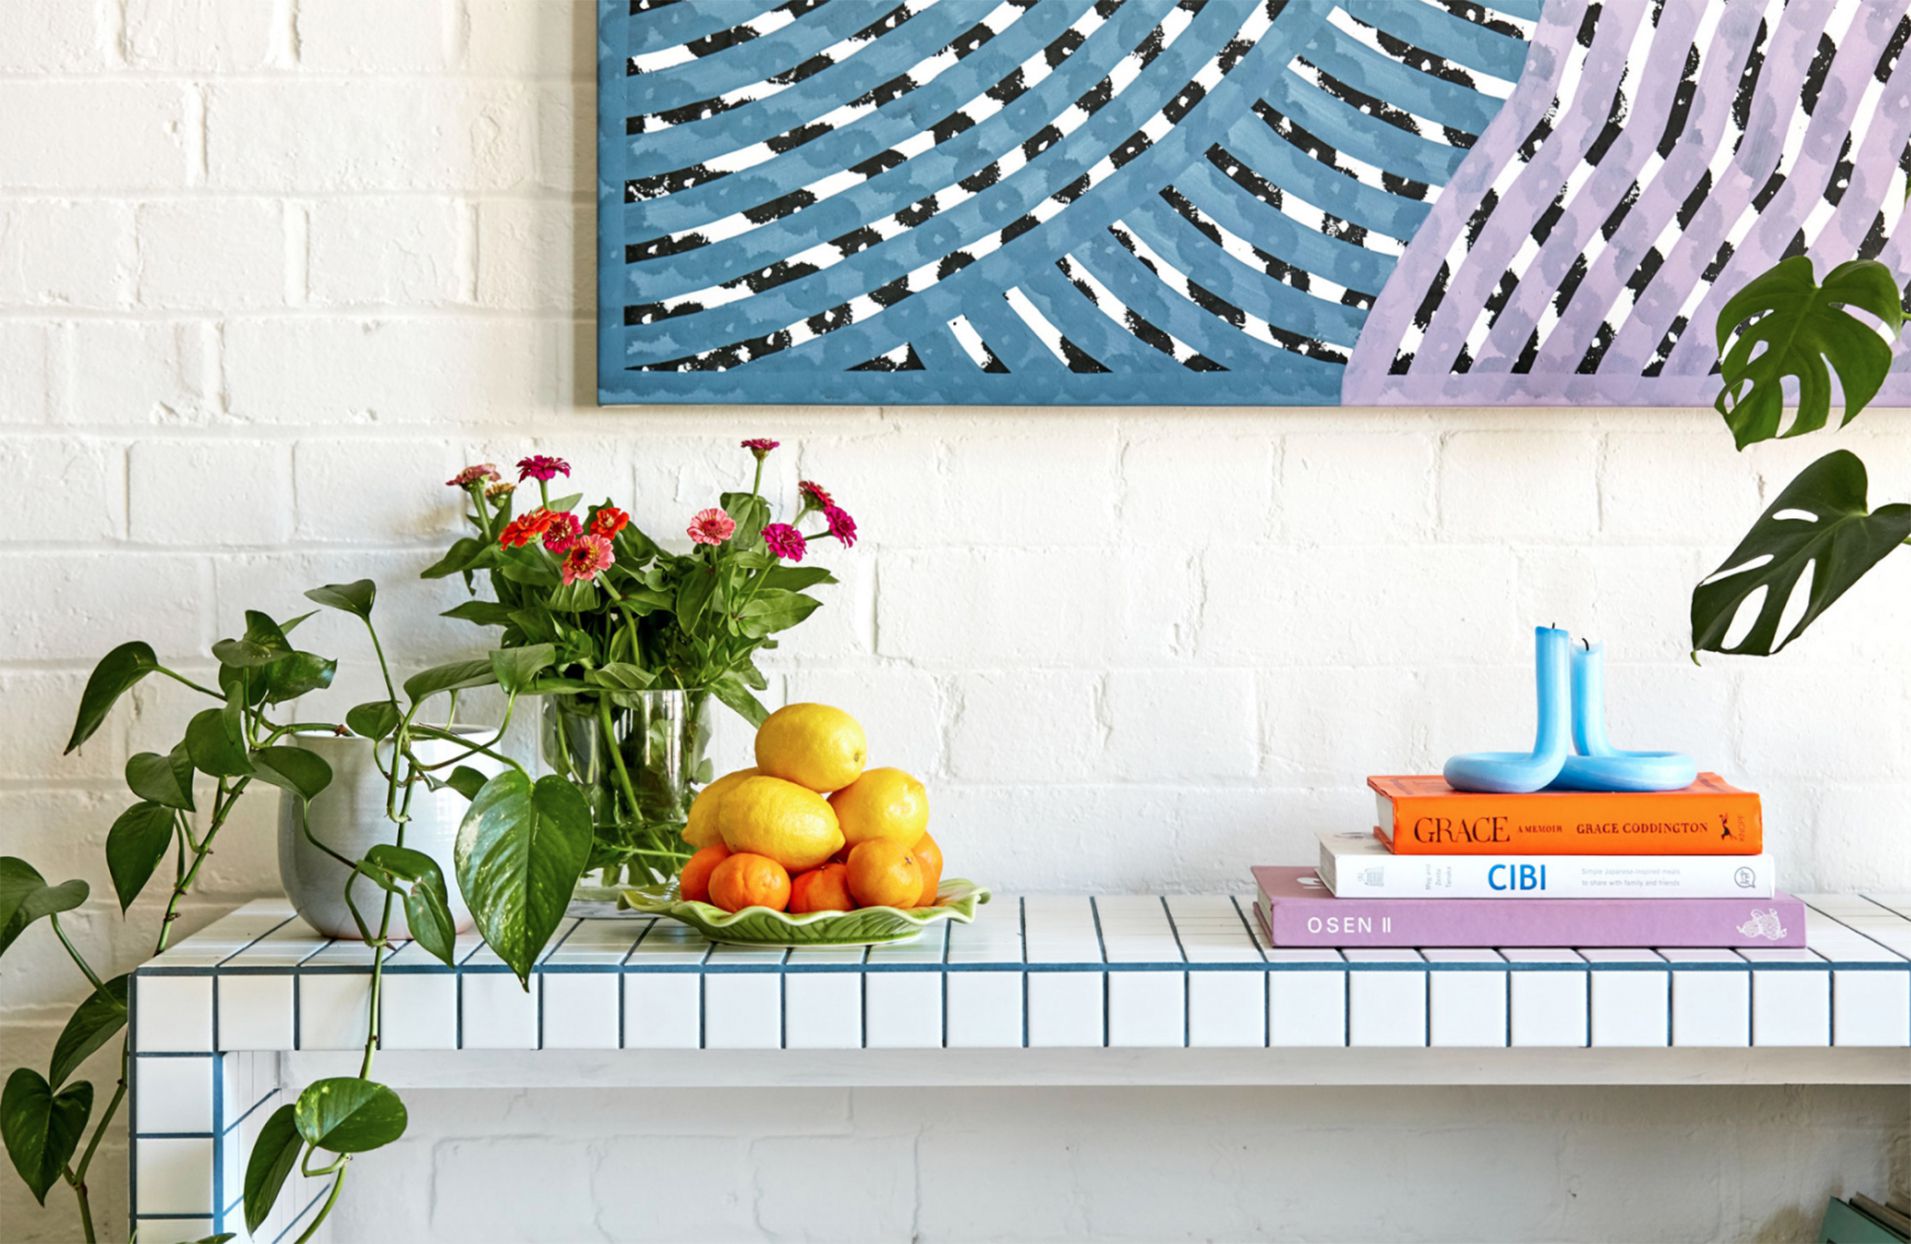
If your algorithm has recently decided you need a tile table, first of all: rude. Second of all: it may not be wrong. Tiled furniture is having a serious moment, and it makes perfect sense. A good DIY tile table looks artsy, custom, slightly European, and wildly more expensive than it actually is. It gives “designer boutique” energy on a “I had a coupon and a dream” budget.
The good news is that you do not need a workshop the size of a small airport to pull this off. For a tile side table, plant stand, or compact coffee table, an under-$100 budget is absolutely realistic if you choose the right base, the right tile, and a layout that works smarter instead of harder. The trick is keeping the project simple, stable, and intentional. In other words: fewer dramatic design decisions made in the adhesive stage.
Below, you’ll find a practical, stylish, and beginner-friendly guide to making a trendy tiled table without blowing your budget, your weekend, or your patience.
Why the DIY Tile Table Trend Is Everywhere
A budget DIY furniture project becomes a trend when it checks three boxes: it looks expensive, it feels personal, and it photographs absurdly well. Tile tables do all three. They combine clean geometry with texture, which is why they work in so many interiors, from retro-inspired apartments to minimalist homes that need one playful piece.
Another reason this trend has taken off is flexibility. You can go full café chic with a black-and-white pattern, lean earthy with matte stone-look porcelain, or fake a custom artisan vibe with glossy handmade-look ceramic tile. A tile table can read vintage, modern, coastal, Mediterranean, or quietly smug in the best possible way.
And unlike some trendy furniture ideas that require advanced woodworking skills, a tile table is refreshingly achievable. You are basically combining a sturdy base with tile, adhesive, grout, and patience. Not glamorous, but effective. Kind of like adulthood.
What You Need for a Tile Table Under $100
The easiest version of this project starts with a small table base you already own, a thrifted table, an unfinished side table, or a simple square top mounted on a basic frame. The smaller the table, the easier it is to stay under budget and get a polished result.
Basic materials
- A small side table, stool, plant stand, or plain wood table base
- Ceramic tile, porcelain tile, or mesh-backed tile sheets
- Tile adhesive or thinset mortar
- Grout
- Notched trowel or putty knife
- Tile spacers if you are using individual tiles
- Sponge and bucket of clean water
- Sandpaper
- Painter’s tape
- Optional: grout sealer, edge trim, caulk, or felt pads
The easiest material choices for beginners
If this is your first tile tabletop DIY, use one of these two approaches:
- Mesh-backed tile sheets: These are easier to align and faster to install, especially on a small square table.
- Small individual square tiles: These give the classic tiled-table look and make it easier to create a checkerboard or color-block pattern.
For indoor tables, ceramic tile is often the friendliest choice for your wallet. For outdoor use or a table that may deal with moisture, porcelain tile is usually the better upgrade because it is denser and less porous.
How to Make a DIY Tile Table Step by Step
1. Start with a stable base
Your tiled top is only as good as what is underneath it. If the table wobbles now, it will still wobble later, except with grout involved. Tighten loose screws, check the legs, and make sure the top is flat. A smooth wood or composite surface works well for a small indoor accent table. If the existing finish is slick, lightly sand it so the adhesive has a better surface to grip.
If you are building from scratch, keep it simple: a square or rectangle is easier than a round top, and a compact side table is easier than a full coffee table. The less cutting required, the more likely you are to enjoy this project and not mutter at it like it owes you money.
2. Measure twice and plan the tile layout
Before opening adhesive, dry-fit every tile on the tabletop. This step matters more than people think. It helps you check spacing, confirm your pattern, and avoid ending up with one weird sliver tile at the edge that screams “I made a choice and regret it.”
Try to center the layout so cut pieces, if needed, end up balanced on opposite sides. If you are using large tiles, fewer grout lines will make the table easier to clean and give it a more seamless, modern look. If you are using mosaics or smaller squares, you’ll get more pattern and texture.
3. Prep the surface
Wipe away all dust after sanding. The surface should be clean and dry before you apply adhesive. If the table has edges you do not want tiled, tape them off. If you do want tiled edges, plan those cuts now instead of pretending Future You will magically become more organized later.
4. Apply adhesive and set the tile
Spread a thin, even layer of tile adhesive or thinset on part of the table using a notched trowel or putty knife. Work in small sections so it does not start setting before the tile goes down. Press the tiles into place gently but firmly, checking alignment as you go.
Use spacers for individual tiles if you want consistent grout lines. If you are using tile sheets, pay close attention to the seams between sheets so the pattern looks continuous. This is the stage where small adjustments make a big visual difference.
Once all tiles are down, let the adhesive cure fully according to the product directions. Resist the urge to “just see” if it is dry. That urge is how projects become stories.
5. Cut edge pieces only if necessary
If your layout requires cuts, use a tile cutter or wet saw, or ask your local home improvement store whether they offer cutting services. For a first project, it is smart to design around minimal cuts. Square tables with small square tile are popular for a reason: they are forgiving.
You can also finish exposed edges with trim, bullnose tile, a wood lip, or caulk if the tile edge is already clean and finished. A neat edge is one of the fastest ways to make a budget table look custom.
6. Grout the table
After the adhesive has cured, apply grout over the tile with a grout float, pushing it diagonally across the joints so the gaps fill evenly. Then wipe away the excess with a damp sponge. The goal is clean joints, not a dramatic swamp scene.
Rinse the sponge often, use light passes, and do not flood the surface with water. Once the grout firms up, buff away haze with a clean cloth. Then let the grout cure as directed.
7. Seal and protect
If your tile or grout calls for sealing, do that after the grout has cured. This is especially worth it if the table will hold drinks, plants, candles, or anything likely to leak, sweat, drip, or behave like a tiny menace. Add felt pads to the feet, and your DIY tile side table is ready for its main-character moment.
Sample Budget Breakdown
Actual pricing varies by region and material choice, but this is a realistic sample budget for a small trendy tile table:
| Item | Estimated Cost |
|---|---|
| Thrifted or unfinished small table base | $20–$35 |
| Budget ceramic tile or one mesh-backed sheet set | $18–$28 |
| Adhesive or thinset | $10–$15 |
| Grout | $12–$18 |
| Sandpaper, sponge, tape, misc. supplies | $8–$12 |
Total: roughly $68 to $98
That budget works best for a small accent table or compact coffee table. Once you move into larger tabletops, specialty tile, fancy trim, or multiple tool purchases, the “under $100” promise can start sweating.
Ceramic vs. Porcelain Tile for a Tabletop
Ceramic tile
Ceramic is usually easier on the budget and often easier to cut, which makes it a strong pick for indoor decorative furniture. It is a great option if your table is mostly for styling, books, lamps, or the occasional coffee mug.
Porcelain tile
Porcelain is denser, tougher, and more moisture resistant. It is a smart choice for outdoor tables, heavy-use surfaces, or homes where coasters are treated as a personal attack. It can cost more, and it may be harder to cut, but it gives you extra durability.
If you are torn, ask yourself one question: is this table mostly cute, or is it going to live a rough life? Cute can be ceramic. Rough life should probably be porcelain.
Design Ideas That Make a Cheap Tile Table Look Expensive
- Go monochrome: All-white, sand, olive, or charcoal tile looks intentional and elevated.
- Try checkerboard: A simple two-color layout gives instant café energy.
- Use matte grout with glossy tile: That contrast adds depth.
- Keep the base simple: A plain wood or black-painted base lets the tile be the star.
- Choose larger tiles for a cleaner look: Fewer grout lines often feel more modern.
- Add a styled vignette: Books, a small lamp, and one sculptural object can make the whole table look like it belongs in a magazine instead of next to your laundry basket.
Common Mistakes to Avoid
Choosing a flimsy base
Tile adds weight. That adorable bargain table with questionable legs may not be your soulmate.
Ignoring layout before gluing
Dry-fitting tile is not optional if you want a polished finish.
Using too much water while cleaning grout
Too much water can weaken the finish and make grout look messy.
Skipping edge planning
A gorgeous top with awkward raw sides never really looks done.
Rushing cure times
Adhesive and grout both need time. Your table is a DIY project, not instant noodles.
Is a DIY Tile Table Actually Worth It?
Yes, especially if you want a statement piece without designer-furniture pricing. A tile coffee table DIY or tile side table project gives you a custom look, lets you control the color palette, and can be adapted to your space in a way store-bought furniture often cannot. It also delivers that unbeatable DIY satisfaction of pointing at something in your home and casually saying, “Oh, that? I made it.”
It is also a project with a decent margin for creativity. You can use glossy white square tile for a clean modern vibe, handmade-look ceramic for warmth, or bold geometric layouts for a more playful finish. You do not need the fanciest materials. You need a cohesive plan.
Final Thoughts
If you have been eyeing the tile table trend and assuming it required a designer budget, here is your sign to stop being intimidated and start measuring. A well-planned DIY tile table for less than $100 is one of those rare home projects that is practical, stylish, and surprisingly achievable. It can work in a living room, bedroom, entryway, patio, or that random corner of your home currently occupied by things you swear you are organizing soon.
Keep the build small, choose tile that suits the table’s real-life use, and do not overcomplicate the layout. Trendy does not have to mean expensive, and custom does not have to mean chaotic. Sometimes it just means a sponge, a grout float, and enough confidence to tile a table like you have been doing this since 1978.
Real-World Experience: What Making a Tile Table Actually Feels Like
One of the most interesting things about making a tile table is that the project looks deceptively simple from the outside. You see the finished piece online and think, “That’s cute. I can do that in an afternoon.” Then you start, and you realize the experience is less like assembling a trendy décor item and more like entering a very specific relationship with measurement, symmetry, and grout haze.
The first emotional phase is optimism. This is when you buy tile and suddenly become convinced you are the kind of person who says things like “I prefer a matte finish” with total authority. Picking colors is fun. Planning the pattern is fun. Bringing the supplies home feels productive and powerful, like your life is about to become significantly more editorial.
Then comes the dry-fit stage, which is where many people discover that a quarter inch is both tiny and completely capable of ruining a layout. This is also where the project becomes real. You start noticing how important balance is. You learn that centering the tile makes a huge difference. You learn that one awkward edge can make an otherwise beautiful table look homemade in the wrong way. This is not bad news, though. It is actually the part where your eye gets better. You begin seeing why some DIY furniture looks custom and some looks like it lost an argument.
Once the adhesive goes on, the project gets oddly calming. Pressing tile into place is satisfying in the same way organizing a drawer is satisfying, except now it has stakes. You start paying attention to spacing, corners, and whether each piece sits level. Small adjustments feel important because they are. Most people who make a tile table for the first time come away with a new appreciation for finish work. The final result is rarely about one dramatic move. It is about a series of careful, boring, excellent choices.
Grouting is where the emotional plot twist happens. At first it looks like you have absolutely destroyed your project. Everything gets cloudy. The tile loses its sparkle. You may briefly wonder whether you should move and start over in a new identity. Then you wipe, buff, and wait. Slowly the surface comes back to life, and the grout lines start making sense. It is an excellent lesson in not judging a project too early, which, frankly, is also excellent life advice.
Another common experience is surprise at how expensive the finished table looks compared to what it actually cost. Even a very simple tiled top has texture, shine, and visual weight. People notice it. They ask where you bought it. And there is a special joy in saying you made it yourself, especially when the table started as a plain little piece that no one would have admired before.
What people also learn from this project is that trendy furniture feels more meaningful when it is customized. Maybe you choose a color that picks up tones from your rug. Maybe you use leftover tile from another room. Maybe the table ends up slightly imperfect, but in a way that makes it feel more personal than something mass-produced. That is part of the appeal. A DIY tile table is not just a budget win. It is a piece with personality, and personality always outperforms perfection in a real home.
So yes, the experience includes some mess, some measuring, and at least one moment of deeply dramatic overthinking. But it also includes creativity, skill-building, and a finished piece that looks far more expensive than its price tag. That is a pretty great trade.