Some people look at a blank wall and see a blank wall. Makers look at it and see unused real estate for solder, geometry, light diffusion, and at least one moment where a wire gets hotter than expected. The LED art project at the center of this story is a perfect example: a custom geometric wall sculpture built from aluminum channel, 3D-printed connectors, addressable LED strips, and software clever enough to make light move as if it knows where it lives.
In a world full of ready-made glowing wall panels, this project stands out because it does not simply buy beauty in a box. It builds beauty from rules. Straight lines. Randomized layouts. Measured LED positions. Graph-based animation paths. A Raspberry Pi Zero W quietly acting as the conductor while hundreds of LEDs perform a tiny electronic ballet. The result is not just LED wall art. It is a handmade conversation piece, a geometry lesson with better lighting, and a reminder that home decor can have a command line.
What Makes This LED Art Project So Beautiful?
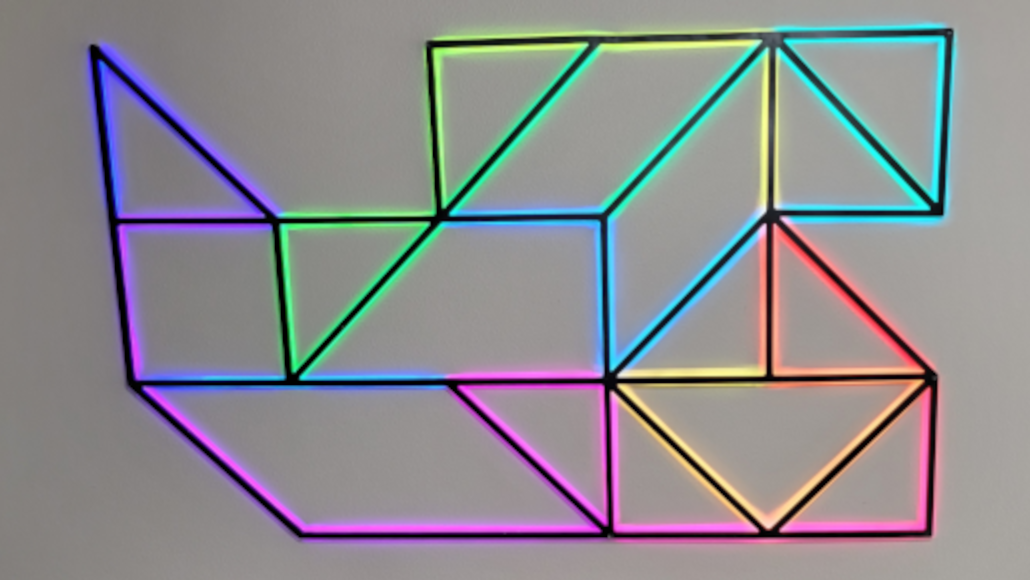
The appeal begins with geometry. Instead of forming a predictable rectangle, circle, or grid, the sculpture uses connected line segments that branch and meet at unusual angles. This gives the design a natural balance: part circuit diagram, part abstract painting, part futuristic subway map for a city where everyone commutes by photon.
The maker, Chris, wanted something more personal than commercial LED wall lights. He had a plain wall behind his sofa, often visible during video calls, and decided it deserved a little personality. Rather than buying modular light panels, he designed a custom geometric pattern from scratch. That decision is the heart of the project. Store-bought panels may look polished, but handmade LED art carries the delightful fingerprint of the person who built it.
The design was generated using a small browser-based tool. The tool allowed different line-segment lengths and random seeds to create layout options. This is where the project gets especially interesting: the geometry was not drawn by pure guesswork. It was explored computationally. The maker could test designs quickly, compare proportions, and choose one that felt visually balanced. In other words, the “random” design was not chaos. It was curated randomness, which is basically what nature has been doing with trees, lightning, and spilled coffee for ages.
The Core Ingredients: Aluminum, LEDs, 3D Printing, and Patience
The physical structure uses straight sections of aluminum channel. Aluminum channel is a favorite material for LED strip projects because it looks clean, protects the strip, helps manage heat, and provides a professional housing for diffusers. It also gives a project crisp edges, which matters when the entire artwork depends on straight lines looking intentional rather than “I measured this with a sandwich.”
The intersections were more complicated. A geometric design with many branching paths needs connectors at different angles, and not every hardware store stocks “oddly specific glowing wall sculpture junctions” next to the drawer pulls. Chris solved the problem with 3D printing. He designed custom plastic adapters in Fusion 360, creating intersection pieces with different numbers and directions of arms. Some of these parts also included screw holes for wall mounting.
This combination of aluminum channel and 3D-printed connectors is what gives the piece its unusually finished look. Many DIY LED projects are charming but visibly improvised. This one feels planned. The parts fit together as a single sculptural frame, and after sanding, filling, priming, and painting, the joins disappear. That finishing work is not glamorous, but it is the difference between “cool prototype” and “yes, I meant to put that in the living room.”
Addressable LEDs: The Magic Behind the Motion
The project uses addressable LED strips, meaning each LED can be controlled individually. This is a major difference from basic LED strips, where the whole strip usually changes color at once. With addressable LEDs, the maker can send color data down the strip and tell pixel number 1 to glow blue, pixel number 2 to fade purple, pixel number 3 to chase across the wall like it just remembered it left the oven on, and so forth.
Addressable LEDs such as WS2812-style pixels are popular in maker projects because they combine red, green, and blue light with a tiny control chip in each LED package. They can be chained together and driven by a microcontroller or small computer. That makes them ideal for custom LED installations, interactive lighting, art panels, wearable projects, and decorative builds where animation matters as much as illumination.
In this sculpture, the LEDs are not merely blinking randomly. The project includes 36 separate LED strip sections with a total of about 850 LEDs. Those strips are arranged in the aluminum channels and connected into a full addressable circuit. The maker mapped the LED positions so animations could move across the physical design with awareness of the sculpture’s actual shape. That is the part that transforms the build from “pretty lights” into “geometric light art.”
Why LED Mapping Matters
Imagine trying to animate a point of light traveling smoothly across a sculpture without knowing where each LED is located. The software would only know LED order, not physical space. A chase effect might technically run from pixel to pixel, but visually it could jump around in strange ways. That may be fun if you are trying to simulate a nervous squirrel, but it is not ideal for elegant wall art.
Chris solved this by treating the sculpture like a graph. In graph theory, nodes are points and edges are the connections between them. The intersections of the sculpture function like nodes, while the straight LED channels function like edges. With that structure, software can calculate paths from one point to another. It can make light travel through the artwork in a way that follows the geometry instead of ignoring it.
The project also uses measured physical LED locations. By knowing where each LED sits in space, animations can move at consistent visual speeds across different segments. A short section and a long section can both participate in the same effect without one looking rushed and the other looking like it stopped for lunch. This attention to spatial mapping is one of the reasons the final result feels polished.
The Raspberry Pi Zero W as the Brain
The sculpture is controlled by a Raspberry Pi Zero W, a tiny Linux-capable computer that has become a classic choice for compact electronics projects. It is small enough to hide, powerful enough to run Python scripts, and flexible enough for remote access. In this build, the Pi sends commands to the LED strips and runs the animation software.
One technical challenge is voltage. Raspberry Pi GPIO pins operate at 3.3 volts, while many common addressable LED strips expect a 5-volt data signal. To bridge that gap, the project uses a level-shifting chip. This may sound like a minor detail, but signal reliability is everything in addressable LED work. A weak or mismatched data signal can lead to flickering, incorrect colors, or behavior best described as “haunted Christmas.”
The software was written in Python, and the maker can connect to the Pi via SSH to choose programs and write new animations. A future web interface was also planned, which would make changing effects easier. That is a smart direction because once an LED sculpture is mounted on a wall, nobody wants to manage it like a server in a broom closet. A browser-based control panel would make the art feel more like a finished product and less like a tiny glowing Linux homework assignment.
Power: The Part of LED Art That Refuses to Be Ignored
LED art is glamorous from the front and very serious from the back. Hundreds of LEDs can draw significant current, especially at high brightness. Good LED projects require careful power planning, proper wire gauge, shared ground connections, and power injection when needed. This project includes a useful cautionary tale: at one point, too much current was flowing through insufficient wiring, and the wires began to smoke after a few minutes.
That is not a design flourish. That is electricity politely suggesting a redesign.
The fix involved separate power connections to avoid pushing too much current through a single path. Large LED installations often need power injected at multiple points along the strip so voltage does not drop and wires do not overheat. This is especially important when the LED count climbs into the hundreds. The brighter the installation, the more important the power plan becomes.
For anyone inspired by this geometric LED wall art, power should be treated as part of the design from the beginning. Estimate current draw, choose a reliable 5-volt power supply with enough amperage, use appropriate wire thickness, and test in stages. The goal is an art piece that glows beautifully, not a wall-mounted toaster with ambition.
Why Geometry Works So Well With LED Art
Geometry and LEDs are natural partners. LEDs are points of light. Geometry gives those points a visual logic. Lines, nodes, symmetry, asymmetry, repetition, and proportion all help the viewer’s eye understand the artwork. Even when the pattern is generated randomly, the use of straight segments and consistent spacing makes the final design feel intentional.
Geometric LED art also benefits from contrast. During the day, the piece can function as a sculptural wall object. At night, it becomes a light performance. The same frame has two personalities: quiet modern decor when off, animated digital sculpture when on. That dual identity is one reason LED wall art has become so popular in homes, studios, maker spaces, gaming rooms, and creative offices.
There is also something deeply satisfying about watching light move through a physical structure. A fade on a normal LED strip is pleasant. A chase animation moving along a mapped network of lines feels alive. It suggests flow: electricity, traffic, data, blood vessels, constellations, thought patterns, or whatever poetic metaphor you prefer before coffee.
DIY LED Wall Art vs. Commercial Light Panels
Commercial LED wall panels are convenient. They are easy to mount, app-controlled, and usually polished right out of the box. They also tend to follow recognizable modular patterns. That is not bad, but it does mean many installations look similar. DIY LED wall art gives makers more control over scale, shape, materials, animation style, and personality.
The trade-off is time. This project took planning, cutting, gluing, soldering, sanding, painting, coding, testing, and troubleshooting. It required learning across several domains: digital design, fabrication, electronics, software, and installation. That is a lot of hats. Fortunately, makers are known for wearing many hats, usually while misplacing the one with the safety glasses attached.
The payoff is originality. No commercial kit could precisely reproduce this piece because the design came from custom rules, a chosen random seed, custom junctions, and hand-built assembly. It is not just decoration. It is a record of decisions.
Design Lessons From the Project
Start With the Wall, Not the LEDs
The project began because a blank wall needed visual interest. That is the right starting point. Before buying parts, consider the space. How large should the piece be? Will it be seen on video calls? Should it be bright enough to light the room or subtle enough to act as ambient decor? A great LED art project is designed for its environment.
Let Software Help With Composition
The browser-based random design tool was a clever move. It allowed rapid exploration before any material was cut. For geometric LED art, a simple generator can help test line lengths, angles, density, and balance. This reduces waste and increases the chance that the final piece looks designed rather than assembled during a mild caffeine emergency.
Map the LEDs Before Writing Fancy Animations
Mapping is the secret sauce. Once the software understands the physical layout, animations become more expressive. Lights can race between nodes, ripple across the structure, pulse from intersections, or flow along calculated paths. Without mapping, animations are limited to strip order. With mapping, the sculpture becomes a programmable canvas.
Finish the Frame Like Furniture
Sanding, filling, priming, and painting may not be as exciting as watching the first LED blink, but those steps matter. A clean finish helps the viewer focus on the shape and light instead of the construction seams. The project’s uniform painted frame makes it feel cohesive and intentional.
Practical Tips for Building a Similar Geometric LED Project
Anyone planning a similar project should begin with a sketch or digital layout. Decide whether the piece will be a closed loop, branching network, grid, wave, or abstract polygonal structure. Then determine the LED density and total strip length. More LEDs create smoother effects but require more power, more data, and more patience. Patience, unfortunately, is not sold in 5-meter reels.
Use aluminum channels where possible. They protect the strips, improve the look, and provide a mounting surface for diffusers. Diffusers are especially useful because raw LEDs can look harsh, with visible bright points. A diffuser softens the light and makes animations appear more fluid.
Plan the wiring before assembly. Addressable LED strips are directional, and data must flow in the correct order unless the software and wiring are designed around multiple outputs. Power and ground can be injected at several points, but all grounds must be connected together. Label sections as you build. Future you will appreciate it, especially when future you is upside down behind a sofa wondering why segment 17 thinks it is segment 4.
Test early and often. Chris tested after every few connections, which is exactly the right habit. Finding a bad solder joint while the frame is on the workbench is annoying. Finding it after the frame is mounted is a small opera in three acts.
The Artistic Side: Light as Motion, Not Just Color
The best LED art projects do not rely only on bright colors. They use motion, rhythm, contrast, and restraint. A wall full of rapidly flashing rainbow effects may be impressive for twelve seconds, after which it begins auditioning for a headache. The geometric sculpture works because the animations can follow paths and relationships. The viewer sees movement with structure.
Subtle effects often look more sophisticated than maximum brightness. Slow pulses, traveling highlights, warm gradients, and occasional bursts of color can make the sculpture feel alive without overwhelming the room. This is especially important for home decor, where the piece must coexist with furniture, people, and the sacred human activity of watching television without being attacked by a disco polygon.
Why This Project Matters in the Maker World
This LED art project is a strong example of modern maker culture because it blends multiple accessible technologies into something personal. Addressable LEDs are widely available. Raspberry Pi boards and microcontrollers have made programmable hardware approachable. 3D printing allows custom mechanical parts. Design tools like Fusion 360 help turn ideas into precise components. Open-source software ecosystems make animation and control easier than ever.
But the project also shows that tools alone do not create beauty. The beauty comes from the integration: the geometry, the mapped LED positions, the hidden wiring, the clean frame, and the willingness to redo the power plan when reality gets smoky. It is a reminder that great DIY projects are not just about making something work. They are about making something work well enough that people forget how hard it was.
Experiences and Reflections: Living With a Geometric LED Art Project
There is a special kind of satisfaction that comes from building an LED art project and then seeing it become part of daily life. At first, it is a technical challenge. You think about segment lengths, solder joints, voltage drop, data direction, mounting points, software libraries, and whether the wall will forgive you for the number of holes you are considering. But once the project is finished, it changes categories. It stops being a build and starts being an atmosphere.
A geometric LED wall sculpture can make a room feel more intentional. It gives the eye a place to land. During the day, the structure adds architectural interest, especially if the frame is painted in a neutral color that blends with the room. At night, the LEDs create depth and mood. The same room can feel calm, futuristic, playful, or dramatic depending on the animation. That flexibility is one of the underrated joys of programmable decor.
The experience is also surprisingly social. Visitors notice LED art immediately. They ask how it works, whether it was bought, how long it took, and whether it can display “just one more rainbow thing.” On video calls, it becomes a background that says, “Yes, I own a soldering iron, and yes, it has opinions.” Unlike a poster or framed print, animated LED art invites questions because it clearly contains hidden effort.
Building one also teaches respect for invisible work. The final piece may look clean and effortless, but the hidden labor is everywhere. Behind every smooth animation is a layout file. Behind every glowing line is a strip cut to length. Behind every tidy intersection is a connector that had to be designed, printed, sanded, and fitted. Behind every reliable effect is a power system that no longer tries to smoke. That hidden engineering becomes part of the appreciation.
There is also creative freedom after the build is complete. Traditional art is usually finished when it is hung. LED art can keep evolving. A new animation can change the personality of the piece without changing the hardware. You can create slow ambient patterns for evenings, bright color effects for parties, seasonal palettes for holidays, or minimalist white motion for a clean modern look. The artwork becomes a platform.
One of the best experiences with this kind of project is discovering that imperfections can be useful teachers. A fragile frame teaches better mounting methods. A confusing wiring path teaches better labeling. A flickering LED teaches signal integrity. A too-bright animation teaches restraint. Each problem leaves behind a smarter maker. The final sculpture may be beautiful, but the process is the real workshop trophy.
For beginners, the project may look intimidating, but it can be scaled down. A smaller version with fewer segments, a single microcontroller, and a modest number of LEDs can still capture the same geometric charm. Start with a desktop panel, a small wall piece, or a framed acrylic design. Learn how addressable LEDs behave. Practice soldering. Try WLED or a simple animation library. Once the basics make sense, larger geometric installations become much less mysterious.
The biggest lesson is that LED art works best when technology serves the design. The goal is not to use every effect or push every LED to full brightness. The goal is to create a visual experience that feels right in the space. Geometry provides the bones. LEDs provide the motion. Software provides the behavior. The maker provides the taste, persistence, and occasional muttering.
That is why this project is so compelling. It is not beautiful because it glows. Lots of things glow. It is beautiful because the glow has structure, intention, and a handmade story behind it. It proves that a blank wall can become a canvas, a circuit can become sculpture, and a random number generator can have surprisingly good interior design instincts.
Conclusion
The LED art project is geometrically beautiful because it brings together design, electronics, fabrication, and software in a way that feels both technical and human. Its straight-line structure gives it modern visual appeal, while addressable LEDs and mapped animations give it motion and personality. The custom 3D-printed joints, aluminum channels, Raspberry Pi control, and carefully planned LED paths show how far a DIY project can go when the maker treats every detail as part of the artwork.
More than a glowing wall decoration, this project is a lesson in creative engineering. It demonstrates why custom LED wall art can be more rewarding than commercial light panels: it is unique, programmable, personal, and shaped by real problem-solving. It also proves that geometry is not just something students survive in school. In the right hands, geometry can light up a room and look fantastic doing it.