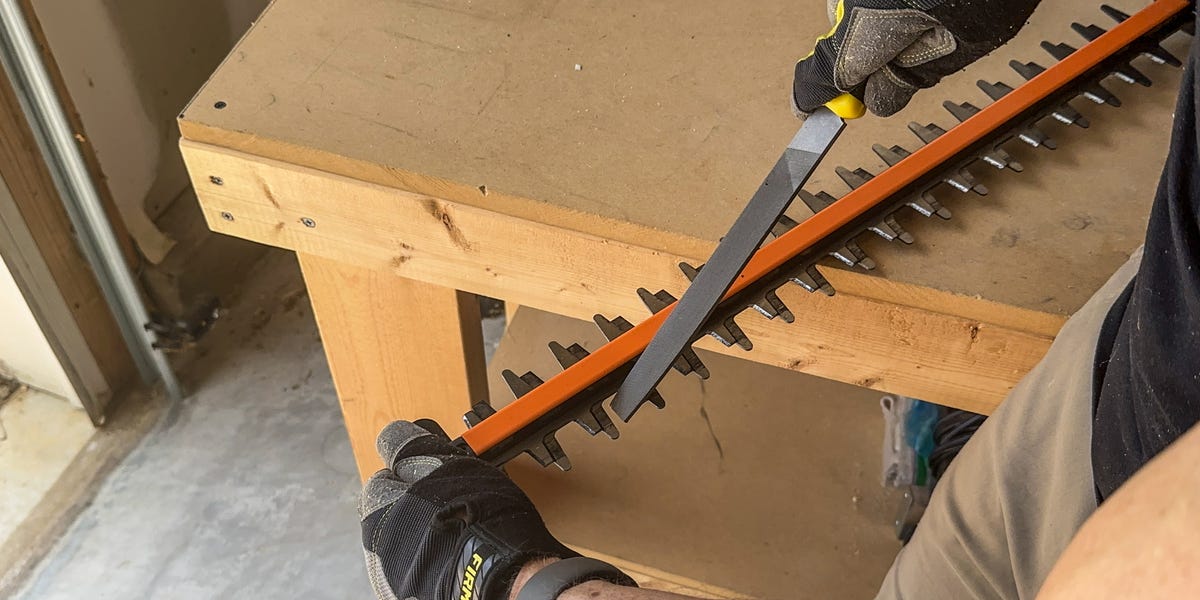
A hedge trimmer with dull blades has a special talent: turning a simple yard job into an upper-body workout while leaving your shrubs looking as though they lost an argument with a lawnmower. Instead of slicing cleanly through fresh growth, dull or dirty blades can tug, tear, jam, and force you to make repeated passes.
Fortunately, learning how to sharpen a hedge trimmer is manageable for many homeowners. The basic process is straightforward: disconnect the power source, clean the cutting bar, inspect the blades, preserve the original cutting angle, file each cutting edge evenly, remove burrs, lubricate the blades, and test the tool carefully. Major tool manufacturers and home-improvement authorities generally agree on those fundamentals, although the exact file shape, blade access method, and service recommendations can vary by model.
This guide explains the process in depth, including how to recognize genuinely dull blades, which tools to use, which mistakes can ruin an otherwise good cutting bar, and when professional sharpening is the smarter choice.
How Do You Know When a Hedge Trimmer Needs Sharpening?
Do not automatically reach for a file every time your hedge trimmer feels sluggish. A cutting problem can come from dull edges, but it can also result from dried sap, trapped debris, inadequate lubrication, damaged teeth, or a mechanical problem inside the drive system.
Common signs of dull hedge trimmer blades include:
- Branches are torn or shredded instead of sliced cleanly.
- The trimmer requires several passes over the same area.
- Fresh growth bends or gets pushed between the teeth instead of being cut.
- The tool feels less efficient even after the blades have been cleaned.
- The cutting edges look rounded rather than crisp.
- Small nicks are visible along otherwise straight cutting bevels.
Sticky plant resin can imitate dullness by increasing friction between the reciprocating blades. Cleaning should therefore come before sharpening. Manufacturers including STIHL, Husqvarna, ECHO, and BLACK+DECKER emphasize regular blade cleaning and maintenance because debris, moisture, and plant residue can interfere with smooth operation.
How Often Should You Sharpen Hedge Trimmer Blades?
There is no universal calendar rule that works for every trimmer and every yard. A homeowner shaping a few soft boxwoods twice a year will wear blades much more slowly than a landscaper cutting dense hedges for hours each week.
Some manufacturer guidance suggests limiting sharpening to roughly every 50 hours of accumulated operation and removing as little metal as necessary. Treat that as a useful reference point rather than a commandment carved into the garage wall. Blade condition, the plants being cut, accidental contact with hard objects, and the instructions for your specific machine matter more than an arbitrary date.
A better habit is to inspect and clean the cutting bar regularly. Sharpen when cleaning and lubrication no longer restore a clean, efficient cut.
What You Need to Sharpen a Hedge Trimmer
For most conventional straight-tooth hedge trimmer blades, a basic hand-sharpening kit is enough:
- Heavy work gloves
- Safety glasses
- A flat mill file or the file specified by the manufacturer
- A fine whetstone, sharpening stone, or suitable diamond stone
- A stiff nylon brush and clean rags
- Blade cleaner or an appropriate resin-removing product
- Blade lubricant recommended for outdoor power equipment
- A bench vise or clamps, when appropriate
- A permanent marker for tracking completed teeth
Do not assume one file fits every cutting-bar design. BLACK+DECKER, for example, has published guidance involving a round file for certain hedge trimmer blades, while STIHL and other sources commonly describe a flat-file method. The operator’s manual should settle the argument before your toolbox gets a vote.
How to Sharpen a Hedge Trimmer Step by Step
1. Disconnect Every Source of Power
This is the most important step, and it is not optional.
For a cordless hedge trimmer, remove the battery. For a corded model, unplug it. For a gas-powered machine, shut off the engine and follow the manufacturer’s servicing instructions, which commonly include preventing accidental ignition before working near the cutting assembly.
Never clean a jam, reposition exposed teeth, or sharpen a blade while the machine can start unexpectedly. Manufacturer safety guidance specifically warns that accidental activation during servicing can cause serious injury.
Set the trimmer on a stable, well-lit work surface. Wear gloves, but remember that gloves are backup protection, not permission to grab the teeth like a sandwich.
2. Clean the Blade Before Filing
Brush away leaves, bark, dust, and loose debris. Then remove sticky sap and resin with a product appropriate for the blade and your manufacturer’s recommendations. Wipe the cutting bar dry.
This step matters for two reasons. First, you need to see the actual cutting edge to sharpen it accurately. Second, resin buildup can increase friction and make a reasonably sharp blade behave like a dull one. Cleaning first may even reveal that sharpening is not yet necessary.
Avoid soaking the motor housing, battery compartment, or electrical components. When in doubt, follow the cleaning instructions in the owner’s manual.
3. Inspect the Teeth for Damage
Before removing metal, inspect the full cutting bar. Look for:
- Cracked teeth
- Deep chips
- Severely bent sections
- Loose hardware
- Abnormal gaps or misalignment
- Heavy corrosion
Light dulling and minor nicks are sharpening jobs. A cracked, badly bent, or seriously damaged cutting assembly is a repair or replacement problem. Filing a structural defect does not magically turn it into healthy steel; it simply produces a slightly shinier structural defect.
Professional service is also sensible when the blade design is unusually complex, the cutting bar cannot be safely accessed, or the manufacturer’s instructions recommend dealer servicing.
4. Position the Teeth for Safe Access
Many powered hedge trimmers use two blade sections that slide back and forth against each other. Depending on where the machine stopped, one blade may partially cover the cutting edges you need to reach.
Consult the manual for the correct way to expose the teeth. Some maintenance procedures involve changing the stopping position of the blades before the power source is finally disconnected. Never place your hands near the cutting bar while performing such a powered positioning step. Once the teeth are accessible, completely isolate the machine from its power source before continuing.
If recommended for your model, secure the trimmer or cutting bar so it cannot slide around while you work. Husqvarna guidance, for example, recommends fixing the blade securely to the work surface to improve control during filing.
5. Find the Original Cutting Bevel
Each cutting tooth has a factory-ground edge. Your goal is to restore that geometry, not invent a more dramatic one.
Hold the file against the existing bevel and match its angle. Do not deliberately make the edge steeper simply because a razor-like profile seems impressive. An unnecessarily thin edge may lose durability, and excessive filing shortens the life of the blade.
Major sharpening guides consistently recommend following the original blade angle and removing metal evenly rather than reshaping the tooth.
6. File Each Cutting Edge in One Controlled Direction
Place the file on the beveled cutting surface. Push it through the sharpening stroke in one direction, then lift or relax it on the return instead of aggressively sawing back and forth.
Use light, deliberate pressure. A few controlled strokes are better than enthusiastic grinding. Keep the file aligned with the original bevel from the beginning of the stroke to the end.
Work tooth by tooth. Mark completed teeth with a marker if the cutting bar is long enough to make you forget where you startedwhich is surprisingly easy once every tooth begins looking like the previous tooth’s identical cousin.
STIHL’s sharpening guidance describes using a flat file on the cutting teeth, while Husqvarna emphasizes straight, even filing and treating the cutting edges consistently.
7. Keep the Sharpening Even
Try to use approximately the same number of light strokes on similarly worn teeth. The objective is consistency, not mathematical perfection. One badly nicked tooth may need slightly more attention, but avoid chasing every imperfection until half the blade has disappeared onto the workshop floor as metal dust.
Lowe’s and other maintenance guides recommend maintaining the original angle and working the cutting edges evenly. This helps preserve consistent cutting geometry across the bar.
8. Remove Burrs From the Opposite Side
Filing a bevel can create a thin raised burr on the flat side of the cutting edge. After sharpening, use a fine whetstone or suitable sharpening stone to remove that burr gently.
The key word is gently. You are not trying to create a second major bevel. The flat side should remain essentially flat while the burr is removed. STIHL and other detailed sharpening guides include this deburring step because a clean edge should not retain a wire-like lip of displaced metal.
9. Clean Away Metal Filings
Wipe the cutting bar carefully after sharpening. Remove loose filings and abrasive residue before lubrication. Small particles left between moving blade sections are not useful souvenirs from your maintenance session.
10. Lubricate the Blades
Apply the blade lubricant recommended for your hedge trimmer. A light, even application is generally preferable to flooding the bar. Excess lubricant can attract debris and make a mess, while appropriate lubrication helps the moving surfaces slide more freely and can assist with corrosion protection during storage.
Because manufacturers may specify different products and maintenance routines, use the owner’s manual as the final authority for your machine.
11. Reinspect and Test Carefully
Before reconnecting the battery, plug, or ignition system, inspect the blade again. Confirm that no tools, clamps, or cleaning materials remain attached to the trimmer.
Restore power only after the tool is fully assembled and positioned for normal operation. Start it in a clear area and listen for abnormal scraping, binding, or vibration. Then make a controlled test cut on appropriate hedge growth within the machine’s rated cutting capacity.
A properly serviced trimmer should cut cleanly without requiring excessive force. If it still binds or tears after cleaning, sharpening, and lubrication, stop using it and investigate alignment, drive, or blade damage rather than repeatedly removing more metal.
Can You Sharpen Hedge Trimmer Blades With a Grinder?
Technically, powered grinding equipment can remove metal quickly. That is precisely the problem.
A grinder can change the blade angle rapidly, remove too much material, or create excessive heat when used without experience. For routine homeowner maintenance, a hand file offers more control. Some manufacturers or service professionals may use specialized powered sharpening equipment, but that does not mean an ordinary angle grinder is the best first choice for a beginner.
Use a rotary tool or grinding wheel only when the blade manufacturer permits it and you understand how to maintain the original geometry without overheating or overgrinding the cutting edge. Lowe’s includes grinding equipment among possible sharpening methods, while manufacturer-specific instructions frequently describe controlled filing.
Common Hedge Trimmer Sharpening Mistakes
Sharpening Before Cleaning
Sap can hide the edge and increase friction. Clean first, then decide whether the blade truly needs sharpening.
Changing the Factory Angle
The original bevel is your guide. Creating a new angle may reduce cutting performance or edge durability.
Filing the Wrong Surface Aggressively
The primary work belongs on the designed cutting bevel. The opposite side generally needs only careful deburring unless your specific blade design calls for another procedure. Bob Vila’s hedge-trimmer sharpening guidance similarly emphasizes preserving the intended cutting surface rather than indiscriminately grinding both sides.
Removing Too Much Metal
Sharpening is maintenance, not sculpture. Stop when the edge is restored.
Ignoring Mechanical Problems
A sharp blade cannot repair damaged gears, a bent cutting bar, loose hardware, or an alignment problem. Persistent binding deserves diagnosis, not another ten minutes with a file.
Working With the Power Source Connected
This is the mistake with the highest potential cost. Remove the battery, unplug the cord, or otherwise disable the machine according to its manual before your hands go near the cutting teeth.
How to Keep Hedge Trimmer Blades Sharp Longer
Good maintenance can reduce how often the blades need serious sharpening.
Clean the cutting bar after demanding jobs, especially when trimming resinous or sticky plants. Lubricate according to the manufacturer’s instructions. Store the machine in a clean, dry place. Avoid forcing the trimmer through branches larger than its rated cutting capacity, and keep the blade away from fences, wire, masonry, rocks, and other objects that can damage the teeth.
Regular cleaning, lubrication, and dry storage are widely recommended across manufacturer and home-maintenance guidance because they help reduce friction, corrosion, and debris buildup.
When Should You Replace or Professionally Service the Blade?
DIY sharpening makes sense when the teeth are simply dull or lightly nicked. Professional service becomes the better choice when:
- The blade has cracks or severe bending.
- Several teeth are deeply damaged.
- The blade binds even after cleaning and lubrication.
- The cutting sections appear misaligned.
- The trimmer vibrates abnormally.
- The blade design requires specialized sharpening equipment.
- The operator’s manual recommends authorized service.
- You cannot secure or access the cutting teeth safely.
There is no prize for turning a repairable cutting bar into modern metal art. When structural damage or mechanical trouble is involved, professional service is often cheaper than replacing parts damaged by an unsuccessful repair attempt.
Practical Experience: What Sharpening Hedge Trimmers Teaches You Over Time
The biggest lesson from repeated hedge trimmer maintenance is that the obvious diagnosis is not always the correct one. A trimmer that suddenly feels dull may simply be covered in sticky residue. Clean the blades thoroughly, add the appropriate lubricant, and the machine may return to smooth operation without a file touching a single tooth. That five-minute check can prevent unnecessary metal removal and extend the life of the cutting bar.
Another practical lesson is that beginners often try too hard. The first instinct is to press the file firmly and create a visibly dramatic new edge. In reality, controlled sharpening is usually quieter and less exciting. You follow the existing bevel, make a few consistent strokes, check your progress, and move on. Good tool maintenance rarely looks like an action movie.
It also helps to develop a system before starting. Work from one end of the bar to the other. Mark the first tooth and, if necessary, mark each completed section. Long cutting bars contain enough nearly identical teeth to make even a careful person wonder, “Did I already do this one?” approximately nine times. A simple marker eliminates the mystery.
Lighting matters more than many people expect. Under poor garage lighting, a rounded edge, a clean bevel, and a burr can look remarkably similar. A bright work light positioned across the cutting surface makes reflections easier to read. Freshly filed metal often looks different from the untouched surface, giving you a useful visual indicator of progress.
Consistency also matters more than chasing perfection. A tiny cosmetic nick does not necessarily justify removing large amounts of material from one tooth. The goal is to restore useful cutting performance while preserving as much blade material as possible. Trying to erase every mark from a working tool can create more wear during sharpening than the hedge created during trimming.
A further lesson is to test the simplest causes first. When a trimmer cuts poorly, a sensible sequence is: inspect for debris, clean the blades, check for obvious damage, lubricate if required, and only then evaluate sharpness. If the blades remain difficult to move or the machine makes unusual noises, stop blaming the cutting edges. Mechanical binding can masquerade as dullness, and sharpening will not repair a drive problem.
Plant type makes a noticeable difference as well. Soft seasonal growth may allow a trimmer to perform well for a long time, while dense woody stems and dirty, neglected hedges can reveal a declining edge much sooner. This is why condition-based inspection is more useful than blindly sharpening on the same date every year.
Finally, the best maintenance routine begins before the blades become truly miserable. Cleaning after use, checking the bar occasionally, and storing the tool dry are easier than rescuing a heavily corroded, resin-packed cutting assembly at the beginning of the next growing season. Future you will appreciate the effort. Future you may even wonder who became so organized. There is no need to reveal the secret.
Conclusion
Learning how to sharpen a hedge trimmer is largely about patience and restraint. Disconnect the power completely, clean the cutting bar, inspect for damage, follow the original bevel, file each cutting edge evenly, remove burrs carefully, clean away filings, and lubricate the blades according to the manufacturer’s instructions.
The most important rule is knowing when sharpening is actually the solution. Dirty blades need cleaning. Dry blades may need lubrication. Bent, cracked, badly damaged, or mechanically misaligned parts need repair or replacement. A file is useful, but it is not a universal form of therapy for outdoor power equipment.
Done correctly, routine blade maintenance can restore cleaner cutting performance and make hedge trimming far less frustrating. Your shrubs get cleaner cuts, your machine works as intended, and you spend less time attacking the same branch from six different angles.
Note: Hedge trimmer designs and servicing procedures vary. Always read the operator’s manual for your exact model before sharpening, repositioning, lubricating, removing, or servicing the cutting blades. Stop and use qualified professional service whenever the blade is damaged or the procedure cannot be performed safely.