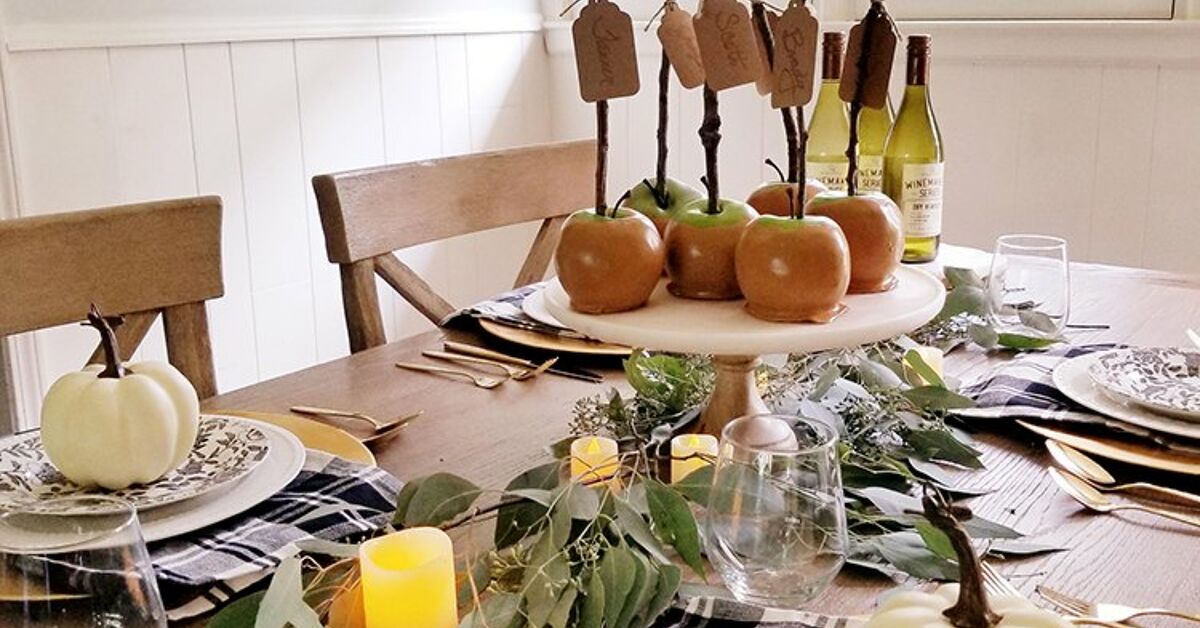
Real caramel apples are delicious, nostalgic, and capable of attaching themselves to your teeth with the determination of industrial adhesive. Faux caramel DIY apples offer the same cheerful fall look without the sticky fingers, spoiled fruit, or emergency dental negotiations.
This easy autumn craft transforms artificial apples into realistic caramel-covered decorations using acrylic paint, decoupage medium, wooden sticks, and imitation toppings. The finished apples are ideal for kitchen displays, tiered trays, Thanksgiving centerpieces, Halloween party decorations, craft-fair booths, and seasonal photo props.
Best of all, you do not need advanced artistic skills. A slightly uneven caramel line actually makes the apples look more authentic. In other words, this is one of those rare projects where a drip is a design feature rather than evidence that the craft table has defeated you.
Seasonal styling and caramel-apple context synthesized from Better Homes & Gardens fall decorating guidance.
Why Faux Caramel Apples Make Such Fun Fall Decor
Apples are naturally associated with orchards, harvest festivals, school days, county fairs, Halloween parties, and cozy fall kitchens. Their familiar shape and rich red or green color make them easy to combine with pumpkins, leaves, plaid fabric, wooden signs, baskets, and other autumn decorations.
Unlike real fruit, artificial apples can remain on display throughout the season. You can arrange them in September, move them into a Halloween vignette in October, and reuse them beside a Thanksgiving centerpiece in November. When fall is over, pack them carefully and bring them back next year.
A Beginner-Friendly and Budget-Conscious Project
Most supplies are available at craft stores, discount stores, or in a well-stocked craft drawer. The technique is simple: insert a stick, mix a caramel-colored coating, cover part of the apple, add toppings, and allow everything to dry.
The project is also easy to customize. Make glossy fairground-style apples, rustic farmhouse apples, chocolate-drizzled versions, miniature place-card holders, or bright candy-coated designs for Halloween. No two apples need to match perfectly. Real caramel apples rarely look like synchronized swimmers, either.
Supplies for Faux Caramel DIY Apples
Gather all materials before mixing the faux caramel. Once the coating is applied, you will need to add the toppings while it is still wet enough to hold them.
Basic Materials
- Artificial red or green apples made from foam, plastic, or lightweight craft material
- Wooden dowels, craft sticks, sturdy twigs, or shortened cinnamon-stick decorations
- Brown, tan, caramel, or cinnamon-colored acrylic craft paint
- Gloss or matte decoupage medium
- A disposable cup or small plastic bowl
- A foam brush, craft brush, or disposable spoon
- Wax paper, parchment paper, or a disposable plate
- Clear acrylic sealer or glossy craft glaze
- Ribbon, raffia, jute, or baker’s twine
Ideas for Fake Caramel Apple Toppings
- Crushed cork for imitation chopped peanuts
- Clean, unused corn-cob bedding sold for small animals
- Polymer-clay sprinkles
- Tiny foam beads
- Brown or white dimensional paint for chocolate drizzle
- Fine decorative gravel for a rustic nut texture
- Small pieces of tan craft foam
- Glitter for a fanciful candy-apple finish
Choose toppings that are clearly designated for crafts and displays. Do not use real nuts, cookie crumbs, candy, cereal, or other food. Real ingredients can attract insects, absorb moisture, develop odors, or deteriorate during storage.
Core materials and paint-plus-decoupage method synthesized from House of Hawthornes, TidyMom, DIY Joy, Craftidly, and The Curated Farmhouse.
How to Make Fun for Fall Faux Caramel DIY Apples
Step 1: Prepare the Work Area
Cover the table with kraft paper, an old tablecloth, or a disposable covering. Place a sheet of wax paper nearby for drying the apples. Set out the toppings in shallow bowls so they can be applied immediately after the faux caramel coating.
Keep a damp paper towel close for wiping accidental paint smears. Acrylic paint is much easier to clean before it dries and decides to become a permanent member of the household.
Step 2: Inspect and Clean the Artificial Apples
Remove price stickers, loose leaves, visible glue strings, and dust. Wipe plastic apples with a slightly damp cloth and dry them thoroughly. A clean surface helps the decorative coating adhere more evenly.
If an apple has an extremely shiny plastic finish, lightly scuff the lower portion with fine-grit sandpaper. Do not sand foam apples aggressively because the surface may crumble or develop dents.
Step 3: Add the Wooden Sticks
Remove the original stem when possible. Insert a wooden dowel or craft stick into the opening. For foam apples, push the stick in slowly and keep it centered. If the opening is too small, create a starter hole with an awl or another suitable craft tool.
Add a small amount of strong craft glue around the stick if it feels loose. Let the glue set before applying the caramel coating. The stick should be secure enough to serve as a handle while you paint the apple.
Step 4: Mix the Faux Caramel Coating
Combine approximately two parts decoupage medium with one part caramel-colored acrylic paint. This is a flexible starting ratio rather than a laboratory formula. Add more paint for stronger color or more decoupage medium for a thinner, glossier coating.
Stir slowly until the mixture is smooth. A believable caramel shade usually contains warm tan, medium brown, and a small touch of golden yellow or orange. Test the mixture on the bottom of one apple before coating the entire batch.
For deeper dimension, prepare two related shades: a medium caramel color for the main coating and a slightly darker brown for subtle shading near the bottom.
Step 5: Apply the Faux Caramel
Hold the apple by its stick and brush the mixture around the lower half or lower two-thirds of the fruit. Leave an irregular edge around the top to imitate an apple that has been dipped by hand.
Use a foam brush for a smooth finish or a spoon for thicker drips. Pull a few narrow trails upward from the coating line, but avoid making every drip identical. Natural variation creates a more realistic result.
Dark red apples may require a second coat. Allow the first layer to dry before adding another. Trying to fix a wet, slippery coating with repeated brushstrokes can create ridges and expose the apple underneath.
Step 6: Add the Decorative Toppings
While the caramel mixture is still wet, hold the apple over a bowl and gently sprinkle the imitation nuts or decorative toppings onto the coated area. Press lightly with a craft stick when necessary, taking care not to flatten the texture.
You can cover the entire caramel section, create a heavy band around the bottom, or decorate only one side. For a gourmet look, combine imitation nuts with polymer-clay sprinkles or a contrasting drizzle.
Step 7: Let the Apples Dry
Place the apples upright on wax paper. If the sticks are sturdy, you can also stand them in a scrap block of floral foam while they dry. Make sure neighboring apples do not touch.
Leave the decorations undisturbed until the coating is completely dry. Thick layers and humid rooms require more drying time. Resist the temptation to test the surface every few minutes; fingerprints are surprisingly effective at destroying the illusion of smooth caramel.
Step 8: Add Chocolate or Candy Drizzles
Once the main coating is dry, use dimensional paint to create thin chocolate, vanilla, or caramel-colored lines. Rotate the apple as you drizzle so the pattern travels naturally around the surface.
For better control, practice on wax paper first. A narrow nozzle produces delicate lines, while a wider opening creates the dramatic “dessert shop went wild” effect.
Step 9: Seal the Finished Apples
Apply a clear glossy sealer to the caramel section for a fresh, candy-like shine. A matte or satin finish creates a softer farmhouse appearance. Several light applications generally look smoother than one heavy coat.
Use spray sealers in a well-ventilated area and follow the manufacturer’s directions. Protect the visible red or green portion if you want the apple skin to retain its original finish.
Glossy glaze and protected-work-surface techniques are consistent with Sculpey’s faux caramel apple project and Plaid finishing guidance.
How to Make Faux Caramel Apples Look Realistic
Use More Than One Brown
A flat tan color can resemble peanut butter, clay, or unfortunate wall paint. Blend a lighter caramel shade into the upper area and a slightly darker shade near the bottom. The subtle variation makes the surface appear deeper and more translucent.
Keep the Dipping Line Uneven
A perfectly straight border looks manufactured. Create gentle peaks, shallow dips, and a few narrow drips around the apple. Keep the overall shape balanced without making it symmetrical.
Choose Natural-Looking Toppings
Imitation nuts look most convincing when the pieces vary slightly in size and color. Mix tan and light-brown materials rather than using one uniform shade. Avoid oversized pieces that overwhelm the apple.
Do Not Overdecorate Every Apple
A collection appears more believable when the designs vary. Leave one apple with plain caramel, cover another with faux nuts, and give a third a chocolate drizzle. The assortment will resemble a small confectionery display instead of a craft assembly line.
Give the Sticks Some Personality
Plain wooden dowels create the classic look, but clean twigs add rustic character. Wrap sticks with baker’s twine, tie on small gingham bows, or attach paper tags reading “Harvest,” “Sweet Fall,” or “Apple Orchard.”
Creative Faux Caramel Apple Variations
Green Apple and Salted Caramel
Use bright green artificial apples with a golden-brown coating. Add coarse white craft granules sparingly to imitate salt. The contrast creates a fresh, modern appearance.
Halloween Poison Apples
Start with black, purple, or dark green apples. Apply a deep red or nearly black candy coating and add lime-green drips. Small skull tags, striped ribbon, or spider charms complete the playful Halloween theme.
Farmhouse Caramel Apples
Select muted red apples, natural twigs, matte caramel, raffia bows, and crushed cork toppings. Display them in a weathered bowl with dried leaves and miniature white pumpkins.
Miniature Place-Card Apples
Use small artificial apples and insert short wooden picks. Attach a name card to each stick for a Thanksgiving dinner, fall wedding, classroom party, or harvest-themed shower.
Chocolate-Caramel Apples
Apply the caramel layer first, then add a dark-brown dimensional-paint drizzle. Finish with polymer-clay sprinkles or imitation toffee pieces. These are dangerously convincing, so a discreet “decorative only” label is a wise addition.
Kid-Friendly Felt Alternatives
For younger crafters, replace liquid faux caramel with tan felt wrapped around foam balls or precut apple shapes. White craft glue, felt leaves, and craft sticks can create charming caramel apple decorations with less mess.
Family-friendly felt, foam, and paper adaptations informed by Fun Family Crafts, Glued to My Crafts, and related caramel-apple projects.
Ways to Display Faux Caramel Apples for Fall
Once the apples are dry, the decorating possibilities multiply faster than pumpkins appearing on front porches in September.
Create a Kitchen Counter Display
Arrange three or five apples on a cake stand, wooden cutting board, or vintage pie plate. Add a folded plaid napkin, a small chalkboard sign, and a few artificial leaves.
Style a Tiered Tray
Miniature faux caramel apples are well suited to tiered trays. Combine them with tiny mugs, cinnamon-stick bundles, wooden beads, small pumpkins, and signs featuring apple-cider sayings.
Build a Fall Centerpiece
Place the apples in a shallow dough bowl with pinecones, dried-looking leaves, faux berries, and miniature gourds. Use an odd number of apples for an arrangement that feels relaxed rather than rigid.
Decorate a Halloween Dessert Table
Display the faux apples among wrapped candy, empty treat boxes, and labeled jars. Their realistic appearance adds height and color without requiring fresh food to remain on the table for hours.
Wrap Them Like Fairground Treats
After the decorations are fully cured, place each one in clear cellophane and tie it with ribbon. Add a visible “Not Edible” tag before using the apples as party props, table accents, or craft-fair displays.
Apple displays, natural textures, harvest bowls, and layered fall vignettes reflect guidance from Better Homes & Gardens and Craftidly.
Common Faux Caramel Apple Mistakes to Avoid
Using a Coating That Is Too Thin
A watery mixture may run off the apple and leave transparent streaks. Add more acrylic paint or a small amount of thicker craft medium until the mixture stays where it is brushed.
Adding Toppings After the Surface Dries
Decorative pieces need a wet or tacky surface for adhesion. Work on one apple at a time rather than coating the entire batch before adding toppings.
Applying One Extremely Thick Layer
A heavy layer can sag, pool underneath the apple, or remain soft for an unnecessarily long time. Build coverage with controlled coats and allow adequate drying between them.
Using Actual Food as Decoration
Real nuts and crumbs may look convincing on day one but can become a storage problem later. Craft-only materials are cleaner, more durable, and far less interesting to pantry pests.
Forgetting That the Apples Look Edible
Keep faux food away from small children and pets. Do not place the decorations on plates beside actual snacks. When using them at an event, label the display clearly so nobody discovers the truth through an ambitious bite.
How to Store Faux Caramel Apples
Dust the apples gently before storage. Wrap each piece in acid-free tissue paper or place it in an individual compartment so the toppings do not rub against neighboring decorations.
Store the apples upright in a rigid container in a cool, dry location. Avoid hot attics, damp basements, and direct sunlight. Heat may soften certain adhesives, while moisture can damage paper tags, wooden sticks, and porous decorative toppings.
Do not tightly wrap an incompletely cured apple in plastic. Trapped moisture and pressure can mark the finish. Make sure all paint, glue, glaze, and sealer have hardened before packing the decorations away.
My Experience Making Faux Caramel DIY Apples
The first time I made faux caramel apples, I assumed the easiest part would be choosing the caramel color. I was wrong. My initial mixture looked less like caramel and more like beige office furniture. Adding a little medium brown helped, but the real improvement came from one tiny drop of warm golden paint. Suddenly, the mixture had the rich, buttery tone I had been trying to create.
I also learned that the artificial apple matters. A lightweight foam apple was easy to pierce with a wooden dowel, but it moved around while I painted it. A heavier plastic apple stayed steady but needed a carefully made starter hole. For a group project, I would prepare all the stick holes in advance. That keeps the creative part enjoyable and reduces the portion of the afternoon devoted to wrestling with fake fruit.
My first apple received far too much coating. I wanted luxurious caramel, so I kept adding more. Gravity had other plans. The mixture slid downward, collected in a large puddle, and formed what looked like a caramel life raft beneath the apple. On the next attempt, I used a thinner first coat, allowed it to dry, and added a second coat only where the red surface showed through. The result was smoother and dried much faster.
The most convincing topping turned out to be crushed cork mixed with a few darker pieces. Uniform craft beads looked colorful, but they did not resemble chopped nuts. The mixed cork had the irregular shapes and natural variation that made visitors lean closer to inspect the apples. That realism was flattering until someone reached toward the display with clear snacking intentions.
Another useful lesson involved the caramel edge. My instinct was to make it tidy and level, but the straight border made the apple look painted. I studied real caramel apples and noticed that the coating rises in some places, falls in others, and forms narrow trails. Once I loosened up and allowed the line to wobble, the project immediately became more believable.
For the second batch, I made three different styles instead of repeating one design. One apple had plain glossy caramel, another had faux nuts around the base, and the third received dark chocolate drizzle. Displayed together on a small cake stand, they looked like a curated set rather than three copies of the same craft.
I experimented with ribbon as well. A large orange bow overwhelmed the apple and made it resemble a prize at an unusually enthusiastic fall festival. Thin gingham ribbon and simple jute twine worked better. They added color without covering the shape of the fruit or competing with the toppings.
The project became especially effective when I stopped treating the apples as isolated objects and began designing the surrounding display. A wooden board, folded plaid cloth, miniature pumpkins, and a handwritten “Apple Orchard” sign created an entire seasonal scene. The apples provided the focal point, while the smaller elements made the arrangement feel intentional.
My strongest practical advice is to make a test apple before beginning a large batch. It reveals whether the paint color is correct, whether the coating is thick enough, how quickly the topping must be added, and how the chosen sealer changes the finish. One experimental apple can prevent an entire basket of caramel-colored regrets.
Most importantly, this craft is more forgiving than it appears. Small drips, uneven topping, and slight color variations usually improve the handmade effect. The goal is not factory-perfect fruit. It is cheerful fall decor that makes the room feel warmer, invites conversation, and survives the season without becoming soft, sticky, or suspiciously fragrant.
Conclusion
Faux caramel DIY apples combine the charm of a classic fall treat with the convenience of reusable seasonal decor. With artificial apples, acrylic paint, decoupage medium, wooden sticks, decorative toppings, and a clear finish, you can create a realistic collection without cooking a single cup of sugar.
Begin with a small batch, test the caramel color, and allow every layer to dry completely. Vary the toppings and finishes so the apples appear handmade rather than identical. Then display them on a tiered tray, cake stand, kitchen counter, Halloween table, or Thanksgiving centerpiece.
The final result is sweet-looking, inexpensive, customizable, and wonderfully free of caloriesmainly because eating one would be an exceptionally poor decision.
Note: These faux caramel apples are decorative craft items and are not edible. Keep them separate from real food and out of reach of young children and pets.