There is a moment in almost every crochet doll project when your amigurumi looks adorable, well-shaped, perfectly stuffedand completely bald. Not “fashionably minimalist” bald. More like “tiny yarn potato waiting for a personality” bald. That is where amigurumi hair comes in.
Learning how to make amigurumi hair is one of the most useful finishing skills for crochet dolls, characters, plushies, fairies, mermaids, witches, mini people, and any tiny yarn citizen who deserves a good hair day. The good news? You do not need advanced crochet skills to make cute doll hair. If you can chain, single crochet, slip stitch, cut yarn, and sew neatly, you can create beautiful amigurumi hairstyles using simple techniques.
This simple crochet tutorial explains how to make yarn hair for amigurumi dolls using beginner-friendly methods: a crochet wig cap, looped yarn strands, crocheted bangs, curls, braids, and quick styling tricks. You will also learn how to choose yarn, measure hair length, attach strands securely, shape a natural hairline, and avoid the dreaded “helmet hair” effect. Your doll may still have a tiny head, but after this tutorial, it will have big personality.
What Is Amigurumi Hair?
Amigurumi hair is the decorative yarn, thread, or crocheted piece added to a stuffed crochet doll’s head to create a hairstyle. It can be made from loose yarn strands, crocheted chains, loop stitches, embroidered stitches, brushed yarn, curly yarn, or a separate wig cap sewn onto the head.
The best technique depends on the look you want. Loose yarn strands work well for long flowing hair. A wig cap creates a clean base and keeps the scalp from showing. Crocheted curls are great for playful dolls. Embroidered hair is perfect for babies, tiny figures, or neat short styles. Chain-loop fringe creates textured hair that holds its shape better than loose strands.
In other words, amigurumi hair is not one single method. It is more like a tiny salon menu, except the scissors are real, the client is made of stuffing, and nobody complains about the wait time.
Supplies You Need
Before starting, gather your materials. Having everything ready makes the process smoother and prevents you from searching for a yarn needle while your doll stares at you with one embroidered eyebrow.
- Finished amigurumi doll head or completed doll
- Yarn for hair, usually acrylic, cotton, cotton blend, or wool blend
- Crochet hook suitable for your yarn and doll stitches
- Yarn needle or tapestry needle
- Sharp scissors
- Stitch markers or pins
- Measuring tape or ruler
- Optional: fabric glue for internal securing
- Optional: book, cardboard, or notebook for cutting even strands
- Optional: pet slicker brush for brushed-out yarn hair
- Optional: paper straws or dowels for making curls
Choosing the Best Yarn for Amigurumi Hair
The yarn you choose changes the entire personality of your doll. Smooth cotton gives tidy, defined strands. Acrylic yarn is affordable, easy to find, and available in many colors. Cotton blends are soft but still structured. Wool blends can be brushed for a fluffy, realistic texture. Bulky yarn creates dramatic hair quickly, while thinner yarn looks more delicate but takes longer to attach.
For beginners, medium-weight acrylic or cotton-blend yarn is a safe choice. It is easy to cut, easy to attach, and forgiving when you trim the final shape. If your doll is small, choose a lighter yarn so the hair does not overpower the head. If your doll is large, thicker yarn can save time and create a fuller look with fewer strands.
Quick Yarn Tips
- Use smooth yarn for neat braids, bangs, and straight hair.
- Use brushed acrylic or wool-blend yarn for fluffy, soft hair.
- Use cotton for clean, sculpted styles that hold shape.
- Use thinner yarn for small dolls and bulky yarn for larger dolls.
- Test one strand first before covering the entire head.
Method 1: How to Make a Simple Crochet Wig Cap
A crochet wig cap is one of the easiest ways to make amigurumi hair look polished. It covers the top of the head like a tiny beanie and gives you a base for attaching strands, bangs, curls, or braids. It also prevents skin-colored yarn from showing through the hair.
Basic Wig Cap Pattern
This is a general pattern for a small to medium amigurumi doll. Adjust the number of rounds based on your doll’s head size.
- Make a magic ring.
- Round 1: Work 6 single crochet stitches into the ring.
- Round 2: Increase in each stitch around. You will have 12 stitches.
- Round 3: Single crochet 1, increase. Repeat around.
- Round 4: Single crochet 2, increase. Repeat around.
- Round 5: Single crochet 3, increase. Repeat around.
- Continue increasing until the circle fits the crown of your doll’s head.
- Work 2 to 4 even rounds without increasing to create a cap shape.
- Fasten off, leaving a long tail for sewing.
Place the cap on the doll’s head before sewing. It should cover the crown and reach the area where you want the hairline. If it looks too high, add another round. If it covers the eyes, congratulations, you made a yarn helmet. Remove one round or fold the edge slightly before sewing.
How to Sew the Wig Cap
Pin the wig cap in place first. Check the front, sides, and back. Once the placement looks balanced, sew around the edge with small, even stitches. Use matching yarn or thread so the seam blends in. Do not pull too tightly, or the cap may pucker.
Method 2: Attaching Loose Yarn Strands
Loose yarn strands are ideal for long hair, ponytails, braids, pigtails, and flowing styles. This is also one of the simplest techniques for beginners.
Step 1: Measure and Cut the Yarn
Cut each strand at least twice the desired finished length. If you want 4-inch hair, cut strands about 8 to 9 inches long. The extra length gives you room for knots, folding, and trimming. Wrap yarn around a book or piece of cardboard, then cut one end to create many equal strands quickly.
Step 2: Fold the Yarn
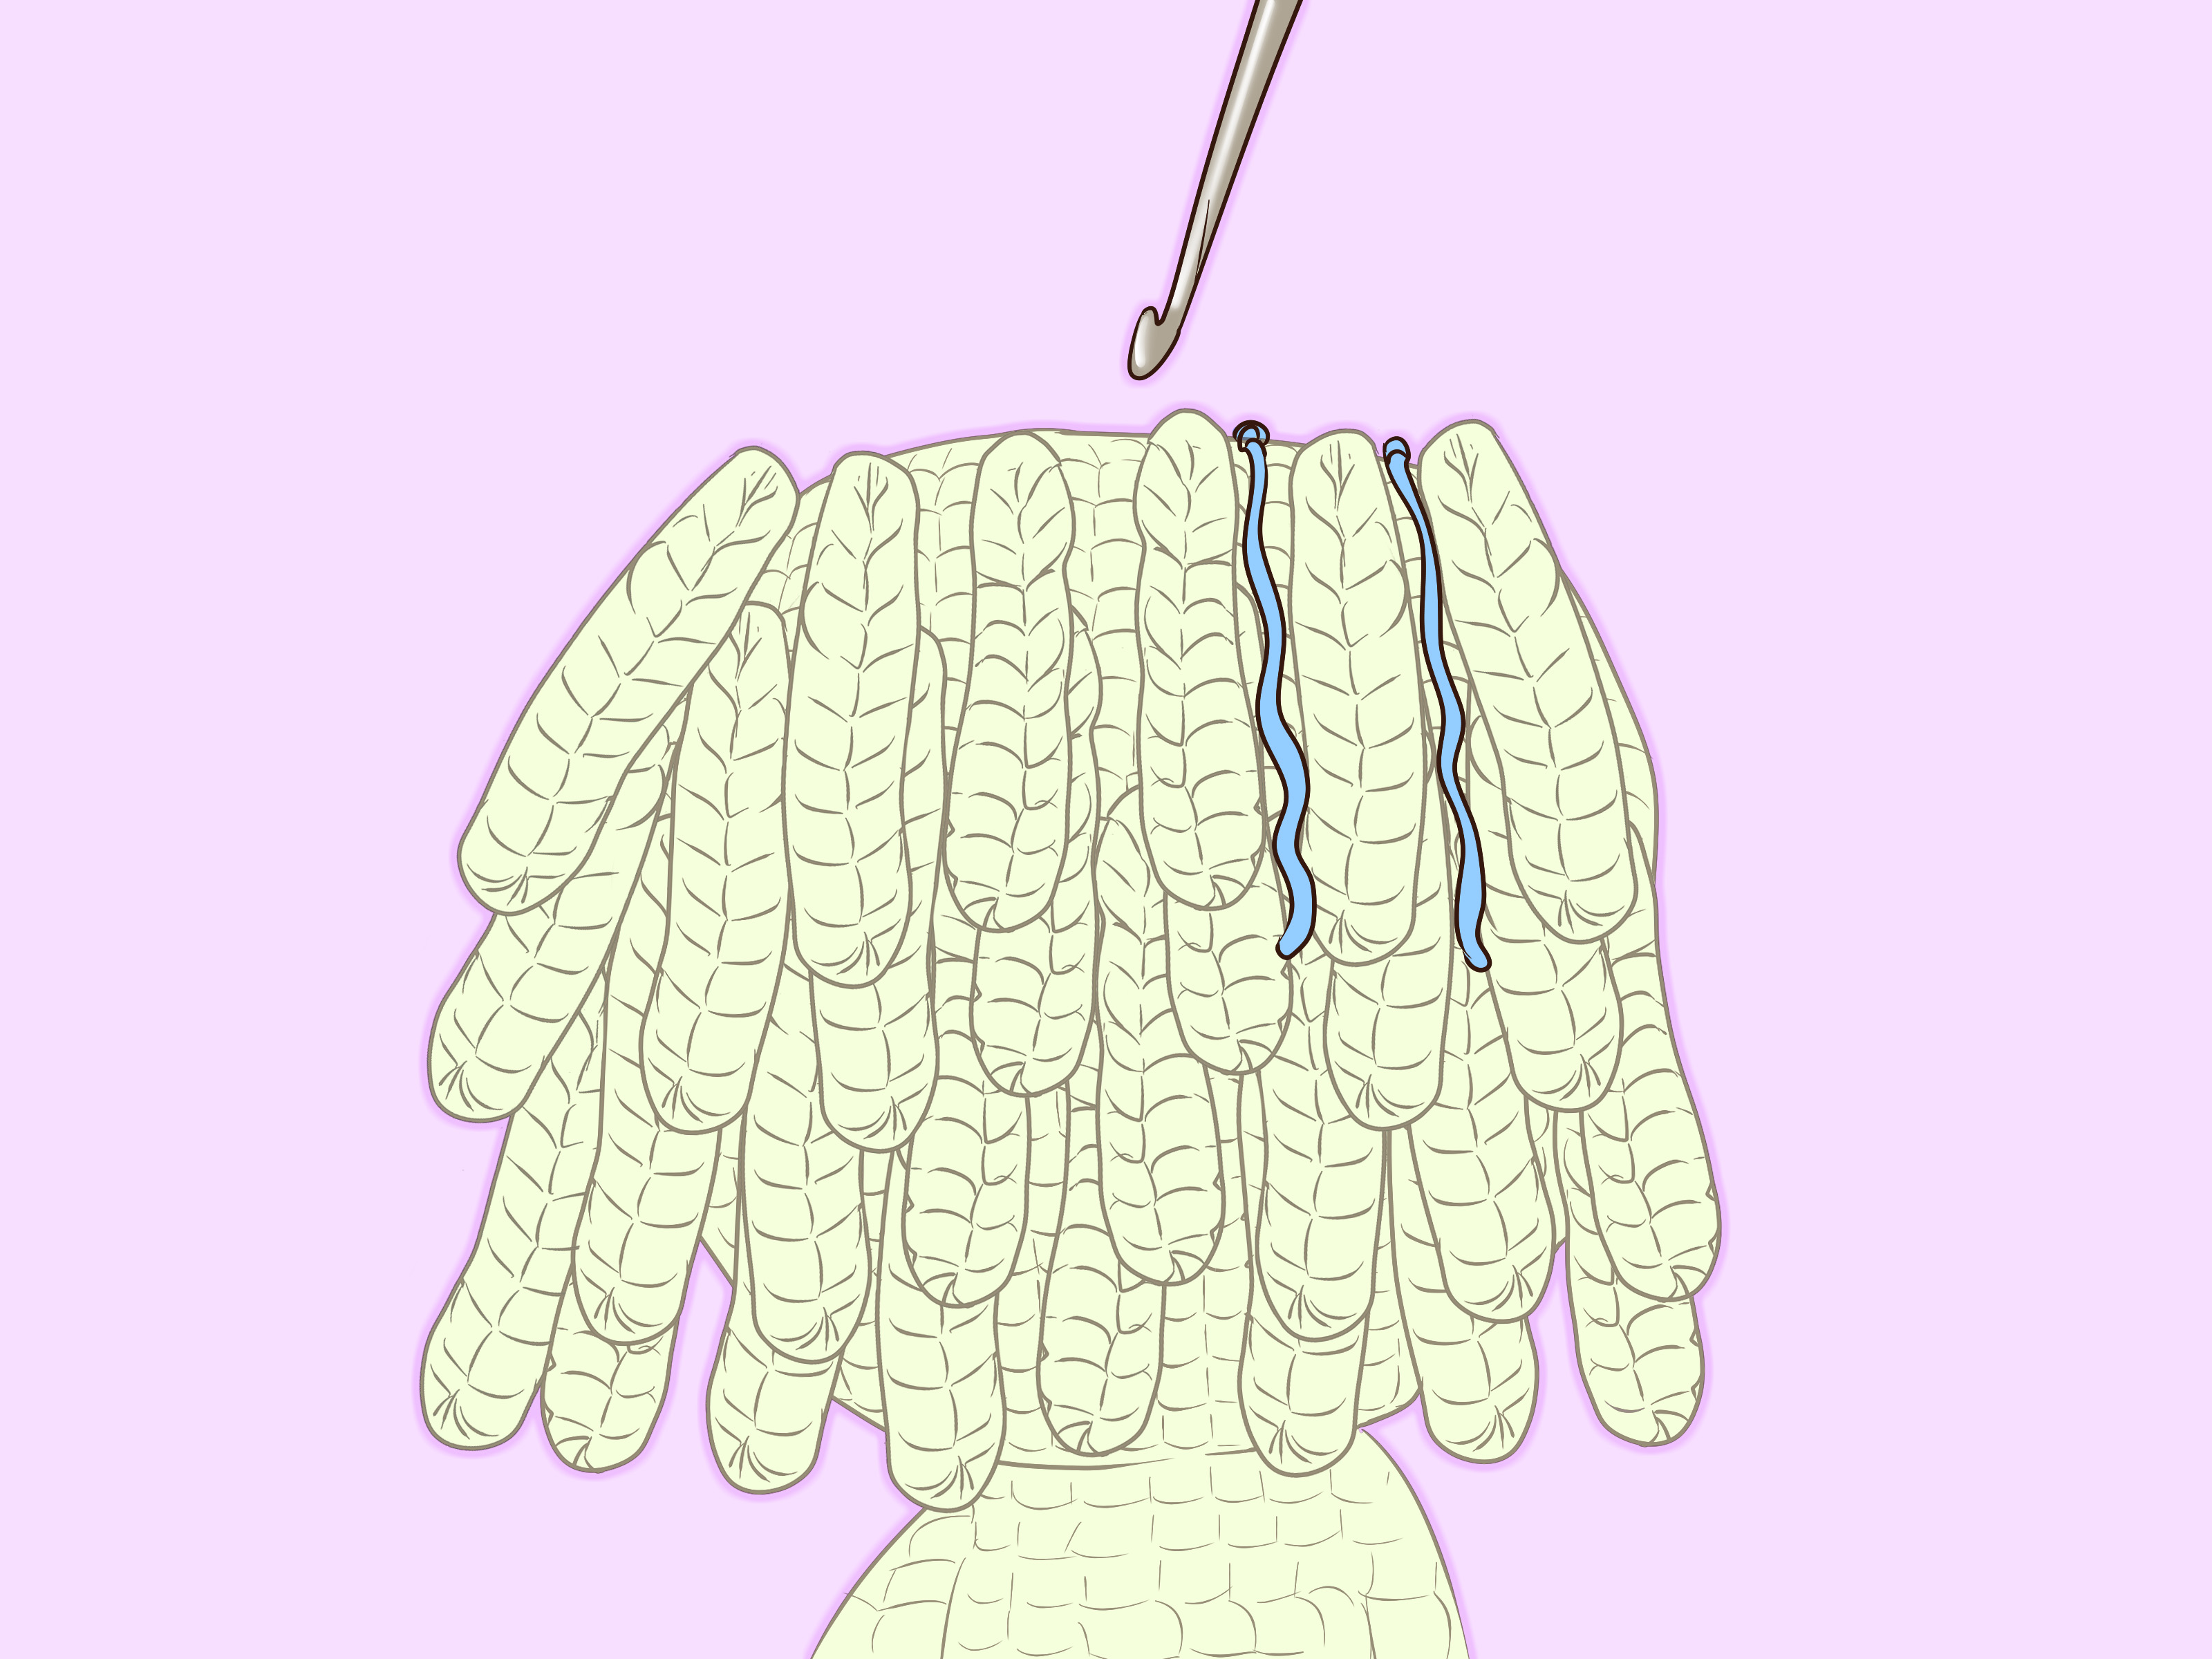
Fold one strand, or a small bundle of two to three strands, in half. The folded center becomes the loop you will pull through the doll’s stitch.
Step 3: Insert the Hook
Insert your crochet hook through a stitch on the wig cap or directly through a stitch on the doll’s head. Start near the lower back hairline or along the edge of the wig cap.
Step 4: Pull the Loop Through
Catch the folded center of the yarn with your hook and pull it partly through the stitch. Do not pull the whole strand through yet. You want a small loop.
Step 5: Secure the Strand
Pull the loose yarn ends through the loop, then gently tighten. This creates a simple lark’s head knot. Repeat until the hairline looks full.
Step 6: Fill Strategically
You do not need to attach hair to every stitch unless you want very thick hair. Start around the hairline, then fill in the crown and back as needed. For bulky yarn, attach strands every other stitch. For thin yarn, place strands closer together.
Method 3: Crocheted Bangs and Fringe
Crocheted bangs are great when you want the front of the hairstyle to look intentional instead of “I lost a fight with a yarn basket.” They can be made directly onto the wig cap or separately and sewn on.
Simple Bangs Pattern
- Join hair-colored yarn at the front edge of the wig cap.
- Chain 6 to 10, depending on desired bang length.
- Single crochet back along the chain.
- Slip stitch into the next stitch on the wig cap.
- Repeat across the forehead.
For a softer look, vary the chain lengths. Try chain 6, chain 8, chain 7, chain 9, then chain 6 again. Real bangs are rarely perfectly even, and doll bangs look more natural with slight variation.
Method 4: Curly Amigurumi Hair
Curly hair gives amigurumi dolls a lively, bouncy look. You can crochet curls with chains, wrap yarn around straws, or use naturally textured yarn.
Crocheted Spiral Curls
To make a spiral curl, chain the desired length. Work 2 or 3 single crochet stitches into each chain as you return down the chain. The extra stitches cause the chain to twist into a curl. For tighter curls, use 3 single crochet stitches per chain. For looser curls, use 2.
- Chain 20 for a short curl or 35 to 50 for longer curls.
- Work 2 single crochet stitches into the second chain from the hook.
- Continue working 2 single crochet stitches into each chain.
- Fasten off, leaving a tail for sewing.
- Sew curls to the wig cap in rows.
Yarn Curls with Straws
You can also wrap yarn around paper straws or small dowels, lightly dampen it, let it dry completely, and then remove it to create curls. Always test your yarn first. Some fibers hold curls beautifully, while others behave like they have never heard of cooperation.
Method 5: Braids, Pigtails, and Ponytails
Once you have attached loose yarn strands, styling becomes simple. Divide the hair into sections and braid as you would with regular hair. Tie the end with a small piece of yarn or embroidery floss. For pigtails, attach more strands on both sides of the head and gather them evenly.
If the doll is for display, you can style the hair more loosely. If it is for gentle play, secure braids and ponytails with a few hidden stitches. This keeps the hairstyle from unraveling after one dramatic tea party adventure.
How to Create a Natural Hairline
The hairline can make or break the finished look. A straight row across the forehead may look too stiff unless you are intentionally making a blunt-bang style. For a natural hairline, stagger the strands slightly.
- Place strands closer together at the front and part line.
- Use fewer strands on the back of the head to reduce weight.
- Angle front strands toward the face for softness.
- Use pins to test the hairline before sewing or knotting everything.
- Trim only after the hair is fully attached.
A side part can be created by placing strands diagonally from the front crown toward the back. A middle part works best when strands are attached in mirrored rows on both sides. For short hairstyles, crocheted pieces or embroidered hair often look cleaner than loose yarn strands.
Common Mistakes to Avoid
Using Too Much Hair
More hair is not always better. Too many strands can make the head heavy, floppy, or oversized. Add hair gradually and check the balance often.
Cutting the Hair Too Short Too Soon
Always leave extra length. Trim at the end when the hair is attached and styled. Yarn is very forgivinguntil it has been cut too short. Then it becomes a life lesson.
Ignoring Yarn Weight
Thin yarn takes more strands to look full. Bulky yarn fills space quickly. Match the yarn weight to the doll size.
Sewing the Wig Cap Too Low
A wig cap that sits too low can cover the eyes or make the forehead disappear. Place the cap, step back, and check the face before sewing.
Forgetting the Back of the Head
Even if the doll will sit on a shelf, the back matters. Add enough hair to cover visible gaps, especially around the lower hairline.
Beginner-Friendly Amigurumi Hair Tutorial: Full Example
Here is a simple project plan for a beginner doll hairstyle with a wig cap, long strands, and side bangs.
Style Goal
Shoulder-length hair with a soft side part and simple bangs.
Steps
- Crochet a wig cap that fits the doll’s head.
- Pin it in place and sew around the edge.
- Cut yarn strands twice the desired length plus 1 inch extra.
- Attach strands around the lower edge of the cap using the loop method.
- Add a second row above the first row for fullness.
- Create a side part by attaching strands diagonally from the front crown.
- Use shorter chain-style bangs across one side of the forehead.
- Comb the yarn gently with your fingers.
- Trim the ends evenly.
- Add a small bow, yarn tie, or crocheted flower if desired.
This hairstyle is simple, cute, and flexible. You can turn it into pigtails, a low braid, or a half-up style without changing the base.
How to Style Amigurumi Hair After Attaching It
After the hair is attached, styling is where the magic happens. Use your fingers first. A regular comb may separate yarn fibers too aggressively, especially with loosely spun yarn. For fluffy hair, brush acrylic yarn gently with a pet slicker brush, but test on a scrap piece first.
For neat hair, lightly steam the strands from a safe distance, but never press a hot iron directly onto acrylic yarn because it can melt. For display dolls, a tiny amount of fabric glue can hold bangs or flyaway strands in place. For children’s toys, sewn styling is usually more durable than glue.
Safety and Durability Tips
If your amigurumi doll is meant for a young child, keep the hairstyle secure and simple. Avoid long loose strands for babies or toddlers because they can be pulled, tangled, or chewed. Embroidered hair or a firmly sewn crochet cap is often safer for very young children. For decorative dolls, you can be more adventurous with flowing hair, beads, accessories, and dramatic curls.
Secure all yarn tails inside the head or wig cap. Knot carefully when needed, weave ends thoroughly, and check that decorative pieces cannot be removed easily. Handmade toys are wonderful, but they should be made with common sense as well as creativity.
Creative Amigurumi Hair Ideas
- Mermaid hair: Use long strands in ocean colors like teal, lavender, and blue.
- Witch hair: Try black, gray, purple, or green yarn with uneven curls.
- Princess hair: Create long golden strands and style them into a braid.
- Pixie cut: Use short crocheted fringe around a wig cap.
- Curly bob: Sew spiral curls in layered rows.
- Messy bun: Attach a small crocheted bun to the back or top of the wig cap.
- Animal mane: Use loop stitch or direct crochet for lions, ponies, or fantasy creatures.
Experience Notes: What I Learned Making Amigurumi Hair
The first thing you learn when making amigurumi hair is that yarn has opinions. You may think you are in charge because you own the hook, the scissors, and the coffee mug beside you. Then one strand twists the wrong way, a curl springs into your lap, and suddenly you are negotiating with a tiny doll head like it has legal representation.
My best experience-based advice is to start with less hair than you think you need. Beginners often try to cover every single stitch, but that can make the doll’s head too heavy. A better approach is to create a clear hairline first, then fill in only where the scalp shows. Once the front, sides, and lower back are covered, the hairstyle usually looks fuller than expected.
Another lesson: always cut strands longer than your final goal. Yarn hair shrinks visually after knotting, styling, braiding, or curling. If you want a neat bob, cut it longer, attach it, let it settle, and trim slowly. Trim in tiny amounts. A doll haircut is just like a human haircut, except the client cannot forgive you with words.
I also recommend making a test strand before committing to a whole head of hair. Try one loose strand, one crocheted curl, and one brushed piece of yarn. This tells you how the yarn behaves. Some acrylic yarn becomes beautifully fluffy when brushed. Some cotton yarn stays crisp and rope-like. Some novelty yarn looks magical in the skein but turns into chaos on a doll. Testing saves time and protects your project from surprises.
When creating curls, patience matters. Wrapped yarn needs to dry completely before you remove it from straws or dowels. If you unwrap too soon, the curl relaxes almost immediately. Crocheted spiral curls are more predictable, especially for beginners, because the stitch structure creates the curl naturally. They are great for dolls that need playful, bouncy hair.
For long hair, I like using a wig cap because it gives the style a clean foundation. Without a cap, you may need many more strands to hide the head color. With a cap, you can attach fewer strands and still get a full look. It also makes it easier to create bangs, side parts, and ponytails because you have a defined base to work from.
One small trick that makes a big difference is pinning the hairstyle before sewing final details. Pin the cap, pin the bangs, pin the braid placement, and look at the doll from several angles. Amigurumi faces are small, so even a slight shift in hairline can change the expression. A low hairline can make the doll look sleepy. A high hairline can make it look surprised. A crooked part can look charmingor like the doll just rode in a yarn tornado.
Finally, do not chase perfection too hard. Handmade amigurumi hair should look lively. A few uneven strands, soft curls, or playful flyaways often make the doll more lovable. The goal is not factory-perfect hair. The goal is personality. Once the hair is attached, your amigurumi stops looking like a project and starts looking like a character.
Conclusion
Making amigurumi hair is one of the most satisfying parts of crocheting dolls because it transforms a simple stuffed shape into a character with attitude, charm, and style. Whether you choose a crochet wig cap, loose yarn strands, chain bangs, spiral curls, braids, or embroidered hair, the key is to work slowly, check your placement often, and build the hairstyle in layers.
Start with a beginner-friendly method, such as a wig cap with looped yarn strands. Once you feel comfortable, experiment with curls, brushed yarn, side parts, buns, and fantasy colors. Every doll teaches you something new. Some teach patience. Some teach trimming skills. Some teach that purple hair is always a valid design choice.
With the right yarn, a few basic crochet stitches, and a little styling confidence, you can make amigurumi hair that looks polished, playful, and completely unique. Your doll is no longer bald. Your yarn salon is officially open.