Need to turn a messy list of dates, milestones, deadlines, or historical events into something people can actually understand? Microsoft Word can help. Yes, the same program famous for essays, resumes, meeting notes, and the occasional “why did my formatting explode?” moment can also create a clean visual timeline.
A timeline in Word is useful for project plans, school assignments, business reports, event schedules, product launches, personal history projects, legal chronologies, nonprofit campaigns, and even wedding planning. If something happens in order, a timeline can make it clearer. Instead of forcing readers to march through a wall of text like tiny exhausted hikers, you give them a visual path.
This guide explains how to make a timeline on Microsoft Word using SmartArt, shapes, templates, and practical formatting tricks. You will also learn when Word is the right tool, when it is not, and how to avoid the common design mistakes that make timelines look like a spaghetti incident wearing business casual.
What Is a Timeline in Microsoft Word?
A timeline is a visual representation of events arranged in chronological order. In Microsoft Word, a timeline usually appears as a horizontal or vertical line with dates, milestones, labels, icons, or short descriptions attached to it. The goal is simple: help readers see what happened, when it happened, and how each event connects to the next.
Microsoft Word does not behave like a full project management platform, but it gives you enough built-in tools to create a professional timeline for documents. The easiest option is SmartArt, which includes process-style graphics such as Basic Timeline and Circle Accent Timeline. You can also build a custom timeline with shapes, lines, text boxes, icons, tables, or downloaded templates.
Before You Start: Plan the Timeline First
Before opening Word and clicking everything with confidence and mild panic, take five minutes to plan. A good timeline begins with clear information, not fancy colors. Write down the dates or stages you want to show. Then decide whether your timeline needs exact dates, broad phases, or simple milestone labels.
Ask These Questions First
What is the purpose of the timeline? Who will read it? How many events do you need to include? Will the document be printed, shared as a PDF, or edited later by a team? These questions matter because a timeline for a one-page school report is different from a timeline for a six-month marketing campaign.
For example, a student timeline about the American Revolution may include years and major events. A project timeline for a website redesign may include phases such as research, design, development, testing, and launch. A legal timeline may need exact dates and short factual notes. Word can handle all of these, but the layout should match the job.
Method 1: How to Make a Timeline in Word Using SmartArt
SmartArt is the fastest way to create a timeline in Microsoft Word. It is built into Word and works well for simple timelines with a limited number of events. If you need something quick, clean, and editable, start here.
Step 1: Open a Word Document
Open Microsoft Word and create a blank document, or open an existing document where you want the timeline to appear. For most timelines, landscape orientation works better because it gives your visual more horizontal room. Go to Layout, choose Orientation, and select Landscape.
Step 2: Insert SmartArt
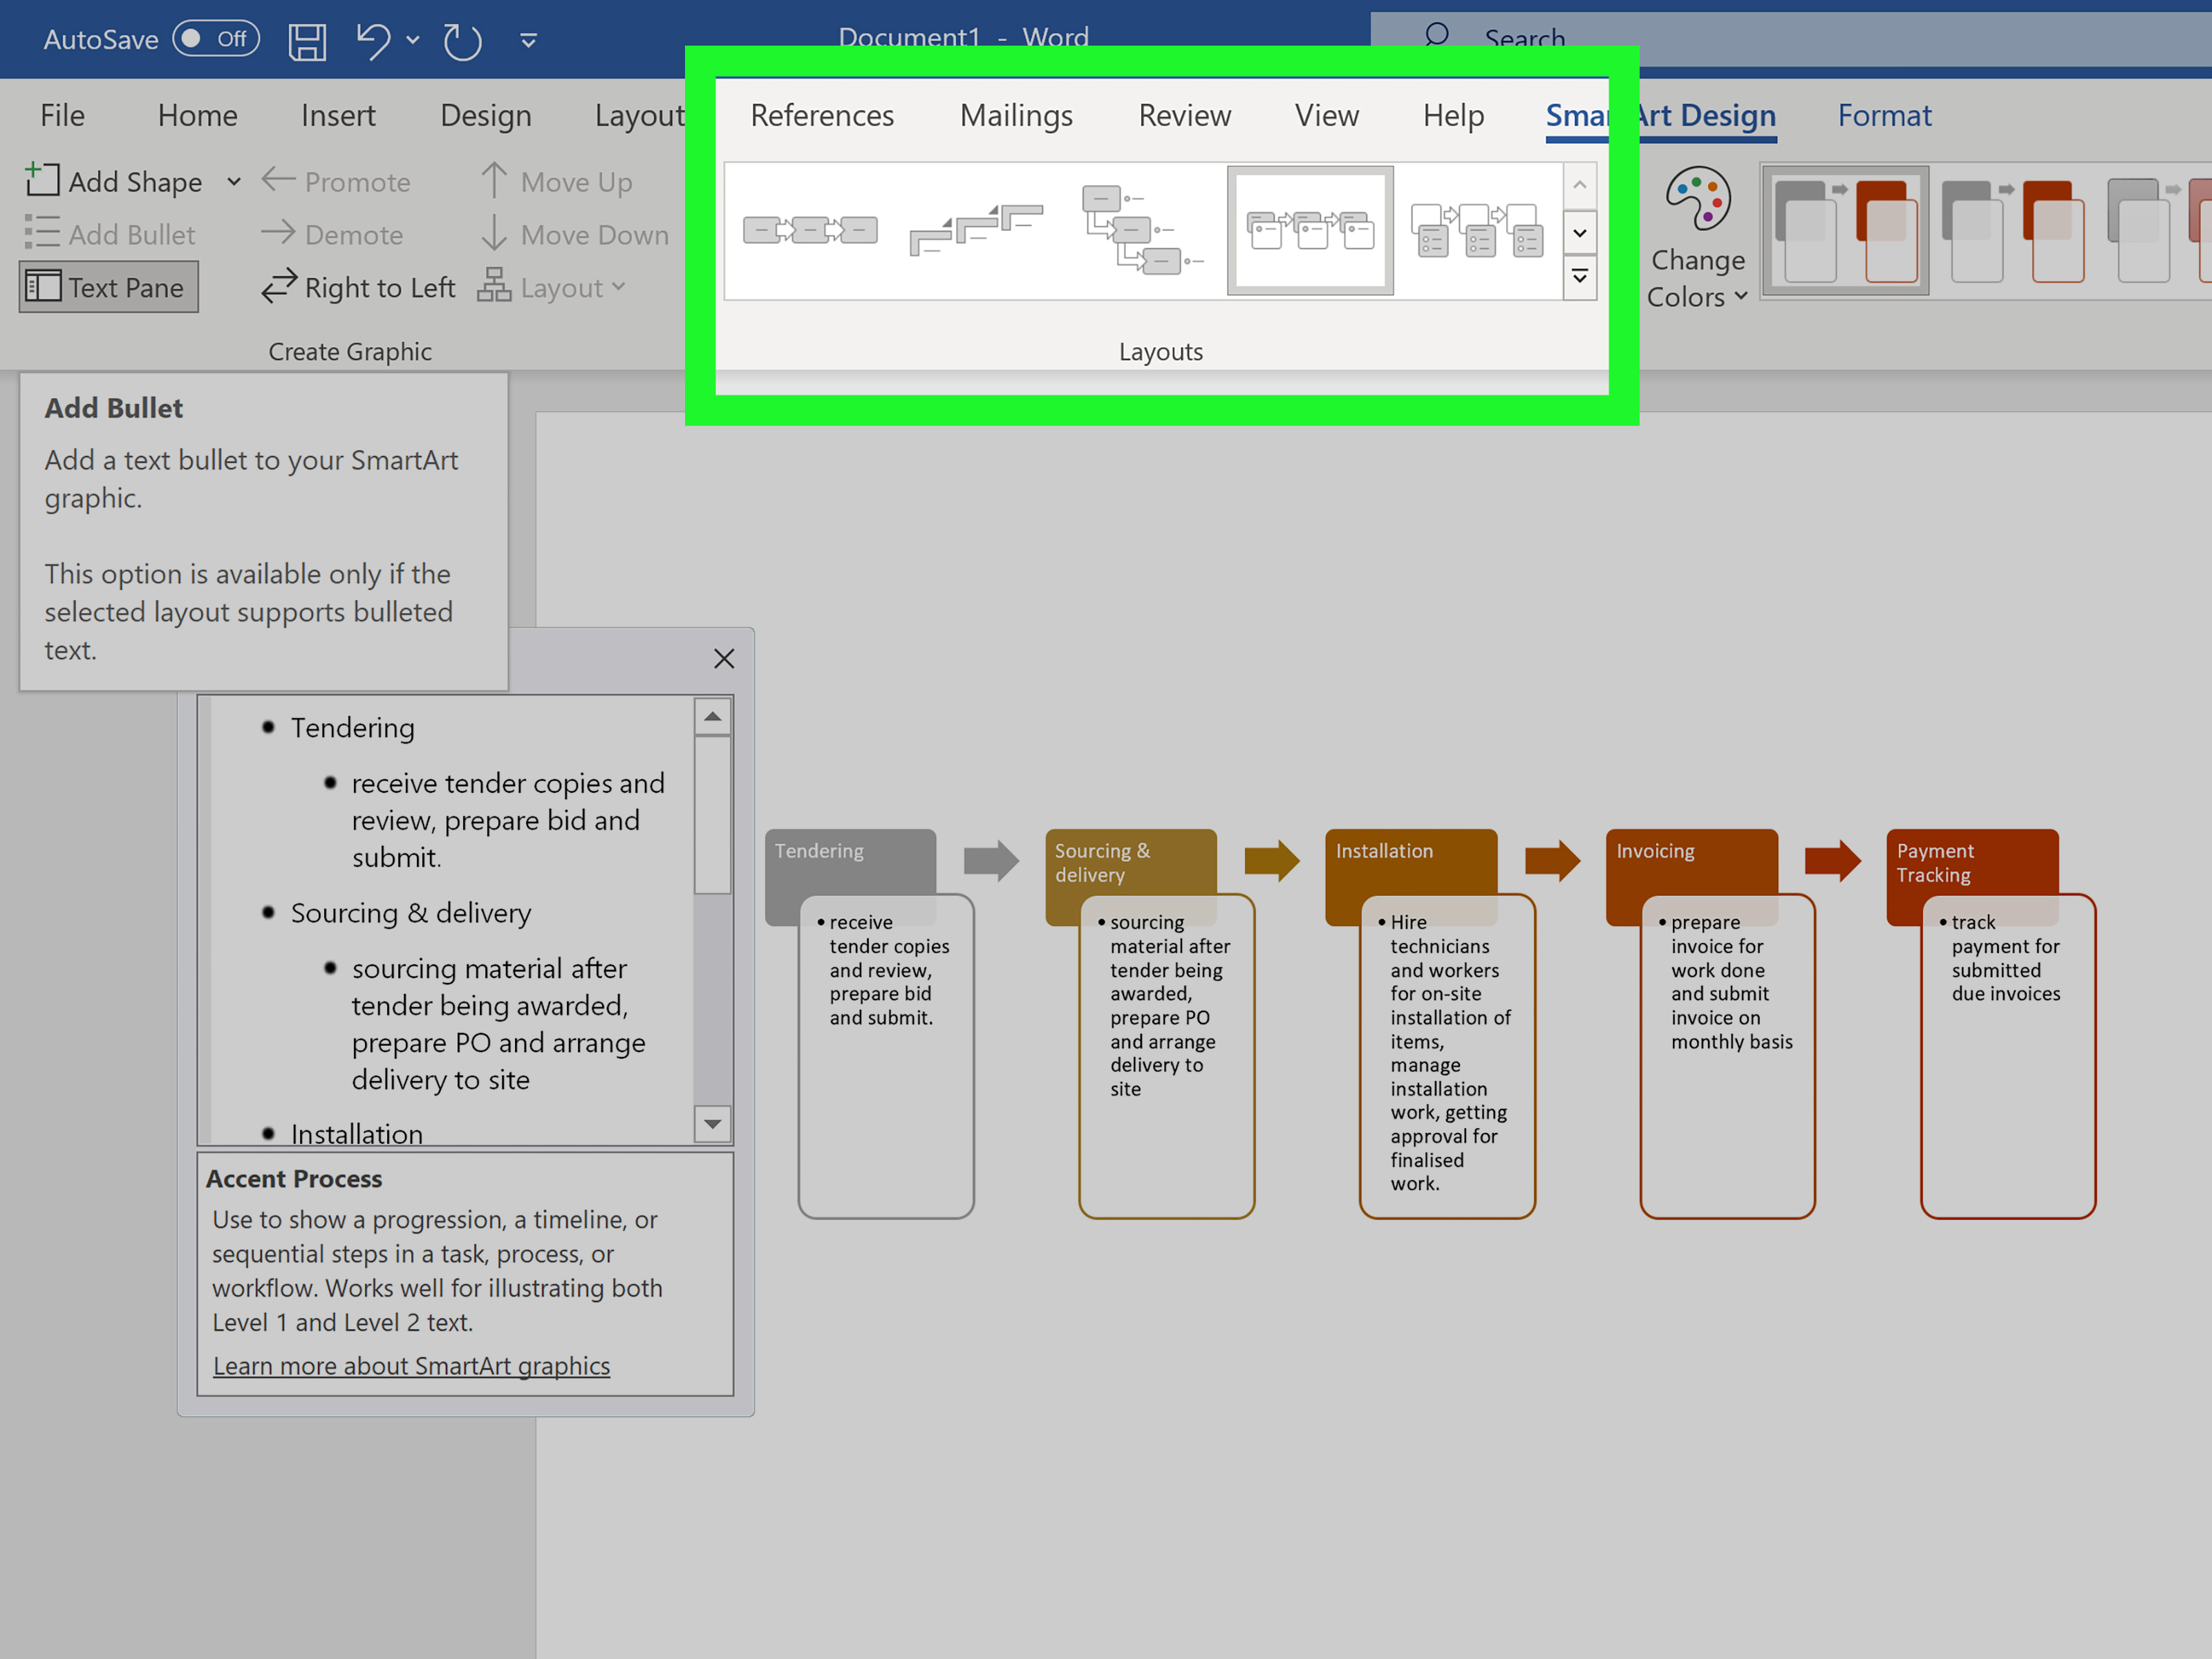
Place your cursor where you want the timeline. Go to the Insert tab and select SmartArt. In the SmartArt gallery, choose Process. This category contains graphics designed to show steps, progressions, sequences, and timelines.
Step 3: Choose a Timeline Layout
Select a layout such as Basic Timeline or Circle Accent Timeline. Basic Timeline is simple and works well for clean documents. Circle Accent Timeline gives each milestone a stronger visual marker. If you want a slightly more stylish look, try a process layout such as Accent Process or Continuous Block Process.
Step 4: Add Your Dates and Events
After the SmartArt appears in your document, click the placeholder text and type your timeline details. You can also use the text pane on the left side of the SmartArt graphic. The text pane is especially helpful because pressing Enter can add another milestone, while deleting a line removes one.
Keep each milestone short. A timeline is not the place to write a novel, even if your project manager has strong feelings about “comprehensive documentation.” Use a date, a brief label, and maybe a short phrase. For example:
- Jan. 10: Research begins
- Feb. 3: Draft completed
- Mar. 15: Client review
- Apr. 1: Final launch
Step 5: Add or Remove Milestones
To add another event, click the text pane and press Enter after an existing milestone. To remove an event, delete the corresponding line from the text pane. If the SmartArt becomes crowded, reduce the number of events or switch to a vertical layout. Word can fit many things, but that does not mean it should. A timeline with twenty tiny labels may technically exist, but nobody will enjoy reading it.
Step 6: Customize the Design
Click the SmartArt timeline. You should see the SmartArt Design and Format tabs. From there, you can change colors, switch layouts, apply SmartArt styles, resize shapes, and adjust fonts. Use colors with intention. If everything is bright, nothing stands out. Choose one main color and one accent color for important milestones.
Method 2: How to Make a Custom Timeline in Word With Shapes
SmartArt is fast, but shapes give you more control. A custom timeline is best when you want a unique design, extra spacing, icons, custom arrows, or a vertical timeline that looks more polished.
Step 1: Insert a Drawing Canvas
Go to Insert, select Shapes, and choose New Drawing Canvas. A drawing canvas helps keep lines, shapes, and text boxes together. Think of it as a little fenced yard for your timeline so the design does not wander across the page like a lost raccoon.
Step 2: Draw the Main Line
Go to Insert > Shapes and choose a straight line or arrow. Hold Shift while dragging to keep the line perfectly horizontal or vertical. A horizontal timeline is best for a small number of milestones. A vertical timeline works better for long explanations or resumes because the page naturally scrolls downward.
Step 3: Add Milestone Markers
Use circles, diamonds, squares, or icons as milestone markers. Insert a shape, place it on the line, and duplicate it for each event. To duplicate quickly, copy and paste the marker instead of drawing a new one every time. This keeps your timeline consistent.
Step 4: Add Text Boxes
Go to Insert > Text Box and add labels above, below, or beside each milestone. Include the date first, then a short description. For example, you might write June 2026: Beta testing begins. Keep descriptions concise, ideally one or two lines.
Step 5: Align and Distribute Objects
Select multiple shapes by holding Ctrl while clicking each object. Then use the Shape Format tab to align and distribute them evenly. This step is the difference between “professional timeline” and “I made this during a coffee emergency.” Consistent spacing makes your timeline easier to scan.
Step 6: Group the Timeline
When your timeline looks right, select all the elements, go to Shape Format, choose Group, and select Group again. Grouping lets you move or resize the entire timeline as one object. This is especially useful when you need to reposition the timeline after adding body text, images, or headings.
Method 3: Use a Microsoft Word Timeline Template
If you do not want to build from scratch, use a timeline template. Templates are useful for project schedules, roadmaps, event plans, history assignments, business reports, and presentations. You can search for timeline templates through Microsoft Create, Microsoft 365 templates, or reputable design platforms that offer editable Word files.
To use a template, download the file, open it in Word, and replace the sample dates and labels with your own information. Adjust colors, fonts, and spacing so the template matches your document. Templates save time, but do not blindly trust them. Some look impressive at first and then collapse emotionally when you add real content. Test the layout with your longest milestone before committing.
SmartArt vs. Shapes vs. Templates: Which Method Is Best?
Use SmartArt when you need a quick timeline with five to eight milestones. It is easy, built-in, and beginner-friendly. Use shapes when you want more design control or need a custom vertical timeline. Use a template when you want a polished starting point and do not mind editing someone else’s structure.
For simple school or office documents, SmartArt usually wins. For client-facing reports, custom shapes may look more original. For project planning, a template can be faster, especially if it already includes phases, task owners, and status notes.
How to Make a Vertical Timeline in Word
A vertical timeline is excellent for resumes, case studies, historical summaries, and long project reports. To create one, use the shapes method. Insert a vertical line, place milestone circles along the line, and add text boxes to the left or right. Alternate the text boxes from side to side if you want a magazine-style layout, or keep them all on one side for a cleaner business look.
Vertical timelines are easier to read when each milestone has a clear hierarchy. Make the date bold, keep the event title short, and place extra explanation beneath it in a smaller font. Avoid placing too many text boxes too close together. White space is not empty space; it is breathing room for the reader’s eyes.
How to Make a Project Timeline in Word
A project timeline should show phases, deadlines, and important deliverables. Start by listing the major stages of the project. For a website launch, your timeline might include discovery, content planning, design, development, testing, approval, and launch. For each phase, add a date range and one key outcome.
If the project is simple, use SmartArt. If the project has overlapping tasks, Word may not be the best long-term tool. You can still create a visual summary in Word, but detailed project tracking is better handled in Excel, Microsoft Project, Planner, Smartsheet, or another project management tool. Word is great for presenting the plan; it is less great for managing daily chaos, especially when deadlines start doing parkour.
How to Format a Timeline So It Looks Professional
A good timeline is not only accurate; it is readable. Use consistent fonts, balanced spacing, and a clear visual order. The reader should understand the timeline within a few seconds. If they need a magnifying glass, a prayer candle, and three cups of coffee, the design needs work.
Use Short Labels
Timeline labels should be brief. Instead of writing “The team completed the first complete internal review of the preliminary design concepts,” write “Internal design review completed.” Save long explanations for the paragraphs below the timeline.
Choose Readable Fonts
Use simple fonts such as Calibri, Aptos, Arial, or Georgia. Avoid decorative fonts unless the timeline is for a creative event and the text remains readable. Font size matters too. In most Word documents, timeline labels should not fall below 9 or 10 points.
Limit the Color Palette
Use color to guide attention, not to host a visual fireworks show. One neutral color for the line, one primary color for milestones, and one accent color for special events is usually enough. For business documents, muted colors often look more polished than neon shades.
Use Icons Carefully
Icons can help readers understand milestones quickly. A calendar icon can represent a deadline, a check mark can show completion, and a flag can mark launch day. However, too many icons can make the timeline feel cluttered. Use them only when they add meaning.
Make It Accessible
If your timeline is important to understanding the document, add alternative text. Right-click the SmartArt graphic or grouped timeline object and choose the alt text option. Describe the purpose of the timeline and summarize the key milestones. Accessibility is not just a checkbox; it helps more people understand your work.
Common Mistakes to Avoid
The first mistake is adding too much information. A timeline should simplify a sequence, not become a tiny encyclopedia with arrows. The second mistake is inconsistent spacing. If one milestone is far away and the next three are crushed together, the reader may assume the spacing has meaning, even when it does not.
The third mistake is poor contrast. Light gray text on a pale blue shape may look soft and elegant on your screen, but it can become unreadable when printed. The fourth mistake is forgetting to test the final version. Always zoom out, print a preview, or save as PDF to check whether the design holds together.
How to Save or Share Your Word Timeline
After creating your timeline, save the Word document as usual. If you are sharing it with people who only need to view it, export it as a PDF. PDF format helps preserve spacing, fonts, and layout. In desktop Word, go to File, choose Export, and select Create PDF/XPS. In Word for the web, use the export or download option to save as PDF.
If the timeline will be edited by someone else, keep a Word copy. If the design is complex, group the elements before sending the file. This reduces the chance that a single accidental click will send your milestone marker into another dimension.
Example: Simple Product Launch Timeline
Here is a basic example you can recreate in Word using SmartArt:
- January: Market research and customer interviews
- February: Product concept and feature list approved
- March: Prototype design completed
- April: Beta testing begins
- May: Marketing campaign prepared
- June: Product launch
This timeline works because each milestone is short, specific, and ordered. It gives readers the big picture without forcing them to decode a complicated chart.
Advanced Tips for Better Word Timelines
If your timeline looks crowded, increase the page margins or switch to landscape orientation. If labels overlap, alternate them above and below the timeline. If the timeline feels flat, use subtle shape styles or icons. If it feels too busy, remove decorations before adding more. Design often improves when you subtract.
You can also combine a timeline with a table. Put the visual timeline at the top of the page and include a detailed table underneath with dates, owners, status, and notes. This gives readers both a quick overview and deeper information. It is a practical approach for reports, proposals, and planning documents.
When Microsoft Word Is Not Enough
Word is excellent for document-based timelines, but it is not always the best tool for complex planning. If you need automatic date calculations, dependencies, task assignments, progress tracking, or interactive filtering, use a dedicated timeline or project management tool. Excel is better for data-heavy timelines. PowerPoint is better for presentation slides. Microsoft Project is better for complex project schedules. Word is best when the timeline supports a written document.
That said, Word remains a strong choice for many everyday timelines because it is familiar, widely available, and easy to export. You do not need a design degree or a subscription to a specialized tool to create something clear and useful.
Personal Experience: What I Learned Making Timelines in Microsoft Word
After making many timelines in Microsoft Word for reports, guides, planning documents, and educational content, one lesson stands above the rest: the timeline is only as good as the thinking behind it. Word gives you the tools, but it will not rescue a messy sequence. If the dates are unclear, the milestones are vague, or the story has no logical flow, the final design will still feel confusing no matter how pretty the colors are.
The most reliable workflow is to draft the timeline in plain text first. I like to create a simple list with dates on the left and events on the right. Then I remove anything that does not help the reader understand the sequence. This editing step feels small, but it makes the final timeline much stronger. A clean five-event timeline often communicates better than a crowded fifteen-event timeline.
SmartArt is my preferred option when speed matters. It is perfect for a quick project overview, a classroom handout, or a one-page report. The Basic Timeline layout is simple and dependable. However, SmartArt can become frustrating when the timeline has too many milestones or when each event needs a longer explanation. At that point, the text shrinks, spacing gets awkward, and the timeline starts looking like it was packed into a suitcase by someone late for a flight.
For polished documents, I usually build the timeline manually with shapes. It takes longer, but the control is worth it. I can decide exactly where each marker goes, how labels align, and how much white space appears between sections. The drawing canvas is especially helpful because it keeps objects together. Without it, moving a custom timeline can feel like trying to herd cats with a laser pointer.
Another practical habit is to test the timeline in the format readers will actually use. If the document will be printed, print one page before finalizing the design. If it will be emailed, export it as a PDF and open it on another device. Timelines that look great on a large monitor can become cramped on a laptop or blurry in a compressed file. Testing saves embarrassment.
I have also learned not to overdecorate. It is tempting to add gradients, shadows, icons, borders, and colorful milestone circles. A little style is good. Too much style turns the timeline into a carnival parade. The best Word timelines usually look calm, organized, and intentional. They use color to highlight meaning, not to shout at the reader.
One of the most useful design tricks is alternating labels. On a horizontal timeline, place one label above the line, the next below it, and continue alternating. This gives each milestone more room and prevents text from colliding. On vertical timelines, keep labels aligned consistently unless there is a strong design reason to alternate sides.
Finally, I recommend saving a backup before making major edits. Word timelines, especially custom ones made with shapes, can shift unexpectedly when text is added above them or page margins change. A backup version lets you experiment without fear. It is not dramatic, but it is the kind of boring habit that saves your afternoon.
In short, Microsoft Word can create timelines that are clear, attractive, and professional. The secret is not finding the fanciest layout. The secret is choosing the right amount of information, giving it room to breathe, and formatting it so the reader instantly understands the story. A good timeline does not merely show dates. It shows progress, cause, movement, and direction.
Conclusion
Learning how to make a timeline on Microsoft Word is a practical skill for students, professionals, teachers, project managers, writers, and anyone who needs to explain events in order. SmartArt is the quickest method, shapes offer the most control, and templates provide a helpful shortcut when you need a polished starting point.
The best timeline is clear, readable, and purposeful. Start with a simple list of dates and milestones. Choose the right layout. Keep labels short. Use consistent spacing. Add accessible descriptions when needed. Then save or export your document in the format your audience will use.
Microsoft Word may not be a full timeline management system, but for everyday documents, it is more capable than many people realize. With a little planning and a few formatting tricks, you can turn a plain list of events into a visual story that readers understand at a glance.