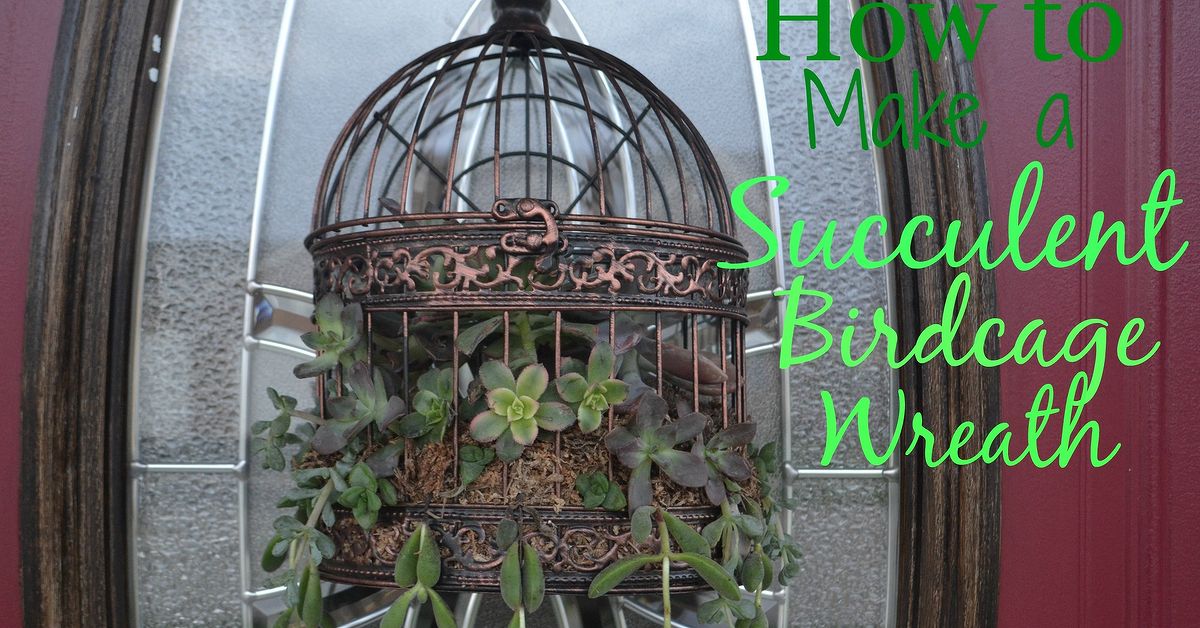
A succulent birdcage wreath is what happens when a vintage cottage garden, a living wall, and a “look what I made!” craft day all decide to share a front door. It is part wreath, part planter, and part tiny botanical stage set. Instead of using a standard grapevine ring or foam base, this project turns a decorative birdcage into a charming vertical succulent display filled with moss, soil, pebbles, and hardy little rosettes that look like they came dressed for a garden party.
The best part? You do not need to be a professional florist, master gardener, or person who owns a labeled drawer for every type of wire. This DIY succulent birdcage wreath is beginner-friendly, budget-flexible, and surprisingly forgiving as long as you remember the golden rule of succulents: they like light, drainage, and not being loved to death with water. Overwatering is basically the dramatic villain in every succulent story.
In this guide, you will learn how to choose the right birdcage, prepare a living planting base, arrange succulents beautifully, secure everything for hanging, and care for your wreath so it stays full and photogenic. Whether you want a spring wreath, a patio accent, a wedding centerpiece, or a year-round front-door decoration, this project delivers plenty of charm without demanding daily maintenance.
What Is a Succulent Birdcage Wreath?
A succulent birdcage wreath is a decorative birdcage transformed into a hanging living planter. Unlike a traditional wreath that lies flat against a door, this version has dimension. The cage gives structure, the moss acts as a supportive liner, the soil feeds and anchors the plants, and the succulents create color and texture.
The design works especially well with flat-back birdcages, wall-mounted cages, or shallow decorative cages because they can hang more securely on a door, fence, garden wall, porch hook, or balcony rail. Round birdcages also work, but they are better for hanging from above rather than sitting flat against a surface.
Why Succulents Are Perfect for This Project
Succulents are ideal for a birdcage wreath because they grow slowly, store moisture in their leaves and stems, and come in a wonderful range of colors and shapes. You can combine blue-green Echeveria, trailing Sedum, burgundy Aeonium, compact Sempervivum, or small jade cuttings for a layered, living arrangement.
They also tolerate shallow planting better than many leafy annuals. That matters because a birdcage wreath has limited soil space. While petunias and begonias may throw a small tantrum without deeper roots, succulents tend to be calmer roommates. Give them a well-draining base, bright light, and occasional deep watering, and they usually settle in nicely.
Supplies You Will Need
Gather your supplies before you start so you do not end up holding a moss-covered birdcage while trying to open a bag of potting mix with your elbow. Ask me how I know.
- One decorative birdcage, preferably flat-backed or shallow
- Assorted small succulents or succulent cuttings
- Long-fiber sphagnum moss or coconut coir liner
- Well-draining cactus or succulent potting mix
- Small pebbles, pumice, or horticultural grit
- Floral wire, fishing line, or thin garden wire
- Floral pins, greening pins, or bent paper clips
- Wire cutters or scissors
- Chopstick, pencil, or wooden skewer
- Spray bottle or bowl of water for moistening moss
- Gardening gloves
- Optional: decorative ribbon, faux bird, moss accents, mini garden sign, or seasonal embellishments
Best Succulents for a Birdcage Wreath
Choose compact succulents with shallow roots and firm stems. You want plants that can handle being tucked into moss and soil without flopping like a tired salad.
Great Succulent Choices
- Echeveria: Beautiful rosettes in green, blue, pink, and lavender tones.
- Sedum: Excellent for filling gaps and adding trailing texture.
- Sempervivum: Also called hens and chicks; hardy and naturally clumping.
- Graptopetalum: Soft pastel rosettes that root easily from cuttings.
- Crassula: Compact jade-like growth for structure and height.
- String of pearls or string of bananas: Best used sparingly for trailing drama.
- Kalanchoe: Adds interesting leaf shapes and occasional blooms.
If your wreath will live outdoors year-round, select succulents suited to your USDA growing zone. Sempervivum and some Sedum varieties tolerate cold better than tender Echeveria or jade plants. If you live where winters freeze, treat the wreath as a seasonal outdoor display and bring it indoors before frost.
Step 1: Choose and Prepare the Birdcage
Start with a birdcage that feels sturdy, not flimsy. A lightweight decorative cage is fine, but it should hold soil, plants, and moisture without bending. If you plan to hang it on a front door, a flat-back birdcage is the easiest choice because it rests neatly against the surface. If you are using a round cage, hang it from a porch hook, shepherd’s hook, or ceiling bracket.
Clean the cage with a damp cloth and remove any dust, rust flakes, or loose paint. If the cage has a removable bottom tray, decide whether you want to keep it. Keeping the tray helps hold soil, but you may need to add drainage holes or create a gravel layer so water does not sit at the bottom. Succulents are charming, but they are not fond of swamp life.
Step 2: Line the Cage with Moss
Soak long-fiber sphagnum moss in water for several minutes, then squeeze it until it is damp but not dripping. Think “wrung-out sponge,” not “rainstorm in a handful.” Line the bottom and sides of the birdcage with moss, pressing it into the bars to form a nest-like planting pocket.
If you prefer a more sustainable option, coconut coir can also work well. It holds moisture, gives roots something to grip, and creates a natural-looking base. The main goal is to keep the soil inside the birdcage while still allowing air movement and drainage.
Step 3: Add a Drainage Layer
Add a thin layer of small pebbles, pumice, or horticultural grit to the bottom of the cage. This helps prevent the soil from sitting in excess water. Do not overdo it; you are not building a driveway. A light layer is enough.
For a door-hanging wreath, weight matters. Too many rocks can turn your cute project into a doorbell-ringing hazard. Keep the base light, especially if your birdcage will hang from a wreath hook.
Step 4: Fill with Succulent Soil
Add cactus or succulent potting mix over the drainage layer. This type of mix is designed to drain faster than regular houseplant soil. If you only have standard potting mix, improve drainage by blending it with coarse sand, pumice, or perlite.
Fill the cage about two-thirds full at first. You can add more soil after placing the plants. Press gently so the soil settles, but do not pack it into a brick. Succulent roots need air as much as they need moisture.
Step 5: Prepare Your Succulents
If you are using rooted succulents, remove them from their nursery pots and gently brush away excess soil. Trim any dead leaves from the base. If you are using cuttings, cut stems about one to two inches long and remove the lowest leaves so you have a clean stem to insert into the moss and soil.
For fresh cuttings, let the cut ends dry and callus for a day or two before planting. This helps reduce the chance of rot. It may feel strange to leave plant pieces sitting on a tray, but succulents are built for this kind of patience. They are basically the camels of the craft table.
Step 6: Arrange Before You Plant
Before planting, lay your succulents on the table and experiment with the arrangement. Place larger rosettes first, then fill around them with smaller plants, trailing varieties, and textural pieces. Aim for a design that looks balanced but not stiff.
A good rule is to use a triangle layout: one large focal succulent near the lower center, another medium plant slightly higher on one side, and a third accent on the opposite side. Then soften the gaps with Sedum, small chicks, moss, or decorative pebbles.
Step 7: Plant the Succulents in the Birdcage
Use a chopstick, pencil, or wooden skewer to make small holes in the moss and soil. Insert each succulent stem or root ball into the hole, then press the moss and soil gently around it. For rooted plants, make sure the roots are covered. For cuttings, insert enough stem so the plant feels secure.
Work from the back toward the front if your cage has a narrow opening. If the birdcage door is small, you may need to use long tweezers or a chopstick to guide plants into position. This is the point where the project feels slightly like decorating a dollhouse for plants. Lean into it.
Step 8: Secure Plants for Hanging
Because this is a vertical or hanging design, secure the plants before moving the wreath. Use floral pins, greening pins, bent paper clips, fishing line, or thin floral wire to hold cuttings in place. Secure only the stem or root area, not the delicate center of a rosette.
If a plant feels loose, add a little extra damp moss around the base. The goal is a snug hold while roots develop. After several weeks, the succulents should begin anchoring themselves into the planting medium.
Step 9: Add Decorative Finishing Touches
Once the plants are secure, add small pebbles, preserved moss, bark chips, or a ribbon to finish the look. A tiny faux bird can be cute, but use restraint. One tasteful bird says “garden charm.” Seven glitter birds says “the craft drawer escaped.”
For seasonal style, swap accents throughout the year. Use pastel ribbon in spring, small dried seed pods in fall, or a simple velvet bow for the holidays. Keep decorations lightweight and avoid anything that blocks sunlight or traps moisture against the plants.
Step 10: Hang the Wreath Correctly
Hang your succulent birdcage wreath from a strong hook, bracket, or over-the-door hanger. If the cage will rest against wood, add a protective backing such as clear plastic, cork, or felt pads to prevent moisture marks. Galvanized or coated hardware is best for outdoor use because it resists rust.
Choose a bright spot with morning sun or strong indirect light. A covered porch is often perfect. Avoid harsh afternoon sun in hot climates, especially during the first few weeks while the plants adjust. Newly planted succulents can sunburn if moved too quickly from shade to intense light.
How to Water a Succulent Birdcage Wreath
Water deeply but infrequently. Instead of misting the top every day, take the wreath down and water the planting medium thoroughly when it feels dry. Let excess water drain before hanging it again. A shallow sprinkle encourages weak roots and can leave the surface damp while the inner soil stays dry.
How often should you water? It depends on temperature, light, humidity, and plant type. In warm bright weather, the wreath may need water every one to two weeks. Indoors or during cooler months, it may need water much less often. Always check the soil and moss before watering. Dry is your signal; a calendar is only a suggestion.
Ongoing Care Tips
- Light: Give the wreath bright light, ideally morning sun or bright indirect exposure.
- Water: Water only when the moss and soil feel dry.
- Rotation: Rotate the cage every week or two so growth stays even.
- Pruning: Remove dried leaves and trim leggy stems.
- Feeding: Use diluted succulent fertilizer during active growth if needed.
- Weather: Protect from frost, heavy rain, and extreme heat.
Common Mistakes to Avoid
Using Regular Soil Without Drainage
Regular potting soil can hold too much moisture for succulents, especially in a moss-lined birdcage. Use a fast-draining succulent mix or amend your soil with gritty material.
Watering Too Often
If leaves turn mushy, yellow, or translucent, overwatering may be the problem. Let the wreath dry thoroughly before watering again.
Hanging It in Deep Shade
Succulents need enough light to keep their compact shape. In too much shade, they stretch toward the light and lose their tidy rosette form.
Skipping the Securing Step
Gravity is not impressed by your artistic vision. Secure cuttings and small plants before hanging the wreath.
Design Variations to Try
Once you understand the basic method, you can customize your succulent birdcage wreath in many ways. For a romantic cottage look, use a white or distressed metal cage with pastel Echeveria and soft green Sedum. For a modern design, choose a black cage, silver-blue succulents, and gray stones. For a rustic garden style, use a weathered cage, natural moss, and Sempervivum in different sizes.
You can also create a faux succulent birdcage wreath if the display will be placed in a dark hallway, event venue, or rental property where watering is inconvenient. Use floral foam, preserved moss, and high-quality faux succulent picks. It will not grow, but it also will not complain. That is sometimes a fair trade.
Troubleshooting Your Living Wreath
If succulents begin stretching, move the wreath to brighter light. If leaves wrinkle, the plants may need a deeper watering. If stems turn black or mushy, remove affected pieces immediately and allow the planting medium to dry. If plants fall out, reinsert them with extra moss and secure them with pins until roots develop.
Do not panic if the wreath looks slightly sparse at first. Many succulent projects fill in over time. As rosettes grow and Sedum spreads, the design becomes fuller and more natural. A little patience turns “I hope this works” into “Yes, I absolutely meant for it to look this charming.”
Personal Experience: What Making a Succulent Birdcage Wreath Teaches You
Making a succulent birdcage wreath is one of those projects that looks fancy when finished but feels wonderfully humble while you are doing it. Your hands get mossy, the soil escapes onto the table, and at least one succulent cutting rolls away like it has a meeting to attend. That is part of the fun. Unlike a perfect store-bought wreath, a handmade living wreath has personality from the beginning.
The first lesson is that structure matters. A birdcage may look decorative, but once you add damp moss, soil, pebbles, and plants, it becomes heavier than expected. Choosing a sturdy cage and a reliable hook saves a lot of worry. A flat-back cage is especially helpful for doors because it hangs more naturally and does not swing every time someone walks by.
The second lesson is that succulents are tougher than they look, but they still have preferences. They do not need constant attention. In fact, the wreath often does better when you resist fussing over it. Many beginners want to mist it daily because misting feels gentle and responsible. Unfortunately, succulents prefer a more practical routine: let the planting medium dry, then water thoroughly. It is less spa day, more desert rainstorm.
Another helpful experience is learning to arrange with contrast. A wreath made of all identical succulents can still be pretty, but mixing shapes creates magic. Pair tight rosettes with trailing stems. Place blue-green leaves beside burgundy or lime tones. Add tiny chicks around larger Echeveria. The birdcage frame already provides visual interest, so the plants should look abundant but not chaotic.
It is also worth planning for the wreath’s future. Succulents grow slowly, but they do grow. Some will stretch, some will produce offsets, and some may need trimming. That is not failure; it is maintenance. A living wreath is not frozen decor. It changes with the season, the light, and the care it receives. This is exactly what makes it more interesting than a plastic wreath that looks the same forever, judging you silently from the storage bin.
If you are making this project as a gift, give simple care instructions with it. Tell the recipient where to hang it, how to check for dryness, and when to bring it indoors. A succulent birdcage wreath makes a beautiful housewarming, Mother’s Day, birthday, or garden club gift, but it becomes even better when the new owner understands how to keep it alive.
Finally, the project teaches you that DIY decor does not need to be complicated to feel special. A thrifted birdcage, a handful of succulent cuttings, and some moss can become a living piece of art. It is creative, affordable, and flexible enough for beginners. Even if the first version is not perfect, it will still have charm. Plants are generous that way. They soften the edges, cover the gaps, and make the maker look clever.
Conclusion
A succulent birdcage wreath is a beautiful way to combine gardening, upcycling, and handmade home decor. With the right birdcage, well-draining soil, damp moss, carefully chosen succulents, and a little floral wire, you can create a living wreath that looks elegant without being fussy. Place it in bright light, water only when dry, protect it from harsh weather, and enjoy watching it settle into its new miniature garden home.
Whether you hang it on a porch, display it on a patio wall, or use it as a garden-party centerpiece, this DIY succulent birdcage wreath brings texture, color, and personality wherever it lands. It is proof that sometimes the best wreath is not round, not flat, and definitely not ordinary.
Note: This article is written as publish-ready HTML body content and is based on real succulent care principles, living wreath techniques, and practical DIY planter methods, with source links intentionally omitted as requested.