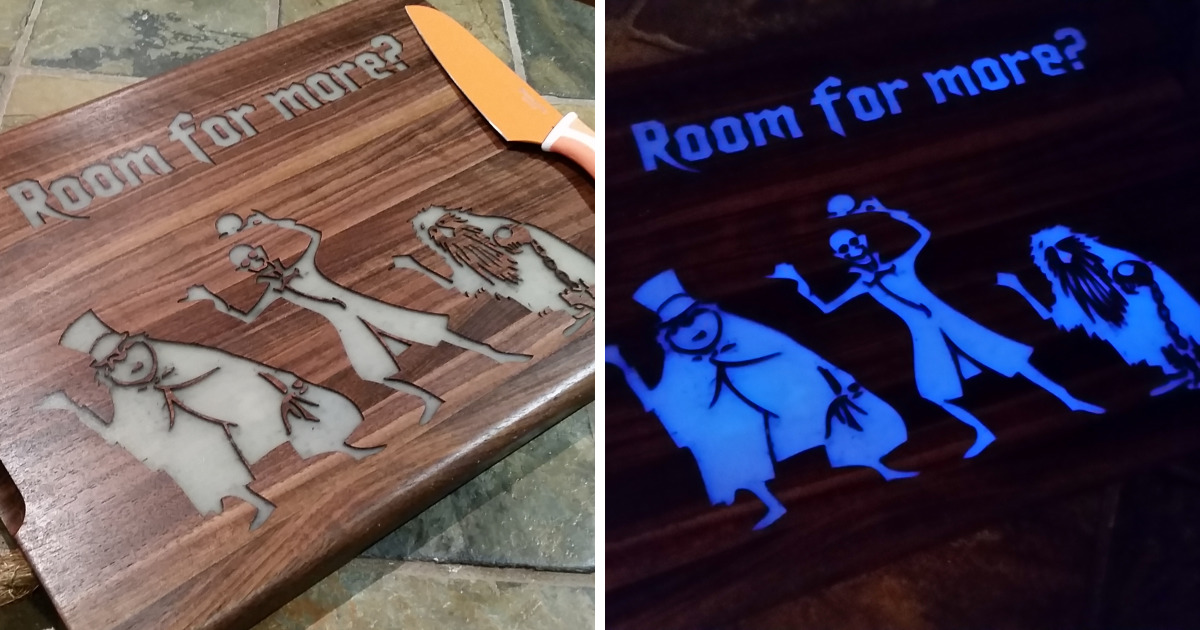
If your kitchen has ever looked at Halloween decorations and whispered, “Cute, but where is the drama?” this project is your answer. A spooky cutting board that glows in the dark is part woodworking project, part kitchen accessory, and part tiny haunted house tour for your cheese cubes. It can sit on a Halloween snack table like a mysterious artifact, then glow after the lights go down like it knows something you do not.
But before we start pouring glowing goo into wood like cheerful mad scientists, let’s be clear about one thing: this project should be designed with food safety in mind. The smartest version is a wooden cutting board with glow-in-the-dark epoxy inlays placed in decorative areas, such as engraved bats, ghosts, cracks, moon shapes, handles, border grooves, or a serving-side design. Keep the heavy knife work on plain wood, or use the glowing side as a serving board for wrapped candy, cupcakes, fruit, crackers, or a Halloween charcuterie spread. Spooky is fun. Eating questionable resin dust is not.
What Is a Glow-in-the-Dark Cutting Board?
A glow-in-the-dark cutting board is usually a hardwood board decorated with photoluminescent pigment mixed into clear epoxy resin. The pigment absorbs light from sunlight, UV lamps, black lights, or strong indoor lighting. When the room goes dark, it slowly releases that stored energy as a visible glow. In normal-human words: you charge it with light, then it performs a tiny magic trick.
For the best results, use strontium aluminate glow powder instead of older, weaker glow pigments. Strontium aluminate is popular in modern glow-in-the-dark crafts because it glows brighter and longer than many basic zinc sulfide pigments. Green and aqua pigments are usually the strongest performers, which is perfect for a haunted slime, ghostly fog, alien moonlight, or “why is the appetizer board judging me?” effect.
Food Safety First: Decorative Glow, Practical Wood
The biggest mistake people make with a DIY glow epoxy cutting board is treating every shiny product labeled “non-toxic” as if it belongs under a chef’s knife. “Non-toxic when cured” and “approved for repeated direct food contact after being mixed with glow pigment and chopped with knives” are not the same sentence. Epoxy can be food-contact compliant only under specific manufacturer instructions, curing conditions, and use cases. Pigments, dyes, mica powders, and glow powders may change that equation.
That does not mean you should abandon the project and sadly eat Halloween candy from a paper towel. It means you should design the board wisely. Put the glow effect in shallow decorative recesses, not across the entire chopping surface. Leave one side of the board as plain, oiled hardwood for cutting. Use the decorated side for serving, display, or light-duty dry foods. If you want a board for raw meat, poultry, or seafood, make a separate plain board and let the spooky one live its glamorous snack-table life.
Best Materials for a Spooky Glow Board
Choose the Right Wood
Hard maple, walnut, and cherry are classic cutting board woods because they are durable, attractive, and reasonably friendly to knife edges. Maple gives a bright contrast against glowing green or blue inlays. Walnut looks dramatic and gothic, like the board owns a velvet cape. Cherry warms up beautifully over time and works well for pumpkin, moon, and autumn designs.
Avoid soft woods like pine because they dent too easily. Also avoid oily, irritating, or unknown woods unless you know they are appropriate for kitchen projects. Your board should be thick enough to resist warping, ideally around 1 to 1.5 inches thick for a solid homemade board.
Use the Right Glue
If you are laminating strips of wood, use a waterproof wood glue rated for cutting boards or indirect food contact. Many woodworkers use Titebond III for cutting boards because it is waterproof and commonly recommended for kitchen wood projects. Spread glue evenly, clamp firmly, and allow the blank to cure fully before shaping or sanding.
Pick a Clear Epoxy Carefully
Choose a clear casting or tabletop epoxy from a reputable manufacturer, and read the label like it contains buried treasure. Look for food-contact compliance after full cure if the epoxy may be near food. Follow the exact mix ratio, temperature range, cure time, and safety instructions. Do not guess. Epoxy is chemistry, and chemistry does not care that you are “pretty sure this is fine.”
Choose Glow Pigment
For a strong glow, use high-quality strontium aluminate glow powder. Green usually glows brightest, aqua often gives a ghostly look, and blue tends to be moodier but less intense. For Halloween, green screams haunted laboratory, aqua says spectral fog, and blue whispers “ancient cursed moon.” Pick your dramatic flavor.
Tools and Supplies
- Hardwood board blank or hardwood strips
- Waterproof wood glue if making a laminated board
- Clamps
- Router, rotary tool, carving tool, or CNC machine for inlays
- Clear epoxy resin
- Glow-in-the-dark pigment powder
- Mixing cups and stir sticks
- Painters tape or sheathing tape
- Sandpaper grits: 80, 120, 180, 220, and optionally 320
- Random orbital sander or sanding block
- Food-grade mineral oil
- Board butter or beeswax-mineral oil blend
- Nitrile gloves, eye protection, and a respirator or dust mask
Step-by-Step: How To Make a Spooky Cutting Board That Glows in the Dark
Step 1: Plan the Spooky Design
Start with a design that looks good in daylight and even better in the dark. Simple shapes work best: bats, ghosts, crescent moons, spiderwebs, potion bubbles, skull outlines, haunted trees, dripping slime borders, or tiny stars. If you are new to woodworking, do not begin with a photorealistic haunted mansion unless you enjoy emotional damage.
Sketch the design on paper first. Decide which areas will glow and which areas will remain plain wood. For a beginner-friendly version, carve a crescent moon and a few stars near one corner. For a dramatic Halloween charcuterie board, add a glowing border groove around the edge and a small ghost near the handle.
Step 2: Prepare the Board Blank
If you are using a premade hardwood cutting board, sand it lightly and make sure it is clean, dry, and flat. If you are building your own, cut hardwood strips to equal length, arrange the grain attractively, glue the edges, clamp the blank, and allow it to cure overnight. After curing, flatten the board with a planer, router sled, drum sander, or careful sanding.
Square the edges and round them over slightly. Sharp edges chip more easily and feel less pleasant in the hand. A small roundover also gives the board a finished, professional look instead of “I made this during a thunderstorm with a spoon.”
Step 3: Carve or Route the Inlay Areas
Transfer your spooky design onto the wood. Use a router, rotary tool, carving bit, or CNC machine to remove shallow areas where the glow epoxy will sit. A depth of about 1/16 to 1/8 inch is usually enough for decorative inlays. Deeper pours can glow strongly, but they also use more resin and may require extra curing time.
Keep the edges crisp. Clean out dust from the carved recesses with a vacuum, compressed air, or a clean brush. Resin sticks best when the area is clean and dry. Dust is the enemy. It sneaks into everything like a tiny beige goblin.
Step 4: Seal the Back and Edges
Epoxy loves to escape. It will find the smallest gap and make a glossy puddle on your workbench while pretending innocence. Use tape on the underside of through-cracks, edges, or any areas where resin might leak. Press the tape firmly. For larger voids, create a temporary dam with plastic, silicone, or packing tape.
Step 5: Mix the Glow Epoxy
Put on nitrile gloves and work in a well-ventilated area. Measure the epoxy resin and hardener exactly according to the manufacturer’s instructions. Mix slowly to reduce bubbles. After the resin and hardener are fully combined, stir in glow pigment.
A practical starting point is about one part glow powder to three or four parts mixed epoxy by volume. More pigment can create a stronger glow, but too much may make the mixture thick, clumpy, or difficult to pour. The resin should still flow into the design. If it looks like haunted oatmeal, you went too far.
Step 6: Pour the Glow Inlay
Pour the glow epoxy into the carved recesses. Use a toothpick, small stick, or disposable brush to push resin into corners and tiny details. Slightly overfill the recesses because epoxy may shrink or settle as bubbles rise. Pass a heat gun or small torch quickly over the surface if the epoxy manufacturer allows it, but do not scorch the wood. This is a cutting board, not a dragon training exercise.
Let the epoxy cure fully. This may take 24 to 72 hours or longer depending on the resin, thickness, room temperature, and humidity. Do not sand too early. Partially cured epoxy can gum up sandpaper and create dust you do not want to breathe.
Step 7: Sand the Board Smooth
Once the epoxy is fully cured, sand the board flat. Start with 80 or 120 grit if the resin is raised, then progress through 180 and 220 grit. Sand evenly and avoid digging into one area. The goal is a smooth transition between wood and epoxy, not a topographic map of regret.
Always use dust control. Wood dust and epoxy dust should not be inhaled. Use a dust extractor if possible and wear appropriate respiratory protection. After sanding, wipe the board clean with a dry cloth or vacuum. Avoid soaking the board with water at this stage.
Step 8: Charge the Glow
Before finishing, test the glow. Place the board under bright sunlight, a UV flashlight, or a black light for several minutes. Turn off the lights and inspect the design. If the glow looks uneven, you may have thin spots in the epoxy or areas where pigment settled poorly. Minor unevenness can look charmingly spooky. Major unevenness may require another shallow pour.
Step 9: Finish the Wood
Apply food-grade mineral oil generously to the wood. Let it soak in, then wipe off the excess. Repeat until the wood stops looking dry. After oiling, apply a thin coat of board butter or a beeswax-mineral oil blend to help seal the surface. Buff with a clean cloth until the board feels smooth.
Do not use vegetable oil, olive oil, or cooking oils as a cutting board finish. They can turn sticky or rancid. Food-grade mineral oil is inexpensive, stable, and widely used for wooden cutting boards.
Design Ideas for Maximum Halloween Drama
Ghostly Moon Board
Use walnut as the base wood and carve a crescent moon, stars, and a small floating ghost. Fill with aqua glow epoxy. In daylight, the design looks elegant. In the dark, it becomes a midnight snack portal.
Slime Border Board
Route a wavy groove around the edge and fill it with green glow epoxy. This creates the look of radioactive slime oozing around your crackers and cheese. It is childish in the best possible way.
Haunted Handle Board
If your board has a handle, carve a tiny skull, bat, or jack-o’-lantern near the handle instead of the cutting area. This keeps the glow decorative and reduces knife contact.
Spiderweb Serving Board
Carve thin spiderweb lines into one corner and fill them with blue-green glow epoxy. Keep the rest of the board clean and minimal so the web stands out when the lights go down.
How To Use the Board Safely
Use the plain wood side for chopping vegetables, herbs, bread, or cooked foods. Use a separate board for raw meat, poultry, and seafood to prevent cross-contamination. If the decorated side contains pigmented resin, treat it as a serving surface unless your exact epoxy and pigment combination is confirmed safe for direct food contact after curing.
Never put a wooden cutting board in the dishwasher. Heat and water can warp or crack the board. Hand-wash it with warm, soapy water, rinse quickly, and dry it upright so air can circulate. Re-oil the board when the wood looks pale, dry, or thirsty. Yes, wood gets thirsty. It is basically a houseplant with better knife skills.
Common Mistakes to Avoid
Using Too Much Glow Powder
More pigment does not always mean better glow. If the epoxy becomes gritty or clumpy, it may not cure or level properly. Start with a moderate ratio and test before committing to the whole board.
Pouring Resin Into Dirty Recesses
Dust, oil, and loose fibers can cause cloudy resin or weak adhesion. Clean the carved areas thoroughly before pouring.
Sanding Before Full Cure
Epoxy may feel hard on the surface before it is fully cured. Give it the full recommended cure time. Patience is cheaper than clogged sandpaper and a ruined finish.
Making the Whole Surface Resin
A full resin-coated cutting board may look beautiful, but knives can scratch resin, and food-contact rules become more complicated. Keep the resin decorative and let the wood do the cutting.
Care and Maintenance
After each use, wash the board by hand with mild soap and warm water. Dry it immediately with a towel, then stand it upright. Once a month, or whenever the wood looks dull, apply food-grade mineral oil. For extra protection, follow with board butter. If odors appear, scrub the wood side gently with coarse salt and lemon, then rinse and dry quickly.
Do not leave the board soaking in the sink. Do not store it flat on a wet counter. Do not use bleach casually unless you are following proper food-safety dilution guidance. And do not let someone cut raw chicken on your decorative glow side unless you enjoy screaming internally.
Real-Life Experience: What This Project Teaches You
Making a spooky cutting board that glows in the dark feels simple at first. It is just wood, resin, pigment, and a Halloween idea, right? Then the project begins teaching lessons immediately. The first lesson is that glow pigment is heavier than it looks. If you mix it lazily, it can settle into the bottom of the cup or clump in the carved lines. A slow, thorough mix gives a better glow and a cleaner pour. The second lesson is that tape matters. Resin leaks are not dramatic in the heroic sense. They are dramatic in the “why is my workbench permanently shiny?” sense.
The third lesson is that simple designs often look better than complicated ones. A clean crescent moon with five stars can glow more beautifully than a crowded haunted village full of tiny details. Thin lines are harder to fill, harder to sand, and easier to lose under dust or bubbles. If you are making your first glow epoxy cutting board, choose bold shapes. Think bats, moons, ghosts, bones, potion bubbles, or slime borders. Save the 47-window haunted castle for your villain era.
Another experience worth mentioning is how different the board looks in different lighting. In daylight, walnut with green epoxy looks rich and modern. Under a black light, it looks like it escaped from a laboratory. After a strong sunlight charge, the glow can be surprisingly bright for the first few minutes, then gradually fade into a softer effect. That fading is normal. Glow-in-the-dark pigment is not a battery-powered LED. It is more like a campfire ghost: bright at first, then moodier as the night goes on.
You also learn that finishing the wood is not optional. A dry board can look dusty and unfinished even if the glow inlay is perfect. Mineral oil deepens the grain, adds contrast, and makes the entire project feel intentional. Board butter adds a smoother touch and helps the surface resist moisture. The finish is the moment when the board goes from “craft experiment” to “yes, I absolutely meant to make this spooky masterpiece.”
In actual use, the best reaction comes when guests see the board normally first. Put it on the table with cheese, crackers, grapes, wrapped candy, or Halloween cookies. Let it sit under bright kitchen lights or near a window before the party. Later, dim the lights or turn on a black light. That is when the little ghost, moon, or slime border suddenly appears, and everyone makes the same delighted noise people make when a dog wears a costume. It is not just a cutting board anymore. It is a conversation piece.
The most practical experience, however, is learning restraint. A spooky board should still be usable. Keep one side plain. Keep the resin away from the hardest chopping zones. Maintain it like a real cutting board. Wash it properly. Oil it regularly. Store it upright. When designed thoughtfully, this project gives you the best of both worlds: a functional wooden kitchen board and a glowing Halloween serving piece with just enough mischief to make snack time more interesting.
Conclusion
A DIY glow-in-the-dark spooky cutting board is one of those rare projects that combines woodworking, kitchen design, Halloween decor, and a little science-class sorcery. The key is to use quality hardwood, choose a reliable clear epoxy, mix in strong glow pigment, and place the glowing details where they add beauty without creating food-safety confusion. Keep the cutting surface practical, keep the decorated side magical, and your board will be ready for cheese, crackers, candy, and compliments.
Note: For the safest result, use the glowing epoxy side as a decorative serving surface and reserve a plain wood side for actual chopping. Always follow the epoxy, pigment, glue, and finish manufacturers’ instructions, and verify food-contact claims before using any resin or pigment near unpackaged food.