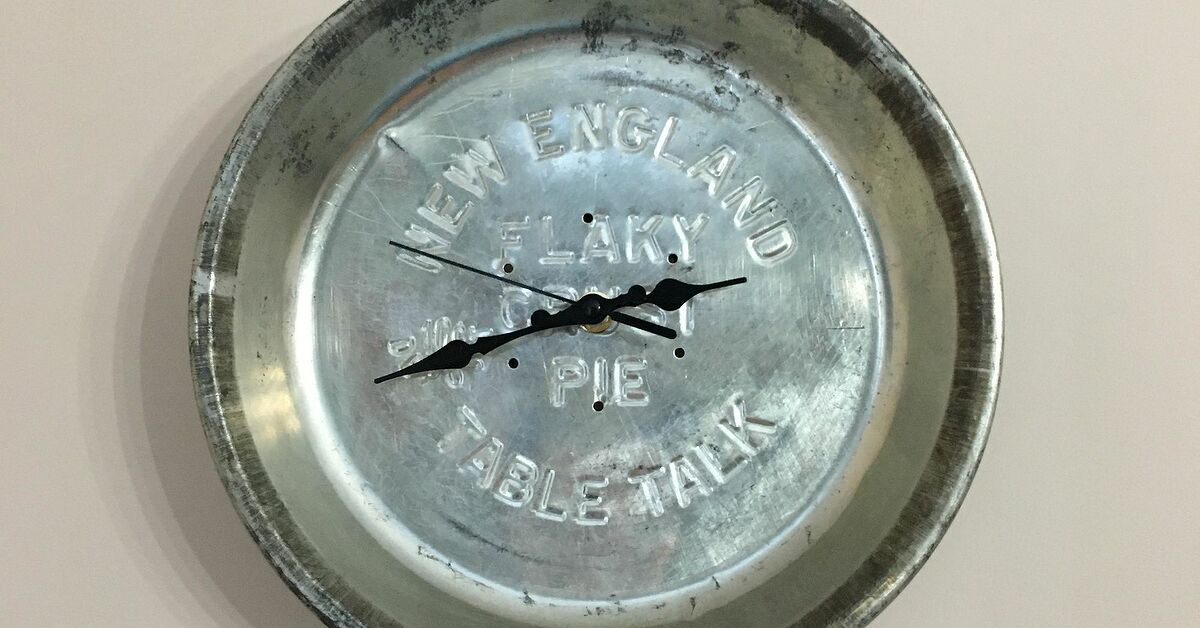
A vintage pie tin already knows how to hold something wonderful. Usually, that wonderful thing is apple pie, pecan pie, or the mysterious “just one more slice” pie that disappears before breakfast. But with a little creativity, a humble old pie tin can become something equally charming: a handmade wall clock with farmhouse character, kitchen nostalgia, and just enough personality to make guests say, “Wait, is that a pie pan?”
This DIY vintage pie tin clock is one of those rare craft projects that looks boutique but does not require boutique-level patience. You need a vintage pie tin, a quartz clock movement kit, a drill, a few basic measuring tools, and a willingness to poke one clean hole through metal without panicking. The result is a functional piece of wall decor that feels cozy, clever, and slightly mischievousin the best possible way.
Whether you found your pie tin at a flea market, inherited it from a family kitchen, or rescued it from a thrift-store shelf between a fondue pot and a rooster-shaped napkin holder, this guide will show you how to turn it into a DIY clock that looks intentional, not like a craft night got loose in the garage.
Why a Vintage Pie Tin Makes Such a Great Clock
A pie tin is nearly perfect for clockmaking because it already has the shape of a clock face. It is round, lightweight, shallow, and easy to hang. Many vintage tins also have stamped lettering, embossed rims, aged patina, old bakery branding, or charming wear marks that give the finished clock instant character.
Unlike a plain wooden clock blank, a vintage pie tin tells a story before you even add the hands. A Table Talk-style tin, an old bakery deposit pan, or a well-loved aluminum pie plate brings the warmth of American kitchen history into the project. The dents, scratches, and dull shine are not flaws. They are the design department. Congratulations, you have hired time itself as your decorator.
Materials You’ll Need
Main Supplies
- One vintage metal pie tin, ideally 8 to 10 inches wide
- Quartz clock movement kit with hands
- AA battery, if required by your clock kit
- Small hanging hook or sawtooth hanger, if your kit does not include one
- Optional number stickers, vinyl decals, rub-on transfers, or paint marker
- Optional clear matte spray sealer
Tools
- Measuring tape or ruler
- Pencil, washable marker, or painter’s tape
- Center punch or nail
- Hammer
- Power drill
- Metal drill bit, step bit, or titanium-coated bit
- Scrap wood block
- Clamps
- Fine sandpaper, metal file, or deburring tool
- Safety glasses and work gloves
Choosing the Right Pie Tin
The best pie tin for this project is sturdy enough to hold its shape but thin enough to drill without drama. Aluminum tins are common, lightweight, and easy to work with. Steel tins may feel stronger, but they can be harder to drill. If you are new to metal projects, start with a thinner aluminum pan and save the heavy-duty mystery metal for your future career as a blacksmith.
Look for a tin with an interesting face. Embossed bakery names, stamped lettering, scalloped edges, and naturally aged surfaces all add charm. Avoid tins with deep rust, sharp cracks, or warped centers. A little patina is beautiful; a jagged tetanus invitation is not.
Before buying or using a tin, check the depth of the rim. Clock hands need room to rotate freely. If the pie tin has a high raised lip, choose shorter hands or mount the movement so the hands sit high enough above the surface. The minute hand should never scrape the rim, the numbers, or any raised decoration.
Choosing the Right Clock Movement Kit
The clock movement is the small battery-powered mechanism that sits behind the tin. Its threaded shaft passes through the center hole, and the hands attach on the front. Most DIY clock kits use quartz movement, which is affordable, quiet enough for most rooms, and easy to install.
The most important detail is shaft length. The threaded shaft must be long enough to pass through the pie tin and still allow the washer and nut to secure the movement. If the shaft is too short, the mechanism will wobble or fail to attach. If it is too long, the hands may sit awkwardly forward or rub against each other.
For a thin metal pie tin, a short-shaft clock movement often works well. However, always measure the thickness and shape of your tin before buying the kit. If the tin has a recessed center, thick embossing, or a curved surface, you may need a slightly longer shaft.
Hand Length Matters Too
Clock hands should fit inside the flat area of the tin. As a general rule, the minute hand should be shorter than the radius of the usable clock face. For example, if your tin is 9 inches wide, the center-to-rim distance is about 4.5 inches. A minute hand around 3 to 4 inches long usually looks balanced and avoids scraping the rim.
When in doubt, go a little shorter. Tiny hands can look intentionally quaint. Oversized hands that catch on the pie tin edge look like your clock is trying to escape.
Step 1: Clean the Pie Tin Without Erasing Its Soul
Wash the tin gently with warm water and mild dish soap. Use a soft cloth or sponge rather than harsh steel wool, especially if the tin has printed graphics or delicate aging. Dry it immediately to prevent water spots or rust.
If the tin is greasy, try a small amount of baking soda paste on the back or an inconspicuous area first. For aluminum, avoid aggressive cleaners that can scratch or dull the surface. The goal is not to make the pie tin look factory-new. The goal is to remove grime while keeping the charming “I survived 47 Thanksgivings” energy.
Step 2: Find the Exact Center
Finding the center is the difference between a clock that looks handmade and a clock that looks like it had a rough afternoon. Lay the pie tin face down on a soft towel. Measure the diameter across the widest part and mark the halfway point. Rotate the tin 90 degrees and measure again. Where the two center marks meet is your drilling point.
If the tin has a printed design, you may decide to visually center the clock based on the artwork rather than the exact physical center. For most round tins, the true center is best. For tins with off-center branding, use painter’s tape to test the placement before drilling.
Step 3: Support the Tin Before Drilling
Place a scrap wood block under the center of the tin. This supports the metal and helps prevent bending when the drill bit breaks through. Clamp the tin gently if possible. If clamps might damage the rim, place folded cardboard or cloth between the clamp and metal.
Do not hold the pie tin in your hand while drilling. Thin metal can spin, flex, or catch on the bit. That turns a cute kitchen clock project into an unplanned slapstick routine. Safety glasses are not optional; metal shavings have terrible manners.
Step 4: Punch a Starter Point
Use a center punch or a nail and hammer to make a small indentation at the center mark. This keeps the drill bit from wandering across the smooth metal surface. Without a starter point, the bit may skate around like it is auditioning for a winter sport.
Use light pressure. You only need a small dimple, not a crater. If the tin is very thin, support it firmly from underneath and tap gently.
Step 5: Drill the Center Hole
Install a metal drill bit slightly smaller than the final hole size. Drill slowly and steadily through the center mark. A pilot hole is helpful because it gives the larger bit or step bit a clean path. For thin sheet metal, a step drill bit works especially well because it enlarges the hole gradually and reduces tearing.
Check your clock movement instructions for the required hole diameter. Many clock movements need a center hole around 5/16 inch, but kits vary. Do not guess unless you enjoy buying replacement pie tins and muttering inspirational phrases under your breath.
After drilling the pilot hole, enlarge it slowly until the threaded shaft fits through. Test the fit often. The shaft should slide in without forcing, but the hole should not be so large that the movement shifts around.
Step 6: Deburr and Smooth the Hole
Freshly drilled metal can leave sharp edges around the hole. Use a deburring tool, small metal file, or fine sandpaper to smooth both sides. This helps the clock movement sit flat and protects your fingers during assembly.
Wipe away metal dust with a damp cloth and dry the tin completely. Check the front surface for scratches. If you used painter’s tape around the drilling area, remove it slowly.
Step 7: Install the Clock Movement
Insert the clock movement shaft from the back of the pie tin through the center hole. Depending on your kit, you may need to add a rubber washer, brass washer, hanger, or mounting nut in a specific order. Follow the instructions that came with the kit, because clock hardware is small, fussy, and surprisingly confident for something powered by one battery.
Tighten the front nut gently. Do not overtighten it. Thin pie tins can dent if you crank down too hard. The movement should be snug and straight, not crushed into submission.
Step 8: Attach the Hour, Minute, and Second Hands
Set all hands to 12 o’clock during installation. Press the hour hand onto the shaft first, then attach the minute hand, then the second hand if your kit includes one. Make sure each hand is parallel to the clock face and not rubbing against another hand.
Once installed, gently rotate the minute hand through a full 12-hour cycle using the adjustment wheel on the back of the movement. Watch carefully to make sure the hands clear the rim, numbers, and raised lettering. If anything rubs, remove and slightly bend the hand upward or choose shorter hands.
Step 9: Add Numbers or Keep It Minimal
This is where your design personality enters the room wearing an apron. You can add traditional numbers, simple tick marks, Roman numerals, tiny vinyl dots, or no numbers at all. A pie tin with bold graphics may look better without added numbers. A plain tin may benefit from black numerals, cream decals, or hand-painted marks.
For a farmhouse kitchen look, try simple black numbers. For a retro diner feel, use red or teal accents. For a minimalist vintage style, add only 12, 3, 6, and 9. If you want whimsy, use tiny fork-and-spoon icons as hour markers. Just remember that the clock still needs to be readable unless its main job is to look cute and confuse everyone about lunchtime.
Step 10: Hang and Test the Clock
Insert the battery and set the time. Let the clock run flat on a table for a few minutes to confirm the hands move freely. Then hang it on a secure wall hook or nail. Because pie tins are lightweight, they usually do not need heavy-duty hardware, but always make sure the hanger is stable.
A vintage pie tin clock looks especially good in a kitchen, breakfast nook, pantry, mudroom, coffee bar, craft room, or farmhouse-style gallery wall. Pair it with old recipe cards, wooden cutting boards, antique utensils, or framed food prints for a collected look.
Design Ideas for Different Styles
Farmhouse Kitchen Clock
Use a worn aluminum pie tin, black spade-style clock hands, and simple black numbers. Keep the patina visible. This version looks like it belongs beside a stack of cookbooks and a crock full of wooden spoons.
Retro Diner Clock
Choose a shiny tin and add red numbers or teal accents. Look for clock hands with a mid-century shape. This style works beautifully in a colorful kitchen or coffee corner.
Family Recipe Clock
Scan or copy a handwritten family recipe and decoupage it lightly onto the tin before installing the movement. Seal it with a matte clear coat. This turns the clock into a sentimental heirloom without locking it away in a drawer.
Minimalist Vintage Clock
Leave the tin plain and use slim black or brass hands. Skip the numbers. Let the metal texture and circular shape do the talking. This version feels clean, quiet, and stylish.
Common Mistakes to Avoid
Using Hands That Are Too Long
This is the most common problem. The hands must rotate freely inside the rim. Always test before finalizing the design.
Drilling Without Support
Unsupported metal can bend or tear. Use scrap wood underneath and drill slowly.
Overtightening the Nut
A pie tin is thin. Tighten the clock movement just enough to keep it stable.
Cleaning Too Aggressively
Vintage charm can vanish under harsh scrubbing. Clean gently and preserve the aged finish.
Ignoring Shaft Length
The movement shaft must match the thickness and shape of the tin. Measure before buying.
How Much Does This DIY Pie Tin Clock Cost?
The cost depends on where you find your materials. A thrifted or flea-market pie tin may cost only a few dollars, while collectible branded tins can cost more. Basic quartz clock kits are usually inexpensive and widely available at craft stores, hardware stores, and online shops.
In many cases, you can complete this project for less than the price of a mass-produced decorative wall clock. Better yet, your finished clock will have real personality. Store-bought clocks tell time. This one tells time and quietly brags that it used to hold cherry pie.
Care and Maintenance
Dust the clock with a soft cloth. Avoid spraying cleaners directly onto the clock face, especially if you added decals, paint, or paper elements. Replace the battery when the hands slow down or stop. If the clock hangs in a humid kitchen, check occasionally for rust or moisture buildup.
If the hands get bumped out of alignment, remove the battery, reset all hands to 12, and reinstall them in the correct order. Most clock kits are forgiving, as long as you handle the parts gently.
Experience Notes: What Making a DIY Vintage Pie Tin Clock Teaches You
The first thing you learn when making a DIY vintage pie tin clock is that “simple project” does not always mean “brainless project.” It is easy, yes, but it rewards patience. Measuring the center carefully, choosing the right hand length, and drilling slowly all matter. A clock is not a throw pillow. If it is crooked, it will announce that fact every time someone checks whether dinner is late.
One of the best experiences in this project is hunting for the tin. Thrift stores, antique malls, estate sales, and flea markets all have different personalities. Some tins look polished and collectible. Others look like they spent decades in a cabinet next to a rolling pin with strong opinions. The best tin is not always the cleanest one. Sometimes the winner is the pan with faded lettering, a softened rim, or a few tiny dents that make it feel real.
Another lesson is that patina should be respected. Many beginners want to scrub the tin until it shines like a spaceship. But a vintage pie tin clock looks best when it still feels old. A gentle cleaning is enough. Leave the small scratches. Leave the dullness. Leave the evidence that this object had a life before it became wall decor. That history is the whole point.
The drilling step is where confidence grows. At first, drilling into metal feels more serious than cutting paper or painting wood. The sound is sharper, the surface is slippery, and the stakes feel higher because you only get one center hole. But once you support the tin, punch a starter point, and use a slow drill speed, the process becomes manageable. It is a small but satisfying skill-building moment. You are not just crafting; you are doing light hardware work while pretending not to be impressed with yourself.
Installing the clock movement is also a good reminder that small parts need calm hands. Clock hands are delicate. If they bend, rub, or overlap, the clock may stop. The trick is to assemble everything gently, test the rotation, and adjust before hanging. Rushing this step is how a cute clock becomes a dramatic wall ornament that is right twice a day.
Design decisions are where the project becomes personal. Some pie tins need bold numbers. Others look better bare. Some call for black hands; others look beautiful with brass or red. A family recipe tin might become a meaningful kitchen keepsake. A bakery-branded tin might become the star of a breakfast nook. A plain aluminum tin might become surprisingly elegant with minimalist hands and no numerals at all.
The finished clock often feels more special than expected because it combines function, memory, and humor. It is useful, but it does not take itself too seriously. It can make a kitchen feel warmer without adding clutter. It can turn a forgotten object into a conversation piece. And unlike many DIY projects, it does not require a garage full of equipment or a weekend-long emotional commitment.
Perhaps the biggest takeaway is that upcycling works best when the old object still gets to be itself. A vintage pie tin should not be disguised. It should still look like a pie tinjust one that got promoted. That is the charm. You are not hiding its past. You are giving it a second act, a battery, and a very important job: reminding everyone when it is time for dessert.
Conclusion
Learning how to make a DIY vintage pie tin clock is a satisfying way to combine nostalgia, creativity, and practical home decor. With one old pie tin, a simple quartz movement, and careful drilling, you can create a charming wall clock that feels handmade, useful, and full of character.
The key is to measure before you drill, choose a clock kit with the right shaft and hand length, preserve the tin’s vintage personality, and test the hands before hanging. Once finished, your clock will look right at home in a cozy kitchen, farmhouse dining space, craft room, or retro-inspired nook.
And the best part? Every time someone asks where you bought it, you get to say, “I made it from a pie tin.” That sentence alone is worth the price of the clock kit.
SEO Tags
Note: This original article was created for web publishing and is based on real DIY clockmaking, metal-drilling, vintage kitchenware, and upcycling best practices.