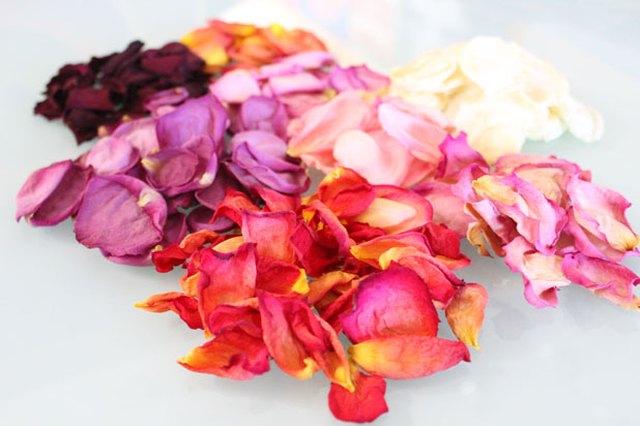
Fresh roses are basically the divas of the flower world: gorgeous, dramatic, and absolutely unwilling to last longer than they feel like.
But dried rose petals? Those are the chill, low-maintenance best friend versionstill beautiful, still fragrant (sometimes),
and ready to show up for potpourri, crafts, wedding confetti, bath salts, or keepsake projects whenever you are.
This guide walks you through several proven ways to dry rose petals at homeslow and classic, fast and modern, and a couple methods for people who
want “Pinterest results” without dedicating a full month of their life to floral patience.
Choose Your Drying Method (Quick Cheat Sheet)
Pick the method based on your goal, not your mood (though both are valid).
- Best for fragrance + potpourri: Air-dry petals on a screen or tray
- Best for crafts that need flat petals: Pressing (book or flower press)
- Best for color + shape (fancy keepsakes): Silica gel (slow) or microwave + silica (fast)
- Best when you’re impatient: Dehydrator or low oven
- Best when it’s humid where you live: Silica gel or dehydrator (air-drying can get… funky)
Before You Start: Petal Prep That Actually Matters
1) Use the right roses (especially if anything will touch skin or food)
If your petals are headed for tea, cake decor, or anything edible, only use roses grown specifically for consumption
(or grown organically without pesticides). Florist roses and many nursery/garden-center roses may be treated with chemicals that are not meant for eating.
For bath or body products, the same “clean source” rule is smart because skin can be sensitive.
2) Harvest at the best time
For the best color and fewer bruises, pick petals when the rose is fully open but not collapsing.
Morning is often ideal because petals are usually firm and less stressed from heat.
Avoid petals that are wet from rain or heavy wateringextra moisture increases drying time and the chance of mold.
3) Separate and sort like you’re judging a tiny beauty pageant
Gently pull petals from the bloom. Discard petals with brown edges, mushy spots, or heavy blemishes.
(A few imperfect edges are fine for potpourri; for crafts, be pickier.)
4) Do you wash rose petals?
If your petals are dusty, you can do a quick, gentle rinse in cool water, then pat dry and air-dry on a towel until there’s no surface moisture.
That said, washing can bruise petals and sometimes reduces fragrance. If the roses are clean and pesticide-free, many people skip washing
and just shake off any debris.
Method 1: Air-Dry Rose Petals on a Tray (The Classic, Low-Drama Option)
This is one of the easiest ways to dry rose petals, especially for potpourri, sachets, and general crafts.
It takes longer than heat methods, but it’s gentle and doesn’t require special supplies.
What you’ll need
- A mesh screen, cooling rack, or parchment-lined baking sheet
- Paper towels (optional, but avoid textured towels if you care about imprinting)
- A dark, dry spot with airflow (no direct sun)
Steps
- Lay petals in a single layer. Overlapping petals trap moisture and slow everything down.
- Place the tray in a cool, dry, dark area with good airflow. Sunlight can fade color.
- Flip petals once a day (or at least every other day) for more even drying.
- Start checking around day 3–5. Depending on humidity, it can take about a week (sometimes longer).
- Petals are done when they feel papery and crisp, with no cool/damp spots.
Pro tip: If your home is humid, run a fan in the room (not directly blasting petals) or use a dehumidifier. Humidity is the villain here.
Method 2: Hang-Drying Rose Heads (Great If You Want Buds Too)
If you want dried rose heads for decor and also want petals later, hang-drying is a two-for-one deal.
You dry the whole bloom first, then pull petals when it’s fully crisp.
What you’ll need
- String or twine
- A hanger or hook
- A dark, dry, well-ventilated space
Steps
- Remove excess leaves (they hold moisture).
- Tie stems in small bundles. Don’t crowd themair needs to circulate.
- Hang upside down in a dark, dry area for about 2–3 weeks (sometimes longer).
- When blooms feel fully dry, gently remove petals as needed.
Heads-up: Hang-drying can slightly darken petals compared to silica gel.
But if you’re going for “romantic vintage,” that’s not a bugit’s a feature.
Method 3: Pressing Rose Petals (For Flat, Frame-Worthy Results)
Pressed rose petals are perfect for bookmarks, cards, scrapbooks, framed art, and resin projects.
The tradeoff: petals flatten (obviously), and reds can deepen over time.
What you’ll need
- Heavy book or a flower press
- Blotting paper, printer paper, parchment, or coffee filters
- Something heavy (optional extra weight)
Steps
- Place petals between two absorbent sheets (coffee filters work nicely).
- Put the “petal sandwich” inside a heavy book, near the middle.
- Add weight on top (another book, a small boxanything stable).
- Wait 1–3 weeks, changing paper if it becomes damp (especially in humid climates).
Tip for prettier pressed petals: Choose petals that aren’t overly thick or curled.
Outer petals often press well; very thick center petals can trap moisture.
Method 4: Silica Gel (Best Color and Shape, a Little “Science Fair”)
Silica gel is a desiccant that pulls moisture out quickly while helping petals keep their shape and color.
It’s one of the best options for keepsakes (think wedding roses) and for petals you want to look “fresh-ish” after drying.
What you’ll need
- Silica gel crystals (craft store)
- An airtight container
- A soft paintbrush for cleanup
Steps (petal version)
- Pour a 1-inch layer of silica gel into the container.
- Lay petals flat on the gel, not overlapping.
- Gently sprinkle more silica gel over the petals until fully covered.
- Seal the container and store it somewhere dry.
- Check in 2–5 days (timing depends on petal thickness and humidity).
- Remove petals carefully and brush off crystals with a soft brush.
Safety note: Silica gel is not food. Keep it away from kids and pets, avoid breathing dust, and don’t use silica-dried petals for edible projects.
Method 5: Microwave + Silica Gel (Fast, Effective, and Slightly Chaotic)
If you want dry petals todaynot in “two to three weeks”microwaving with silica gel is the speed-run method.
Done right, it can preserve color beautifully. Done wrong… it can smell like burnt dreams.
What you’ll need
- Microwave-safe container (no metal)
- Silica gel
- A cup of water (yes, really)
Steps
- Pour a layer of silica gel into the container.
- Lay petals on the gel and cover completely with more gel.
- Place an uncovered cup of water in the microwave with the container (helps prevent over-drying/scorching).
- Microwave on medium power in short bursts (start around 30–60 seconds).
- Let the container cool before checkingpetals can continue drying from retained heat.
- Repeat short bursts if needed until petals feel dry and papery.
Microwave reality check: Every microwave is different. The first batch is your calibration round.
Start conservative, because you can always add timebut you can’t un-toast a petal.
Method 6: Oven-Drying (Good for Bulk Petals, Watch Them Closely)
Oven-drying works when you have a lot of petals and want a predictable, controlled approach.
It can slightly reduce fragrance, and if the heat is too high, petals can brown.
What you’ll need
- Baking sheet
- Parchment paper
- Oven set to low heat
Steps
- Preheat oven to a very low temperature (think “warm,” not “roast”).
- Lay petals in a single layer on a parchment-lined sheet.
- Place in the oven and keep the door slightly cracked if possible (to let moisture escape).
- Check frequently and flip gently; remove as soon as petals feel dry and crisp.
Tip: If you’re drying petals for potpourri, slightly under-drying is better than over-browning.
You can finish air-drying them on a tray afterward.
Method 7: Dehydrator (Set-It-and-Check-It)
A dehydrator is a great middle-ground: faster than air-drying, gentler than an oven, and usually more consistent in humid weather.
Steps
- Spread petals in a single layer on dehydrator trays (use mesh liners if petals are small).
- Set to a low temperature.
- Check every 30–60 minutes until petals are dry to the touch and crisp.
Bonus: This method can work well for rose petals intended for non-silica projects where you still want decent color.
How to Store Dried Rose Petals (So They Don’t Turn Weird Later)
Drying is only step one. Storage is where you lock in the win.
- Use airtight containers: Glass jars with tight lids or sealed containers work well.
- Keep them dark: Store away from sunlight to help preserve color.
- Keep them dry: A small food-safe desiccant packet (for crafts-only petals, any desiccant is fine) can help in humid areas.
- Don’t crush them: If you want intact petals, don’t pack the jar too tightly.
- Label the batch: Date, rose color/type, method used. Future-you will be grateful.
Troubleshooting: Common Problems and How to Fix Them
“My petals turned brown.”
- They dried too slowly (humidity) or got too hot (oven/microwave).
- Next time: improve airflow, use a desiccant, keep petals out of direct sun, and reduce heat/time.
“They feel dry, but smell musty.”
- They likely held moisture too long and started to mildew.
- Next time: spread petals thinner, flip more often, and avoid drying in damp rooms (bathroom = no).
“They lost all fragrance.”
- Heat methods can reduce scent. Some roses are also less fragrant to begin with.
- For potpourri: add essential oil later (a few drops at a time) and let it meld in a sealed container.
“They’re so crisp they crumble.”
- That can happen with high heat or very thin petals. Not always badcrushed petals are still useful.
- Use them for sachets, bath soaks (if clean source), or confetti where perfection isn’t required.
What to Do With Dried Rose Petals (Ideas That Aren’t Just ‘Potpourri’)
Yes, potpourri is classic. But dried rose petals can do so much more.
- DIY potpourri: Mix petals with dried citrus peel, lavender, and a fixative (like orris root) for longer-lasting scent.
- Sachets for drawers: Sew small fabric pouches and fill with petals + a hint of lavender.
- Wedding or party confetti: Eco-friendly and photo-friendly (test for staining if fabric is involved).
- Bath salts: Combine with Epsom salt and a skin-safe fragrance (use clean, chemical-free petals).
- Soap and candle toppers: Great for aestheticsjust keep fire safety in mind for candles.
- Pressed-petal art: Frame petals or use them in greeting cards.
- Resin keepsakes: Coasters, jewelry, paperweightspressed petals work especially well.
- Gift wrap upgrade: Sprinkle a few petals into tissue paper for a fancy unboxing moment.
FAQ: Quick Answers
How long do dried rose petals last?
If fully dried and stored airtight away from light and moisture, petals can last a long timeoften many months to years.
Color and fragrance may fade over time, but the petals can still be used for crafts.
Can I dry rose petals in direct sunlight?
You can, but sunlight often fades color. If your priority is vibrant petals, dry them in a shaded, airy place instead.
Are dried rose petals edible?
Only if the petals come from roses grown specifically for culinary use (or known pesticide-free).
Do not eat petals from florist bouquets or roses treated with chemicals.
Real-World Experiences: What People Learn After Drying Rose Petals a Few Times (500+ Words)
The first time most people try drying rose petals, the plan is adorable: “I’ll gently dry these perfect petals and make something charming.”
The reality can be more like: “Why do my petals feel damp on day five?” and “Is that a musty smell or am I imagining things?”
The good news is that rose petals are forgiving, and the learning curve is shortonce you know what actually makes a difference.
One of the biggest “aha” moments is that humidity decides everything. In a dry climate, tray drying feels effortless:
petals crisp up, color stays decent, and you start believing you could run a boutique called “Whispers of Rose” (you can’t, but dream big).
In a humid climate, that same tray method can turn into slow-motion trouble. Petals may look dry on top but stay soft underneath,
especially if they overlap even slightly. People who get consistent results in humid areas usually switch to either a dehydrator or silica gel,
or they at least add a fan and spread petals with the kind of personal space you’d want on a crowded subway.
Another lesson: not all roses dry the same. Thin, delicate petals can dry quickly but also become brittle fast.
Thick, velvety petals (often the very ones you’re most excited about) may hold moisture longer, which means more time flipping and more patience required.
If you’re trying to preserve color for a keepsake, many people eventually conclude that silica gel is worth it.
It feels like overkill until you pull out petals that still look surprisingly bright, and suddenly you’re the person giving silica gel “as a gift idea.”
Life comes at you fast.
Heat methods come with their own reality check: microwaves are wildly individual.
Some microwaves run hot, some run uneven, and some seem personally offended by flower projects.
The trick most successful crafters settle into is using short bursts, letting the container cool,
and checking often. That cooling time matters because petals can continue drying from residual heatso if you microwave again immediately,
you may overshoot and end up with petals that look toasted. (Still useful, just… now they’re “antique.”)
People also learn that “dry” and “stored safely” are different victories.
A jar that isn’t fully airtight, or a container stored near a sunny window, can undo your work.
Color can fade, petals can soften, or fragrance can disappear. The best long-term batches usually come from
petals that were dried fully, cooled completely, and stored in airtight containers in a dark place.
If you’re making potpourri and want stronger scent, many people add essential oil later rather than expecting
the original rose fragrance to survive forever.
Finally, there’s the “source” lessonespecially when petals might touch skin or food:
people who dry petals from florist bouquets sometimes realize too late that those roses weren’t meant for culinary or bath use.
The smarter habit is deciding the end use first: if it’s edible, use culinary roses; if it’s for bath products, use clean, chemical-free roses;
if it’s strictly decor, you have more flexibility. Once you match the method and the rose source to the project,
drying rose petals stops feeling like a gamble and starts feeling like a reliable little home ritual.
Conclusion
Drying rose petals is part craft, part common sense, and part “please cooperate, tiny flower.”
If you want the easiest route, air-dry petals in a single layer with good airflow. If you want the best color and shape, use silica gel.
If you want fast results, microwave with silica gel carefully in short burstsor use a dehydrator for steady, low-drama drying.
Once petals are crisp and fully dry, store them airtight in a cool, dark place, and they’ll be ready whenever inspiration strikes.