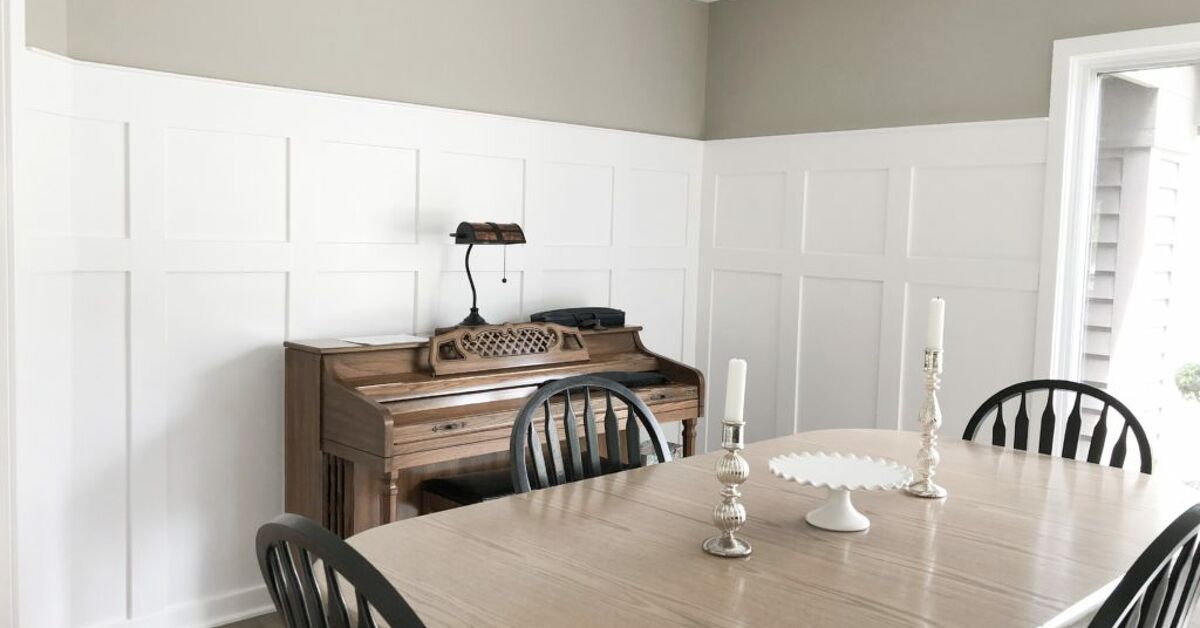
There comes a moment in many homes when a plain wall looks at you and says, “Is this all I am?” That is usually the moment people discover board and batten. It is classic, clean, surprisingly beginner-friendly, and dramatic enough to make guests ask, “Did you hire someone?” You can smile mysteriously and say, “Oh, this old thing?” while hiding the caulk under the bed.
A DIY board and batten wall is one of the best home improvement projects for adding architectural detail without tearing your house apart. It works in bedrooms, entryways, dining rooms, hallways, home offices, nurseries, mudrooms, and even bathrooms if you choose the right materials. The basic idea is simple: attach vertical battens and horizontal trim to a wall, fill gaps, sand, caulk, paint, and enjoy the sudden urge to photograph your room from seventeen different angles.
This guide walks you through how to DIY board and batten a wall from planning to painting, including layout math, material choices, tools, installation tips, common mistakes, and real-world experience from the “measure twice, mutter once” school of home projects.
What Is a Board and Batten Wall?
Board and batten is a wall treatment made with wider flat surfaces, called boards, and narrower vertical strips, called battens. Traditional board and batten was used on exterior siding, where battens covered the seams between wide boards. Inside the home, the look is often decorative. Many DIYers skip full wall boards and install battens directly over smooth drywall, creating a “faux board and batten” wall that looks custom once painted.
The style can lean farmhouse, coastal, craftsman, cottage, modern, or elegant depending on the spacing, height, paint color, and trim profile. White board and batten feels bright and timeless. Deep green or navy creates a cozy feature wall. Beige, greige, charcoal, and soft clay tones can make the design feel more modern and less “barn wedding, but indoors.”
Why DIY Board and Batten Is Worth It
Board and batten gives a room depth, rhythm, and character. It can make a small entryway feel intentional, a bedroom wall feel like a headboard, or a dining room feel like it has been upgraded from “place where mail goes to die” to “actual grown-up space.”
The project is also flexible. You can create a full wall design from baseboard to ceiling, a half-wall wainscoting style, a three-quarter wall with a top ledge, or a geometric grid pattern. For most homeowners, a simple vertical batten layout is the easiest starting point because it requires fewer tricky cuts and looks good in almost any room.
Tools and Materials You’ll Need
Basic tools
- Tape measure
- Level or laser level
- Pencil
- Stud finder
- Miter saw, circular saw, or hand saw with miter box
- Brad nailer or hammer and finish nails
- Caulk gun
- Putty knife
- Sanding block or orbital sander
- Paintbrush and roller
Materials
- Primed MDF, pine, poplar, or PVC trim boards
- Construction adhesive, optional but helpful
- Brad nails or finish nails
- Wood filler or spackle
- Paintable caulk
- Primer, if boards are raw wood or wall color is dark
- Interior paint in your preferred sheen
- Painter’s tape and drop cloth
For interior accent walls, many people use primed MDF because it is smooth, affordable, easy to paint, and usually straighter than budget pine. However, MDF is not the best choice in wet zones where it may absorb moisture. For bathrooms, laundry rooms, or damp entryways, consider PVC trim, sealed pine, or moisture-resistant materials. Your wall does not care what the internet thinks is trendy; it cares whether the material swells like a biscuit in soup.
Step 1: Choose the Wall and Design Style
Start with one wall, especially if this is your first board and batten project. A bedroom headboard wall, dining room focal wall, hallway wall, or entryway drop zone are excellent candidates. Avoid walls with too many obstacles for your first attempt, such as multiple windows, oddly placed outlets, vents, thermostats, or mystery bumps that no one in the household wants to discuss.
Next, decide the height. A full-height board and batten wall runs from baseboard to ceiling and makes the biggest statement. A half-wall treatment typically rises about one-third to one-half of the wall height and works beautifully in dining rooms and hallways. A three-quarter wall can feel more custom and often includes a small ledge at the top for art, frames, or tiny seasonal pumpkins that multiply without permission.
Step 2: Measure the Wall Carefully
Measure the full width and height of the wall. Then measure again because walls enjoy lying. Record the width at the top, middle, and bottom. If the numbers are slightly different, welcome to homeownership. Use the smallest or most practical measurement for planning, and remember that individual battens can be cut to slightly different lengths if your floor or ceiling is not perfectly level.
Also measure your existing baseboard. Standard baseboards are often thinner than the battens you want to install. If your battens are thicker than the baseboard, they may stick out awkwardly at the bottom. You can solve this by replacing the baseboard with a thicker board, adding a small shoe molding, cutting the bottom of each batten at a slight angle, or choosing thinner battens that sit neatly against the existing baseboard.
Step 3: Plan the Board and Batten Spacing
Good spacing is what makes board and batten look professional. Bad spacing is what makes it look like the wall got dressed in the dark.
The most common approach is to install vertical battens evenly across the wall. Many DIYers space battens somewhere between 12 and 20 inches apart, depending on the wall size and desired look. Narrow spacing feels traditional and detailed. Wider spacing feels cleaner and more modern.
Simple spacing formula
Use this formula to estimate even spacing:
Wall width – total width of battens = total open space
Total open space ÷ number of gaps = space between battens
For example, imagine your wall is 120 inches wide and you want seven vertical battens that are each 2.5 inches wide. Seven battens take up 17.5 inches. That leaves 102.5 inches of open space. If those seven battens create six gaps between them, each gap would be about 17.08 inches. That is a clean, balanced layout.
Before cutting wood, mark the layout on the wall with painter’s tape. Step back. Squint dramatically. If the design feels too crowded or too empty, adjust now. Tape is much easier to move than nailed trim, and it does not require apologizing to drywall.
Step 4: Prep the Wall
Remove wall decor, outlet covers, switch plates, and anything else in the work area. Clean the wall so dust and grime do not interfere with adhesive, caulk, or paint. If the wall has heavy texture, you have two options: embrace the texture as part of the look or cover the wall with a thin hardboard or MDF panel before adding battens. Smooth walls create the most convincing “built-in” finish.
If you plan to paint the wall and battens the same color, paint the wall first or at least prime it. It is much easier to roll paint over a flat wall before battens create little obstacle courses for your brush.
Step 5: Remove or Adjust the Baseboard
If your existing baseboard is too thin or too decorative, consider removing it and replacing it with a flat board. A simple 1×4, 1×5, or 1×6 style base can give the battens a clean place to land. Use a utility knife to score the caulk line before prying off the old baseboard. This reduces wall damage and keeps the project from becoming a surprise drywall repair tutorial.
If you keep the existing baseboard, test a scrap piece of batten against it. If the batten overhangs slightly, you can bevel the bottom edge, add a transition trim, or choose thinner material. The goal is to make the bottom edge look intentional, not like the batten tripped over the baseboard and decided to stay there.
Step 6: Install the Horizontal Boards
Most board and batten walls include a bottom board, top board, or both. For a half-wall treatment, the top horizontal board acts like a cap rail. For a full-height wall, you may install a top rail just below the ceiling or use the ceiling line as the stopping point.
Use a level to position the horizontal board. Floors and ceilings are not always straight, so trust the level more than your eyeballs. Apply construction adhesive to the back if desired, press the board into place, and fasten it with brad nails. When possible, nail into studs. If studs are not available in every location, adhesive helps hold the board securely against the wall.
Step 7: Cut and Install the Vertical Battens
Measure each vertical batten individually from the top of the baseboard to the underside of the top rail, or from the baseboard to the ceiling if you are doing a full-height design. Do not assume every batten will be the same length. Old houses especially enjoy variety, usually in places that make no sense.
Cut your battens and dry-fit them before nailing. Use your pencil marks or painter’s tape layout as a guide. Check every batten with a level before fastening. A slightly crooked batten may not seem obvious at first, but once the wall is painted, it will wave at you every morning like an annoying little trim goblin.
Apply a thin bead of construction adhesive to the back of each batten if you want extra hold. Then nail it into place with a brad nailer. Use enough nails to secure the board flat, but do not turn it into a porcupine. If using only nails and no adhesive, aim for studs where possible.
Step 8: Work Around Outlets and Obstacles
Outlets, switches, vents, and wall fixtures can complicate the layout. Before finalizing batten spacing, check whether any batten lands directly on an outlet. If it does, adjust the spacing slightly so the outlet falls inside an open panel instead of in the middle of a board.
If a batten must meet an outlet or switch area, you may need to notch the trim carefully. For deeper wall treatments, electrical boxes may need box extenders so outlets sit safely and flush with the finished surface. When electrical work goes beyond removing a cover plate, follow local code and call a qualified electrician if you are unsure. A beautiful wall is not worth turning your outlet into a tiny haunted campfire.
Step 9: Fill Nail Holes and Seams
Once the boards are installed, fill nail holes with wood filler or spackle. For MDF, lightweight spackle often sands easily and disappears under paint. For wood trim, wood filler can work well. Use a putty knife, slightly overfill the holes, let everything dry, and sand smooth.
Check seams where boards meet. If there are small gaps at butt joints, fill and sand them. If two boards meet in a highly visible area, take your time here. Paint improves many things, but it does not magically erase lumpy filler. That job belongs to sanding, which is less glamorous but deeply loyal.
Step 10: Caulk the Edges
Caulk is the secret sauce of DIY trim work. It fills the tiny gaps between boards and wall, making the entire project look built-in rather than attached-on-Friday-night. Use paintable interior caulk along both sides of each batten, along the top rail, and anywhere trim meets the wall.
Cut a small opening in the caulk tube tip and apply a thin bead. Smooth it with a damp finger or caulk tool. Keep a damp rag nearby. Do not use silicone caulk unless it is specifically paintable. Regular silicone repels paint, which is fun only if your hobby is emotional damage.
Step 11: Sand, Prime, and Paint
After filler and caulk have dried, sand rough spots and wipe away dust. If you are painting raw wood, patched areas, or a dark wall, apply primer first. Primer improves paint coverage and helps create an even finish.
For paint sheen, satin and eggshell are popular choices for living areas because they offer a soft finish with some durability. Semi-gloss can work for mudrooms, bathrooms, or high-traffic areas, but it highlights imperfections more. Matte paint looks beautiful but may be harder to clean. In busy households with kids, pets, shoes, backpacks, and the occasional flying snack, durability matters.
Use a brush for edges and inside corners, then roll the flat sections with a small foam or microfiber roller. Two thin coats usually look better than one thick coat. Let the paint dry fully before replacing outlet covers and styling the room.
Best Paint Colors for a Board and Batten Wall
White is classic, especially for cottage, coastal, farmhouse, and traditional spaces. Warm whites look softer, while crisp whites feel more modern. For a moody accent wall, try deep navy, charcoal, forest green, black, or muted burgundy. For a calm and current look, consider taupe, mushroom, sage, warm gray, creamy beige, or dusty blue.
If the room is small, do not automatically avoid dark colors. A dark board and batten wall can create depth and make the space feel intentional. The trick is balancing it with good lighting, lighter textiles, and simple decor. In other words, let the wall be dramatic; your throw pillows do not also need to audition for Broadway.
Common DIY Board and Batten Mistakes to Avoid
Skipping the layout plan
Uneven spacing is one of the fastest ways to make the project look homemade in the wrong way. Always sketch the wall, calculate spacing, and tape the design before cutting.
Forgetting outlet placement
Outlets can ruin a perfect layout if ignored. Plan around them early so you are not notching boards at midnight while questioning every decision you have ever made.
Using warped boards
Check every board at the store. Look down the length of the board to spot curves, twists, and bows. A warped batten will fight the wall, the nails, and your peace of mind.
Not caulking
Even tiny gaps can show after paint. Caulk creates the clean, seamless finish that makes board and batten look custom.
Painting too soon
Let filler, caulk, and primer dry properly. Rushing the finish can lead to cracks, drag marks, uneven sheen, and language not suitable for a family blog.
How Much Does DIY Board and Batten Cost?
The cost depends on wall size, material, trim width, tools you already own, and paint choice. A small accent wall using MDF battens may be very budget-friendly, while a full room with premium wood, new baseboards, and high-end paint will cost more. The biggest savings come from doing the labor yourself. Professional trim work is beautiful, but DIY board and batten lets you spend less while still getting a polished upgrade.
To estimate your budget, list the number of vertical battens, horizontal boards, baseboard changes, caulk tubes, filler, primer, paint, nails, and any tool rentals. Add at least 10 percent extra material for mistakes and waste. This is not pessimism; it is wisdom wearing safety glasses.
Where Board and Batten Works Best
In a bedroom, board and batten behind the bed can replace a traditional headboard or frame one beautifully. In a dining room, a half-wall treatment adds elegance without overwhelming the space. In an entryway, board and batten can pair with hooks and a bench to create a hardworking drop zone. In a hallway, it protects the wall from scuffs while adding visual rhythm. In a home office, a bold painted board and batten wall can make video calls look far more intentional than “I cleaned this corner only.”
Bathrooms can also be great candidates, but moisture matters. Choose suitable materials, seal edges well, and use paint designed for humid spaces. Avoid installing MDF where water splashes often unless it is properly protected.
of Real-Life Experience: What DIY Board and Batten Actually Feels Like
The first thing you learn when installing board and batten is that walls are not straight. They look straight from across the room, sitting there all innocent and painted. Then you place a level on them and discover they have been living a secret life. This is why measuring each batten individually is not optional. On paper, all the boards should be identical. In real life, one board may be 57 7/8 inches, the next 58 inches, and the next some strange number that makes you wonder whether your house was built during a minor earthquake.
The second lesson is that layout matters more than speed. It is tempting to start cutting boards the moment inspiration hits, especially after watching a short video where someone transforms a room in twelve seconds. In reality, the best part of the project happens before the first cut. Painter’s tape on the wall will save you from awkward spacing, weird outlet collisions, and the classic mistake of ending with a tiny skinny panel in the corner. A taped layout may look silly, but it is your crystal ball.
The third lesson is that caulk can make you look more skilled than you are. A small gap between a batten and the wall may look harmless before paint, but after paint it becomes the Grand Canyon with trim around it. A neat bead of paintable caulk turns separate boards into one finished wall treatment. It is one of those little details that separates “weekend DIY” from “custom millwork energy.” Just keep the bead small, wipe as you go, and resist the urge to solve every problem with more caulk. Caulk is helpful. Caulk is not a lifestyle.
The fourth lesson is to respect sanding. Nobody loves sanding. Sanding is the broccoli of DIY: not exciting, but important if you want good results. Nail holes, seams, and filler patches must be smooth before paint. If you can feel a bump with your fingers, paint will not hide it. Paint is a finish, not a magician.
The fifth lesson is that paint color changes everything. A white board and batten wall can make a room feel fresh and open. A dark color can make the same design feel dramatic and expensive. A soft neutral can make it feel calm and designer-approved. Always test paint samples on the actual wall because lighting changes color throughout the day. What looks like elegant sage at noon may become “sad celery” by evening.
Finally, DIY board and batten teaches patience in the nicest possible way. The project is not technically difficult, but it rewards careful steps. Measure, mark, level, nail, fill, caulk, sand, paint. None of these steps is glamorous by itself, but together they create a wall that looks intentional, textured, and far more expensive than it was. And when someone asks who installed it, you get the deep satisfaction of saying, “I did,” which is honestly worth at least one extra trip to the hardware store.
Conclusion
Learning how to DIY board and batten a wall is one of the most rewarding ways to upgrade your home without taking on a full renovation. With careful measuring, smart spacing, the right materials, and a little patience, a flat wall can become a custom-looking feature that adds charm, texture, and value to the room. The key is not rushing the prep work. Plan the layout, account for outlets and baseboards, use straight boards, caulk the edges, and give the paint enough time to cure.
Whether you choose a classic white half-wall, a full-height bedroom accent wall, or a bold moody office backdrop, board and batten is a flexible DIY project that gives big visual results. It is approachable for beginners, satisfying for experienced DIYers, and forgiving enough that caulk and paint can rescue many tiny imperfections. In short, your boring wall has been warned.