There is a certain point in December when ordinary decorations stop feeling festive enough. A wreath looks polite. A strand of lights looks pleasant. Then somebody places a three-foot red Christmas ball in the middle of the lawn, and suddenly the house looks as though Santa accidentally dropped part of his cargo during a low-altitude flyover.
That is the charm of DIY outdoor Christmas balls. These oversized ornaments are colorful, playful, surprisingly affordable, and easy to customize for almost any yard. They can sit beneath trees, line a walkway, glow beside the porch, or hang dramatically from sturdy branches. Better still, many versions can be made from inexpensive plastic balls, bowls, lamp globes, wire frames, or repurposed household materials.
This guide explains how to make giant Christmas ornaments for your yard, protect them from winter weather, illuminate them safely, and arrange them so the display feels intentional rather than like a craft store delivery truck tipped over on your lawn.
Why Outdoor Christmas Balls Work So Well in a Yard
Large spherical ornaments create immediate visual impact because their shape is familiar but their scale is unexpected. A standard ornament belongs on a tree. An ornament the size of a beach ball belongs in a holiday movieor, conveniently, beside your driveway.
Oversized decorations are especially effective outdoors because small details disappear when viewed from the street. A tiny bow or miniature figurine may look adorable from six feet away but become decorative confetti at forty feet. Giant Christmas balls remain recognizable from the sidewalk, a passing car, or the other side of the neighborhood cookie exchange.
They also combine easily with greenery, garlands, pathway lights, gift-box props, candy-cane stakes, and porch decorations. Major home and lifestyle publications frequently recommend oversized elements, layered greenery, repeated colors, and illuminated focal points for creating stronger holiday curb appeal.
Choose the Best Type of DIY Outdoor Christmas Ball
Before purchasing paint in every shade known to elves, decide how the ornaments will be displayed. The ideal construction method depends on whether the balls will sit on the ground, hang from a tree, or contain lights.
Plastic Play Balls or Beach Balls
Large plastic play balls are lightweight and naturally round, making them excellent for hanging ornaments or sheltered porch displays. They are inexpensive and available in multiple colors, which may eliminate the need for painting.
Inflatable beach balls are even lighter, but they can lose air in cold temperatures and may not accept every type of adhesive or paint. Use flexible, plastic-compatible products and test them on a hidden area first. Avoid high-temperature glue, which can soften thin plastic or create a dramatic and deeply unfestive hiss.
Acrylic Globe Light Shades
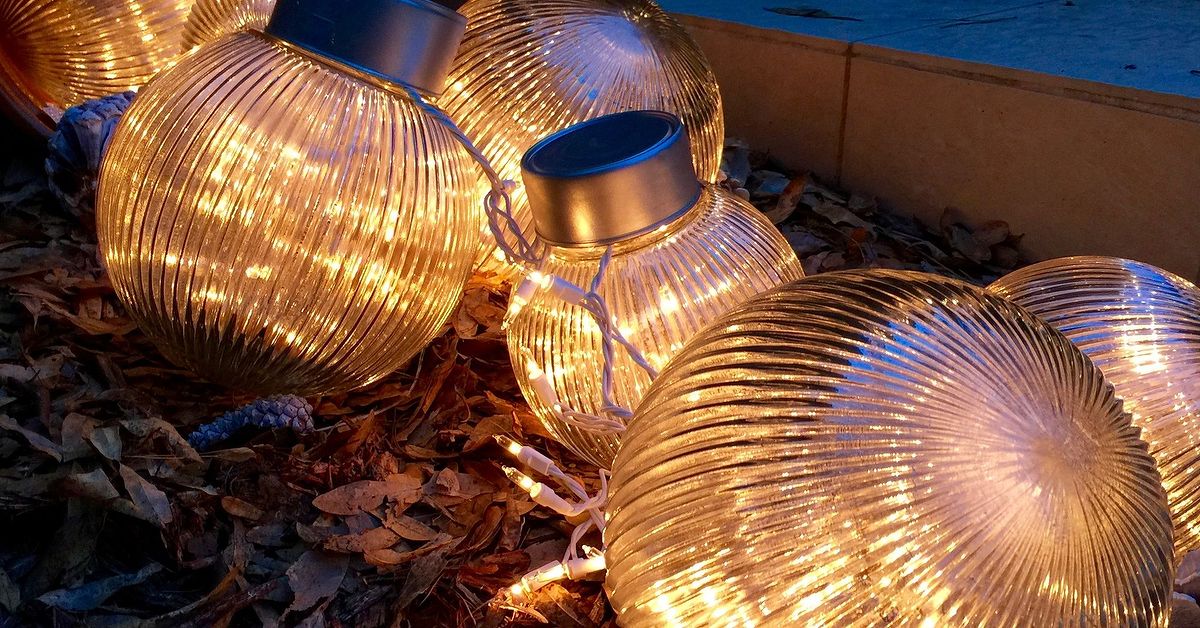
Plastic globe shades produce a polished, translucent ornament that can be illuminated from within. HGTV recommends acrylic globe lamp shades with plastic food-storage bowls used as ornament caps. This approach creates a durable, professionally shaped decoration without requiring you to negotiate with a beach ball that refuses to stay still.
Two Plastic Bowls Joined Together
Large punch bowls, serving bowls, or lightweight garden bowls can be connected rim to rim to form a sphere. This method works well for ground displays because the finished ornament is more rigid than an inflatable ball.
Choose matching bowls with wide, flat rims. Drill small paired holes around the rims and connect them with outdoor-rated zip ties. Mechanical connections usually tolerate weather changes better than relying on adhesive alone.
Wire-Frame Christmas Balls
For glowing ornaments, connect two wire hanging baskets or form a sphere from galvanized wire mesh. Wrap the frame with outdoor-rated LED string lights and secure the wire with UV-resistant zip ties.
Wire ornaments are ideal for trees because wind can pass through them. They also require less storage space if the halves can be separated after Christmas.
Materials and Tools
Your exact supply list will depend on the construction style, but a versatile starter kit includes:
- Large plastic play balls, acrylic globes, matching bowls, or wire baskets
- Small plastic bowls, plant saucers, food containers, or clean metal cans for ornament caps
- Outdoor-rated spray paint formulated for plastic
- Plastic-compatible primer, if recommended by the paint manufacturer
- Outdoor clear protective coating
- UV-resistant zip ties
- Exterior construction adhesive suitable for the chosen materials
- Flexible outdoor caulk or sealant
- Drill and small drill bits
- Craft wire, eye bolts, or heavy-duty screw eyes
- Ribbon, vinyl tape, stencils, or weather-resistant decals
- Outdoor-rated LED lights
- Outdoor extension cords and GFCI-protected power access
- Landscape stakes, sandbags, coated wire, or monofilament for anchoring
- Gloves, safety glasses, and a drop cloth
Whenever possible, use plastic rather than glass. Shatterproof materials are easier to carry, safer around children and pets, and less likely to turn a windy afternoon into an archaeological dig for ornament fragments.
How to Make Giant Outdoor Christmas Balls
Step 1: Plan the Color Palette
Limit the display to two or three dominant colors. Classic red and gold create a traditional look. Silver, white, and icy blue feel wintry and elegant. Pink, turquoise, lime, and purple produce a playful candy-land theme.
Repeat each color in several areas of the yard. For example, place a red ornament near the porch, another near the mailbox, and a third beneath a tree. Repetition helps the eye connect separate decorations into one coordinated scene.
Step 2: Clean and Prepare the Surface
Wash plastic pieces with mild soap and water to remove dust, manufacturing residue, and fingerprints. Rinse thoroughly and allow everything to dry. A light wipe with rubbing alcohol can improve paint adhesion on many hard plastics, although you should first confirm that it will not damage the material.
If the plastic is extremely glossy, gently scuff it with fine-grit sandpaper. Do not sand inflatable balls or thin globes aggressively. The goal is to reduce shine, not excavate a window.
Step 3: Paint the Ball
Place the ball on a bucket, planter, or sturdy container so it cannot roll away. Apply several thin coats of plastic-compatible outdoor spray paint rather than one heavy coat. Rotate the ball only after the painted section is dry enough to handle.
Thin applications reduce drips, wrinkling, and uneven curing. Follow the product instructions for temperature, ventilation, drying time, and recoating. Paint outdoors or in a well-ventilated work area away from flames and ignition sources.
High-gloss paint resembles a traditional glass ornament, while satin paint hides minor imperfections. Metallic gold and silver finishes look beautiful but tend to reveal every bump, drip, and fingerprint, including the one you made immediately after telling yourself, “It is definitely dry.”
Step 4: Add Stripes, Patterns, or Glitter Effects
Once the base color cures, apply painter’s tape to create stripes or geometric patterns. Weather-resistant vinyl dots can form polka-dot designs without additional painting. Stencils work well for snowflakes, stars, initials, or simple holiday shapes.
For sparkle without loose glitter spreading across three neighboring counties, use glitter-finish spray paint or a clear coating containing reflective particles. Reflective surfaces catch nearby lights and remain visible after sunset.
Step 5: Make the Ornament Cap
Turn a small plastic bowl, plant saucer, food container, or lightweight metal can upside down. Paint it gold, silver, bronze, or black. Drill two small holes through the top and thread a loop of coated wire through them.
Attach the cap to the ball with exterior adhesive, bolts, or zip ties, depending on the materials. A cap measuring roughly one-fifth to one-quarter of the ball’s diameter usually looks proportionate. An undersized cap disappears; an oversized cap makes the ornament look like it is wearing a cooking pot.
Several established DIY projects use plastic bowls, cake pans, storage containers, or similar repurposed pieces to imitate the metal crown of a traditional ornament.
Step 6: Create a Secure Hanger
Decorative ribbon alone should not support a large hanging ornament. Wind, rain, and repeated movement can weaken fabric quickly. Use coated steel wire, heavy monofilament, or another load-rated support line as the structural hanger. Add ribbon around it for appearance.
Test the hanger close to the ground before installing the ornament overhead. Pull firmly in several directions and confirm that the cap, wire, and ball remain connected.
Step 7: Seal the Finished Ornament
Apply an outdoor clear coat compatible with the paint and base material. Seal drilled openings and exposed seams with flexible exterior sealant. Flexible products are helpful because plastic expands and contracts as temperatures change.
No homemade decoration is completely indestructible. Place delicate painted ornaments beneath a porch roof or dense tree canopy when severe winter weather is common. Current outdoor-decor guidance also recommends checking weather resistance, securing lightweight pieces with clips or ties, and choosing products intended for exterior exposure.
How to Add Lights to Outdoor Christmas Balls
Illuminated Globe Method
Place a short strand of outdoor-rated LED lights inside a translucent acrylic globe. Distribute the bulbs evenly so one side does not resemble a tiny sun while the other remains mysteriously dark.
Provide a protected opening for the cord and avoid trapping electrical connections where water can collect. The globe should not be sealed so tightly that heat and moisture have no way to escape.
Wire-Sphere Method
Wrap LED lights around a wire sphere in several directions. Start near the power connection and space the strand evenly. Secure it every few inches with small outdoor-rated zip ties, keeping ties away from bulb housings and plug connections.
Battery and Solar Options
Battery-powered or solar lights reduce the number of cords crossing the lawn. Choose models specifically labeled for outdoor use. Place solar panels where they receive adequate daylight rather than hiding them beneath a shrub and then accusing them of lacking Christmas spirit.
Outdoor Electrical Safety
Only use lights, cords, and decorations marked for outdoor use. Inspect every strand for cracked insulation, loose sockets, exposed wire, or damaged plugs before installation. Outdoor decorations should be connected to GFCI-protected circuits, particularly where moisture is present.
Follow the manufacturer’s limit for connecting light strings. Do not overload outlets or daisy-chain power strips. UL Solutions also advises inspecting powered decorations, avoiding overloaded outlets, and turning lights off while the home is unattended or occupants are asleep.
Keep plug connections elevated from standing water, route cords away from walkways, and use timers to control operating hours. Clips and zip ties are preferable to nails or staples that may pierce electrical insulation.
Creative Ways to Decorate the Yard
Create an Ornament Spill
Arrange several balls so they appear to be pouring from a giant gift bag, decorative sleigh, tipped basket, or oversized box. Use at least three sizes to create depth. Place the largest ornament closest to the container and allow smaller balls to trail outward.
Build a Giant Outdoor Christmas Tree
Outline a triangular tree shape on the lawn with green lights or garland. Position oversized balls inside the triangle as ornaments. A star mounted at the top completes the illusion without requiring an actual forty-foot evergreen or an emergency meeting with an arborist.
Line a Walkway
Place ornaments in alternating colors beside a path. Keep them far enough from the walking surface that coats, pets, and delivery packages will not knock them over. Low pathway lighting can illuminate the arrangement without overpowering it.
Cluster Balls Beneath a Tree
Groups of three, five, or seven ornaments tend to look more natural than evenly spaced single pieces. Mix diameters while maintaining a consistent color palette. Add evergreen branches, weather-resistant bows, or warm-white lights around the cluster.
Hang Ornaments at Different Heights
Hanging balls create one of the most dramatic displays, especially from a large deciduous tree. Vary the height while leaving clear space beneath each ornament. Never hang heavy decorations above sidewalks, vehicles, seating areas, or places where children play.
Attach ornaments only to healthy, substantial branches, using wide straps or non-damaging support methods. Avoid wire that can cut into bark. For very large or heavy pieces, consult a qualified tree professional or display them at ground level instead.
Decorate the Porch
Place two large ornaments beside the front door as symmetrical anchors. Add garland around the entrance and repeat the ornament colors in a wreath or ribbon. Symmetry gives the display a polished look, while one intentionally mismatched accent keeps it from feeling like the North Pole Department of Municipal Buildings.
How to Keep Giant Christmas Balls from Blowing Away
Lightweight ornaments must be anchored even when the weather forecast seems calm. Wind often arrives immediately after the final photograph has been taken.
For ground ornaments, attach coated wire to the lower portion and secure it to landscape stakes. Hollow rigid balls can be weighted internally with a sealed sandbag, provided the base is strong enough to support it. Do not pour loose sand or water directly into a painted ornament unless it was designed to hold that material.
Use two or three anchor points in exposed locations. Multiple connections reduce spinning and distribute wind forces. Place the anchors behind the ornament so they remain hidden from the street.
Temporarily remove lightweight decorations when high winds, ice, or severe storms are expected. No anchoring method can make a thin plastic ball hurricane-proof, despite what the optimistic quantity of zip ties may suggest.
Common DIY Mistakes to Avoid
Using the Wrong Paint
Some paints remain tacky, crack, or damage flexible plastic. Read the label and test the product before coating the entire ball.
Depending Only on Hot Glue
Hot glue may soften lightweight plastic and can become brittle outdoors. Combine compatible exterior adhesive with mechanical fasteners such as bolts, wire, or zip ties whenever possible.
Making Every Ornament the Same Size
A row of identical balls can look rigid. Combining several sizes creates a more layered, professional display.
Ignoring the Daytime Appearance
Lights create excitement at night, but the decorations should also look attractive during daylight. Strong colors, metallic caps, clear patterns, and greenery give the display twenty-four-hour curb appeal.
Forgetting About Storage
Before making twelve four-foot ornaments, locate a place to keep them in January. Removable caps, separable wire frames, and stackable bowl ornaments make storage much easier.
Experience-Based Lessons for a Better DIY Display
The most useful lesson from outdoor ornament projects is that preparation takes longer than assembly. Joining two bowls may require only a few minutes, but cleaning, painting, curing, sealing, and testing can stretch across several days. Starting early prevents the classic December crisis in which six sticky ornaments occupy the garage while the family car develops frost.
It also helps to build one prototype before purchasing materials for an entire yard. A single test ornament reveals whether the paint adheres, whether the cap looks proportionate, whether the adhesive holds, and whether the finished object survives a night outdoors. When a flaw appears on one ornament, it is an experiment. When it appears on twenty ornaments, it is a theme.
Another common discovery is that large decorations need fewer details than expected. Thin lines and tiny snowflakes may look beautiful at arm’s length but disappear from the street. Broad stripes, large stars, oversized dots, and high-contrast colors remain visible at a distance. It is helpful to place the unfinished ball in its intended location, walk to the sidewalk, and judge the design from there.
Lighting should also be tested before the ornament is sealed or installed. Arrange the decoration at dusk, turn on the lights, and look for dark patches, visible cords, or bulbs concentrated in one area. Correcting these problems on a worktable is much easier than doing so while kneeling in wet grass and questioning every decision that led to the moment.
Weather protection matters most at seams and attachment points. Water usually enters around drilled holes, caps, cord openings, and joined rims rather than through the center of the ball. Carefully sealing those areas can add more durability than applying endless clear coats to surfaces that were already watertight.
Anchoring is another area where a small test is valuable. After placing an ornament, push it gently from several directions. If it tips, rolls, spins excessively, or lifts at one side, add another stake or move it to a more sheltered location. Decorations beside walls, shrubs, and porches generally experience less wind than pieces standing alone in an open lawn.
From a design perspective, the best displays usually include breathing room. Covering every square foot with decorations can make individual pieces difficult to appreciate. One large ornament cluster, one illuminated pathway, and a coordinated porch often create more impact than scattering unrelated items everywhere.
Finally, take photographs before declaring the project complete. A phone camera compresses the scene and makes uneven spacing surprisingly obvious. The picture may reveal that one ornament needs to move two feet, a light strand is too bright, or the gold ball has somehow become the undisputed ruler of the front yard. Small adjustments after reviewing a photo can transform a good arrangement into a polished one.
Conclusion
Learning how to decorate a yard with outdoor Christmas balls DIY is less about complicated craftsmanship and more about choosing suitable materials, repeating a clear color scheme, building secure attachment points, and protecting everything from weather. Plastic balls, acrylic globes, joined bowls, and wire baskets can all become convincing oversized ornaments with paint, a decorative cap, and a little patience.
Start with a small group, test it outdoors, and expand the display only after the construction method proves reliable. Arrange ornaments in clusters, vary their sizes, add outdoor-rated lighting, and anchor every lightweight piece. The result will be festive enough to delight visitors, impress the neighbors, and make passing reindeer wonder whether they have arrived at a regional distribution center.