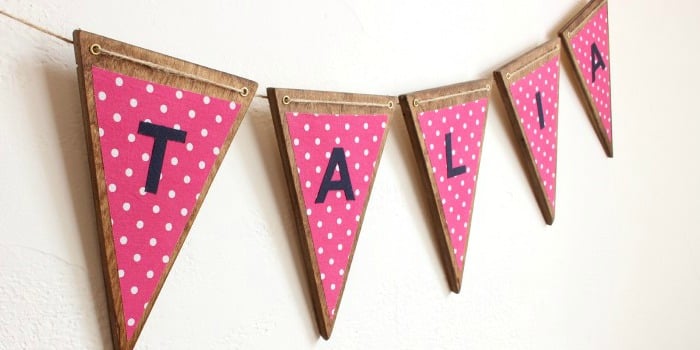
Some decorations quietly sit in a room and behave themselves. A DIY wood bunting with fabric letters is not one of them. It hangs above a mantel, nursery crib, party table, or craft-room shelf and cheerfully announces, “Yes, somebody made meand they probably found glue on their elbow three hours later.”
This handmade banner combines the warmth of wood with the color and softness of fabric. Unlike disposable paper garlands, wooden bunting can be stored, repainted, rearranged, and displayed again. You can spell a child’s name, welcome guests, celebrate a holiday, decorate a wedding, or create a permanent message such as “HOME,” “CREATE,” or “STAY COZY.”
The project is beginner-friendly, but a few details make the difference between charming handmade décor and a row of tiny wooden road signs. Careful measuring, smooth edges, crisp fabric letters, and restrained glue application will produce a banner that looks polished without losing its handcrafted personality.
Why Make Wood Bunting Instead of a Fabric or Paper Banner?
Traditional fabric bunting is lightweight and festive, while paper banners are fast and inexpensive. Wood bunting offers something different: structure. Each pennant hangs neatly instead of curling, folding, or turning backward whenever the air conditioner clears its throat.
Wood also creates a useful neutral background for patterned fabric. Floral cotton, gingham, linen, denim, felt, and even small quilting scraps become more noticeable when placed on a solid wooden surface. Better Homes & Gardens recommends fabric bunting as a reusable decoration and highlights scrap-fabric projects as a practical way to repurpose leftover material.
This mixed-material design is especially useful when you want:
- Personalized nursery or children’s room décor
- A reusable birthday, shower, or wedding banner
- Seasonal decorations that will survive storage
- A project for using small fabric remnants
- A handmade gift that feels personal but remains practical
Materials and Tools
Wood and Finishing Supplies
- One-eighth-inch to one-quarter-inch birch plywood, poplar project board, or precut wooden pennants
- Pencil, ruler, and measuring tape
- Cardboard or paper for a pennant template
- Jigsaw, scroll saw, handsaw, or craft cutting service
- 120-grit and 220-grit sandpaper
- Wood primer, craft paint, wood stain, or clear finish
- Small foam brush or artist’s paintbrush
- Drill with a small wood bit
- Scrap wood to use as a drilling backer
- Clamps
- Safety glasses and a dust mask
Fabric Letter Supplies
- Cotton fabric, felt, linen, canvas, or other tightly woven scraps
- Printed letter templates or alphabet stencils
- Fabric scissors or a rotary cutter and cutting mat
- Iron and ironing surface
- Optional fusible web or lightweight interfacing
- Decoupage medium, fabric glue, or compatible multi-surface craft adhesive
- Wax paper or a reusable craft mat
Assembly Supplies
- Jute twine, cotton cord, ribbon, suede lace, or baker’s twine
- Painter’s tape
- Optional beads, tassels, pom-poms, bells, or wooden spacers
Step 1: Plan the Message and Number of Pennants
Choose your wording before cutting anything. This sounds obvious, but craft projects have a mysterious ability to reveal spelling problems only after the paint dries.
Use one pennant for each letter. Add blank pennants between words or use decorative shapes as separators. A banner spelling “BE KIND,” for example, could use six lettered pennants plus one narrower spacer.
For a balanced indoor banner, make each wooden flag approximately 4 inches wide and 5 to 6 inches tall. Larger 6-by-8-inch pennants work well above a fireplace or party table. Small 3-inch flags are better for shelves, cabinet doors, and tabletop displays.
Arrange paper mock-ups on the floor before cutting the wood. Check the overall length and leave at least 12 to 18 inches of extra cord on both ends for hanging.
Step 2: Create a Consistent Pennant Template
Draw a rectangle on cardboard using your chosen width and height. Mark the center of the bottom edge, then draw diagonal lines from the lower corners to that center point. Cut out the resulting triangular pennant.
Trace the template onto your wood. Position the pieces close together to reduce waste, but leave enough space for the saw blade. Mark the front of each pennant lightly in pencil so you do not accidentally decorate half the pieces backward.
A classic triangle is not your only option. Try shield shapes, rectangles with notched bottoms, rounded tags, miniature houses, or alternating geometric forms. Consistency matters more than complexity.
Step 3: Cut and Sand the Wooden Flags
Secure the board to a stable work surface and cut each pennant slowly. Allow the saw to do the work rather than forcing it around the point. A precut set of unfinished wooden tags is an excellent shortcut for anyone who would prefer not to introduce power tools to the afternoon.
Begin sanding with approximately 120-grit paper to remove rough edges, shallow saw marks, and splinters. Follow with 220-grit paper for a smoother finish. Sand in the direction of the grain when possible, then remove all dust before painting or staining. Minwax, Lowe’s, and The Home Depot recommend progressing from medium to finer abrasives and cleaning away sanding residue before applying finishes.
Wear safety glasses during cutting and drilling, and control wood dust with ventilation, a suitable mask, and prompt cleanup. OSHA notes that wood dust can irritate the eyes, skin, nose, and respiratory system.
Step 4: Drill the Hanging Holes
Mark two holes near the upper corners of each pennant. Keep their locations identical by making a small cardboard drilling guide. Placing the holes about 3/8 to 1/2 inch from the top and side edges generally leaves enough wood around them to reduce splitting.
Clamp each pennant over a scrap piece of wood. The backer supports the fibers as the bit exits and helps prevent tear-out. Start the drill slowly, keep it perpendicular to the surface, and use gentle pressure. This Old House recommends accurate marking, controlled drilling, and a scrap backer when boring through wood.
Sand lightly around the holes after drilling. Test the cord through one pennant before finishing the entire set. Discovering that the ribbon is wider than the holes after painting is a traditional crafting experience, but it does not need to become your tradition.
Step 5: Paint, Stain, or Leave the Wood Natural
For Painted Pennants
Apply a thin coat of wood primer, especially when working with porous bare wood or when using pale paint over dark grain. Primer promotes a more even finish and helps reduce uneven absorption. Sherwin-Williams and Family Handyman recommend priming bare wood after sanding and dust removal.
Apply two thin coats of acrylic craft paint or interior latex paint, allowing each coat to dry according to the product directions. Thin coats produce cleaner edges and fewer brush marks than one heroic puddle of paint.
For Stained Pennants
Test the stain on a scrap from the same board. Softwoods and plywood veneers can absorb color unevenly, so a compatible pre-stain conditioner may improve consistency. Wipe away excess stain and let the pieces dry completely before adding fabric.
For a Natural Finish
Leave the wood unfinished for a simple Scandinavian look, or protect it with a clear matte water-based finish. Test any sealer first because some products deepen the wood color.
Step 6: Prepare the Fabric for Crisp Letters
Wash and dry washable fabric before cutting if shrinkage or color bleeding is a concern. Press out every wrinkle. A crease running through the middle of an “M” will not look charmingly rustic; it will look like the letter recently survived a small accident.
To reduce fraying, brush a light coat of fabric-compatible decoupage medium onto the back of the material and let it dry before cutting. Plaid recommends washing, drying, and ironing fabric, then applying a light coat of Fabric Mod Podge so it cuts more like paper with cleaner edges.
Another option is fusible web. Press it onto the wrong side of the fabric according to its instructions, leaving the paper backing attached while tracing the letters. Cricut’s appliqué guidance similarly recommends working with clean, pressed fabric and stabilizing it with an appliqué material before cutting.
Step 7: Trace and Cut the Fabric Letters
Print your letters in a bold, simple font. Block letters, slab serifs, and rounded sans-serif styles are easier to cut than thin scripts. Letters such as “A,” “B,” “D,” “O,” “P,” “Q,” and “R” contain interior openings, so use sharp, pointed scissors for those smaller cuts.
When tracing onto the front of the fabric, orient the template normally. When tracing onto the paper side of fusible web, reverse the template so the finished letter faces the correct direction after cutting.
Pinning a template to felt or stabilized fabric can keep it from shifting. Fiskars recommends sharp fabric shears for producing cleaner letter edges.
Place each cut letter on its pennant without adhesive. Adjust the spacing and compare the full set before gluing. Letters should sit at approximately the same height and maintain similar margins.
Step 8: Attach the Fabric Letters to the Wood
Choose an adhesive labeled for the materials you are combining. For lightweight cotton, a thin layer of decoupage medium works well. Felt, canvas, or textured upholstery scraps may need a thicker fabric or multi-surface adhesive.
Apply adhesive sparingly to the back of the letter, paying special attention to corners and narrow sections. Press the fabric onto the wood from the center outward. Smooth gently with clean fingers, a brayer, or the edge of an old gift card covered with wax paper.
Remove squeezed-out glue immediately using the cleanup method specified by the manufacturer. Aleene’s advises choosing adhesive according to the materials, application method, and whether the project will be used indoors or outdoors.
Allow the letters to dry flat. Avoid stacking the pennants until the adhesive has fully cured.
Step 9: Seal the Finished Pennants
Sealing is optional for an indoor banner. A clear matte finish can make painted wood easier to dust and may help protect the fabric edges. However, some sealers can darken fabric, alter its texture, or cause colors to bleed.
Test the product on a spare piece of fabric attached to scrap wood. Apply light coats rather than saturating the surface. For a banner intended for a covered porch, use paint, adhesive, cord, and sealer specifically rated for exterior conditions. Even then, bring it indoors during severe weather.
Step 10: String and Space the Bunting
Lay the pennants in the correct order. Thread the cord through the first hole from the back, across the front upper edge, and through the second hole toward the back. Continue with the remaining pieces.
This method keeps each flag facing forward and allows it to slide for spacing adjustments. Leave a gap of approximately 1/2 to 1 inch between pennants, or add wooden beads and tassels between words.
Once the spacing looks right, place a small piece of painter’s tape behind each hole or tie discreet knots in the cord to reduce movement. Hang the banner temporarily, step back, and check its curve before making the final knots.
Design Ideas for Personalized Wood Bunting
Nursery Name Banner
Use pale wood, muted paint, and cotton letters in gingham, tiny florals, stars, or woodland prints. Add a tassel at each end without placing heavy ornaments above a crib or sleeping area.
Birthday Bunting
Create a reusable “HAPPY BIRTHDAY” set with removable spacer pieces. Paint the wood in neutral colors so the banner works with different party themes.
Holiday Garland
Spell “JOY,” “BOO,” “GATHER,” or “LOVE.” Add snowflakes, pumpkins, hearts, leaves, or stars to blank pennants. Keep the base neutral and make interchangeable seasonal letters for year-round use.
Wedding or Shower Décor
Use stained wood, cream linen letters, velvet ribbon, and small dried-flower clusters. Suitable phrases include “CARDS,” “GIFTS,” “SWEET LOVE,” or the couple’s shared last name.
Scrap-Busting Patchwork Banner
Cut every letter from a different remnant while repeating two or three colors throughout the banner. The result feels playful without looking as though the fabric drawer exploded.
Common Problems and Easy Fixes
The Fabric Frays While Cutting
Stabilize it with fusible web or a light coat of fabric-compatible decoupage medium. Felt and tightly woven quilting cotton are easier for beginners than loose linen or slippery satin.
The Letters Look Uneven
Draw a faint horizontal alignment guide on each pennant or make a positioning template from clear acetate. Compare the entire phrase before attaching anything.
The Wood Splinters Around the Holes
Drill over scrap wood, begin at a low speed, use a sharp bit, and avoid placing holes too close to the edges. Sand minor tear-out before finishing.
The Fabric Develops Dark Glue Spots
Use less adhesive and spread it evenly. Thin or pale fabric reveals wet glue more easily, so test the combination first.
The Pennants Flip Around on the Cord
Thread the cord across the front between two holes rather than hanging each piece from a single hole. A slightly heavier pennant and wider spacing also improve stability.
From the Craft Table: Practical Experience and Lessons Learned
The most useful experience with DIY wood bunting is learning that the project is not difficult, but it rewards doing things in the correct order. The smoothest workflow is to cut every pennant, drill every hole, sand every edge, and complete the finishing before touching the fabric. Switching repeatedly between cutting, painting, and gluing makes the work area chaotic and increases the chance of decorating a piece that still needs drilling.
Making one test pennant first is also worth the extra few minutes. It reveals whether the chosen wood is too heavy, whether the cord fits through the holes, whether the paint raises the grain, and whether the adhesive shows through the fabric. A test piece may feel unnecessary when enthusiasm is high, but enthusiasm is rarely available to repair 14 glue-stained letters at midnight.
Fabric selection has a larger effect on the finished appearance than many beginners expect. Small prints usually work better than large patterns because each letter displays only a limited section of material. High-contrast combinations are easiest to read from across a room. Navy fabric on dark-stained wood may look sophisticated from six inches away and disappear completely from the doorway.
It also helps to cut more fabric than the project technically requires. Make duplicate versions of narrow letters such as “I,” “L,” “T,” and “Y,” which can distort while being glued. Save extra material until the banner is finished in case one letter needs replacing.
Another common lesson involves paint drying time. Paint may feel dry on the surface while remaining soft enough to collect fingerprints, stick to wax paper, or lift when painter’s tape is removed. Letting the wooden pieces cure longer than the minimum drying time produces a tougher surface and makes letter placement less stressful.
When arranging the final banner, spacing should be judged while the bunting is hanging, not only while it is lying flat. Gravity changes the curve, and a phrase that appears evenly spaced on a table can bunch toward the center once suspended. Temporary knots or small pieces of removable tape make adjustment much easier.
The project becomes faster after the first few pennants because the work naturally develops into an assembly line. Trace all the shapes at once. Cut all the pieces at once. Sand in batches. Paint the fronts, let them dry, and then paint the backs. Lay out the letters in order before opening the glue. This approach is less glamorous than improvising, but it leaves more time for the enjoyable decisions: colors, prints, tassels, and where the finished banner will live.
Finally, slight irregularities are not necessarily mistakes. Tiny variations in grain, fabric placement, and hand-cut edges are part of the appeal. The goal is consistency, not factory-level sameness. A handmade banner should look intentional and well finished, yet still carry enough personality to prove that it was created by a human being rather than a very tidy decorative robot.
Conclusion
DIY wood bunting with fabric letters turns basic craft materials into durable, personalized décor. The process is straightforward: design the message, cut and sand the pennants, drill matching holes, finish the wood, prepare crisp fabric letters, attach them carefully, and string the pieces with even spacing.
The best results come from patience rather than expensive equipment. Smooth the edges, test the materials, apply thin coats, and let every layer dry properly. Once you have made one banner, the same method can be adapted for birthdays, nurseries, weddings, holidays, classrooms, craft fairs, and gifts.
Note: This guide synthesizes established practices from U.S. woodworking, paint, craft, fabric, adhesive, and safety resources, including The Home Depot, Lowe’s, Minwax, Family Handyman, Plaid, Aleene’s, Fiskars, Cricut, Better Homes & Gardens, OSHA, Bob Vila, This Old House, and Sherwin-Williams.