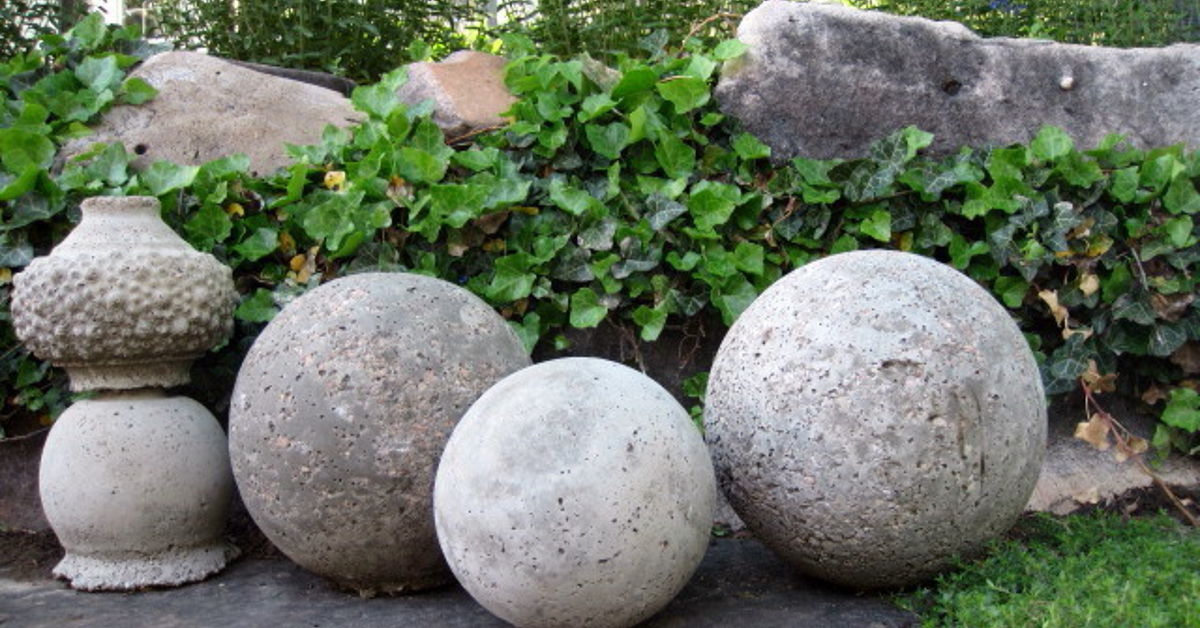
Concrete garden spheres have a rare landscaping superpower: they look expensive, architectural, and slightly mysterious, yet they can be made with a bag of concrete and an ordinary round mold. Place one beside a pathway and it becomes a focal point. Arrange three among ornamental grasses and suddenly your backyard appears to have hired a designer.
This in-depth guide explains how to make DIY concrete garden spheres using either a full-sphere mold or two half-sphere molds. You will learn how to choose the right concrete mix, prevent air pockets, cure the spheres correctly, repair minor imperfections, and create finishes ranging from smooth modern gray to convincing faux moss.
Why Concrete Spheres Work So Well in a Garden
A sphere introduces a clean geometric shape into a landscape filled with irregular leaves, branches, stones, and flowers. That contrast attracts attention without making the ornament look fussy. Concrete’s neutral color also complements nearly every garden style, including modern, cottage, woodland, Mediterranean, and Japanese-inspired landscapes.
Unlike lightweight plastic decorations, solid concrete balls stay put during strong winds. They age naturally, developing subtle stains and weathering that often improve their appearance. A small amount of moss or lichen can make a newly cast sphere look as though it has occupied the garden since squirrels began keeping records.
Choose a Size Before Buying Materials
Spheres between 6 and 10 inches in diameter work well in containers, borders, and small gardens. Twelve- to 16-inch spheres create stronger focal points, while anything larger becomes extremely heavy.
For perspective, a solid 12 and 10 inches in diameter work well in containers, borders, and small gardens. Twelve- to 16-inch spheres create stronger focal points, while anything larger becomes extremely heavy.</-inch concrete sphere can weigh approximately 75 pounds, depending on the mix. A 16-inch version may weigh well over 170 pounds. Large pieces should therefore be cast near their final location or constructed as hollow halves. Concrete has many admirable qualities, but respect for your lower back is not among them.
Materials and Tools
Gather everything before mixing. Once water meets concrete, the project acquires a schedule of its own.
- Plastic globe, commercial sphere mold, or two matching half-sphere molds
- Fine-grain concrete, countertop mix, mortar mix, or sand-topping mix
- Clean water measured according to the product instructions
- Bucket, mixing tub, or wheelbarrow
- Drill-mounted mixing paddle or sturdy hoe
- Measuring container
- Concrete-compatible mold-release product
- Small scoop, trowel, or disposable cup
- Rubber mallet
- Plastic sheeting or a large plastic bag
- Waterproof alkali-resistant gloves
- Safety glasses and long sleeves
- A properly fitted particulate respirator for handling dry mix
- Masonry rubbing stone or wet/dry abrasive pad
- Exterior concrete sealer, if desired
Plastic Molds Versus Glass Globes
Old glass light globes are traditionally used as concrete sphere molds because they produce a smooth surface. However, the glass must be broken away after curing, creating sharp fragments and a difficult cleanup. Thin glass can also crack unexpectedly while being filled.
A flexible plastic globe, reusable commercial mold, or sturdy acrylic light cover is safer and easier to remove. If glass is used, work on a protected surface, wear eye and hand protection, contain the globe inside a heavy box or bag during removal, and collect every fragment immediately. Keep children and pets away from the work area.
Selecting the Best Concrete Mix
Standard all-purpose concrete contains coarse aggregate that provides strength but may leave a bumpy surface on smaller ornaments. For spheres under about 12 inches, a fine-grain concrete, countertop mix, mortar mix, or sand-topping mix generally fills curved molds more cleanly.
For larger solid spheres, bagged concrete with small aggregate offers good durability. Sift out unusually large stones only when the manufacturer permits it, since altering a formulated mixture can affect performance. If the sphere will endure repeated freezing and thawing, select a product rated for exterior exposure in your climate.
Do Not Add Too Much Water
A soupy mixture may pour easily, but excess water can increase shrinkage, porosity, surface dusting, and cracking. Begin with the amount specified on the bag. Add water gradually until the mixture is workable and holds together without running like pancake batter.
For most mold-casting projects, the ideal consistency resembles thick oatmeal or soft cookie dough. It should settle when the mold is tapped but should not separate into gravel and watery cement paste.
How to Make a Solid Concrete Garden Sphere
Step 1: Prepare a Stable Work Area
Place the round mold in a bucket, planter, box of sand, or sturdy ring so it cannot roll. Confirm that the filling opening points upward and that the mold is level. Set up in a shaded, well-ventilated location protected from rain, freezing temperatures, intense heat, and curious paws.
Step 2: Apply Mold Release
Coat the mold’s interior lightly and evenly with a release product compatible with both the mold and concrete. Heavy puddles can discolor the casting or create surface defects. Commercial release agents are the most predictable choice, although some simple plastic forms may release with a very light coating of mineral oil.
Step 3: Mix the Concrete Safely
Wear gloves, long sleeves, eye protection, and appropriate respiratory protection. Dry concrete mix can release airborne dust, while wet Portland-cement products are highly alkaline and may cause serious skin or eye injury.
Add the measured water and dry mix in the order recommended by the manufacturer. Blend until no dry pockets remain, scraping the bottom and sides of the container. Prepare only as much as you can place before the mixture begins to stiffen.
Step 4: Fill in Layers
Scoop concrete into the mold until it is approximately one-quarter full. Tap the mold gently with a rubber mallet and shake its support container. This vibration moves trapped air toward the surface.
Continue filling in several layers, tapping after each addition. Use a narrow stick to work the mixture around the edges if the opening is small, but avoid aggressive stirring that introduces more air. Slightly overfill the opening, then level the exposed concrete with a trowel.
Step 5: Cover and Cure
Cover the filled mold loosely with plastic to slow moisture loss. Concrete becomes strong through hydrationa chemical reaction between cement and waternot simply by “drying.” Rapid evaporation can weaken the surface and encourage cracks.
Follow the mix manufacturer’s curing schedule. Many small castings can be removed from their molds after 24 to 48 hours, but fast-setting products and cool weather may change that timetable. When uncertain, give the sphere another day. Impatience is responsible for a remarkable number of concrete objects becoming abstract art.
Step 6: Remove the Mold
Support the sphere on folded towels, foam, or sand. Flex and peel a plastic mold away gradually. If the mold must be cut, use hand snips carefully and avoid scoring the concrete. Do not pull the sphere by its narrow filling neck.
The concrete will still be relatively young and vulnerable to chipped edges. Handle it gently and return it to a protected curing area. Keep it moderately moist or covered as directed by the product manufacturer.
How to Cast a Hollow Sphere in Two Halves
The half-sphere method significantly reduces weight and is often the best choice for large garden orbs. Prepare two matching bowl-shaped molds with release agent. Pack or pour concrete into each mold, leaving the center hollow and forming walls approximately 1½ to 2 inches thick for medium-size decorative spheres.
For greater crack resistance, use an approved fiber-reinforced mix or embed alkali-resistant fiberglass mesh designed for cementitious materials. Keep reinforcement away from the visible surface so it will not become exposed as the concrete weathers.
After the halves have cured enough to handle, remove them from the molds. Roughen and dampen the joining edges, then apply an exterior-rated repair mortar or bonding mortar. Press the halves together, remove excess material, and smooth the seam. Brace the sphere until the joint hardens.
A hollow sphere should have a discreet drainage opening at its lowest point. Trapped water may freeze, expand, and damage the ornament. The opening also lets moisture escape after heavy rain.
Smoothing and Finishing the Sphere
Repairing Voids and Seams
Small pinholes are normal and can contribute to an attractive stone-like surface. Fill distracting cavities with a cement-based patching compound compatible with exterior concrete. Dampen the repair area first if the product instructions require it, press in the patch, and feather the edges.
Use a masonry rubbing stone or wet abrasive pad to soften a raised seam. Work outdoors and keep the surface wet to control dust. Avoid dry grinding whenever possible, since disturbing hardened concrete can generate respirable silica dust.
Natural Gray Finish
Uncoated gray concrete provides a clean, contemporary appearance. Variations in color are normal, especially during early curing. Wait until the concrete has matured and dried evenly before deciding that a darker patch is permanent.
Integral Color and Concrete Stain
For consistent color throughout the sphere, use an integral pigment formulated for cement and measure it carefully. For an aged or mottled effect, apply a compatible concrete stain after the required curing period. Test all colors on a sample casting because wet concrete, cured concrete, and sealed concrete can look surprisingly different.
Faux-Moss Finish
Dab exterior acrylic paint in several muted greens, browns, and charcoal tones. Concentrate darker shades around the bottom, seam, and natural surface pits. Use a nearly dry sponge rather than painting an even green coat. Real moss is patchy and subtle; otherwise, the sphere may resemble a large abandoned tennis ball.
Should Concrete Garden Spheres Be Sealed?
Sealing is optional. A breathable exterior concrete sealer can reduce water absorption and staining, making sense in wet or freeze-thaw climates. A penetrating sealer preserves a natural appearance, while some acrylic products deepen the color or add sheen.
Allow the sphere to cure for the period required by both the concrete and sealer manufacturers. Applying a coating too soon may trap moisture, produce cloudiness, or interfere with curing. If natural moss and weathering are desired, leave the sphere unsealed.
Placement Ideas for Concrete Garden Orbs
- Create a trio: Group three different sizes in a loose triangle rather than lining them up like bowling balls.
- Frame an entrance: Place matching spheres on both sides of a gate, walkway, or porch step.
- Add contrast: Set smooth concrete against feathery grasses, ferns, hostas, or flowering ground covers.
- Use negative space: A single large sphere can become a strong focal point in gravel or a minimalist planting bed.
- Repeat the shape: Echo rounded shrubs, alliums, globe lights, or circular paving details.
- Secure slopes: Seat each sphere in a shallow, compacted depression so it cannot roll.
Place heavy spheres on compacted soil, gravel, stone, or paving. Soft ground may allow them to sink unevenly. Never balance a solid sphere on a narrow pedestal unless both pieces are mechanically secured and the support is engineered for the load.
Common Problems and Practical Fixes
Large Air Pockets
Air pockets usually result from a mixture that was too stiff, insufficient vibration, or filling the mold all at once. Patch existing holes with repair mortar. On the next casting, fill in layers and tap continuously but gently.
A Weak or Chalky Surface
Too much mixing water, poor curing, or premature unmolding can cause a soft surface. Allow the piece to continue curing before evaluating it. If the surface remains friable or can be scraped away easily, replacement may be more reliable than coating over weak material.
Cracks After Unmolding
Cracks may develop from rapid moisture loss, excessive water, early handling, freezing during initial curing, or thin walls in a hollow sphere. A hairline cosmetic crack can sometimes be sealed or filled. A widening structural crack in a heavy sphere warrants replacement, particularly if the ornament is placed near a walkway.
The Mold Will Not Release
Give the concrete more time, then flex the mold gradually. Warmnot boilingwater may make some plastic molds slightly more pliable. Do not hammer directly against young concrete. For future castings, clean the mold thoroughly and apply a more even release coat.
Safety and Long-Term Care
Prevent dry mix from becoming airborne, and avoid sweeping concrete dust. Work in a ventilated location and use the protective equipment specified on the product label and safety data sheet. Wash wet concrete from skin immediately. Remove contaminated clothing promptly, and seek medical attention for persistent irritation, eye exposure, or suspected chemical burns.
Once installed, inspect each sphere seasonally. Clean it with water and a soft or medium-stiff brush. Avoid acidic household cleaners, including vinegar, because acids can etch cement-based surfaces. Repair developing cracks, renew sealer according to its label, and keep hollow spheres’ drainage holes open.
Conclusion
DIY concrete garden spheres combine inexpensive materials with genuine visual impact. The process is straightforward, but the best results come from details that are easy to overlook: choosing a fine enough mix, measuring water carefully, vibrating the mold in layers, and allowing the concrete to cure without being rushed.
Begin with a modest plastic mold to learn how your chosen mixture behaves. Once you can produce a smooth small sphere, scale up, experiment with hollow construction, or add stains and weathered finishes. Even minor imperfections tend to settle comfortably into a garden, where leaves, rain, and time turn handmade concrete into part of the landscape.
Practical Experience Notes: Lessons From Casting Garden Spheres
The First Sphere Is Usually the Teacher
A first attempt often reveals more than several pages of instructions. One common surprise is how quickly a round mold becomes unstable after it is partially filled. An empty plastic globe feels harmless; a half-full one behaves like a determined wrecking ball. Nesting it firmly in sand or inside a padded bucket before mixing eliminates frantic adjustments with concrete-covered gloves.
Another lesson is that surface bubbles are not random acts of betrayal. When concrete is dumped through a narrow opening in one large pour, air becomes trapped against the mold. Adding smaller layers and tapping after each layer produces a dramatic improvement. Rotating the mold slightly between fills can also help the mixture reach the entire curved surface.
Water Is the Most Tempting Shortcut
During mixing, the batch may initially look too dry, encouraging the addition of a generous splash of water. After another minute of mixing, however, the original amount often proves adequate. Waiting briefly before adding more water prevents the mix from becoming thin and segregated.
Measuring water also makes later batches repeatable. “About half a bucket” is not a measurement; it is the beginning of a family argument. Recording the product, batch size, water quantity, air temperature, and result creates a useful recipe for matching several spheres.
Small Imperfections Usually Improve the Design
A few pinholes can look intentional once the sphere is placed among stone and plants. Aggressively filling and sanding every pore may remove the handcrafted character while creating unnecessary dust. It is generally better to repair only deep voids, sharp projections, or defects that may hold water.
Seams on two-part spheres respond well to patient layering. A thin initial patch pressed firmly into the joint bonds better than one oversized ridge. After it becomes firm, a second skim coat can blend the contour. Trying to sculpt the entire seam while the mortar is wet often spreads the repair farther than necessary.
Placement Changes How the Sphere Looks
A concrete orb that appears enormous on a workbench can look surprisingly small in an open yard. Testing the intended location with an inflated ball or inexpensive plastic globe helps establish scale before casting. The mock-up can be viewed from the patio, windows, gate, and street to determine whether the finished ornament will disappear behind summer foliage.
Groups tend to look strongest when the spheres vary in size and sit at slightly different heights. Partially nestling one into gravel or ground cover makes the composition feel established. Perfectly equal spacing can look formal, which may be desirable near architecture but less convincing in a naturalistic border.
Patience Produces the Most Durable Result
The hardest stage is often leaving the mold alone. Concrete may feel solid after a day while still lacking enough strength to tolerate twisting, cutting, or rolling. Waiting beyond the minimum unmolding time is especially worthwhile for large castings, thin hollow shells, cool conditions, or unfamiliar mixtures.
After demolding, the sphere should be treated as a young casting rather than finished yard decor. Protected curing, careful handling, and delayed sealing improve its chances of surviving years of rain, sun, and seasonal temperature changes. The reward is a substantial garden accent made for far less than many retail versionsand the quiet satisfaction of knowing that the perfectly round object did not, in fact, roll away during production.