Note: This article is written as original, web-ready content and is based on real cooking and food-safety guidance from reputable U.S. culinary and government sources, with source links intentionally omitted from the article body as requested.
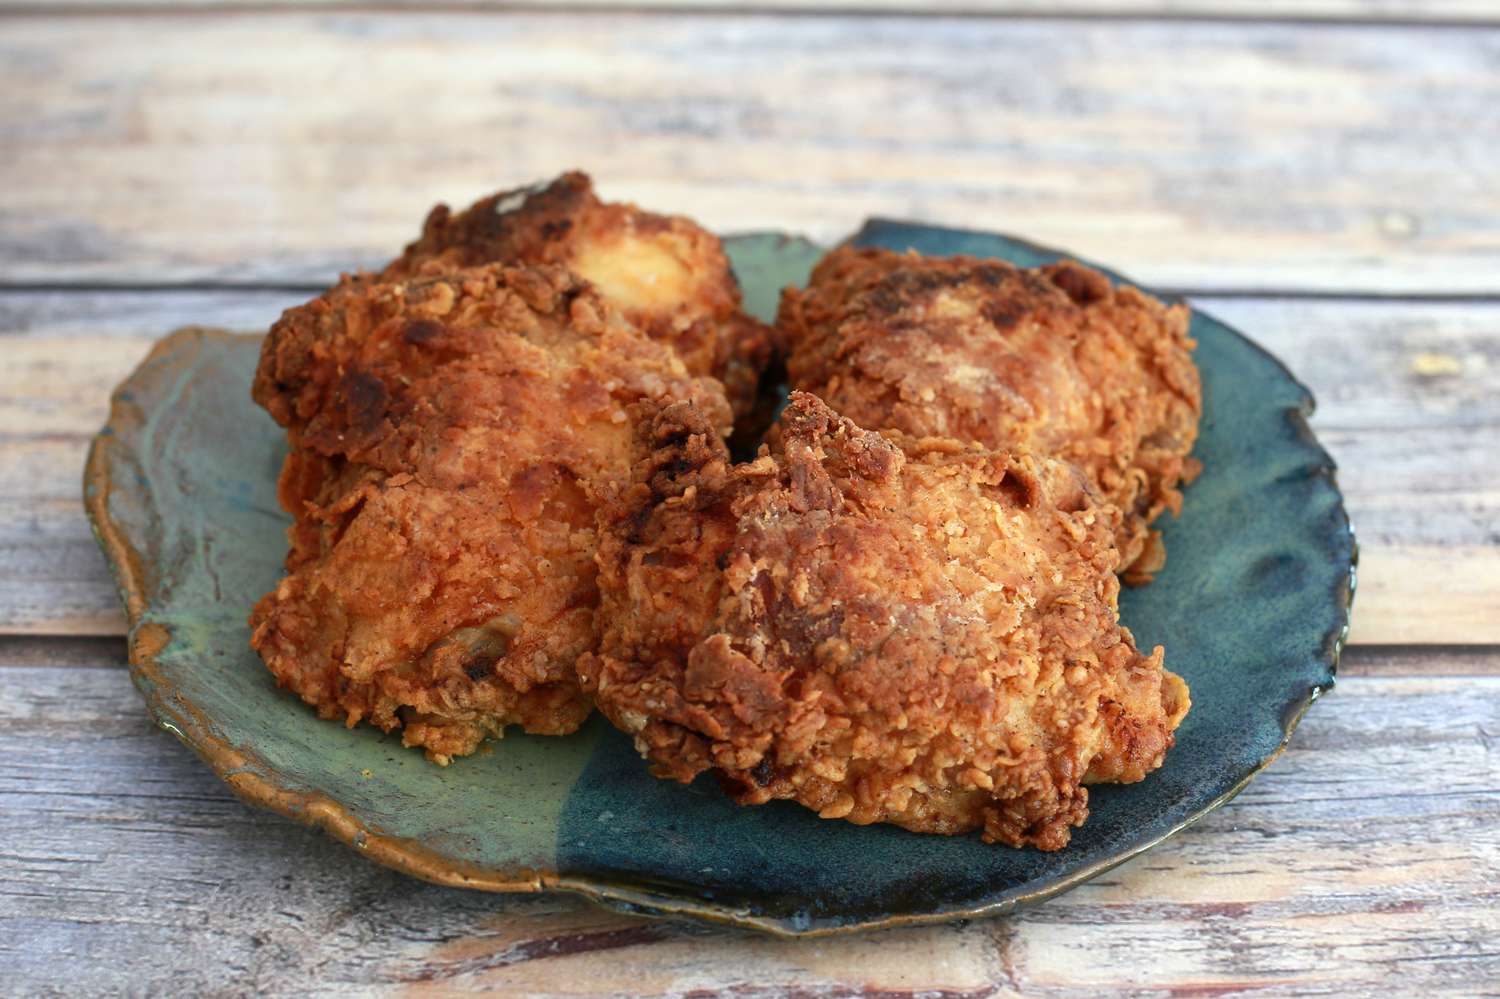
If fried chicken had a responsible cousin who still knew how to party, it would be this crispy oven-fried chicken thighs or legs recipe. You get the golden crunch, juicy dark meat, and irresistible seasoned coatingwithout standing over a pot of hot oil like you are guarding treasure from pirates. The oven does most of the heavy lifting, the cleanup is easier, and your kitchen will not smell like a county fair for three business days.
This recipe is designed for bone-in, skin-on chicken thighs, drumsticks, or a mix of both. These cuts are budget-friendly, flavorful, and forgiving. Unlike chicken breast, which can go from “perfectly cooked” to “why is this a sponge?” in minutes, thighs and legs stay moist thanks to their dark meat, skin, and connective tissue. When cooked properly, the outside turns crisp and deeply savory while the inside stays tender enough to make silence fall over the dinner table.
The secret is not one magic trick. It is a smart combination of dry chicken skin, bold seasoning, a crunchy coating, high heat, airflow from a wire rack, and a reliable thermometer. Once you understand the method, you can change the spices, swap the coating, or make it spicy, smoky, garlicky, or Southern-style. The oven is your frying pan now. Treat it with respect, and it will reward you with chicken worth bragging about.
Why This Oven-Fried Chicken Works
Oven-fried chicken succeeds when it copies the best parts of frying while avoiding the messy parts. Traditional fried chicken uses hot oil to dehydrate and brown the exterior quickly. In the oven, we need to help that process along. That means removing excess moisture, using a coating that browns well, and lifting the chicken off the pan so hot air can circulate around every piece.
The wire rack is not optional if you want real crispiness. When chicken sits flat on a baking sheet, steam collects underneath, creating the dreaded soggy bottom. Nobody wants chicken with a crunchy roof and a damp basement. A rack allows heat to move around the thighs or legs, helping the coating crisp more evenly.
A little fat also matters. A light mist of cooking spray, a drizzle of oil, or a brush of melted butter encourages browning and gives the coating that “fried” personality. You are not deep-frying, but you are still inviting flavor to the party.
Ingredients for Crispy Oven-Fried Chicken Thighs or Legs
Main Ingredients
- 6 bone-in, skin-on chicken thighs or 8 chicken drumsticks
- 1 cup buttermilk
- 1 large egg
- 1 tablespoon hot sauce, optional
- 1 cup all-purpose flour
- 1 cup panko breadcrumbs or crushed cornflakes
- 2 teaspoons baking powder
- 1 1/2 teaspoons kosher salt
- 1 teaspoon black pepper
- 1 1/2 teaspoons smoked paprika
- 1 teaspoon garlic powder
- 1 teaspoon onion powder
- 1/2 teaspoon dried thyme
- 1/2 teaspoon cayenne pepper, optional
- 3 tablespoons melted butter or neutral oil
- Cooking spray or additional oil for the rack
Ingredient Notes
Chicken thighs or legs: Bone-in, skin-on pieces give the best flavor and crunch. Boneless pieces cook faster, but they do not deliver the same classic oven-fried texture.
Buttermilk: Buttermilk helps the coating stick and gives the chicken a gentle tang. It also works beautifully with spices. If you do not have buttermilk, mix 1 cup of milk with 1 tablespoon of lemon juice or vinegar and let it sit for 5 minutes.
Panko or cornflakes: Panko creates a light, jagged crunch. Crushed cornflakes give a slightly sweeter, extra-crispy crust. Flour alone works, but adding one of these makes the texture much more exciting.
Baking powder: This is a small but powerful helper. It encourages browning and crispness, especially on skin-on chicken. Use baking powder, not baking soda, unless you enjoy chicken that tastes like regret.
Step-by-Step Instructions
Step 1: Pat the Chicken Dry
Use paper towels to pat every piece of chicken very dry. This step may seem boring, but it is one of the biggest secrets to crispy oven-fried chicken. Moisture is the enemy of crunch. If the chicken goes into the oven wet, the coating steams before it browns.
Step 2: Make the Buttermilk Mixture
In a large bowl, whisk together the buttermilk, egg, and hot sauce if using. Add the chicken and turn each piece to coat. Cover and refrigerate for at least 1 hour. For deeper flavor, marinate it for 4 to 12 hours. If you are short on time, even 30 minutes helps.
Step 3: Prepare the Crispy Coating
In a shallow dish, combine the flour, panko breadcrumbs or crushed cornflakes, baking powder, salt, pepper, smoked paprika, garlic powder, onion powder, thyme, and cayenne. Mix well so every bite has seasoning. Bland coating is a culinary misdemeanor.
Step 4: Set Up the Baking Rack
Preheat the oven to 425°F. Place a wire rack over a rimmed baking sheet and grease the rack with cooking spray or a thin layer of oil. The rimmed sheet catches drips, while the rack keeps the chicken lifted and crisp.
Step 5: Coat the Chicken
Remove one piece of chicken from the buttermilk mixture and let the excess drip off. Press it firmly into the seasoned coating, turning to cover all sides. Do not just sprinkle the coating on like you are dusting a bookshelf. Press it in so it clings. Place the coated chicken skin-side up on the prepared rack.
Step 6: Add a Little Fat for Browning
Drizzle or brush the coated chicken lightly with melted butter or oil. You can also use cooking spray. This helps the crust brown and gives it that oven-fried finish. Dry flour patches will stay pale, so make sure the surface gets a little love.
Step 7: Bake Until Crispy and Cooked Through
Bake for 40 to 50 minutes, depending on the size of the chicken pieces. Drumsticks may finish closer to 40 minutes, while large thighs may need the full 50. The coating should be golden brown, the skin should look crisp, and the internal temperature should reach at least 165°F when measured near the bone without touching it.
Step 8: Rest Before Serving
Let the chicken rest for 5 to 10 minutes before serving. This helps the juices settle and keeps the coating from sliding off. Do not cover it tightly with foil, or you may trap steam and soften the crust. A loose tent is fine if needed.
How to Make the Chicken Extra Crispy
For the crispiest oven-fried chicken thighs or legs, start with dry skin. Pat the chicken thoroughly, and if you have time, place the pieces uncovered in the refrigerator for 1 to 2 hours before marinating or coating. This helps surface moisture evaporate.
Use a rack, not just a pan. Airflow is the difference between “crispy all over” and “crispy on top, sad underneath.” Also, avoid overcrowding the baking sheet. Leave space between pieces so hot air can move freely.
Another helpful trick is to combine textures in the coating. Flour gives coverage, while panko or cornflakes create crunch. Baking powder supports browning. Butter or oil finishes the job. Together, they create the kind of crust that makes people ask, “Are you sure this was baked?”
Best Seasoning Variations
Southern-Style Oven-Fried Chicken
Add 1 teaspoon poultry seasoning, 1/2 teaspoon white pepper, and an extra pinch of cayenne to the coating. Serve with biscuits, collard greens, and honey butter if you want applause.
Spicy Oven-Fried Chicken
Add 2 tablespoons hot sauce to the buttermilk and increase the cayenne to 1 teaspoon. After baking, drizzle lightly with hot honey for a sweet-heat finish.
Garlic Parmesan Chicken
Add 1/3 cup finely grated Parmesan to the coating and increase the garlic powder to 1 1/2 teaspoons. Finish with chopped parsley and a squeeze of lemon.
Smoky BBQ-Style Chicken
Add 1 teaspoon chili powder and 1 teaspoon brown sugar to the coating. Brush lightly with barbecue sauce during the last 5 minutes of baking, but do not add it too early or the sugars may burn.
Common Mistakes to Avoid
Skipping the thermometer: Color is helpful, but it is not a food-safety plan. Use an instant-read thermometer to confirm doneness. Chicken should reach at least 165°F internally.
Using too much wet marinade: Let extra buttermilk drip off before breading. Too much liquid makes the coating heavy and gummy.
Forgetting to oil the coating: A dry coating can taste powdery. A light coating of oil or butter encourages browning and crisp texture.
Overcrowding the pan: Crowded chicken steams. Give each piece space, even if that means using two pans.
Covering the chicken after baking: Steam softens crunch. Let the chicken rest uncovered or loosely tented.
What to Serve with Oven-Fried Chicken
This crispy oven-fried chicken recipe is flexible enough for a weeknight dinner or a weekend spread. For classic comfort, serve it with mashed potatoes, macaroni and cheese, coleslaw, cornbread, or green beans. For something lighter, pair it with cucumber salad, roasted vegetables, or a bright cabbage slaw with vinegar dressing.
It also makes excellent picnic-style chicken. Let it cool slightly, pack it with potato salad and pickles, and watch it disappear. The coating is best hot from the oven, but the flavor still holds up well at room temperature for a short serving window.
Storage and Reheating Tips
Store leftover oven-fried chicken in an airtight container in the refrigerator for 3 to 4 days. For the best texture, reheat it in a 375°F oven or air fryer until hot and crisp again. Avoid the microwave if you care about crunch. The microwave is wonderful for many things, but crispy chicken is not one of its love languages.
To freeze, let the cooked chicken cool completely, then wrap pieces tightly and store them in a freezer-safe container for up to 2 months. Reheat from frozen in the oven at 375°F until warmed through and crisp, adding extra time as needed.
Recipe Summary
- Prep time: 20 minutes
- Marinating time: 1 to 12 hours
- Cook time: 40 to 50 minutes
- Total time: About 2 hours with minimum marinating
- Servings: 4 to 6
- Best chicken cuts: Bone-in thighs, drumsticks, or a mix
- Oven temperature: 425°F
- Safe internal temperature: 165°F minimum
My Experience Making Crispy Oven-Fried Chicken Thighs or Legs
The first time I tried making oven-fried chicken, I had one goal: avoid deep-frying while still getting that glorious crunch. I had high hopes, a hungry family, and a baking sheet full of chicken that looked promising. Unfortunately, I also skipped the wire rack. The tops were beautiful, but the bottoms were soft enough to need emotional support. Lesson learned: crispy chicken needs airflow.
After a few rounds of testing, the biggest improvement came from drying the chicken properly. It sounds too simple to matter, but patting the pieces dry made a dramatic difference. When I rushed and left the skin damp, the coating became patchy and heavy. When I took the time to dry the chicken, the crust clung better, browned better, and had that satisfying bite that makes you pause mid-chew and nod like a very serious food judge.
I also learned that seasoning must happen in layers. If only the coating is seasoned, the first bite tastes good, but the meat underneath can be quiet. Buttermilk with hot sauce gives the chicken a flavorful foundation. The flour and crumb mixture adds the second layer. A final pinch of salt right after baking can wake everything up. It is not about making the chicken salty; it is about making sure every part tastes intentional.
Chicken thighs are my favorite for this recipe because they stay juicy even when baked until deeply golden. Drumsticks are fun, especially for kids or casual dinners, but thighs give you that rich, tender bite that feels closest to traditional fried chicken. If I make a mixed tray, I usually place the largest thighs toward the back of the oven where heat is strongest and keep smaller drumsticks toward the front. It is a small detail, but it helps everything finish evenly.
Another useful experience: do not panic if the coating looks dry halfway through baking. Give it time. The chicken fat renders, the butter or oil starts working, and the surface slowly turns golden. If you see stubborn pale spots near the end, a quick spritz of oil usually fixes them. I prefer not to flip the chicken because keeping the skin side up preserves the best crust, but rotating the pan halfway through baking helps with even browning.
This recipe has become one of those dependable dinners that feels special without being dramatic. It is easy enough for a Wednesday night, but it still has the “somebody cared” energy of Sunday supper. The leftovers are excellent chopped into salads, tucked into sandwiches, or eaten cold straight from the fridge while pretending you only opened the door to look for mustard. No judgment. Crispy chicken has a way of rewriting plans.
The best part is that oven-fried chicken gives you room to experiment. Some nights call for smoky paprika and garlic. Other nights want cayenne and hot honey. Sometimes crushed cornflakes win; sometimes panko is the hero. Once the basic technique is in your handsdry chicken, seasoned coating, wire rack, hot oven, thermometeryou can make it your own without fear. That is the beauty of a great home recipe: it teaches you the rules, then lets you play.
Conclusion
This crispy oven-fried chicken thighs or legs recipe proves that you do not need a deep fryer to make chicken with serious crunch and juicy flavor. With buttermilk, bold seasoning, a textured coating, a hot oven, and a wire rack, you can create golden, satisfying chicken that feels indulgent but is much easier to manage at home.
Whether you choose thighs, drumsticks, or both, the method is simple, reliable, and flexible. Serve it with classic sides, brighten it with salad, spice it up with cayenne, or drizzle it with hot honey. However you plate it, this is the kind of oven-fried chicken that makes dinner feel like an eventwithout requiring you to mop oil off the stove afterward.