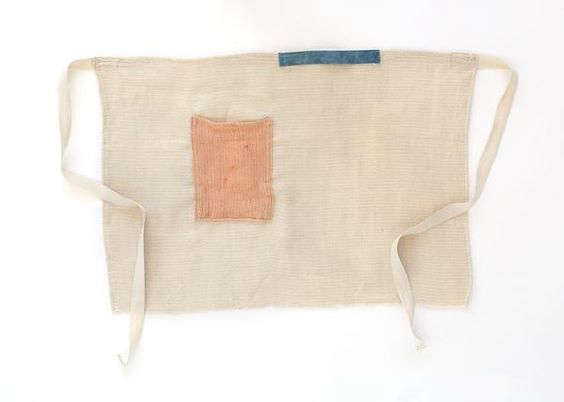
A color block half apron is proof that practical sewing does not have to look practical in the boring, beige, “issued by the cafeteria supervisor” sense. With a few pieces of contrasting fabric, a comfortable waistband, and pockets large enough to hold a wooden spoon, recipe card, phone, or emergency chocolate, an ordinary kitchen accessory becomes a small piece of wearable design.
This project is especially appealing because it combines straightforward construction with plenty of creative freedom. Most half aprons are built from rectangles or gently shaped panels, so beginners can focus on accurate cutting, straight seams, pressing, and topstitching without wrestling with sleeves, zippers, or mysterious pattern markings that resemble an ancient treasure map. Established sewing resources frequently recommend simple apron projects for newer sewists because the fit is forgiving and the basic structure can be customized easily.
What Is a Color Block Half Apron?
A half apron covers the wearer from the waist to somewhere around the upper thigh or knee. Unlike a full apron, it does not include a bib or neck strap. It is secured with ties or a belt around the waist, making it quick to put on, comfortable in warm kitchens, and easy to adjust for different wearers.
Color blocking means joining sections of solid or minimally patterned fabric to create a deliberate visual arrangement. The blocks may be horizontal, vertical, diagonal, symmetrical, or wonderfully off-center. The technique has long been used in clothing, quilts, bags, and home décor because seam lines can function as design lines rather than merely construction necessities. Sewing publications commonly demonstrate that solid fabrics can be combined into bold geometric layouts without requiring complicated decorative techniques.
On a half apron, the simplest arrangement uses one color for the upper section, another for the lower section, and a third for the waistband and pockets. The result looks intentional, modern, and far more sophisticated than the amount of sewing involved would suggest. That is the crafting equivalent of arriving at a party with bakery cookies placed on your own serving platter.
Why This Apron Design Works So Well
It Is Friendly to Beginners
A color block half apron requires many of the skills used in larger sewing projects, but it presents them in manageable portions. You learn how to measure, cut straight pieces, join fabrics, finish raw edges, create a waistband, attach pockets, hem a garment, and press seams properly. If one seam is slightly adventurous, the apron will usually remain wearable. It is an apron, not a spacesuit.
The project also provides immediate feedback. Uneven blocks reveal cutting problems, rippled seams suggest tension or pressing issues, and crooked topstitching encourages slower sewing. Because the pieces are relatively small, mistakes can often be corrected without sacrificing a large amount of fabric.
It Uses Fabric Efficiently
Color blocking is an excellent way to use leftover yardage. A piece too small for a skirt or tote bag may be perfectly sized for an apron panel, pocket, or waistband. Coordinated remnants can create a polished design, while unrelated scraps can produce a playful patchwork effect.
Many half-apron tutorials use less fabric than a full apron, and rectangular construction makes it easier to arrange pieces economically. Some established patterns also combine three coordinating fabrics or use small cuts for pocket linings and ties, demonstrating how effectively an apron can turn modest fabric quantities into a useful finished item.
It Is Easy to Personalize
The same basic apron can look minimalist, retro, rustic, professional, or cheerful depending on the color palette. Black, cream, and camel create a modern café style. Red, pink, and orange produce a lively retro look. Sage green, natural linen, and deep brown feel calm and earthy. Navy, white, and yellow suggest a bright coastal kitchen even when the nearest coastline is three states away.
You can also add embroidery, labels, decorative stitching, rickrack, piping, contrast thread, or appliqué. However, a strong color arrangement often needs no extra decoration. Knowing when to stop is an advanced crafting skill, usually learned five minutes after attaching one embellishment too many.
Choosing Fabric for a Color Block Half Apron
Best Fabric Types
Choose a stable woven fabric that can tolerate frequent washing. Quilting cotton is easy to cut and sew, comes in a huge range of colors, and works well for a lightweight kitchen apron. Cotton canvas, duck cloth, denim, and twill offer greater durability for gardening, crafting, grilling, or workshop use. Linen and linen blends provide a relaxed, upscale appearance and become softer with washing.
Apron patterns and tutorials from sewing educators commonly recommend medium- to heavyweight woven materials such as canvas, denim, twill, linen, broadcloth, chambray, and quilting cotton. The right choice depends on whether you want a light serving apron or a sturdier utility garment.
Avoid pairing fabrics with dramatically different weights unless you understand how they will behave together. A stiff canvas panel joined to thin rayon may sag, twist, or pull at the seam. For predictable results, use fabrics of similar weight and fiber content.
Prewash Before Cutting
Wash and dry the fabrics using the same method you expect to use for the finished apron. Prewashing allows potential shrinkage or dye release to occur before the pieces are joined. This step matters particularly in color-blocked projects because different fabrics may shrink at different rates. Without pretreatment, one block can tighten while its neighbor remains relaxed, creating an apron with the architectural integrity of a potato chip.
Finish or secure loosely woven raw edges before washing, press the fabric afterward, and check that the grain is straight before cutting. Sewing specialists consistently recommend pretreating washable fabric so its final dimensions and behavior are established before construction.
Test for Color Transfer
Strong red, navy, black, and saturated hand-dyed fabrics deserve extra attention. Rub a damp white cloth over the fabric or wash a small sample with a light-colored scrap. If the color transfers, wash the fabric separately until the excess dye is reduced. A cream pocket turning pale pink may be charming. A cream waistband developing random blue clouds is less likely to match the original vision.
Planning the Color Blocks
Before cutting valuable fabric, sketch the apron as a simple rectangle. Divide the rectangle into blocks and shade each area with colored pencils or digital swatches. This tiny planning step can prevent a surprisingly large quantity of seam ripping.
Use a Dominant, Supporting, and Accent Color
A dependable palette uses one dominant color, one supporting color, and one smaller accent. For example:
- Dominant: Deep navy across the lower two-thirds of the apron.
- Supporting: Soft blue across the upper panel.
- Accent: Mustard yellow for the waistband and pocket edge.
The largest block gives the design stability. The supporting color adds variation, while the accent attracts attention to functional details. Giving every color equal space can work, but it often produces a busier result.
Consider Where the Apron Will Be Worn
Darker fabric near the bottom hides cooking splashes, soil, paint, and other evidence of productive enthusiasm. Lighter fabric near the waist brightens the design without occupying the area most likely to meet tomato sauce. For a craft apron, place the most durable fabric behind the pockets because tools repeatedly rubbing against a lightweight panel can cause premature wear.
Match the Grain Direction
Cut all major panels with the grain running in the same direction. Even though the pieces are rectangular, rotating one block can make it stretch or hang differently. Stripes and checks require extra care because small alignment errors are more visible along a color-block seam.
Suggested Measurements and Materials
The following dimensions create a versatile adult half apron. Adjust the width, length, and ties for the intended wearer.
- Upper panel: 24 inches wide by 7 inches high
- Lower panel: 24 inches wide by 14 inches high
- Waistband center: 25 inches long by 4 inches wide
- Two waist ties: 30 inches long by 4 inches wide each
- Two pocket pieces: 8 inches wide by 9 inches high
- Optional pocket accent strips: 8 inches wide by 2 inches high
- Coordinating all-purpose thread
- Fabric scissors or rotary cutter
- Cutting mat and acrylic ruler
- Pins or sewing clips
- Fabric marker
- Iron and ironing board
These dimensions include room for standard seams and hems, but you should decide on a consistent seam allowance before cutting. A 1/2-inch allowance is approachable for beginners and provides enough fabric for clean edge finishing.
How to Sew the Color Block Half Apron
Step 1: Cut and Label the Pieces
Press the fabric before cutting. Use a ruler to make the panels square, checking each corner instead of trusting the edge of the fabric. Label the wrong side of each piece with removable chalk so the upper panel does not suddenly decide it was meant to be a pocket.
Step 2: Join the Main Color Blocks
Place the upper and lower panels right sides together, aligning the long edges. Pin or clip the seam, then sew with a 1/2-inch allowance. Finish the raw edges with a serger, zigzag stitch, or pinking shears.
Press the seam allowance toward the darker or heavier fabric. Topstitch about 1/8 inch from the seam on that side. This helps the joined panels lie flat and gives the color division a crisp, intentional finish.
Step 3: Prepare the Pockets
If using accent strips, sew one strip to the top of each pocket. Press the seam toward the accent fabric and topstitch. Fold the pocket sides and bottom to the wrong side by 1/2 inch and press. Fold the upper edge down again if it is not already finished by the accent strip.
Position the pockets on the apron front before sewing. Put on the unfinished apron or hold it against your waist to confirm that your hands can reach the pockets naturally. Pattern diagrams are helpful, but your arms have the final vote.
Topstitch around the sides and bottom, leaving the top open. Add a small triangle, short zigzag, or bar tack at each upper corner. Reinforcement is useful because pocket openings receive repeated pulling, especially when the pockets carry utensils, garden clippers, or a phone that appears to gain weight whenever it enters an apron. Sewing references frequently recommend reinforced pocket corners and secure topstitching for frequently washed or utility-focused aprons.
Step 4: Hem the Sides and Bottom
Fold each side edge to the wrong side by 1/2 inch, then fold it another 1/2 inch to conceal the raw edge. Press and stitch close to the inner fold. Repeat along the bottom edge.
Pressing before stitching is essential. The iron creates the shape; the sewing machine merely persuades it to stay there. For neat lower corners, fold the corner diagonally before completing the second turn, or use a mitered-corner method.
Step 5: Construct the Waistband and Ties
Sew one tie to each short end of the center waistband, right sides together. Press the connecting seams open. Fold the entire long strip in half lengthwise with wrong sides together and press to create a center guideline.
Open the strip. Fold both long raw edges inward until they meet the center crease, then press again. Fold the strip along the original center line. The result resembles extra-wide double-fold binding.
Center the apron’s raw upper edge inside the waistband, enclosing it between the folded layers. Pin carefully, making sure the back fold covers the previous stitching line. Topstitch from one end of the first tie, across the waistband, and to the end of the second tie.
Step 6: Finish the Tie Ends
Turn each short end inward before closing the ties, or angle the ends for a tailored appearance. Backstitch securely. Inspect the entire apron for loose threads, missed sections, and pins that may be planning an unpleasant surprise.
Step 7: Press the Completed Apron
Give the apron a final press from the wrong side, using a temperature suitable for the fabric. Smooth the pockets and waistband rather than dragging the iron aggressively across them. A final press sharpens the color blocks, flattens the hems, and transforms the project from “I made this” into “Yes, I absolutely intended every detail.”
Optional Design Variations
Add a Lining
A lining hides the internal seam allowances and gives lightweight cotton more body. It also provides another place to introduce color. Lined apron designs are often recommended when quilting cotton needs extra structure or when a reversible finish is desired.
Create an Asymmetrical Block
Divide the apron vertically so one color occupies roughly one-third of the width and another occupies two-thirds. Place a pocket across the dividing seam to unify the design. Carefully match the horizontal pocket details so the layout feels deliberate.
Make One Oversized Pocket
Instead of two separate pockets, attach one wide pocket across the front and stitch vertical dividing lines. This style works well for gardening, serving, crafting, or market stalls because it provides several storage compartments without adding much construction time.
Use Reclaimed Fabric
Old jeans, tablecloths, cotton curtains, and sturdy button-up shirts can supply interesting color blocks. Inspect reclaimed fabric for worn areas, stains, weak folds, and permanent odors before cutting. Existing shirt pockets or denim pockets can be incorporated into the design, saving time while adding character.
Common Mistakes to Avoid
Skipping the Pressing Steps
Finger-pressing is rarely enough for crisp color blocks. Press each seam as it is sewn instead of waiting until the end. This keeps the project square and prevents small inaccuracies from multiplying.
Using an Unstable Waistband
A waistband made from very soft fabric can collapse or twist. Add lightweight woven interfacing when necessary, especially if the apron body is heavy or the pockets will carry tools.
Making the Ties Too Short
Long ties provide more flexibility and may allow the apron to tie at the front. Measure the intended wearer before cutting. When making a gift, longer ties are generally safer because they can be shortened later.
Ignoring Seam Bulk
Multiple layers of canvas, denim, interfacing, and folded waistband fabric can become difficult for a standard machine to handle. Grade or trim hidden seam allowances, use an appropriate needle, and turn the handwheel slowly when crossing thick intersections.
Choosing Colors Only Under Store Lighting
Fabric colors can appear different in daylight. Place the selections together near a window and photograph them in black and white. If all the fabrics become the same shade of gray, the design may lack contrast even though the colors differ. Strong value contrast helps the color-block arrangement remain visible from a distance.
Five Hundred Words of Real-World Color Block Half Apron Experience
The first lesson I learned from making color block half aprons was that rectangles are not automatically simple. A rectangle cut one-quarter inch wider at one end will still look innocent on the cutting table. Once it is joined to a contrasting panel, however, it announces the error with the confidence of a crooked picture frame. Measuring both ends of every piece and checking the corners with a clear ruler made a bigger difference than buying another decorative sewing gadget.
I also discovered that color placement affects how often an apron gets worn. One early version used pale yellow across the entire lower section. It looked sunny, optimistic, and completely unprepared for spaghetti sauce. After two cooking sessions, the apron had become a scrapbook of dinner decisions. Later versions used charcoal, navy, olive, or medium-value prints near the hem and reserved light colors for the waistband and upper panel. They stayed presentable longer without becoming visually heavy.
Pocket testing was another memorable education. On my first attempt, I positioned two beautiful pockets according to a neat paper sketch. Unfortunately, the sketch did not have arms. When I wore the apron, the pockets sat too far toward the sides, forcing me to perform a small elbow dance every time I reached for a spoon. Since then, I temporarily pin the pockets in place, tie the apron around my waist, and walk around the room. I put my hands inside the pockets, sit down, bend forward, and check whether a phone falls out. This thirty-second rehearsal prevents a surprising number of problems.
The waistband taught me to respect pressing. I once tried to fold and sew a long tie without pressing each stage because I was “saving time.” The result curled, twisted, and changed width whenever it became bored. I spent far longer unpicking the seam than I would have spent at the ironing board. Now I press the center crease, both inward folds, every connecting seam, and the enclosed waistband before topstitching. The finished ties look straighter, feed through the machine more smoothly, and lie flatter around the waist.
Contrast thread sounded exciting until I realized that contrast thread is also an unpaid quality inspector. Every wobble becomes visible. For confident topstitching, it looks fantastic. For a first project, matching thread is more forgiving. Another practical option is using matching thread for construction and adding one carefully planned line of contrast topstitching along the color-block seam.
Fabric weight changed the personality of each apron. Quilting cotton produced a light, cheerful apron that folded easily into a drawer. Linen created a softer, more relaxed piece that looked increasingly natural after washing. Canvas made an excellent gardening and craft apron, although bulky intersections required slower stitching and a stronger needle. Mixing a heavy lower panel with a lighter upper panel worked only when the waistband had enough structure to support both.
The most successful color combinations were not always the most dramatic. Rust, blush, and cream created a warm apron that felt modern without shouting. Navy, chambray, and mustard looked lively but still practical. Black, gray, and natural linen produced a professional version suitable for serving guests or working at a market booth. The best palette was usually the one with clear contrast and one quiet color that gave the eyes somewhere to rest.
Finally, I learned that a handmade apron becomes more useful when it is designed for a specific person. A gardener may need deep divided pockets. A baker may prefer a loop for a towel. A crafter may want one narrow slot for scissors and another for marking tools. A cook who constantly misplaces a phone may need a secure upper pocket rather than a giant open pouch near the knees. The color blocks make the apron attractive, but thoughtful details make it the apron someone reaches for repeatedly.
Conclusion
A color block half apron offers an ideal balance of creativity and practicality. Its simple shape makes it approachable for a beginner, while its visible seams, pockets, waistband, and color arrangement provide enough design choices to keep experienced sewists interested.
Start with washable woven fabrics of similar weight, prewash them, plan the proportions on paper, and press every seam as you work. Reinforce the pockets, give the ties generous length, and choose darker fabric for areas likely to collect stains. Most importantly, design the apron around its actual job. A beautiful apron is satisfying; a beautiful apron that keeps your spoon, phone, towel, and emergency chocolate within reach is a triumph of modern engineering.
Note: Measurements in this article are flexible starting points. Test the apron width, length, pocket position, and tie length on the intended wearer before completing the final stitching.