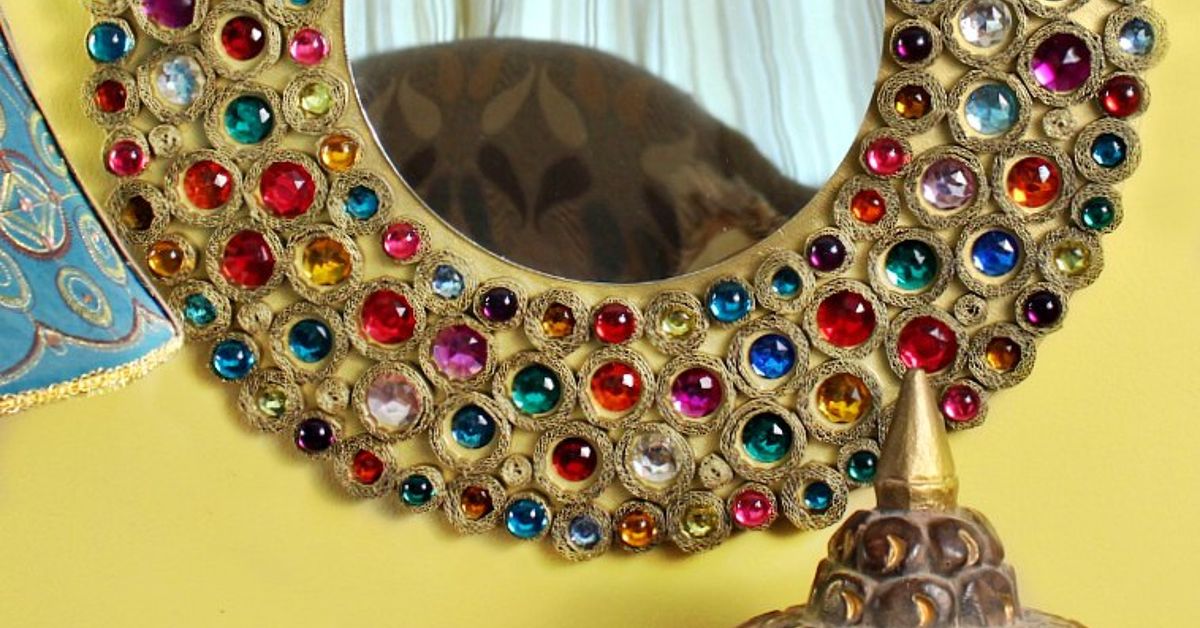
If your walls are feeling a little too “rental beige” and not nearly enough “small palace with excellent taste,” a cardboard bejeweled mirror might be exactly the crafty chaos your home needs. This project takes humble materialscardboard, glue, paint, faux gems, and an inexpensive mirrorand turns them into a piece that feels playful, personal, and surprisingly stylish. It is budget-friendly, beginner-friendly, and just dramatic enough to make visitors ask, “Wait… you made that?” which is the highest form of DIY praise.
A mirror is already one of the hardest-working objects in home decor. It reflects light, can make a room feel brighter, and often helps a small space look more open. Add a handmade jeweled frame, and suddenly it is not just functional; it becomes wall art with main-character energy. The cardboard base keeps the project affordable and easy to customize, while gems, beads, mirror tiles, sequins, or metallic paint deliver that sparkly payoff. In other words, this is one of those rare crafts that lets you feel thrifty and glamorous at the same time.
This guide covers everything from planning the shape to layering cardboard for strength, choosing embellishments, styling the finished mirror, and avoiding the classic DIY mistakes that turn “eclectic masterpiece” into “hot-glued accident.” Grab your supplies and your favorite playlist. We are about to make cardboard look suspiciously fancy.
Why a Cardboard Bejeweled Mirror Actually Works
At first glance, cardboard may sound like an odd material for decor. It has a reputation for being the overworked hero of online shopping and middle school science fairs. But in craft land, cardboard is wonderfully useful. It is easy to cut, easy to layer, simple to paint, and flexible enough to support all sorts of textures and decorative treatments. Thicker chipboard or layered corrugated cardboard can create a frame that feels substantial without becoming heavy or expensive.
The “bejeweled” part is where the fun really begins. A plain cardboard frame can be transformed with acrylic paint, metallic rubs, pearl stickers, rhinestones, glass gems, decoupage paper, ribbon trim, or miniature mirror pieces. Whether you want vintage glam, playful maximalism, boho sparkle, or a fairy-tale look, the design can shift dramatically depending on your color palette and embellishments. That is the beauty of this project: the bones are cheap, but the personality is priceless.
It also fits nicely with the growing love for personalized decor. Instead of buying a generic frame that looks like it came from the “neutral rectangle aisle,” you get a one-of-a-kind object that reflects your own taste. Literally and metaphorically. That is efficient decorating.
Materials You Will Need
The base supplies
Start with a small lightweight mirror. A thrifted mirror, dollar-store mirror, or basic craft mirror works beautifully. You will also need cardboard or chipboard for the frame base. Corrugated cardboard is great for depth, while chipboard is useful for flatter decorative layers. A pencil, ruler, craft knife or scissors, and cutting mat help with clean shaping.
Adhesives and finishes
For assembly, use a strong craft glue or hot glue suitable for lightweight embellishments. Acrylic paint is ideal for the base coat, and metallic shades like gold, silver, copper, champagne, or jewel tones give the mirror a more polished look. A clear sealer can help protect the surface once everything is dry.
The sparkle squad
This is the part where restraint goes on vacation. Gather faux gems, stick-on rhinestones, beads, sequins, mirror tiles, buttons, cabochons, pearls, broken costume jewelry, ribbon trim, lace, or decorative paper. You do not need all of them unless you want your mirror to look like it won a pageant, but having options helps.
How to Make a Cardboard Bejeweled Mirror
1. Choose the shape and size
Decide whether you want the mirror to be round, oval, arched, rectangular, scalloped, sunburst-inspired, or completely freeform. Round and oval shapes feel soft and playful. Rectangles look a little more classic. An arched top gives instant boutique-hotel charm. Trace your mirror onto cardboard, then sketch an outer border that will become the decorative frame.
2. Build a sturdy frame
Cut out the frame shape and make at least one or two duplicate layers. Gluing multiple cardboard layers together gives the piece more strength and a nicer profile. If the cardboard seems flimsy, add an extra backing layer. Think of it as giving your mirror core values.
3. Smooth and prep the surface
Before decorating, cover rough cardboard edges with thin strips of paper, masking tape, or a light layer of papier-mâché-style wrapping if needed. This helps create a cleaner finish. Once dry, apply a base coat of paint. Dark jewel tones create drama, while gold and silver make the frame feel more ornate.
4. Attach the mirror
Center the mirror carefully and glue it down. Leave enough frame space around the edges for decoration. If the mirror is very lightweight, this step is easy. If it has a little more heft, reinforce the back with extra cardboard and be sure the glue has fully cured before moving on.
5. Plan the embellishment layout
Before gluing anything, dry-fit your gems and decorative pieces. This is where you discover whether your original idea looks “whimsical princess heirloom” or “craft store exploded.” Arrange large pieces first, then fill gaps with smaller elements. Repeating a few shapes or colors keeps the design cohesive.
6. Glue in layers
Work from the largest embellishments to the smallest. Layering gives the mirror depth and makes it look more intentional. Place statement pieces at regular intervals, then tuck beads, pearls, sequins, or mirror tiles around them. If you are using metallic paint, you can brush accents around the gems after the main pieces are attached.
7. Add texture and finishing details
This is the stage where the mirror develops personality. You can dry brush gold over raised details, add dots of dimensional paint, weave in ribbon, or use tiny mirrors for a mosaic effect. A little contrast goes a long way. Matte paint mixed with shiny gems creates visual balance. Too much shine everywhere can start to look chaotic instead of luxurious.
8. Seal and hang
Once everything is dry, apply a light protective finish if your embellishments allow it. Add hanging hardware or strong wall-safe backing appropriate for the size and weight. If the mirror is small, it can also lean on a shelf, vanity, or dresser.
Design Ideas That Make It Look Expensive
Go with a controlled color story
The fastest way to make a DIY project look intentional is to limit the palette. Emerald and gold feel rich. Blush and pearl feel romantic. Black, silver, and smoked mirror details feel moodier and more modern. Even rainbow can work if the shades are repeated thoughtfully instead of thrown on like confetti after three espressos.
Mix materials, not random clutter
A beautiful bejeweled mirror usually includes contrast. Combine smooth gems with textured trim. Pair glossy paint with matte cardboard detailing. Use a few tiny mirror tiles to bounce light and make the frame feel more dimensional. The goal is not to use every craft supply you own. The goal is to make it look like you made choices on purpose.
Borrow from vintage and decorative styles
If you want the mirror to feel more elevated, take cues from ornate vintage frames, sunburst mirrors, and gallery-wall styling. A scalloped edge can feel sweet and retro. Raised floral details feel cottage-inspired. Geometric mirror tile accents feel modern. Tiny pearls around the inner frame bring old-school glamour without needing an actual castle.
Where to Use a Cardboard Bejeweled Mirror
This project is versatile enough to work in more than one room. In an entryway, it becomes a cheerful last-look mirror before you head out the door. In a bedroom, it can sit above a vanity or dresser and add softness to the wall. In a child’s room or teen room, it can lean playful and colorful without feeling disposable. In a craft room, it doubles as decor and proof that your glue gun deserves respect.
Because mirrors can help reflect light and visually open up smaller areas, a bejeweled version can be especially charming in compact spaces. The trick is placement. Try hanging it where it catches daylight or reflects a tidy corner rather than visual clutter. Even a fabulous mirror cannot save a chair that is wearing six sweaters and a tote bag.
Common Mistakes to Avoid
Using cardboard that is too thin
If the base flexes too much, the finished piece may warp or feel fragile. Layer your cardboard and reinforce the back. Strength first, sparkle second.
Skipping the dry layout
Gluing gems one by one without a plan often leads to crowded corners and awkward gaps. Arrange first, commit later. Your future self will be grateful.
Overdecorating every inch
Yes, the project is called bejeweled. No, that does not mean every square centimeter must scream for attention. Leaving a little painted surface visible helps the decorative elements stand out more.
Ignoring weight and hanging safety
Even cardboard-based projects need thoughtful hanging. Make sure the mirror itself is lightweight and that the backing is secure before placing it on a wall.
Why This Project Appeals to Budget Decor Lovers
A cardboard bejeweled mirror sits at the sweet spot between thrifty and expressive. Many decor projects either cost too much or look too temporary. This one can be made from recycled materials, thrifted finds, and leftover embellishments, yet still create a visually strong piece. It is ideal for renters, students, first apartments, dorm rooms, kids’ spaces, and anyone who wants home decor with personality but does not want to spend three figures on a designer mirror.
It is also a satisfying way to reuse materials. Cardboard, old costume jewelry, broken earrings, extra beads, ribbon scraps, and leftover paint can all become part of the final design. Instead of tossing odds and ends into the mysterious junk drawer where things go to be forgotten, you can turn them into something decorative and useful.
Final Thoughts
The charm of a cardboard bejeweled mirror is not that it pretends to be something it is not. It knows exactly what it is: a crafty, clever, joyfully extra object made from accessible materials and good ideas. It brings together reflection, texture, color, and a bit of sparkle in a way that feels personal rather than mass-produced. And in a world full of identical decor, that is a lovely thing.
Whether you make one with pearl trim and gold paint, go bold with jewel tones and rhinestones, or create a quirky mosaic from mismatched craft leftovers, this project gives you room to experiment. It can be elegant, playful, vintage-inspired, or gloriously over-the-top. The best version is the one that makes you smile every time you pass by it. Bonus points if it also makes your room look brighter and your DIY confidence look unstoppable.
Experience: What It Feels Like to Make and Live With a Cardboard Bejeweled Mirror
There is something oddly satisfying about starting with a plain piece of cardboard and ending with a mirror that looks like it belongs in a whimsical boutique. The first time I worked on a project like this, I expected it to feel like a quick craft. Instead, it felt more like styling a tiny set for a movie where the lead character is fabulous, slightly dramatic, and definitely owns more than one metallic pen. The process was relaxing in the best way. You trace, cut, paint, shuffle little jewels around, step back, change your mind, and then suddenly the frame begins to look intentional.
What surprised me most was how much the mirror changed the mood of the room once it went up. Before, the wall was just a wall doing wall things. Afterward, it had a focal point. The mirror caught light from the window and the gems added just enough texture to make the whole corner feel more alive. It did not look store-bought, but that was the appeal. It looked personal. It looked like someone had a point of view and access to a glue gun.
Another memorable part of the experience was how forgiving the project felt. If a gem landed in the wrong place, it could be adjusted. If a painted section looked flat, a metallic highlight fixed it. If one side of the frame seemed too busy, repeating a shape on the opposite side brought balance back. Unlike some DIY projects that punish every tiny mistake, this one welcomes creative detours. Imperfections can actually add charm, especially when the overall composition still feels balanced.
Living with the finished mirror is fun in a low-stakes, high-compliment kind of way. People notice it. They ask where it came from. And there is a very specific joy in saying, “Oh, I made it,” as casually as possible while internally doing a victory dance. It also tends to inspire more projects. Once you realize cardboard can become decor, you start eyeing every leftover box like it has potential. Cereal box? Maybe not. Sturdy shipping box? Now we are talking.
The best part, though, is emotional rather than decorative. A handmade mirror reflects more than your face. It reflects time spent making something on purpose. It reflects your taste, your humor, your patience, and maybe your willingness to glue tiny fake pearls for an hour while pretending that is perfectly normal behavior. And honestly, it is. Crafts like this remind you that beauty does not always need expensive materials. Sometimes it just needs imagination, a free afternoon, and enough sparkle to make cardboard forget its former life.
Note: This HTML is intentionally publish-ready and excludes source links or editor-only reference markup.