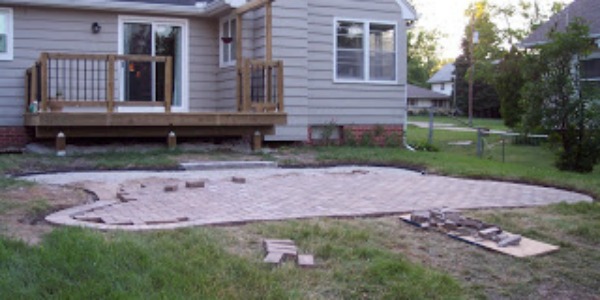
A brick paver patio can turn an underused patch of lawn into an outdoor dining room, a grilling station, or the neighborhood headquarters for iced tea and suspiciously competitive card games. Better still, a properly installed patio does not require a poured concrete slab or a masonry degree.
The catch is that the attractive bricks are only the visible portion of the project. The real work happens underneath them. Excavation, drainage, base preparation, and compaction determine whether your patio remains smooth or gradually develops enough hills and valleys to qualify as a miniature golf course.
This brick paver patio how-to guide covers the complete process, from planning and estimating materials to setting the final paver and filling the joints. It also explains common mistakes and practical lessons that can save time, money, and several conversations with an uncooperative wheelbarrow.
Before You Build a Brick Paver Patio
Choose the Right Type of Paver
Traditional clay brick pavers offer rich, permanent color and a classic appearance. Concrete pavers are available in more shapes, sizes, textures, and price ranges. Both can work well, but the units must be manufactured for paving and exterior ground contact. Thin wall brick, commonly called brick veneer, is not a patio paver.
Check the product specifications for freeze-thaw durability if you live in a cold climate. Large-format slabs may also require different bedding, compaction equipment, or installation techniques than standard brick-shaped pavers. The paver manufacturer’s instructions should take priority over generic advice.
Check Drainage, Utilities, and Local Rules
Choose a location where runoff can move safely away from the house, foundation, basement windows, and neighboring property. A conventional paver patio normally needs a continuous slope of approximately 1/8 to 1/4 inch per foot. Over a 12-foot patio, that equals a total drop of 1 1/2 to 3 inches.
Contact 811 or your state’s utility-marking service before excavating. Irrigation lines, private wiring, and pipes installed by homeowners may not be marked, so locate those separately. Also review permit, setback, stormwater, and homeowners association requirements. A ground-level patio often needs no building permit, but local rules vary.
Estimate Pavers and Base Material
Multiply the patio’s length by its width to find the square footage. For example, a 12-by-16-foot patio covers 192 square feet. Add roughly 5% for a simple running-bond layout and 10% or more for diagonal patterns, curves, or extensive cutting. For the example patio, ordering about 206 to 212 square feet would provide a sensible allowance.
Calculate aggregate by volume rather than by surface area alone. A 192-square-foot patio with a compacted 6-inch base requires about 96 cubic feet, or 3.6 cubic yards, before allowances for compaction and waste. Ask the landscape supplier how much extra material is appropriate for the selected aggregate.
Brick Paver Patio Tools and Materials
A typical DIY paver patio requires the following:
- Clay brick or concrete pavers rated for patio use
- Dense-graded crushed aggregate or the base specified by the paver manufacturer
- Washed concrete sand for the bedding layer
- Joint sand or compatible polymeric sand
- Geotextile fabric when recommended for weak, clay-heavy, or unstable soil
- Plastic, metal, concrete, or masonry edge restraints
- Stakes, mason’s line, marking paint, tape measure, and line level
- Shovels, landscape rake, wheelbarrow, and hand tamper
- Plate compactor with a protective paver pad when required
- One-inch screed pipes and a straight 2-by-4 board
- Rubber mallet, push broom, and long level
- Masonry saw or splitter for cuts
- Safety glasses, hearing protection, gloves, and appropriate respiratory protection
Renting a plate compactor and wet masonry saw usually makes sense for anything larger than a very small patio. Hand tamping several tons of aggregate is possible, but so is churning butter. Modern equipment exists for a reason.
How to Build a Brick Paver Patio Step by Step
1. Lay Out the Patio
Mark the perimeter with stakes and mason’s line. For a rectangular design, confirm that opposite sides are equal and measure both diagonals. Matching diagonals indicate square corners. You can also use the 3-4-5 method: mark 3 feet along one side, 4 feet along the adjacent side, and adjust the corner until the distance between those marks is 5 feet.
Set the strings at the intended finished height of the pavers. Establish the drainage slope now rather than trying to invent one after several tons of material are in place. Extend the excavation several inches beyond the finished edge so the base can support the restraints.
2. Excavate to the Correct Depth
Remove sod, roots, organic topsoil, and soft material. Calculate the excavation depth by adding the compacted base, approximately 1 inch of bedding sand, and the paver thickness. A patio with a 6-inch base, a 1-inch sand bed, and 2 1/4-inch pavers needs roughly 9 1/4 inches of structural depth.
The exact base requirement depends on soil, drainage, climate, frost conditions, and product specifications. Four to six inches of compacted aggregate is common for pedestrian patios, but weak soils and severe freeze-thaw conditions may require more. Keep the subgrade parallel to the planned finished slope.
3. Prepare and Compact the Subgrade
Rake the exposed soil smooth, remove loose pockets, and compact it. Do not build over saturated, muddy, or frozen ground. If the soil pumps, shifts, or remains spongy under the compactor, stop and correct the problem instead of hiding it under gravel.
Install geotextile when site conditions or the pavement design call for it. The fabric separates the native soil from the aggregate so the materials do not gradually mix. It is not a magical cure for poor drainage, and ordinary plastic sheeting is not a substitute.
4. Add the Crushed-Stone Base in Lifts
Spread the base aggregate in 2- to 3-inch loose layers. Lightly moisten it if recommended, then make overlapping passes with a plate compactor. Add and compact additional lifts until the required depth is reached. Dumping six inches at once and vibrating the top may produce a firm-looking crust above a loose base.
Frequently measure from the mason’s lines to confirm both elevation and slope. Check several directions with a long straightedge. Low areas should be corrected with additional aggregate and recompacted; loose bedding sand should not be used to repair major base defects.
5. Install the Edge Restraints
Edge restraints prevent the perimeter pavers from drifting outward and allowing joints to open. Depending on the system, restraints may be installed before or immediately after the pavers, but they must bear on the compacted base rather than float on loose bedding sand.
Secure plastic or metal edging with the specified spikes. Concrete curbs and masonry borders are alternatives for curves, raised edges, or demanding conditions. Fixed structures such as walls may restrain some sides, but never assume that joint sand alone will hold the patio together.
6. Screed the Bedding Sand
Place one-inch screed rails on the finished base and spread washed concrete sand between them. Pull a straight board across the rails with a gentle sawing motion. Remove the rails and fill the channels carefully without disturbing the surrounding surface.
Screed only as much area as you can cover without walking on it. The bedding layer should remain uniform; it is designed to make small final adjustments and help the pavers seat evenly. It should not become a lumpy correction layer for an inaccurate aggregate base.
7. Lay the Brick Pavers
Begin at a straight edge or a 90-degree corner and work outward. Place each paver gently rather than sliding it through the sand. Use mason’s lines to keep rows aligned and maintain the joint width specified by the manufacturer. Many interlocking pavers include spacer nibs, but a string line still prevents the pattern from slowly wandering.
Mix pavers from several pallets or cubes as you work. Clay and concrete products can have subtle color variations, and blending the units produces a natural distribution instead of accidental patches. Step back periodically to examine alignment and color in the entire field.
Popular patterns include running bond, basket weave, and herringbone. Running bond is friendly to first-time installers. Herringbone creates strong visual interlock but usually requires more perimeter cutting. Save narrow cuts for inconspicuous locations and avoid tiny slivers that may crack or work loose.
8. Cut the Border Pieces
Mark cuts individually with chalk or a masonry pencil. A wet saw with a diamond blade produces accurate edges, while a paver splitter is fast and creates a more rustic break. Follow the equipment manufacturer’s safety procedures and control silica-containing dust with appropriate cutting methods and protective equipment.
Dry-fit each cut before moving to the next one. A 1/4-inch measuring error repeated around 30 border pieces can become an impressive collection of expensive coasters.
9. Compact the Pavers
After all pavers and restraints are installed, clean the surface and compact the field as directed by the paver manufacturer. Use a protective pad or roller-compatible compactor to avoid scratching, chipping, or scuffing finished surfaces. Some large slabs and specialty pavers should not be compacted with a standard plate machine, so verify the instructions first.
Make overlapping passes in more than one direction. This step seats the pavers into the bedding layer and helps create a uniform surface. Replace damaged units before filling the joints.
10. Fill and Activate the Joints
Spread compatible jointing sand over completely dry pavers and sweep diagonally across the joints. Compact again if the product instructions require it, refill low joints, and remove every trace of loose sand from the paver faces.
If using polymeric sand, follow its weather, temperature, watering, and curing directions exactly. Damp pavers can develop a stubborn polymer haze, while too little water may leave the sand unactivated. Too much water can wash binders out of the joints. This is one occasion when creative improvisation deserves the afternoon off.
Common Brick Paver Patio Mistakes
Using the Wrong Base Material
Rounded pea gravel rolls instead of locking together, and ordinary garden soil cannot provide structural support. Use angular, compactable aggregate that meets the paver system’s requirements. Open-graded bases are another valid option, but they use a different assembly and should be built as a complete engineered system.
Ignoring the Finished Elevation
A patio that ends too high can trap water against siding, cover drainage openings, interfere with doors, or create awkward steps. Establish the finished elevation before excavation and preserve required clearances around the building.
Making the Sand Bed Too Thick
Bedding sand is not a substitute for crushed stone. A thick sand layer can shift, retain uneven moisture, and allow pavers to settle. Correct elevation problems in the compacted base, then install a consistent bedding course.
Skipping Edge Restraints
The center of a patio may look perfect while unrestrained outer bricks slowly migrate into the lawn. Once the edges spread, joints lose sand and the damage moves inward. Proper edging is small, mostly invisible, and far less expensive than rebuilding the perimeter.
Directing Water Toward the House
Do not sacrifice drainage to make the bubble in a level sit perfectly centered. The surface should look flat while maintaining a deliberate pitch away from structures. If the site cannot discharge water safely, consult a qualified drainage or hardscape professional.
Maintaining a Brick Paver Patio
Sweep the patio regularly and remove leaves before they decompose in the joints. Replenish joint sand when it drops significantly below the paver chamfers. Control weeds promptly; most growth begins in organic debris deposited from above rather than rising heroically through six inches of compacted stone.
Clean stains with products approved for the paver material. Avoid overly aggressive pressure washing, which can etch surfaces and blast sand from the joints. If a brick settles, lift the affected units, correct the underlying base or bedding problem, and reinstall them. One advantage of segmental paving is that local repairs do not require demolishing the entire patio.
Experience-Based Lessons From Real-World Patio Projects
Written instructions make patio construction look like a tidy sequence: dig, add gravel, spread sand, lay bricks, and admire the sunset. In practice, the project is more physical and more dependent on small decisions. The patio does not usually fail because someone chose the wrong shade of red. It fails because preparation became boring and the installer hurried toward the photogenic part.
Consider a typical 12-by-16-foot backyard patio. It sounds modest until excavation begins. Removing an average of 9 inches of soil from 192 square feet produces roughly 5.3 cubic yards of material. That soil also expands when disturbed, so the pile may be larger than expected. Arranging disposal before digging can prevent the driveway from becoming a temporary archaeological site.
Material access is another underestimated issue. If bulk aggregate must travel through a narrow gate, every cubic yard may need to be moved by wheelbarrow. Protecting the lawn with plywood, positioning deliveries close to the work area, and using two wheelbarrows can save hours. A good workflow often matters more than heroic enthusiasm.
The most valuable habit during installation is measuring repeatedly. A DIY crew may establish the correct slope at the strings, compact the first lift beautifully, and then gradually lose the pitch while adding material. Checking elevation at a grid of points after every lift catches errors when they are still easy to repair. Discovering a low corner after the bricks are installed is considerably less charming.
Weather also changes the schedule. Excavation immediately before heavy rain can create a muddy basin, while polymeric sand should generally be installed only when the surface and joints are dry and the required curing window is available. Covering stored sand and watching the forecast are not glamorous project milestones, but neither is scraping polymer residue from 192 square feet of brick.
First-time installers often gain speed by creating separate work zones. One person supplies and blends pavers, another places them, and a third checks lines and prepares cuts. Even when working alone, it helps to stage manageable quantities nearby rather than walking back to the pallet for every brick. Rotate pavers with minor color differences instead of trying to sort them into perfectly matching groups.
The first several rows deserve disproportionate attention. If the starting corner is square and the lines are accurate, the rest of the pattern usually progresses smoothly. If those rows are slightly crooked, the error grows across the patio. Pausing to reset the beginning may feel slow, but it is faster than cutting a parade of wedge-shaped border pieces later.
Another practical lesson concerns fatigue. Base preparation, compaction, and paver handling are strenuous, and accuracy declines when everyone is tired. Dividing a medium patio into several planned workdays is often wiser than attempting a dawn-to-midnight marathon. Stop at a stage that can be protected from weather, keep loose materials covered, and avoid leaving an exposed excavation where someone can step into it after dark.
Finally, purchase several extra pavers from the same production run and store them after completion. Years later, a stained or cracked unit can be replaced with a close match. That small leftover stack may look unnecessary on installation day, but future-you will regard it as buried treasureexcept conveniently above ground.
Conclusion
Learning how to build a brick paver patio is largely about constructing a dependable foundation. Plan the drainage, excavate to the appropriate depth, compact the aggregate in thin lifts, maintain a uniform bedding layer, and secure every open edge. The bricks provide the style, but the hidden base provides the lifespan.
Take accurate measurements, follow the paver and joint-sand manufacturers’ instructions, and adjust the design for local soil and climate. With careful preparation, a DIY brick patio can remain attractive, repairable, and comfortable for yearslong after the memory of moving all that gravel has become slightly less vivid.