A staircase may be designed for getting from one floor to another, but it often occupies some of the most valuable visual real estate in a home. When the carpet is tired, the wood finish feels dated, or the railing has entered its “honey oak forever” era, a black and white painted staircase transformation can change the entire room without requiring demolition, structural alterations, or a wheelbarrow full of money.
The appeal is easy to understand. Black brings definition and architectural weight, while white reflects light and highlights details. Together, they create a staircase that can feel traditional, modern, farmhouse-inspired, or quietly dramatic depending on how the colors are distributed. The palette is simple, but the preparation is not something to rush. Stairs endure shoes, pets, dirt, dropped laundry baskets, and the occasional child pretending the landing is a launchpad.
This guide explains how to plan, prepare, paint, style, and maintain a black and white staircase that looks intentional and stands up to everyday traffic.
Why a Black and White Staircase Works So Well
Black and white is one of the rare color combinations that can adapt to almost any interior. In a traditional entryway, black handrails and treads can emphasize decorative newel posts and turned balusters. In a contemporary home, clean black lines against white walls create a crisp, graphic effect. In a farmhouse-style space, white risers combined with dark treads provide contrast without making the staircase feel overly formal.
The combination also helps visually organize a complicated structure. A staircase contains treads, risers, nosing, stringers, balusters, handrails, newel posts, and trim. Painting selected components black creates a clear outline, while white allows the smaller details to recede or appear brighter.
Popular Black and White Paint Layouts
There is no single correct arrangement. The best choice depends on the amount of natural light, the surrounding flooring, the condition of the wood, and how much maintenance you are willing to accept.
- Black treads with white risers: This classic combination creates strong horizontal lines and makes each step easy to distinguish visually.
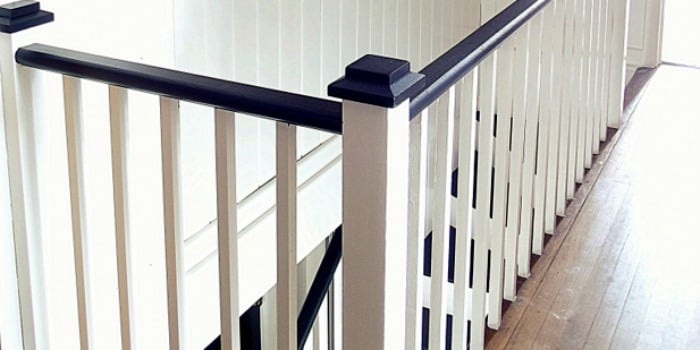
- Black handrail with white balusters: A reliable option for updating dated woodwork while preserving a light, open appearance.
- Black treads, handrail, and newel posts: This delivers a more dramatic, architectural result.
- White stairs with black accents: Best for compact or dim stairwells where an all-dark staircase could feel heavy.
- Black risers with lighter treads: A bold reversal that works particularly well in modern interiors.
Before committing, paint large sample boards and place them on different parts of the staircase. Black paint can reveal blue, green, brown, or charcoal undertones under changing light. White paint has similar personality issues; some whites look crisp in the store and strangely yellow beside existing trim.
Evaluate the Staircase Before Opening a Paint Can
A successful painted staircase makeover begins with an honest inspection. Paint can improve an unattractive surface, but it cannot repair loose treads, structural movement, deep rot, or serious water damage. Walk slowly up and down the stairs and listen for squeaks. Check for movement, raised fasteners, cracked nosing, loose balusters, peeling coatings, and gaps between the treads and risers.
Small cosmetic problems can usually be repaired with wood filler, paintable caulk, or properly set finish nails. Significant movement or structural damage should be evaluated by a qualified carpenter before painting. Otherwise, the fresh finish may crack along moving joints, which is the staircase equivalent of putting lipstick on a very noisy pig.
Use Extra Caution in Older Homes
Homes built before 1978 may contain lead-based paint. Sanding, scraping, or disturbing an older painted staircase can release hazardous dust. Determine the age and history of the existing coating before beginning aggressive surface preparation. When lead may be present, use lead-safe work practices and consider hiring a certified professional rather than dry-sanding the surface.
Tools and Materials for a Painted Staircase Makeover
Buying the right materials at the beginning is considerably more pleasant than discovering halfway through the project that the only clean brush is a tiny craft brush from a holiday ornament kit.
- Vacuum with a brush or crevice attachment
- Degreasing cleaner suitable for the existing surface
- Sanding sponges or sandpaper in appropriate grits
- Wood filler and paintable caulk
- Putty knife and caulk gun
- High-quality painter’s tape
- Drop cloths or heavy protective paper
- Angled trim brush
- Small microfiber or foam rollers
- Bonding or stain-blocking primer
- Durable trim enamel for railings and balusters
- Floor or porch enamel rated for wood treads
- Optional compatible anti-slip additive
- Gloves, eye protection, and an appropriate dust mask or respirator
Always confirm that the primer and topcoat are compatible with the existing surface and with each other. A staircase is not a good place to conduct an unsupervised chemistry experiment.
How to Prepare Stairs for Black and White Paint
Preparation is the least glamorous stage and the one most responsible for long-term performance. Stairs collect body oils from hands, residue from cleaning products, floor polish, dust, pet hair, and mystery grime that appears to have its own mailing address. Painting over contamination can cause peeling, fisheyes, poor adhesion, and uneven sheen.
1. Remove Carpet, Staples, and Loose Material
If the staircase is carpeted, carefully remove the carpet, padding, tack strips, staples, and nails. Work slowly around the stair nosing to avoid damaging the wood. Vacuum repeatedly because old carpet padding has a remarkable ability to turn into airborne confetti.
Scrape away loose or peeling paint, but do not aggressively disturb a potentially lead-containing coating. Any remaining finish should be sound and firmly bonded.
2. Repair Damage and Movement
Set protruding nails below the surface. Fill nail holes, dents, and shallow gouges with a filler intended for painted wood. Allow it to dry, then sand it flush. Use paintable caulk for narrow stationary gaps along stringers, trim, or risers. Do not fill joints that need to move with a rigid material, as it may crack later.
Fix squeaks and loose components before painting whenever access allows. Fresh black paint has many talents, but silencing a loose tread is not one of them.
3. Clean Thoroughly
Vacuum first, then wash the surface with an appropriate cleaner or degreaser. Pay special attention to handrails and the front edge of each tread, where oils and dirt accumulate. Rinse or wipe away cleaner residue according to the product instructions and allow the staircase to dry completely.
4. Sand for Adhesion
Sand glossy or uneven surfaces to dull the existing finish and create a better bonding profile. The goal is usually not to remove every trace of the old coating but to eliminate loose material, smooth repairs, and reduce gloss. Follow the coating manufacturer’s preparation requirements, especially when painting varnished, stained, or previously coated wood.
Vacuum every tread, corner, baluster, and ledge after sanding. Finish with a clean lint-free cloth or another dust-removal method approved for the paint system. Dust left behind becomes texture, and not the sophisticated designer kind.
Choose Paint That Can Handle Stair Traffic
Ordinary wall paint is not designed for the friction and impact experienced by stair treads. For walking surfaces, select a durable floor, porch, or stair coating specifically approved for the substrate and location. These products are formulated to resist scuffing, blocking, and repeated traffic better than standard interior wall paint.
Railings, newel posts, stringers, and balusters can usually be finished with a durable interior enamel. Satin and semi-gloss finishes are common because they are easier to clean than flat paint. However, the walking surface requires additional thought.
Balance Durability, Appearance, and Traction
High-gloss black treads can look polished in photographs, but glossy finishes may highlight every dent, footprint, dust particle, and pet hair. They can also feel more slippery than lower-sheen surfaces. A satin or low-luster floor enamel often offers a practical compromise between cleanability and traction.
For stairs used by children, older adults, pets, or anyone who regularly wears socks, consider an approved anti-slip additive or a properly installed runner. Confirm that any additive is compatible with the selected coating. Do not improvise by tossing random sand into the paint unless the manufacturer specifically permits it.
Step-by-Step Black and White Staircase Painting Process
Step 1: Plan the Order of Work
Paint railings, balusters, trim, and stringers before finishing the walking surfaces whenever practical. This reduces the chance of dripping white paint onto freshly painted black treads. Work from the top downward so you are not repeatedly leaning over completed sections.
If the staircase is the only route between floors, plan an access strategy. One common approach is to paint alternating treads, allow them to cure sufficiently, and then paint the remaining steps. Clearly mark the usable steps. This method requires patience and coordination, particularly when household members are sleepy.
Step 2: Prime the Surfaces
Apply a compatible primer in a thin, even coat. A bonding primer may be appropriate over glossy existing finishes, while a stain-blocking primer can help prevent tannins, knots, or previous stains from bleeding through white paint. Bare wood, repaired areas, and major color changes often benefit from careful priming.
Use an angled brush for corners and detailed trim, and a small roller for broader flat areas. Watch for drips beneath handrails and around the bases of balusters. Allow the primer to dry for the full time stated on the label.
Step 3: Paint the White Components
Apply the white enamel to risers, balusters, stringers, or trim according to the design plan. Two thin coats generally produce a smoother, stronger finish than one thick coat. Lightly sand between coats when the product instructions permit, then remove all dust.
White risers create a fresh look but will display shoe marks more readily than dark ones. Choosing a washable enamel makes future cleaning considerably easier.
Step 4: Mask the Color Boundaries
Once the white paint is adequately dry, mask the edges where black and white meet. Press painter’s tape firmly into corners. For especially crisp lines, seal the edge with a very thin coat of the underlying color before applying the contrasting paint. Any seepage will then match the existing section rather than creating a jagged black line.
Step 5: Paint the Black Details
Apply black enamel to the handrail, newel posts, treads, or other selected elements. Maintain a wet edge and avoid repeatedly brushing paint that has begun to set. On treads, use thin, even coats and follow the recommended recoat interval exactly.
Remove painter’s tape at the stage recommended by the tape and coating manufacturers. Pull it back over itself at an angle rather than yanking it directly upward.
Step 6: Respect the Cure Time
Dry paint is not necessarily cured paint. A coating may feel dry to the touch while remaining vulnerable to shoes, furniture, cleaning, or pet claws. Observe the manufacturer’s guidance for light foot traffic, normal use, recoating, and full cure. Avoid covering fresh treads with rugs or protective materials unless the coating instructions allow it, because trapped moisture can damage the finish.
Styling the Finished Black and White Staircase
A black and white staircase already has visual impact, so nearby decor does not need to compete for attention. Repeat small amounts of black elsewhere in the entryway through picture frames, light fixtures, cabinet hardware, or a console table. This makes the dark staircase elements feel connected rather than accidental.
Warm wood flooring, woven baskets, natural-fiber rugs, and brass accents can soften the graphic palette. For a modern effect, pair the staircase with streamlined lighting and simple artwork. For a traditional room, use framed portraits, architectural molding, or a patterned runner.
Lighting matters more than many homeowners expect. Black treads can disappear in a dim stairwell, so provide consistent illumination at the top, bottom, and along the flight where appropriate. Good lighting improves both the appearance of the paintwork and the visibility of each step.
Common Staircase Painting Mistakes
- Skipping cleaning: Sanding dirty wood can grind oils and residue deeper into the surface.
- Using wall paint on treads: A decorative wall coating is not a substitute for a floor-rated product.
- Choosing extreme gloss for every component: Gloss can exaggerate imperfections and reduce traction on walking surfaces.
- Applying heavy coats: Thick paint can sag, remain soft longer, and produce visible roller edges.
- Walking on the stairs too soon: Premature traffic can leave prints, dents, and embedded debris.
- Ignoring lighting: Dark treads need enough illumination to remain visually distinct.
- Painting over loose parts: Movement can cause cracks at joints and edges.
- Assuming every white matches: Existing trim may be warm, cool, creamy, or surprisingly gray.
Maintaining Black Treads and White Risers
Vacuum or dust painted stairs regularly so grit does not act like sandpaper under shoes. Clean marks with a soft cloth and a mild product approved for the coating. Avoid abrasive pads and aggressive household chemicals unless the paint manufacturer confirms compatibility.
White risers will eventually show scuffs, while black treads tend to display pale dust, lint, and pet hair. This is not a design failure; it is simply contrast performing its job with unnecessary enthusiasm. Keep a small amount of labeled touch-up paint for minor damage. Use the same application tool and feather the repair into the surrounding finish.
Inspect high-wear areas periodically, especially the front nosing and the center of each tread. Early touch-ups are easier than waiting until bare wood is exposed.
Real-World Experience: Lessons From a Black and White Staircase Transformation
The most surprising part of a painted staircase project is how little time is spent applying the glamorous final coat. The majority of the work happens while pulling staples, filling dents, sanding corners, cleaning dust, and debating whether a tiny gap needs caulk. It usually does. A staircase contains more edges than seems mathematically reasonable, and every one becomes visible when white paint enters the conversation.
On one typical transformation, the original staircase had orange-toned wood, worn varnish, carpet staple holes, and a railing that visually dominated the entryway. The first instinct was to paint everything immediately. The better decision was to pause and test several arrangements. An all-black staircase looked dramatic but absorbed too much light. An all-white version felt bright but erased the architectural shape. Black treads and handrails paired with white risers and balusters provided the right balance.
Cleaning the handrail revealed another useful lesson. A surface can look clean while still holding years of skin oils and furniture-polish residue. The first test patch of primer separated in small spots, making the contamination obvious. After a more thorough cleaning, rinsing, drying, and sanding, the next test adhered properly. That small experiment prevented a much larger peeling problem.
The white components required patience because turned balusters create drips in places that are difficult to see until the paint begins to dry. Working in sections and checking each spindle from several angles helped catch runs early. A small angled brush handled detailed areas better than an overloaded roller. The roller was faster, but speed becomes less impressive when it leaves a necklace of paint beads around every baluster.
Painting the treads in alternating groups kept the second floor accessible, though it transformed the staircase into a temporary strategy game. Small removable notes identified the usable steps. Everyone in the house was informed, reminded, and informed again. Pets, naturally, declined to attend the briefing.
The most important practical lesson was to allow more curing time than the schedule seemed to permit. The treads felt dry fairly quickly, but they were still vulnerable to pressure and abrasion. Waiting before allowing normal shoe traffic produced a noticeably harder finish. Rushing would have saved a day and created months of visible marks.
After completion, the black handrail immediately made the staircase feel more substantial, while the white balusters brightened the entry. The dark treads visually connected with nearby black hardware and light fixtures. The room looked more coordinated even though none of the surrounding furniture had changed.
Maintenance also became predictable. White risers collected toe scuffs near the center, while black treads displayed dust along the edges. Regular vacuuming and gentle spot cleaning kept both under control. A small labeled jar of each paint color made touch-ups quick. The occasional mark no longer felt catastrophic because the staircase was designed as a hardworking surface, not a museum exhibit.
The broader experience is that a black and white staircase transformation rewards restraint. Crisp color placement, careful preparation, durable coatings, and sufficient curing matter more than decorative complexity. When those basics are handled correctly, the staircase becomes a strong focal point without looking trendy or overworked.
Conclusion
A black and white painted staircase can turn an overlooked passageway into one of the most memorable features in a home. The palette supplies instant contrast, but the long-lasting result comes from less photogenic decisions: repairing loose components, removing contamination, sanding properly, applying compatible primer, selecting floor-rated paint, and respecting the cure schedule.
Choose the color arrangement according to the home’s lighting and architecture rather than copying a photograph without considering the space. Keep walking surfaces practical, provide adequate illumination, and plan for normal maintenance. Done carefully, this staircase makeover delivers the visual impact of a major renovation with far less disruptionand no need to explain why a contractor has been living in the foyer for six weeks.