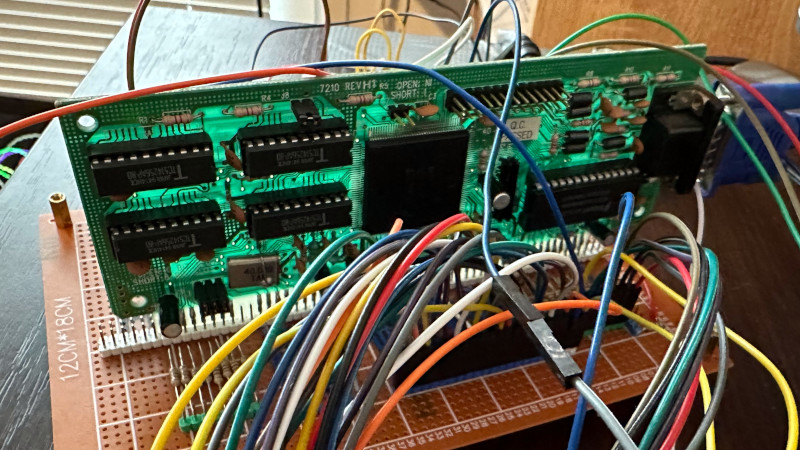
There is something beautifully ridiculous about asking an Arduino to talk to a VGA monitor. On paper, it sounds like asking a bicycle to tow a moving truck. A classic Arduino Uno runs at 16 MHz, has only 2 KB of SRAM, and was designed for sensors, LEDs, relays, motors, and the occasional “why is my serial monitor blank?” moment. VGA, meanwhile, expects tightly timed video signals, analog color voltages, horizontal sync, vertical sync, and the emotional confidence of a graphics card.
And yet, Arduino VGA is absolutely possible. Not luxurious. Not buttery smooth. Not the kind of thing you use to render a 4K dragon with realistic smoke physics. But possible, educational, charming, and deeply satisfying in the same way that starting an old lawn mower on the third pull is satisfying. “Arduino VGA, the old fashioned way” means creating video output with simple electronics, strict timing, a handful of resistors, and the bold belief that a microcontroller can impersonate a video card long enough for a monitor to say, “Fine, I’ll display that.”
This guide explains how classic Arduino VGA projects work, why they are so limited, what hardware is usually involved, and why the old-fashioned approach is still one of the best ways to understand video signals, microcontroller timing, and retrocomputing.
What Does “Arduino VGA, The Old Fashioned Way” Mean?
In modern projects, the easy route is to use a display module, HDMI adapter, TFT screen, dedicated graphics chip, ESP32 VGA library, RP2040 PIO trickery, or an FPGA. The old-fashioned route is different. It is intentionally bare-bones. You generate the VGA signals yourself or use the Arduino as a controller for vintage video hardware, such as an old ISA VGA card.
There are two classic approaches:
1. Direct VGA Signal Generation
The Arduino creates horizontal sync, vertical sync, and color signals directly. A few resistors reduce the voltage on the red, green, and blue lines so the VGA monitor receives safe analog levels. This method is often called bit-banging because the microcontroller manually changes output pins at very specific times.
2. Driving an Old VGA Card
The Arduino can also act like a tiny retro host system and communicate with a vintage ISA VGA card. This is the truly “old fashioned” flavor: instead of making the Arduino generate every pixel, you let old PC graphics hardware do the display work. The Arduino handles bus signals, writes to video memory, and uses the VGA card as a gloriously overqualified display adapter.
Both methods teach the same lesson: video is timing. Not vibes. Not hopes. Timing.
How VGA Works in Plain English
VGA stands for Video Graphics Array, but for hobbyists it might as well stand for “Very Grueling Accuracy.” A VGA connector carries separate red, green, and blue analog color signals, plus horizontal sync and vertical sync signals. The color lines typically expect analog values from black to full intensity, while the sync lines tell the monitor where each scan line and frame begin and end.
A traditional 640×480 VGA signal at 60 Hz uses a pixel clock around 25 MHz. That means a real VGA system is pushing pixels far faster than a 16 MHz Arduino Uno can comfortably handle. The Uno cannot produce a full 640×480 frame buffer in normal memory either. A 640×480 monochrome image would already need 38,400 bytes if packed as one bit per pixel. The Uno has 2,048 bytes of SRAM total. That is not “tight”; that is “pack for a weekend trip using a shirt pocket.”
So Arduino VGA projects cheat intelligently. They reduce resolution, use character modes, draw simple patterns, store graphics in program memory, or depend on carefully optimized assembly code and hardware timers. The monitor still sees a signal that resembles VGA, but the visible content is often lower resolution, fewer colors, or text-based.
Why the Arduino Uno Is Both Terrible and Perfect for VGA
The Arduino Uno is terrible for VGA because it is slow, memory-limited, and not designed for high-speed video output. It is perfect for VGA because those same limitations force you to understand every cycle.
On an Uno, every CPU cycle matters. A single slow function call can ruin the scan line. An unexpected interrupt can make the image wobble. A careless loop can turn your neat text display into abstract modern art. VGA generation exposes the hidden cost of “easy” Arduino functions like digitalWrite(). For video timing, direct port manipulation is the grown-up table.
This is why old Arduino VGA projects often use timers, interrupts, inline assembly, and carefully chosen pins. The goal is to make the microcontroller toggle output pins at exactly the right moments. It is less like drawing a picture and more like conducting an orchestra where the violins are resistors and the trumpet section is already overheating.
The Minimal Hardware for Direct Arduino VGA
A simple Arduino VGA setup can be surprisingly small. Many classic builds use:
- An Arduino Uno, Nano, or compatible ATmega328P board
- A female DE-15 VGA connector
- A handful of resistors, often in the 470-ohm to 1-kilohm range
- Jumper wires or a breadboard
- A VGA monitor that is tolerant of hobbyist timing
- Common ground between Arduino and VGA connector
The red, green, and blue lines are connected through resistors so the Arduino’s 5V digital outputs do not directly slam into the monitor’s analog inputs. VGA color inputs are designed around 75-ohm termination and low analog voltage levels, so the resistors act as a crude digital-to-analog converter. With one pin per color, you get basic on/off color. With multiple pins and a resistor ladder, you can create more shades, though the Arduino quickly runs out of timing headroom and memory.
The horizontal sync and vertical sync pins are usually driven as digital signals. These are the monitor’s metronome. If they are wrong, the screen may roll, flicker, go black, or display the dreaded “no signal” message, which is monitor language for “nice try, tiny board.”
The Software Trick: Timers, Scan Lines, and Ruthless Discipline
Generating VGA in software is all about building a strict schedule. Each frame is divided into scan lines. Each scan line includes visible pixels and blanking periods. During blanking, the sync pulses happen. During visible time, the Arduino outputs color data.
Because the Uno is not fast enough for full VGA pixel-by-pixel output, many projects use lower horizontal resolution. For example, a library may store a small framebuffer such as 120×60 pixels and stretch or repeat timing so the monitor accepts it. Text output is also common because characters are more memory-efficient than full graphics. Instead of storing every pixel, the program stores character codes and uses a font table.
Software VGA usually depends on hardware timers. One timer may manage vertical sync. Another may help with horizontal line timing. The main code often has very little room to do anything else while the video signal is active. That is why some projects use a second microcontroller for application logic and let the video Arduino behave like a display terminal.
Using an Old ISA VGA Card with Arduino
The other old-fashioned method is even more retro: connect an Arduino Mega to an old 8-bit ISA VGA card. This approach is delightful because it avoids forcing the Arduino to generate every pixel. Instead, the Arduino writes data to the VGA card, and the card outputs a proper VGA signal.
Vintage VGA cards were designed for PC buses, not breadboards. They expect address lines, data lines, control signals, a clock, and the correct bus behavior. An Arduino Mega has enough I/O pins to imitate some of that bus activity. The project becomes less about pixel timing and more about retro hardware communication.
This approach can support classic VGA modes such as 80×25 color text, 320×200 graphics, or 640×480 limited-color graphics, depending on the card and implementation. It is not a practical way to build a modern display system, but it is a wonderful way to learn how early PC graphics cards worked. It also gives dusty old hardware a second life, which is good news for anyone whose parts drawer looks like a museum with worse labeling.
Direct VGA vs. Old VGA Card: Which Is Better?
Direct Arduino VGA is simpler in hardware but harder in timing. You need only a connector and resistors, but your code must be obsessively precise. It is best for simple graphics, demo effects, retro games, low-resolution displays, and learning how sync pulses work.
Using an old VGA card is more complex in wiring but more authentic as retrocomputing. You deal with ISA bus behavior, card initialization, video memory, and classic display modes. It is best for people who enjoy vintage PC architecture and do not panic when a project suddenly needs more jumper wires than a small telephone exchange.
If your goal is to display sensor readings, direct VGA or a small library may be enough. If your goal is to understand old graphics hardware, the ISA card route is much more interesting. If your goal is practical, high-resolution display output, use a newer microcontroller, graphics module, or FPGA and let your Arduino retire with dignity.
Common Arduino VGA Project Ideas
Retro Text Terminal
A text terminal is one of the best Arduino VGA projects. The Arduino receives serial or I2C data and displays characters on a monitor. It can become a debugging screen, sensor dashboard, or tiny command console.
Simple Game Display
Pong, Snake, Breakout, and tiny platform experiments are realistic. The graphics are simple, the color count is low, and the old-school limitations actually make the project more fun.
Data Dashboard
An Arduino VGA display can show temperature, humidity, voltage, motion detection, or network status from another controller. Think of it as a 1980s control panel for your modern desk.
Educational Timing Demo
For electronics students, VGA is a fantastic timing exercise. It teaches counters, synchronization, interrupts, memory limits, analog voltage levels, and why “close enough” is not always close enough.
Troubleshooting: Why Your Monitor Says “No Signal”
The most common Arduino VGA problems come from timing, wiring, voltage levels, and monitor compatibility. Modern LCD monitors can be surprisingly picky. Some tolerate odd timing beautifully; others reject anything that does not smell like a proper graphics card.
If the display does not work, check the ground first. A missing common ground is a classic beginner mistake. Next, verify the VGA pinout. The DE-15 connector is easy to mirror accidentally, especially when you are staring at the back of a socket and pretending you are not confused.
Then check resistor values. The color lines should not be driven directly from Arduino pins. Use appropriate resistors to keep the signal within a safe range. Also check horizontal and vertical sync polarity and timing. If the image rolls, tears, jitters, or appears off-center, your sync timing may be slightly wrong.
Finally, keep the code lean. Disable unnecessary interrupts if the library requires it. Avoid serial printing during active video generation unless the project is specifically designed to handle it. In Arduino VGA, one innocent debug message can become a screen earthquake.
Why This Old Technique Still Matters
Arduino VGA is not popular because it is efficient. It is popular because it is revealing. It shows what a video signal really is. It turns invisible timing into visible consequences. When the code is right, the monitor locks on. When the code is wrong, the screen complains immediately.
This makes Arduino VGA a fantastic bridge between software and hardware thinking. Many beginners write Arduino sketches as if pins are magic light switches. VGA teaches that pins are electrical signals moving in time. You learn that memory is not abstract, clocks matter, voltage levels matter, and hardware does not care how elegant your variable names are.
It also connects modern makers with retrocomputing history. Old VGA cards, resistor DACs, text modes, scan lines, and sync pulses belong to the same family tree as early home computers, arcade boards, and PC graphics adapters. Building Arduino VGA the old-fashioned way is like visiting that family tree and realizing everyone brought oscilloscopes to the reunion.
Best Practices for a Reliable Build
Start with known-working code or a proven VGA library before writing your own timing engine. Confirm that your monitor accepts the signal. Use short wires, especially for sync lines. Breadboards are convenient, but messy wiring can introduce noise and unreliable connections. Once the circuit works, consider soldering it to perfboard or making a small adapter board.
Use direct port writes instead of high-level pin functions for performance-critical sections. Keep video generation separate from application logic when possible. If the project grows, use one microcontroller for display and another for sensors, controls, or communication. That division keeps the video timing stable.
Most importantly, choose realistic goals. An Arduino Uno is not going to become a gaming GPU. It can, however, become a tiny video terminal, a retro demo machine, or a teaching tool that makes timing visible. That is more than enough reason to try it.
When to Use Something More Modern
If you need smooth animation, many colors, high resolution, or complex user interfaces, the old-fashioned Arduino VGA method is the wrong tool. Use an ESP32 with VGA output support, an RP2040 board with PIO-based video, a TFT display, a dedicated graphics controller, or an FPGA. These platforms provide more speed, memory, and video-friendly hardware.
But do not mistake “not practical” for “not valuable.” Some projects are worth doing because they teach the machine underneath the machine. Arduino VGA is one of those projects. It is inconvenient in all the right ways.
Experience Notes: What Building Arduino VGA Teaches You the Hard Way
The first experience most people have with Arduino VGA is not a crisp image. It is a blank monitor, a suspiciously warm resistor, and a feeling that the VGA connector is judging them. That is normal. The old-fashioned VGA approach rewards patience more than raw enthusiasm. You are not just uploading a sketch; you are negotiating with a display standard that expects discipline.
One of the first lessons is that wiring diagrams must be read from the correct side of the connector. A VGA socket viewed from the solder side is not the same as a plug viewed from the front. This sounds obvious until you have swapped pins, checked your code six times, and blamed the monitor with theatrical confidence. Labeling the pins before soldering saves time, dignity, and possibly one tiny cloud of resistor smoke.
The second lesson is that not all monitors are equally friendly. Older LCD monitors and some VGA-capable displays are surprisingly forgiving. Others refuse slightly nonstandard timing. If one monitor says “no signal,” the project may still be fine. Testing with another screen can feel like magic. Suddenly the same mess of wires becomes a working display, and you realize the first monitor was simply a perfectionist with a plastic bezel.
The third lesson is that Arduino code has hidden timing costs. A beginner may assume that drawing a line means running a loop and setting pixels. With VGA, even a tiny delay can shift the display. Functions that feel instant in normal Arduino projects are enormous when measured against scan-line timing. This is where direct port manipulation stops being an advanced trick and becomes necessary. You begin to appreciate why old programmers counted cycles like they were counting oxygen tanks on a submarine.
Another useful experience is discovering how little memory you truly have. A full image buffer is usually out of the question on an Uno. That limitation forces creative design. Instead of storing a detailed bitmap, you use tiles, characters, procedural patterns, or tiny buffers. Oddly, this can make projects more elegant. Constraints push you toward smarter representations. Retro game developers understood this deeply, and Arduino VGA gives you a small taste of that world.
The old VGA card method teaches a different set of lessons. Working with an ISA VGA card feels like talking to a fossil that still remembers how to draw pixels. You must respect bus timing, address decoding, and control signals. The card is powerful compared with the Arduino, but it expects the Arduino to behave like a small computer bus. When it works, it feels less like a display hack and more like waking up a piece of PC history.
The most satisfying moment is when the monitor finally locks onto the signal. Even if the image is just blocky text or a few colored bars, it feels earned. You know the screen is not being driven by a polished graphics pipeline. It is being driven by a microcontroller, resistors, timing loops, and stubbornness. That is the charm of Arduino VGA the old-fashioned way: it is not the easiest path to video, but it is one of the most memorable.
Conclusion
Arduino VGA, the old fashioned way, is a strange and wonderful project category. It takes a humble microcontroller and pushes it into the world of video timing, analog color, sync pulses, resistor ladders, and retro graphics hardware. It is not the best solution for modern displays, but it is one of the best ways to understand what video output really means.
Whether you generate VGA directly with an Arduino and a few resistors or use an Arduino Mega to control an old ISA VGA card, the project teaches lessons that normal display modules hide. You learn about timing, memory limits, electrical levels, monitor behavior, and the clever compromises behind early computer graphics. It is part electronics lesson, part retrocomputing adventure, and part comedy routine performed by jumper wires.
If you want convenience, use a modern display solution. If you want understanding, build Arduino VGA the old-fashioned way. Your monitor may complain at first, but when that first flickering image appears, it will feel like you personally convinced 1987 to shake hands with a microcontroller.